本篇博文主要介绍构建AppBar基本步骤、如何构建AppBar、如何在AppBar中构建上下文命令、如何在AppBar中构建菜单、如何构建页面间共享AppBar。
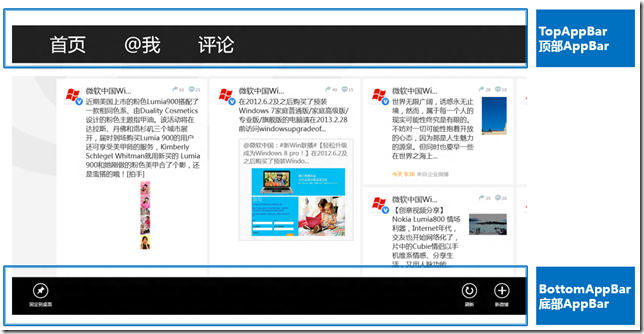
构建应用栏的目的的显示导航、命令和始终隐藏不需要的使用的工具。我们可以把应用栏放在页面顶部或底部或同时存在顶部和底部。
默认情况在AppBar是隐藏的,当用户单击右键、按下Win+Z、或从屏幕的顶部或底部边缘轻松时可显示或关闭AppBar。当然我们也可以通过编程的方式将AppBar设置为当用户做选择或与应用交互时显示。
构建AppBar基本步骤
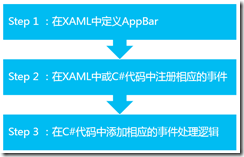
通常我们构建一个应用的AppBar,只需要三步就可以完成:
如何构建AppBar
应用中添加AppBar,需要将AppBar控件指定给Page的TopAppBar或BottomAppBar属性。
XAML代码可如下:
<Page.BottomAppBar>
<AppBar x:Name="bottomAppBar" Padding="10,0,10,0">
<Grid>
<StackPanel Orientation="Horizontal" HorizontalAlignment="Left">
<Button Style="{StaticResource EditAppBarButtonStyle}" />
<Button Style="{StaticResource RemoveAppBarButtonStyle}" />
<Button Style="{StaticResource AddAppBarButtonStyle}" />
</StackPanel>
<StackPanel Orientation="Horizontal" HorizontalAlignment="Right">
<Button Style="{StaticResource RefreshAppBarButtonStyle}" />
<Button Style="{StaticResource HelpAppBarButtonStyle}" />
</StackPanel>
</Grid>
</AppBar>
</Page.BottomAppBar>
XAML代码中引用的资源样式可以在应用程序解决方案的Common文件夹中StandardStyles.xaml文件中找到。
运行效果:
若我们想在加载页面时打开AppBar,可以在XAML代码中将AppBar控件的IsOpen属性值设置为true,也可以在C#代码中控制打开AppBar。
private void OpenButton_Click(object sender, RoutedEventArgs e)
{
topAppBar.IsOpen = true;
}
当用户在应用的AppBar以外任何位置进行交互时,默认情况会解除AppBar进行隐藏。我们可以将IsSticky属性值设置为true来改变解除模式。
此时用户只有右击、按下Win+Z、或从屏幕的顶部或底部边缘轻扫时才会隐藏AppBar。
private void StickyButton_Click(object sender, RoutedEventArgs e)
{
bottomAppBar.IsSticky = true;
}
如何在AppBar中构建上下文命令
我们可能有一些图像编辑命令,并且这些命令只有在图像选中时才有用。或者我们可能有一个全局AppBar,其中某些命令尽在相关页面中显示。这时就需要我们控制上下文命令了。
首先在应用的页面中用户可选择控制上下文命令的方式。具体步骤如下:
1)向应用中添加AppBar;
2)为要显示或隐藏的命令或组进行命名。
XAML代码可如下:
<AppBar IsOpen="True" IsSticky="True">
<Grid>
<StackPanel Orientation="Horizontal" HorizontalAlignment="Left">
<StackPanel x:Name="pinCommands" Orientation="Horizontal"
Visibility="Collapsed">
<Button Style="{StaticResource UnpinAppBarButtonStyle}"
Click="Button_Click"/>
<Button Style="{StaticResource PinAppBarButtonStyle}"
Click="Button_Click"/>
<Rectangle Height="50" Width="2" Fill="LightGray"/>
</StackPanel>
<StackPanel Orientation="Horizontal">
<Button Style="{StaticResource FavoriteAppBarButtonStyle}"
Click="Button_Click"/>
<Button Style="{StaticResource SearchAppBarButtonStyle}"
Click="Button_Click"/>
</StackPanel>
</StackPanel>
</Grid>
</AppBar>
然后可以在C#代码中通过命令或组的Visibility属性进行控制显示或隐藏。
pinCommands.Visibility = Visibility.Visible;
或
pinCommands.Visibility = Visibility.Collapsed;
另外我们也可以通过编程的方式向AppBar中添加命令。通常在页面之间共享AppBar并且具有仅应用与某一特定页面时,才这样做。
首先我们可以添加一个底部AppBar:
<Page.BottomAppBar>
<AppBar x:Name="bottomAppBar" IsSticky="True">
<Grid>
<StackPanel x:Name="rightPanel"
Orientation="Horizontal" HorizontalAlignment="Right">
<Button Style="{StaticResource AppBarButtonStyle}"
Content=""
AutomationProperties.Name="Sort"
AutomationProperties.AutomationId="SortButton"
Click="SortMenuButton_Click" />
</StackPanel>
</Grid>
</AppBar>
</Page.BottomAppBar>
我们需要在C#代码中控制的是当页面OnNavigatedTo方法执行的时将Button添加在AppBar中,OnNavigatingFrom方法执行时将Button从AppBar中删除。
Button addButton = null;
protected override void OnNavigatedTo(NavigationEventArgs e)
{
if (rightPanel != null)
{
addButton = new Button();
addButton.Style = (Style)App.Current.Resources["AddAppBarButtonStyle"];
addButton.Click += Button_Click;
rightPanel.Children.Add(addButton);
}
}
private void Button_Click(object sender, RoutedEventArgs e)
{
}
protected override void OnNavigatingFrom(NavigatingCancelEventArgs e)
{
if (rightPanel != null)
{
addButton.Click -= Button_Click;
rightPanel.Children.Remove(addButton);
}
}
如何在AppBar中构建菜单
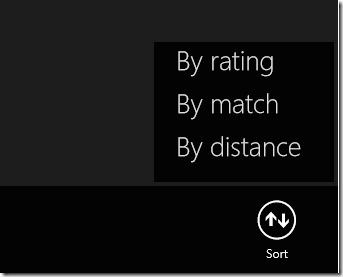
将多个命令添加到AppBar中时,我们可以考虑构建菜单来提供更多选项。例如:
我们如何构建这种菜单效果呢?
1)应用中添加AppBar,其中包含一个用于显示菜单的按钮。
<Page.BottomAppBar>
<AppBar x:Name="bottomAppBar" IsSticky="True">
<Grid>
<StackPanel x:Name="rightPanel"
Orientation="Horizontal" HorizontalAlignment="Right">
<Button Style="{StaticResource AppBarButtonStyle}"
Content=""
AutomationProperties.Name="Sort"
AutomationProperties.AutomationId="SortButton"
Click="SortMenuButton_Click" />
</StackPanel>
</Grid>
</AppBar>
</Page.BottomAppBar>
2)页面C#代码,SortMenuButton_Click方法中创建一个Popup来放置菜单。
Popup popUp = new Popup();
将Popup.IsLightDismissEnabled属性设置为true,实现用户与应用其他部分交互时,Popup会自动隐藏。
popUp.IsLightDismissEnabled = true;
将面板创建为菜单UI的根目录。
StackPanel panel = new StackPanel();
panel.Background = bottomAppBar.Background;
panel.Height = 140;
panel.Width = 180;
菜单UI中添加命令按钮。
Button byRatingButton = new Button();
byRatingButton.Content = "By rating";
byRatingButton.Style = (Style)App.Current.Resources["TextButtonStyle"];
byRatingButton.Margin = new Thickness(20, 5, 20, 5);
byRatingButton.Click += SortButton_Click;
panel.Children.Add(byRatingButton);
将菜单跟面板添加为Popup的内容。
popUp.Child = panel;
计算Popup弹出后的位置。
popUp.HorizontalOffset = Window.Current.CoreWindow.Bounds.Right - panel.Width - 4;
popUp.VerticalOffset = Window.Current.CoreWindow.Bounds.Bottom - bottomAppBar.ActualHeight - panel.Height - 4;
最后打开Popup。
popUp.IsOpen = true;
如何构建页面间共享AppBar
我们应用中可能通过顶部提供一个导航栏,进行页面之间的切换。因此我们希望每个页面中显示相同的导航栏而不是在每个页面中重新构建该导航栏,例如新浪微博中顶部导航栏效果:
那么是如何实现共享AppBar呢?
使用根页面来承载共享AppBar和一个Frame,其中Frame来承载用户导航到的应用页面。
<Page.TopAppBar>
<AppBar x:Name="globalAppBar" Padding="10,0,10,0">
<Grid>
<StackPanel x:Name="leftCommandPanel"
Orientation="Horizontal" HorizontalAlignment="Left">
<Button x:Name="Back" Style="{StaticResource BackAppBarButtonStyle}"
AutomationProperties.Name="Back"
Click="Back_Click"/>
</StackPanel>
<StackPanel x:Name="rightCommandPanel"
Orientation="Horizontal" HorizontalAlignment="Right">
<Button x:Name="page1Button" Content="1"
Style="{StaticResource AppBarButtonStyle}"
AutomationProperties.Name="Page 1"
Click="Page1Button_Click"/>
<Button x:Name="page2Button" Content="2"
Style="{StaticResource AppBarButtonStyle}"
AutomationProperties.Name="Page 2"
Click="Page2Button_Click"/>
</StackPanel>
</Grid>
</AppBar>
</Page.TopAppBar>
根页面中添加一个Frame。
<Grid Background="{StaticResource ApplicationPageBackgroundThemeBrush}">
<Frame x:Name="frame1"/>
</Grid>
C#代码中添加用于在页面见导航的命令。
Page rootPage = null;
protected override void OnNavigatedTo(NavigationEventArgs e)
{
rootPage = e.Parameter as Page;
frame1.Navigate(typeof(Page1), this);
}
private void Back_Click(object sender, RoutedEventArgs e)
{
if (frame1.CanGoBack)
{
frame1.GoBack();
}
else if (rootPage != null && rootPage.Frame.CanGoBack)
{
rootPage.Frame.GoBack();
}
}
private void Page1Button_Click(object sender, RoutedEventArgs e)
{
frame1.Navigate(typeof(Page1), this);
}
private void Page2Button_Click(object sender, RoutedEventArgs e)
{
frame1.Navigate(typeof(Page2), this);
}
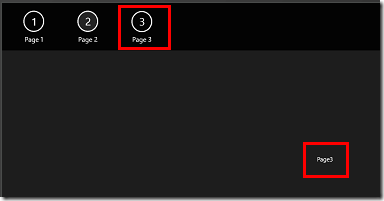
最后运行效果:
点击“Page3”按钮后跳转到Page3页面,点击“Page2”按钮后跳转到Page2页面。
相关AppBar示例代码可从该链接中下载:http://code.msdn.microsoft.com/windowsapps/XAML-AppBar-control-sample-2aa1cbb4/。


