一、Deployment、ReplicaSet、Pod之间的关系
我们接着前面的文章说,如果不清楚的请查看之前的博文:http://blog.51cto.com/wzlinux/2322616
前面我们已经了解到,Kubernetes 通过各种 Controller 来管理 Pod 的生命周期。为了满足不同业务场景,Kubernetes 开发了 Deployment、ReplicaSet、DaemonSet、StatefuleSet、Job 等多种 Controller。我们首先学习最常用的 Deployment。
1、运行 Deployment
先从例子开始,运行一个 Deployment:
kubectl run nginx-deployment --image=nginx:1.7.9 --replicas=2
上面的命令将部署包含两个副本的 Deployment nginx-deployment,容器的 image 为 nginx:1.7.9。
2、查看 Deployment(deploy)
查看刚刚创建的 deployment,其可以简写为deploy。
[root@master ~]# kubectl get deploy
NAME               DESIRED   CURRENT   UP-TO-DATE   AVAILABLE   AGE
nginx-deployment   2         2         2            2           4m56s
使用命令kubectl describe deploy查看内部内容。
kubectl describe deploy nginx-deployment
Name:                   nginx-deployment
Namespace:              default
CreationTimestamp:      Thu, 29 Nov 2018 17:47:16 +0800
Labels:                 run=nginx-deployment
Annotations:            deployment.kubernetes.io/revision: 1
Selector:               run=nginx-deployment
Replicas:               2 desired | 2 updated | 2 total | 2 available | 0 unavailable
StrategyType:           RollingUpdate
MinReadySeconds:        0
RollingUpdateStrategy:  25% max unavailable, 25% max surge
Pod Template:
  Labels:  run=nginx-deployment
  Containers:
   nginx-deployment:
    Image:        nginx:1.7.9
    Port:         <none>
    Host Port:    <none>
    Environment:  <none>
    Mounts:       <none>
  Volumes:        <none>
Conditions:
  Type           Status  Reason
  ----           ------  ------
  Available      True    MinimumReplicasAvailable
  Progressing    True    NewReplicaSetAvailable
OldReplicaSets:  <none>
NewReplicaSet:   nginx-deployment-5fd98dbf5f (2/2 replicas created)
Events:
  Type    Reason             Age    From                   Message
  ----    ------             ----   ----                   -------
  Normal  ScalingReplicaSet  6m11s  deployment-controller  Scaled up replica set nginx-deployment-5fd98dbf5f to 2
展示的内容大部分都是描述信息,我们看最后一行,这里告诉我们创建了一个 ReplicaSet nginx-deployment-5fd98dbf5f,Events 是 Deployment 的日志,记录了 ReplicaSet 的启动过程。
通过上面的分析,也验证了 Deployment 通过 ReplicaSet 来管理 Pod 的事实。
3、查看 ReplicaSet(rs)
查看我们有哪些 rs。
[root@master ~]# kubectl get rs
NAME                          DESIRED   CURRENT   READY   AGE
nginx-deployment-5fd98dbf5f   2         2         2       12m
使用命令kubectl describe rs查看其详细信息。
kubectl describe rs nginx-deployment-5fd98dbf5f
Name:           nginx-deployment-5fd98dbf5f
Namespace:      default
Selector:       pod-template-hash=5fd98dbf5f,run=nginx-deployment
Labels:         pod-template-hash=5fd98dbf5f
                run=nginx-deployment
Annotations:    deployment.kubernetes.io/desired-replicas: 2
                deployment.kubernetes.io/max-replicas: 3
                deployment.kubernetes.io/revision: 1
Controlled By:  Deployment/nginx-deployment
Replicas:       2 current / 2 desired
Pods Status:    2 Running / 0 Waiting / 0 Succeeded / 0 Failed
Pod Template:
  Labels:  pod-template-hash=5fd98dbf5f
           run=nginx-deployment
  Containers:
   nginx-deployment:
    Image:        nginx:1.7.9
    Port:         <none>
    Host Port:    <none>
    Environment:  <none>
    Mounts:       <none>
  Volumes:        <none>
Events:
  Type    Reason            Age   From                   Message
  ----    ------            ----  ----                   -------
  Normal  SuccessfulCreate  13m   replicaset-controller  Created pod: nginx-deployment-5fd98dbf5f-8g7nm
  Normal  SuccessfulCreate  13m   replicaset-controller  Created pod: nginx-deployment-5fd98dbf5f-58c4z
我们可以看到Controlled By: Deployment/nginx-deployment,说明此 ReplicaSet 由 Deployment nginx-deployment。
在Events记录了两个副本 Pod 的创建,那我们查看一下 Pod。
4、查看 Pod
查看目前的 Pod。
[root@master ~]# kubectl get pods
NAME                                READY   STATUS    RESTARTS   AGE
nginx-deployment-5fd98dbf5f-58c4z   1/1     Running   0          19m
nginx-deployment-5fd98dbf5f-8g7nm   1/1     Running   0          19m
随便选择一个 Pod,查看其详细信息。
kubectl describe pod nginx-deployment-5fd98dbf5f-58c4z
Name:               nginx-deployment-5fd98dbf5f-58c4z
Namespace:          default
Priority:           0
PriorityClassName:  <none>
Node:               node02.wzlinux.com/172.18.8.202
Start Time:         Thu, 29 Nov 2018 17:47:16 +0800
Labels:             pod-template-hash=5fd98dbf5f
                    run=nginx-deployment
Annotations:        <none>
Status:             Running
IP:                 10.244.2.3
Controlled By:      ReplicaSet/nginx-deployment-5fd98dbf5f
Containers:
  nginx-deployment:
    Container ID:   docker://69fa73ed16d634627b69b8968915d9a5704f159206ac0d3b2f1179fa99acd56f
    Image:          nginx:1.7.9
    Image ID:       docker-pullable://nginx@sha256:e3456c851a152494c3e4ff5fcc26f240206abac0c9d794affb40e0714846c451
    Port:           <none>
    Host Port:      <none>
    State:          Running
      Started:      Thu, 29 Nov 2018 17:47:28 +0800
    Ready:          True
    Restart Count:  0
    Environment:    <none>
    Mounts:
      /var/run/secrets/kubernetes.io/serviceaccount from default-token-sm664 (ro)
Conditions:
  Type              Status
  Initialized       True
  Ready             True
  ContainersReady   True
  PodScheduled      True
Volumes:
  default-token-sm664:
    Type:        Secret (a volume populated by a Secret)
    SecretName:  default-token-sm664
    Optional:    false
QoS Class:       BestEffort
Node-Selectors:  <none>
Tolerations:     node.kubernetes.io/not-ready:NoExecute for 300s
                 node.kubernetes.io/unreachable:NoExecute for 300s
Events:
  Type    Reason     Age   From                         Message
  ----    ------     ----  ----                         -------
  Normal  Scheduled  20m   default-scheduler            Successfully assigned default/nginx-deployment-5fd98dbf5f-58c4z to node02.wzlinux.com
  Normal  Pulling    20m   kubelet, node02.wzlinux.com  pulling image "nginx:1.7.9"
  Normal  Pulled     20m   kubelet, node02.wzlinux.com  Successfully pulled image "nginx:1.7.9"
  Normal  Created    20m   kubelet, node02.wzlinux.com  Created container
  Normal  Started    20m   kubelet, node02.wzlinux.com  Started container
我们可以看到Controlled By: ReplicaSet/nginx-deployment-5fd98dbf5f,说明此 Pod 是由 ReplicaSet nginx-deployment-5fd98dbf5f 创建的。
Events记录了 Pod 的启动过程。
5、总结
- 用户通过 kubectl 创建 Deployment。
- Deployment 创建 ReplicaSet。
- ReplicaSet 创建 Pod。
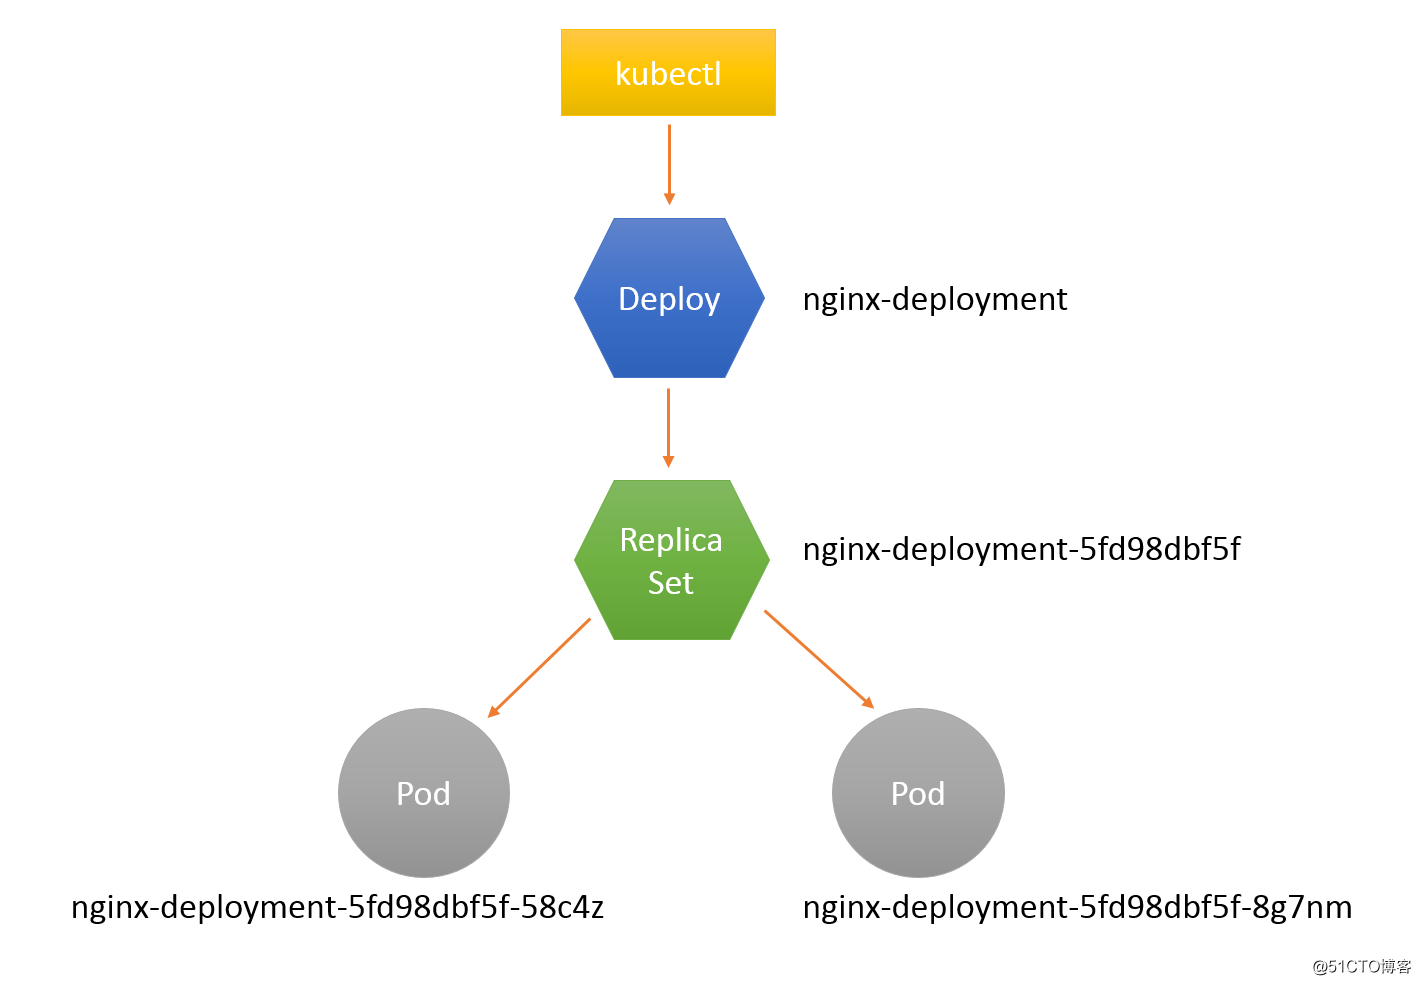
从上图也可以看出,对象的命名方式是:子对象的名字 = 父对象名字 + 随机字符串或数字。
二、伸缩
伸缩(Scale Up/Down)是指在线增加或减少 Pod 的副本数。
我们重新创建一下。
[root@master ~]# kubectl run nginx --image=nginx:1.7.9 --replicas=2
deployment.apps/nginx created
[root@master ~]# kubectl get pod -o wide
NAME                    READY   STATUS    RESTARTS   AGE   IP            NODE                 NOMINATED NODE
nginx-699ff78c9-2xxnj   1/1     Running   0          51s   10.244.1.11   node01.wzlinux.com   <none>
nginx-699ff78c9-j5w6c   1/1     Running   0          51s   10.244.3.6    node02.wzlinux.com   <none>
我们把副本数量修改为5个,查看一下。
[root@master ~]# kubectl scale --replicas=5 deploy/nginx
deployment.extensions/nginx scaled
[root@master ~]# kubectl get pod -o wide
NAME                    READY   STATUS    RESTARTS   AGE     IP            NODE                 NOMINATED NODE
nginx-699ff78c9-2xxnj   1/1     Running   0          2m21s   10.244.1.11   node01.wzlinux.com   <none>
nginx-699ff78c9-4qq9h   1/1     Running   0          18s     10.244.1.12   node01.wzlinux.com   <none>
nginx-699ff78c9-b6dt4   1/1     Running   0          18s     10.244.3.7    node02.wzlinux.com   <none>
nginx-699ff78c9-j5w6c   1/1     Running   0          2m21s   10.244.3.6    node02.wzlinux.com   <none>
nginx-699ff78c9-zhwsz   1/1     Running   0          18s     10.244.3.8    node02.wzlinux.com   <none>
三个新副本被创建并调度到 node01 和 node02 上,出于安全考虑,默认配置下 Kubernetes 不会将 Pod 调度到 Master 节点。如果希望将 master 也当作 Node 使用,可以执行如下命令:
kubectl taint node master node-role.kubernetes.io/master-
如果要恢复 Master Only 状态,执行如下命令:
kubectl taint node master node-role.kubernetes.io/master="":NoSchedule
想要减少副本数量也是同样的方法,指定数量即可,那我们减少到3个副本。
[root@master ~]# kubectl get pod -o wide
NAME                    READY   STATUS    RESTARTS   AGE     IP            NODE                 NOMINATED NODE
nginx-699ff78c9-2xxnj   1/1     Running   0          2m55s   10.244.1.11   node01.wzlinux.com   <none>
nginx-699ff78c9-4qq9h   1/1     Running   0          52s     10.244.1.12   node01.wzlinux.com   <none>
nginx-699ff78c9-j5w6c   1/1     Running   0          2m55s   10.244.3.6    node02.wzlinux.com   <none>
三、故障转移
目前是五个应用分别运行在两台机器上面,我们把 node02 关闭,造成 node02 出现问题,然后再查看一下 Pod 的情况。
[root@master ~]# kubectl get pod -o wide
NAME                    READY   STATUS    RESTARTS   AGE     IP            NODE                 NOMINATED NODE
nginx-699ff78c9-2xxnj   1/1     Running   0          8m49s   10.244.1.11   node01.wzlinux.com   <none>
nginx-699ff78c9-4qq9h   1/1     Running   0          6m46s   10.244.1.12   node01.wzlinux.com   <none>
nginx-699ff78c9-j5w6c   1/1     Unknown   0          8m49s   10.244.3.6    node02.wzlinux.com   <none>
nginx-699ff78c9-wqd5k   1/1     Running   0          32s     10.244.1.13   node01.wzlinux.com   <none>
等待一段时间之后,我们看到 node02 上的 Pod 标记为 Unknown 状态,并在 node01 上面新建三个 Pod,维持总副本数为3。
那我们重启把服务器启动起来,正常情况下,如果配置没有问题,服务会自动添加到集群中,我们启动查看状态。
[root@master ~]# kubectl get pod -o wide
NAME                    READY   STATUS    RESTARTS   AGE     IP            NODE                 NOMINATED NODE
nginx-699ff78c9-2xxnj   1/1     Running   0          14m     10.244.1.11   node01.wzlinux.com   <none>
nginx-699ff78c9-4qq9h   1/1     Running   0          12m     10.244.1.12   node01.wzlinux.com   <none>
nginx-699ff78c9-wqd5k   1/1     Running   0          6m37s   10.244.1.13   node01.wzlinux.com   <none>
当 node02 恢复后,Unknown 的 Pod 会被删除,不过已经运行的 Pod 不会重新调度回 node02。
四、标签
默认配置下,Scheduler 会将 Pod 调度到所有可用的 Node。不过有些情况我们希望将 Pod 部署到指定的 Node,比如将有大量磁盘 I/O 的 Pod 部署到配置了 SSD 的 Node;或者 Pod 需要 GPU,需要运行在配置了 GPU 的节点上。
我们使用mytest.yaml文件创建一个Deployment,内容如下:
apiVersion: extensions/v1beta1
kind: Deployment
metadata:
  name: mytest
  namespace: default
spec:
  replicas: 5
  template:
    metadata:
      labels:
        run: mytest
    spec:
      containers:
      - image: wangzan18/mytest:v1
        imagePullPolicy: IfNotPresent
        name: mytest
使用下面命令创建应用。
[root@master ~]# kubectl create -f mytest.yaml
deployment.extensions/mytest created
Kubernetes 是通过 label 来实现这个功能的。label 是 key-value 对,各种资源都可以设置 label,灵活添加各种自定义属性。比如执行如下命令标注 node01 是配置了 SSD 的节点。
kubectl label node node01.wzlinux.com disktype=ssd
然后使用命令kubectl get node --show-labels我们查看。
NAME                 STATUS   ROLES    AGE   VERSION   LABELS
master.wzlinux.com   Ready    master   26h   v1.12.3   beta.kubernetes.io/arch=amd64,beta.kubernetes.io/os=linux,kubernetes.io/hostname=master.wzlinux.com,node-role.kubernetes.io/master=
node01.wzlinux.com   Ready    <none>   25h   v1.12.3   beta.kubernetes.io/arch=amd64,beta.kubernetes.io/os=linux,disktype=ssd,kubernetes.io/hostname=node01.wzlinux.com
node02.wzlinux.com   Ready    <none>   91m   v1.12.3   beta.kubernetes.io/arch=amd64,beta.kubernetes.io/os=linux,kubernetes.io/hostname=node02.wzlinux.com
disktype=ssd 已经成功添加到 node01,除了 disktype,Node 还有几个 Kubernetes 自己维护的 label。
有了disktype这个自定义 label,接下来就可以指定将 Pod 部署到 node01。编辑 mytest.yaml:
apiVersion: extensions/v1beta1
kind: Deployment
metadata:
  name: mytest
  namespace: default
spec:
  replicas: 5
  template:
    metadata:
      labels:
        run: mytest
    spec:
      containers:
      - image: wangzan18/mytest:v1
        imagePullPolicy: IfNotPresent
        name: mytest
      nodeSelector:
        disktype: ssd
在 Pod 模板的spec里通过nodeSelector指定将此 Pod 部署到具有 label disktype=ssd 的 Node 上。
重新部署 Deployment 并查看 Pod 的运行节点:
[root@master ~]# kubectl apply -f mytest.yaml
Warning: kubectl apply should be used on resource created by either kubectl create --save-config or kubectl apply
deployment.extensions/mytest configured

[root@master ~]# kubectl get pod -o wide
NAME                      READY   STATUS    RESTARTS   AGE   IP            NODE                 NOMINATED NODE
mytest-6f7fbbfdc7-2tr6s   1/1     Running   0          63s   10.244.1.19   node01.wzlinux.com   <none>
mytest-6f7fbbfdc7-5g9tj   1/1     Running   0          61s   10.244.1.21   node01.wzlinux.com   <none>
mytest-6f7fbbfdc7-bnfxv   1/1     Running   0          61s   10.244.1.22   node01.wzlinux.com   <none>
mytest-6f7fbbfdc7-bqzqq   1/1     Running   0          60s   10.244.1.23   node01.wzlinux.com   <none>
mytest-6f7fbbfdc7-v6cqk   1/1     Running   0          63s   10.244.1.20   node01.wzlinux.com   <none>
全部 6 个副本都运行在 node01 上,符合我们的预期。
要删除 label disktype,执行如下命令:
[root@master ~]# kubectl label node node01.wzlinux.com disktype-
node/node01.wzlinux.com labeled
不过此时 Pod 并不会重新部署,依然在 node01 上运行。
除非在mytest.yaml中删除nodeSelector设置,然后通过kubectl apply重新部署。
关于对象资源的设定,大家可以使用命令kubectl explain,比如查看pod中nodeSelector的参数设定,我们可以使用命令
kubectl explain pod.spec.nodeSelector
小问题:手动重新添加到集群
如果因为某些问题,服务不能自动添加到集群中,我们就需要手动重新初始化添加一次。
在 master 节点上面先删除 node02节点。
kubectl delete node node02.wzlinux.com
在 node02 上面 reset。
kubeadm reset
重新使用kubeadm init初始化,但是发现token过期了,我们需要在master节点重新生成token。
[root@master ~]# kubeadm token create
v269qh.2mylwtmc96kd28sq
生成ca-cert-hash sha256的值。
[root@master ~]# openssl x509 -pubkey -in /etc/kubernetes/pki/ca.crt | openssl rsa -pubin -outform der 2>/dev/null |
>    openssl dgst -sha256 -hex | sed 's/^.* //'
84e50f7beaa4d3296532ae1350330aaf79f3f0d45ec8623fae6cd9fe9a804635
然后在node节点上面重新使用kubeadm init进行添加集群中。