1.节点规划
master节点:192.168.188.135
node 节点:(node1)192.168.188.136,(node2)192.168.188.137
2.禁用SELinux
1 [root@localhost ~]# setenforce 0
[非必须]彻底禁用SELinux
修改配置文件 /etc/selinux/config,修改
SELINUX=enforcing
为
SELINUX=disabled
3.禁用firewalld
1 [root@localhost ~]# systemctl stop firewalld
2 [root@localhost ~]# systemctl disable firewalld
4.同步系统时间
将三台服务器的时间通过 NTP 进行同步
1 [root@localhost ~]# ntpdate -u cn.pool.ntp.org
5.etcd 集群配置
在 Master 节点上面执行以下命令:
1 [root@localhost ~]# yum -y install kubernetes-master etcd
修改 etcd 配置文件 /etc/etcd/etcd.conf,修改的代码部分如下:
 1 #[Member]
 2 #ETCD_CORS=""
 3 ETCD_DATA_DIR="/var/lib/etcd/default.etcd"
 4 #ETCD_WAL_DIR=""
 5 ETCD_LISTEN_PEER_URLS="http://192.168.188.135:2380"
 6 ETCD_LISTEN_CLIENT_URLS="http://192.168.188.135:2379,http://127.0.0.1:2379"
 7 #ETCD_MAX_SNAPSHOTS="5"
 8 #ETCD_MAX_WALS="5"
 9 ETCD_NAME="etcd1"
10 #ETCD_SNAPSHOT_COUNT="100000"
11 #ETCD_HEARTBEAT_INTERVAL="100"
12 #ETCD_ELECTION_TIMEOUT="1000"
13 #ETCD_QUOTA_BACKEND_BYTES="0"
14 #ETCD_MAX_REQUEST_BYTES="1572864"
15 #ETCD_GRPC_KEEPALIVE_MIN_TIME="5s"
16 #ETCD_GRPC_KEEPALIVE_INTERVAL="2h0m0s"
17 #ETCD_GRPC_KEEPALIVE_TIMEOUT="20s"
18 #
19 #[Clustering]
20 ETCD_INITIAL_ADVERTISE_PEER_URLS="http://192.168.188.135:2380"
21 ETCD_ADVERTISE_CLIENT_URLS="http://192.168.188.135:2379"
22 #ETCD_DISCOVERY=""
23 #ETCD_DISCOVERY_FALLBACK="proxy"
24 #ETCD_DISCOVERY_PROXY=""
25 #ETCD_DISCOVERY_SRV=""
26 ETCD_INITIAL_CLUSTER="etcd1=http://192.168.188.135:2380,etcd2=http://192.168.188.136:2380,etcd3=http://192.168.188.137:2380"
27 #ETCD_INITIAL_CLUSTER_TOKEN="etcd-cluster"
28 #ETCD_INITIAL_CLUSTER_STATE="new"
29 #ETCD_STRICT_RECONFIG_CHECK="true"
30 #ETCD_ENABLE_V2="true
-
ETCD_LISTEN_PEER_URLS :指定 etcd 节点监听的 URL,用于与其他分布式 etcd 节点通信,实现各个 etcd 节点的数据通信、交互、选举以及数据同步等功能。
-
ETCD_LISTEN_CLIENT_URLS :指定对外提供服务的地址,即 etcd API 的地址,etcd 客户端通过该 URL 访问 etcd 服务器
-
ETCD_NAME :指定 etcd 节点的名称,该名称用于在集群中表示本 etcd 节点
-
ETCD_INITIAL_ADVERTISE_PEER_URLS :指定节点同伴监听地址,这个值会告诉 etcd 集群中其他 etcd 节点。该地址用来在 etcd 集群中传递数据
-
ETCD_ADVERTISE_CLIENT_URLS : 指定当前 etcd 节点对外公告的客户端监听地址,这个值会告诉集群中其他节点。
-
ETCD_INITIAL_CLUSTER :列当前 etcd 集群中所有的 etcd 节点的节点通讯地址
在 node1 节点上执行以下命令:
1 [root@localhost ~]# yum -y install kubernetes-node etcd flannel docker
修改 etcd 配置文件 /etc/etcd/etcd.conf,修改的代码部分如下:
 1 #[Member]
 2 #ETCD_CORS=""
 3 ETCD_DATA_DIR="/var/lib/etcd/default.etcd"
 4 #ETCD_WAL_DIR=""
 5 ETCD_LISTEN_PEER_URLS="http://192.168.188.136:2380"
 6 ETCD_LISTEN_CLIENT_URLS="http://192.168.188.136:2379,http://127.0.0.1:2379"
 7 #ETCD_MAX_SNAPSHOTS="5"
 8 #ETCD_MAX_WALS="5"
 9 ETCD_NAME="etcd2"
10 #ETCD_SNAPSHOT_COUNT="100000"
11 #ETCD_HEARTBEAT_INTERVAL="100"
12 #ETCD_ELECTION_TIMEOUT="1000"
13 #ETCD_QUOTA_BACKEND_BYTES="0"
14 #ETCD_MAX_REQUEST_BYTES="1572864"
15 #ETCD_GRPC_KEEPALIVE_MIN_TIME="5s"
16 #ETCD_GRPC_KEEPALIVE_INTERVAL="2h0m0s"
17 #ETCD_GRPC_KEEPALIVE_TIMEOUT="20s"
18 #
19 #[Clustering]
20 ETCD_INITIAL_ADVERTISE_PEER_URLS="http://192.168.188.136:2380"
21 ETCD_ADVERTISE_CLIENT_URLS="http://192.168.188.136:2379"
22 #ETCD_DISCOVERY=""
23 #ETCD_DISCOVERY_FALLBACK="proxy"
24 #ETCD_DISCOVERY_PROXY=""
25 #ETCD_DISCOVERY_SRV=""
26 ETCD_INITIAL_CLUSTER="etcd1=http://192.168.188.135:2380,etcd2=http://192.168.188.136:2380,etcd3=http://192.168.188.137:2380"
27 #ETCD_INITIAL_CLUSTER_TOKEN="etcd-cluster"
28 #ETCD_INITIAL_CLUSTER_STATE="new"
29 #ETCD_STRICT_RECONFIG_CHECK="true"
30 #ETCD_ENABLE_V2="true"
在 node2 节点上执行与 node1 相同操作,注意 /etc/etcd/etcd.conf 要修改相应 ip
配置完成后在三个节点上分别执行如下命令,以启用和启动 etcd 服务:
1 [root@localhost ~]# systemctl enable etcd
2 [root@localhost ~]# systemctl start etcd
启动后,查看 etcd 服务状态:
1 [root@localhost ~]# systemctl status etcd
etcd 提供的 etcd 命令可以查看 etcd 集群的健康状态,如下:
1 [root@localhost ~]# etcdctl cluster-health
2 member 7e33cb58132b284f is healthy: got healthy result from http://192.168.188.135:2379
3 member aa5c1227d8011cfc is healthy: got healthy result from http://192.168.188.136:2379
4 member e159bd761a0249b1 is healthy: got healthy result from http://192.168.188.137:2379
5 cluster is healthy
6.Master节点配置
Master 节点上运行着 apiserver、controller-mannager 以及 scheduler 等主要的服务进程。以上服务的配置文件都位于 /etc/kubernetes 目录中。
修改 /etc/kubernetes/apiserver:
 1 ###
 2 # kubernetes system config
 3 #
 4 # The following values are used to configure the kube-apiserver
 5 #
 6
 7 # The address on the local server to listen to.
 8 # KUBE_API_ADDRESS="--insecure-bind-address=127.0.0.1"
 9 # KUBE_API_ADDRESS 表示 api-server 进程绑定的 IP 地址
10 # 设置为 0.0.0.0 表示绑定本机所有 IP 地址
11 KUBE_API_ADDRESS="--address=0.0.0.0"
12 # The port on the local server to listen on.
13 KUBE_API_PORT="--port=8080"
14
15 # Port minions listen on
16 # KUBELET_PORT="--kubelet-port=10250"
17
18 # Comma separated list of nodes in the etcd cluster
19 KUBE_ETCD_SERVERS="--etcd-servers=http://192.168.188.135:2379,http://192.168.188.136:2379,http://192.168.188.137:2379"
20
21 # Address range to use for services
22 KUBE_SERVICE_ADDRESSES="--service-cluster-ip-range=10.254.0.0/16"
23
24 # default admission control policies
25 KUBE_ADMISSION_CONTROL="--admission-control=NamespaceLifecycle,NamespaceExists,LimitRanger,SecurityContextDeny,ServiceAccount,ResourceQuota"
26
27 # Add your own!
28 KUBE_API_ARGS=""
-
KUBE_API_ADDRESS :表示 api-server 进程绑定的 IP 地址
-
KUBE_API_PORT :表示 api-server 进程监听的端口。
-
KUBE_ETCD_SERVERS : 指定 etcd 集群中的每个节点的地址。
启动 Master 节点上面的各项服务:
1 [root@localhost ~]# systemctl start kube-apiserver
2 [root@localhost ~]# systemctl start kube-controller-manager
3 [root@localhost ~]# systemctl start kube-scheduler
查看服务状态:
1 [root@localhost ~]# systemctl status kube-apiserver
2 [root@localhost ~]# systemctl status kube-controller-manager
3 [root@localhost ~]# systemctl status kube-scheduler
设置各项服务在 Linux 系统启动时自启动:
1 [root@localhost ~]# systemctl enable kube-apiserver
2 [root@localhost ~]# systemctl enable kube-controller-manager
3 [root@localhost ~]# systemctl enable kube-scheduler
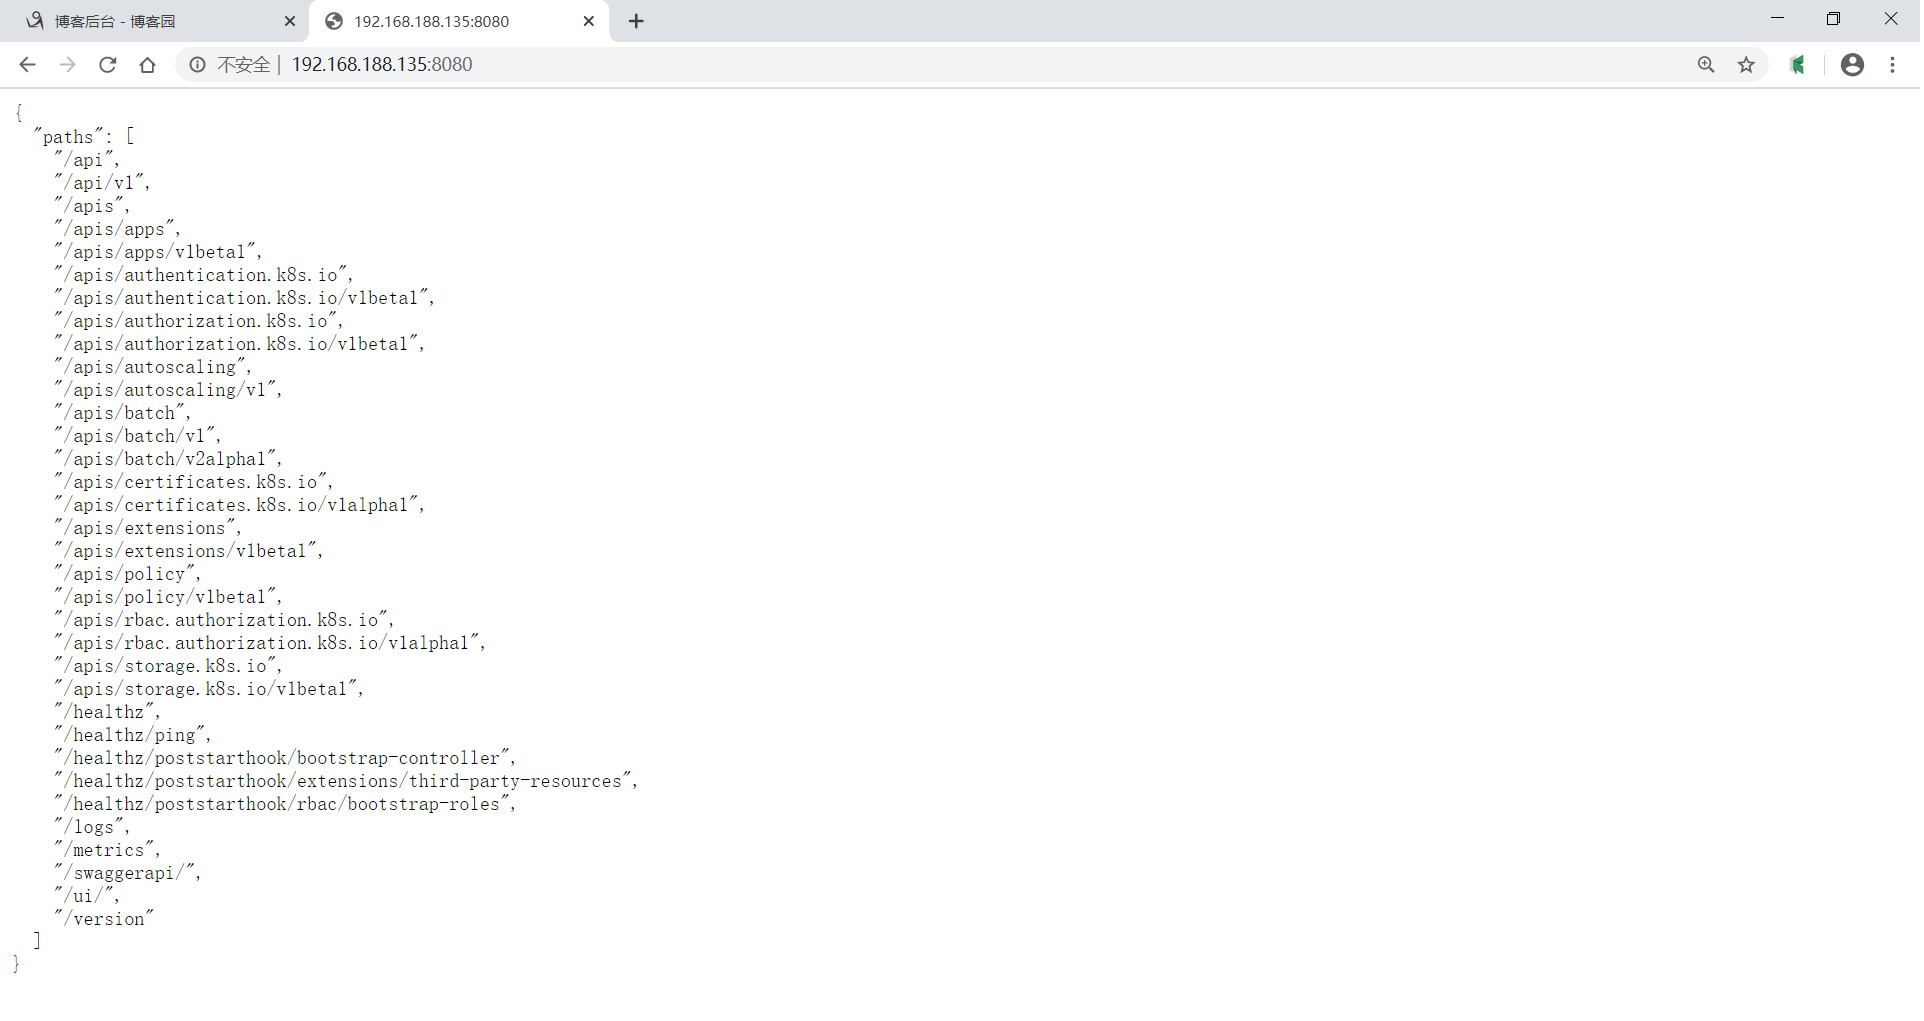
Kubernetes 的 api-server 提供的各个接口都是 RESTful 的,用户可以通过浏览器访问 Master 节点的 8080 端口,api-server 会以 JSON 对象的形式返回各个 API 的地址:
7.node 节点配置(以node1为例)
Node 节点上主要运行 kube-proxy 和 kubelet 等进程。需要修改三个文件:
修改 Kubernetes 全局配置文件:/etc/kubernetes/config,主要修改 KUBE_MASTER 选项,指定 apiserver的地址:
 1 ###
 2 # kubernetes system config
 3 #
 4 # The following values are used to configure various aspects of all
 5 # kubernetes services, including
 6 #
 7 #   kube-apiserver.service
 8 #   kube-controller-manager.service
 9 #   kube-scheduler.service
10 #   kubelet.service
11 #   kube-proxy.service
12 # logging to stderr means we get it in the systemd journal
13 KUBE_LOGTOSTDERR="--logtostderr=true"
14
15 # journal message level, 0 is debug
16 KUBE_LOG_LEVEL="--v=0"
17
18 # Should this cluster be allowed to run privileged docker containers
19 KUBE_ALLOW_PRIV="--allow-privileged=false"
20
21 # How the controller-manager, scheduler, and proxy find the apiserver
22 KUBE_MASTER="--master=http://192.168.188.135:8080"
修改 /etc/kubernetes/kubelet:
-
KUBELET_ADDRESS :指定 kubelet 绑定的 IP 地址,如果想绑定本机所有的网络接口,可以设置为 0.0.0.0
-
KUBELET_HOSTNAME :本节点主机名
-
KUBELET_API_SERVER :指定 apiserver 的地址
 1 ###
 2 # kubernetes kubelet (minion) config
 3
 4 # The address for the info server to serve on (set to 0.0.0.0 or "" for all interfaces)
 5 KUBELET_ADDRESS="--address=127.0.0.1"
 6
 7 # The port for the info server to serve on
 8 # KUBELET_PORT="--port=10250"
 9
10 # You may leave this blank to use the actual hostname
11 # KUBELET_HOSTNAME="--hostname-override=127.0.0.1"
12 KUBELET_HOSTNAME="--hostname-override=192.168.188.136"
13
14 # location of the api-server
15 # KUBELET_API_SERVER="--api-servers=http://127.0.0.1:8080"
16 KUBELET_API_SERVER="--api-servers=http://192.168.188.135:8080"
17
18 # pod infrastructure container
19 KUBELET_POD_INFRA_CONTAINER="--pod-infra-container-image=registry.access.redhat.com/rhel7/pod-infrastructure:latest"
20
21 # Add your own!
22 KUBELET_ARGS=""
23 ~
修改 /etc/kubernetes/proxy 文件 :
1 ###
2 # kubernetes proxy config
3
4 # default config should be adequate
5
6 # Add your own!
7 # KUBE_PROXY_ARGS=""
8 KUBE_PROXY_ARGS="0.0.0.0"
配置完成,配置 自启动,并且启动服务:
[root@localhost kubernetes]# systemctl enable kube-proxy
[root@localhost kubernetes]# systemctl enable kubelet

[root@localhost kubernetes]# systemctl start kube-proxy
[root@localhost kubernetes]# systemctl start kubelet
在 node2 上同样操作。
8.测试集群是否正常
 1 [root@localhost ~]# kubectl get nodes,cs
 2 NAME                 STATUS    AGE
 3 no/192.168.188.135   Ready     23h
 4 no/192.168.188.136   Ready     22h
 5 no/192.168.188.137   Ready     22h
 6
 7 NAME                    STATUS    MESSAGE             ERROR
 8 cs/controller-manager   Healthy   ok
 9 cs/scheduler            Healthy   ok
10 cs/etcd-1               Healthy   {"health":"true"}
11 cs/etcd-2               Healthy   {"health":"true"}
12 cs/etcd-0               Healthy   {"health":"true"}
参考书目:
《从Docker到kuberbetes入门与实战》, 罗利民 著,清华大学出版社,2019,ISBN 978-7-302-53481-5