Ajax三种提交方式
a.原生ajax(XmlHttpRequest)
XmlHttpRequest对象的主要方法:
var void = new XmlHttpRequest();

a. void open(String method,String url,Boolen async)
   用于创建请求

   参数:
       method: 请求方式(字符串类型),如:POST、GET、DELETE...
       url:    要请求的地址(字符串类型)
       async:  是否异步(布尔类型)

b. void send(String body)
    用于发送请求

    参数:
        body: 要发送的数据(字符串类型)

c. void setRequestHeader(String header,String value)
    用于设置请求头

    参数:
        header: 请求头的key(字符串类型)
        vlaue:  请求头的value(字符串类型)

d. String getAllResponseHeaders()
    获取所有响应头

    返回值:
        响应头数据(字符串类型)

e. String getResponseHeader(String header)
    获取响应头中指定header的值

    参数:
        header: 响应头的key(字符串类型)

    返回值:
        响应头中指定的header对应的值

f. void abort()

    终止请求
XmlHttpRequest对象的主要属性:
a. Number readyState
   状态值(整数)

   详细:
      0-未初始化,尚未调用open()方法;
      1-启动,调用了open()方法,未调用send()方法;
      2-发送,已经调用了send()方法,未接收到响应;
      3-接收,已经接收到部分响应数据;
      4-完成,已经接收到全部响应数据;

b. Function onreadystatechange
   当readyState的值改变时自动触发执行其对应的函数(回调函数)

c. String responseText
   服务器返回的数据(字符串类型)

d. XmlDocument responseXML
   服务器返回的数据(Xml对象)

e. Number states
   状态码(整数),如:200、404...

f. String statesText
   状态文本(字符串),如:OK、NotFound...


 1 function Ajax1(){
 2     var xhr = getXHR();
 3     //var xhr = new XMLHttpRequest();
 4     xhr.open('POST', '/ajax_json/',true);
 5     xhr.onreadystatechange = function(){
 6         if(xhr.readyState == 4){
 7             // 接收完毕
 8             var obj = JSON.parse(xhr.responseText);
 9             console.log(obj);
10         }
11     };
12     xhr.setRequestHeader('k1','v1');
13     xhr.setRequestHeader('Content-Type', 'application/x-www-form-urlencoded; charset-UTF-8');
14     xhr.send("name=root;pwd=123");
15 }
兼容IE
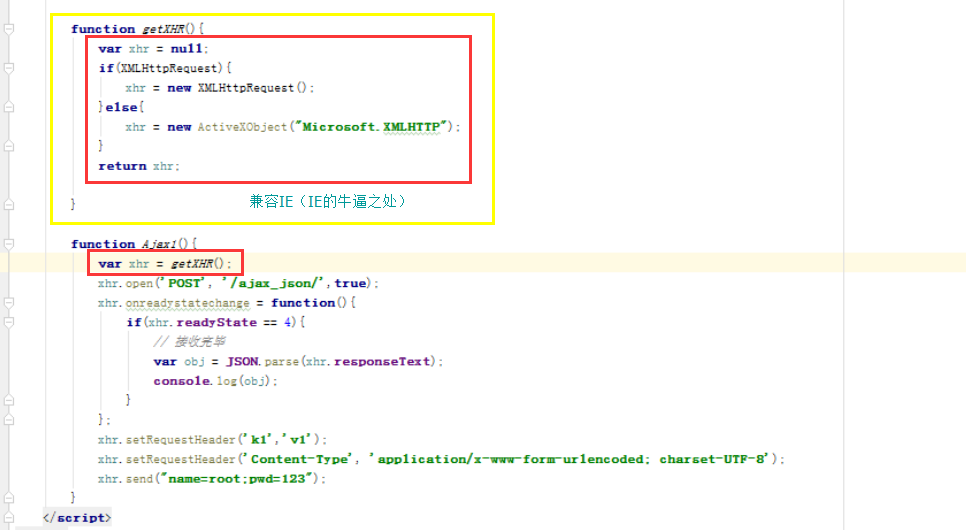
 1 <!DOCTYPE html>
 2 <html>
 3 <head lang="en">
 4     <meta charset="UTF-8">
 5     <title></title>
 6 </head>
 7 <body>
 8
 9     <h1>XMLHttpRequest - Ajax请求</h1>
10     <input type="button" onclick="XmlGetRequest();" value="Get发送请求" />
11     <input type="button" onclick="XmlPostRequest();" value="Post发送请求" />
12
13     <script src="/statics/jquery-1.12.4.js"></script>
14     <script type="text/javascript">
15
16         function GetXHR(){
17             var xhr = null;
18             if(XMLHttpRequest){
19                 xhr = new XMLHttpRequest();
20             }else{
21                 xhr = new ActiveXObject("Microsoft.XMLHTTP");
22             }
23             return xhr;
24
25         }
26
27         function XhrPostRequest(){
28             var xhr = GetXHR();
29             // 定义回调函数
30             xhr.onreadystatechange = function(){
31                 if(xhr.readyState == 4){
32                     // 已经接收到全部响应数据,执行以下操作
33                     var data = xhr.responseText;
34                     console.log(data);
35                 }
36             };
37             // 指定连接方式和地址----文件方式
38             xhr.open('POST', "/test/", true);
39             // 设置请求头
40             xhr.setRequestHeader('Content-Type', 'application/x-www-form-urlencoded; charset-UTF-8');
41             // 发送请求
42             xhr.send('n1=1;n2=2;');
43         }
44
45         function XhrGetRequest(){
46             var xhr = GetXHR();
47             // 定义回调函数
48             xhr.onreadystatechange = function(){
49                 if(xhr.readyState == 4){
50                     // 已经接收到全部响应数据,执行以下操作
51                     var data = xhr.responseText;
52                     console.log(data);
53                 }
54             };
55             // 指定连接方式和地址----文件方式
56             xhr.open('get', "/test/", true);
57             // 发送请求
58             xhr.send();
59         }
60
61     </script>
62
63 </body>
64 </html>
65
66 基于原生AJAX - Demo
b.jQuery方式的ajax
初识Ajax(在jQuery下)
$('#i1').click(function(){		// 绑定一个事件
    $.ajax({					// $.ajax(里面是一个字典)
        url: '/ajax_edit',		// 要发送到的url
        type: "POST",			// 以post的方式发送
        data: $('#add_form').serialize(),	// 打包form里所有的东西 发送,但要在提交的form表单上写id、class内写东西来绑定
		// data: {'user': 123,'host_list': [1,2,3,4]},
        dataType: 'JSON', 		// 每次后端发送的都是字典转成的字符串,每次都要转码太麻烦,所以写上这个ajax内部就帮我们转码
        traditional: true,		// 传输列表[1,2,3,4]时要写上
        success: function(obj){	// 回调函数,执行成功后自动触发这个函数
            location.reload();	// jQuery下的 刷新页面
        },
        error: function () {	// 发送请求,如果后台没抓到时执行

        }

    })
});
 1 student_info.html
 2
 3 </select><span id='i4' style='color:red'></span></P>    //在模态对话框写这个,返回错误数据
 4
 5 ---------------------------------------------------
 6 <script src="/static/jquery-1.12.4.js"></script>
 7 <script>
 8     $('#i2').click(function () {
 9         $.ajax({
10             url:'/cmdb/stu_add/',
11             type:'POST',
12             data:$('.form_edit').serialize(),
13             success:function(data){
14                 var erro_dic = JSON.parse(data);
15                 if(erro_dic.stactic){
16                     console.log(erro_dic.stactic);
17                     location.reload();
18                 }else{
19                     $('#i4').text(erro_dic.error);
20                     setTimeout(function () {
21                         $('#i4').text('')
22                     },2000);
23                     }}})});
24     ...
25 </script>
26
27 views.py
28
29 import json
30
31 def stu_add(request):
32     ret={'stactic':True,'error':None}
33     try:
34         n = request.POST.get('stu_name')
35         b = request.POST.get('stu_bibased')
36         t = request.POST.get('stu_tea')
37         nid = request.POST.get('nid')
38
39         if n:
40             if b:
41                 if nid=='i1':
42                     print(nid)
43                     models.StudentInfo.objects.create(stu_name=n,stu_bibased=b,stu_tea_id=t)
44                 else:
45                     sid=request.POST.get('sid')
46                     print(nid,sid)
47                     models.StudentInfo.objects.filter(sid=sid).update(stu_name=n, stu_bibased=b, stu_tea_id=t)
48             else:
49                 ret['stactic']=False
50                 ret['error']='请输入毕设题目'
51         else:
52             ret['stactic']=False
53             ret['error']='请输入学生姓名'
54     except Exception as e:
55         ret['stactic']=False
56         ret['error']='其他错误'
57
58     return HttpResponse(json.dumps(ret))
小Tips:
1.前端json转换
s=JSON.stringify(li)    //[]==>'[]' 对象转换成字符串
newLi=JSON.parse(s)     //'[]'==>[] 字符串转换成对象

2.ajax不能直接做跳转,但我们可以间接的做啊
function.reload()    #刷新页面
function.href = '/...'    #做跳转
c.伪ajax

 1 <!DOCTYPE html>
 2 <html lang="en">
 3 <head>
 4     <meta charset="UTF-8">
 5     <title>Title</title>
 6 </head>
 7 <body>
 8     <form method="post" action="/ajax_json/" target="ifm1">
 9         {% csrf_token %}
10         <iframe id="ifm1"  name="ifm1"></iframe>
11         <input type="text" name="username">
12         <input type="text" name="email">
13         <input type="submit" value="伪ajax提交">
14     </form>
15     <script src="/static/jquery-1.12.4.js"></script>
16     <script>
17
18             $("#ifm1").load(function () {
19                 var text = $("#ifm1").contents().find('body').text();
20                 var obj = JSON.parse(text);
21                 console.log(text)
22             });
23
24     </script>
25 </body>
26 </html>
小tips
onload事件
在页面或图片加载完成立即执行

onchange事件
改变立即执行
ajax上传文件
a.原生ajax上传
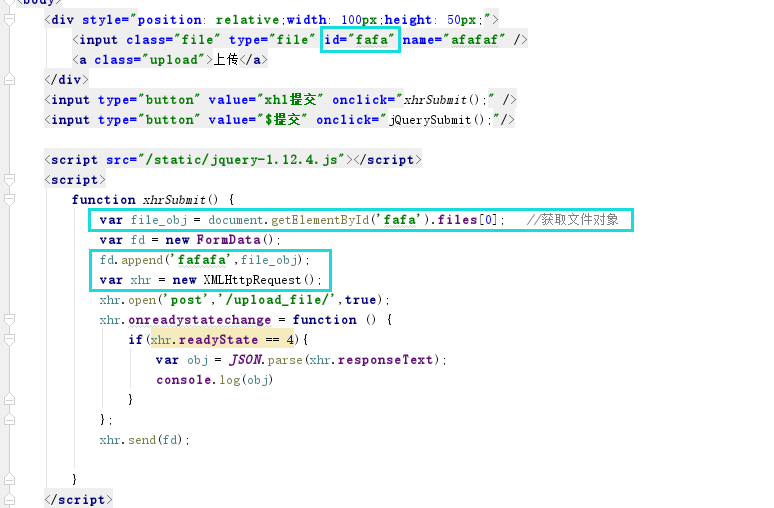
 1 <!DOCTYPE html>
 2 <html lang="en">
 3 <head>
 4     <meta charset="UTF-8">
 5     <title>Title</title>
 6     <title></title>
 7     <style>
 8         .upload{
 9             display: inline-block;padding: 10px;
10             background-color: brown;
11             position: absolute;
12             top: 0;
13             bottom: 0;
14             right: 0;
15             left: 0;
16             z-index: 90;
17         }
18         .file{
19             width: 100px;height: 50px;opacity: 0;
20             position: absolute;
21             top: 0;
22             bottom: 0;
23             right: 0;
24             left: 0;
25             z-index: 100;
26         }
27     </style>
28 </head>
29 <body>
30     <div style="position: relative; 100px;height: 50px;">
31         <input class="file" type="file" id="fafa" name="afafaf" />
32         <a class="upload">上传</a>
33     </div>
34     <input type="button" value="xhl提交" onclick="xhrSubmit();" />
35     <input type="button" value="$提交" onclick="jQuerySubmit();"/>
36
37     <script src="/static/jquery-1.12.4.js"></script>
38     <script>
39         function xhrSubmit() {
40             var file_obj = document.getElementById('fafa').files[0];   //获取文件对象
41             var fd = new FormData();
42             fd.append('fafafa',file_obj);
43             var xhr = new XMLHttpRequest();
44             xhr.open('post','/upload_file/',true);
45             xhr.onreadystatechange = function () {
46                 if(xhr.readyState == 4){
47                     var obj = JSON.parse(xhr.responseText);
48                     console.log(obj)
49                 }
50             };
51             xhr.send(fd);
52
53         }
54     </script>
55 </body>
56 </html>
b.jQuery ajax上传文件
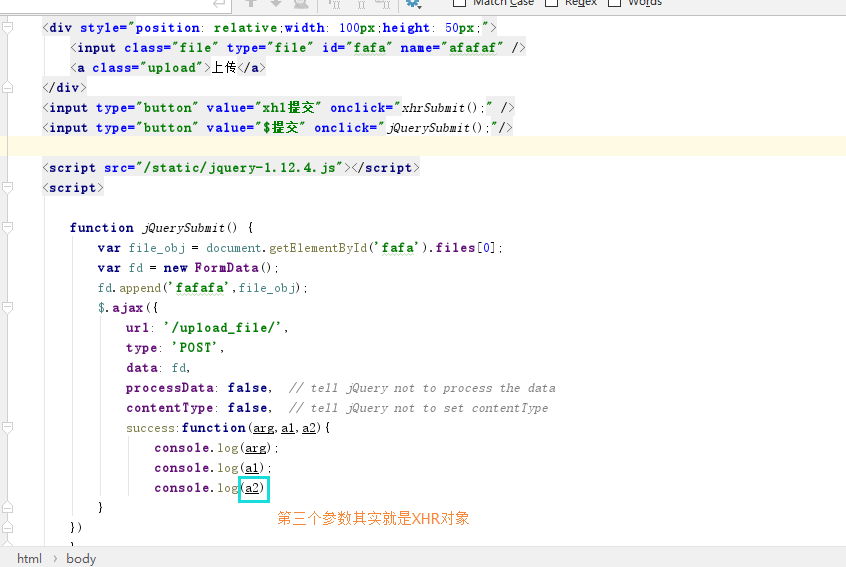
 1 <!DOCTYPE html>
 2 <html lang="en">
 3 <head>
 4     <meta charset="UTF-8">
 5     <title>Title</title>
 6     <title></title>
 7     <style>
 8         .upload{
 9             display: inline-block;padding: 10px;
10             background-color: brown;
11             position: absolute;
12             top: 0;
13             bottom: 0;
14             right: 0;
15             left: 0;
16             z-index: 90;
17         }
18         .file{
19             width: 100px;height: 50px;opacity: 0;
20             position: absolute;
21             top: 0;
22             bottom: 0;
23             right: 0;
24             left: 0;
25             z-index: 100;
26         }
27     </style>
28 </head>
29 <body>
30     <div style="position: relative; 100px;height: 50px;">
31         <input class="file" type="file" id="fafa" name="afafaf" />
32         <a class="upload">上传</a>
33     </div>
34     <input type="button" value="xhl提交" onclick="xhrSubmit();" />
35     <input type="button" value="$提交" onclick="jQuerySubmit();"/>
36
37     <script src="/static/jquery-1.12.4.js"></script>
38     <script>
39
40         function jQuerySubmit() {
41             var file_obj = document.getElementById('fafa').files[0];
42             var fd = new FormData();
43             fd.append('fafafa',file_obj);
44             $.ajax({
45                 url: '/upload_file/',
46                 type: 'POST',
47                 data: fd,
48                 processData: false,  // tell jQuery not to process the data
49                 contentType: false,  // tell jQuery not to set contentType
50                 success:function(arg,a1,a2){
51                     console.log(arg);
52                     console.log(a1);
53                     console.log(a2);
54             }
55         })
56         }
57
58
59     <!--***********************************************************-->
60
61         function xhrSubmit() {
62             var file_obj = document.getElementById('fafa').files[0];   //获取文件对象
63             var fd = new FormData();
64             fd.append('fafafa',file_obj);
65             var xhr = new XMLHttpRequest();
66             xhr.open('post','/upload_file/',true);
67             xhr.onreadystatechange = function () {
68                 if(xhr.readyState == 4){
69                     var obj = JSON.parse(xhr.responseText);
70                     console.log(obj)
71                 }
72             };
73             xhr.send(fd);
74
75         }
76     </script>
77 </body>
78 </html>
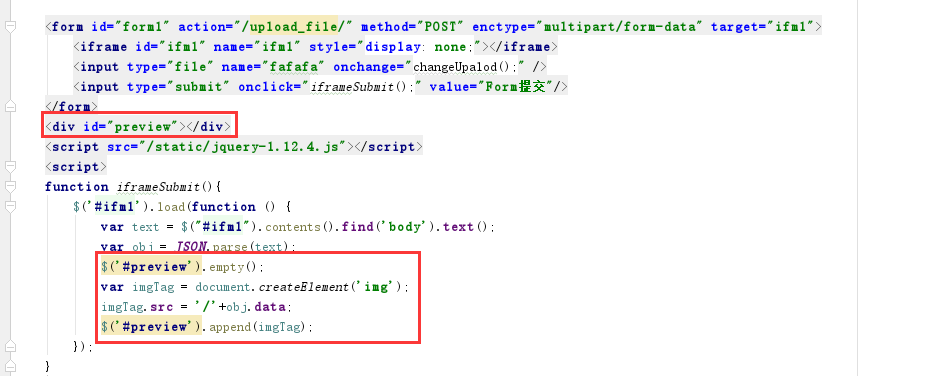
c.伪ajax上传
上传文件

上传图片并显示
不用点提交就上传
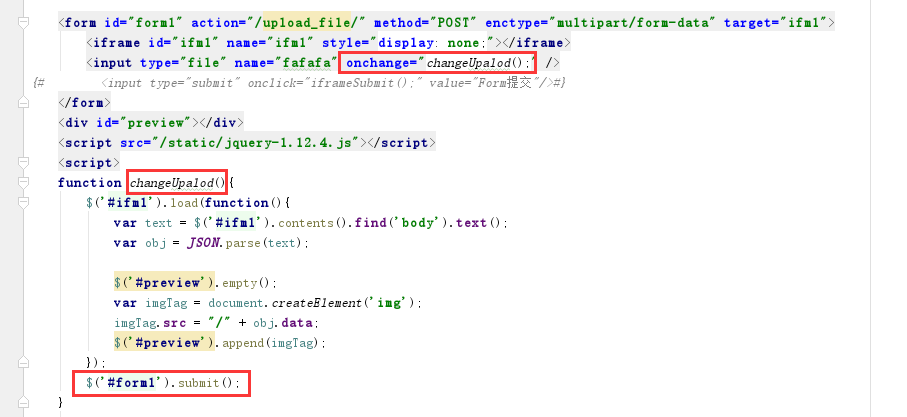
  1 <!DOCTYPE html>
  2 <html lang="en">
  3 <head>
  4     <meta charset="UTF-8">
  5     <title>Title</title>
  6     <title></title>
  7     <style>
  8         .upload{
  9             display: inline-block;padding: 10px;
 10             background-color: brown;
 11             position: absolute;
 12             top: 0;
 13             bottom: 0;
 14             right: 0;
 15             left: 0;
 16             z-index: 90;
 17         }
 18         .file{
 19             width: 100px;height: 50px;opacity: 0;
 20             position: absolute;
 21             top: 0;
 22             bottom: 0;
 23             right: 0;
 24             left: 0;
 25             z-index: 100;
 26         }
 27     </style>
 28 </head>
 29 <body>
 30     <div style="position: relative; 100px;height: 50px;">
 31         <input class="file" type="file" id="fafa" name="afafaf" />
 32         <a class="upload">上传</a>
 33     </div>
 34     <input type="button" value="xhl提交" onclick="xhrSubmit();" />
 35     <input type="button" value="$提交" onclick="jQuerySubmit();"/>
 36
 37     <!--***********************************************************-->
 38
 39     <form id="form1" action="/upload_file/" method="POST" enctype="multipart/form-data" target="ifm1">
 40         <iframe id="ifm1" name="ifm1" style="display: none;"></iframe>
 41         <input type="file" name="fafafa" onchange="changeUpalod();" />
 42         <input type="submit" onclick="iframeSubmit();" value="Form提交"/>
 43     </form>
 44     <div id="preview"></div>
 45     <script src="/static/jquery-1.12.4.js"></script>
 46     <script>
 47
 48         $('#ifm1').load(function () {
 49             var text = $("#ifm1").contents().find('body').text();
 50             var obj = JSON.parse(text);
 51             console.log(obj);
 52         });
 53 {#    function iframeSubmit(){#}
 54 {#        $('#ifm1').load(function () {#}
 55 {#            var text = $("#ifm1").contents().find('body').text();#}
 56 {#            var obj = JSON.parse(text);#}
 57 {#            $('#preview').empty();#}
 58 {#            var imgTag = document.createElement('img');#}
 59 {#            imgTag.src = '/'+obj.data;#}
 60 {#            $('#preview').append(imgTag);#}
 61 {#        });#}
 62 {#    }#}
 63     function changeUpalod(){
 64         $('#ifm1').load(function(){
 65             var text = $('#ifm1').contents().find('body').text();
 66             var obj = JSON.parse(text);
 67
 68             $('#preview').empty();
 69             var imgTag = document.createElement('img');
 70             imgTag.src = "/" + obj.data;
 71             $('#preview').append(imgTag);
 72         });
 73         $('#form1').submit();
 74     }
 75
 76     <!--***********************************************************-->
 77
 78         function jQuerySubmit() {
 79             var file_obj = document.getElementById('fafa').files[0];
 80             var fd = new FormData();
 81             fd.append('fafafa',file_obj);
 82             $.ajax({
 83                 url: '/upload_file/',
 84                 type: 'POST',
 85                 data: fd,
 86                 processData: false,  // tell jQuery not to process the data
 87                 contentType: false,  // tell jQuery not to set contentType
 88                 success:function(arg,a1,a2){
 89                     console.log(arg);
 90                     console.log(a1);
 91                     console.log(a2);
 92             }
 93         })
 94         }
 95
 96
 97     <!--***********************************************************-->
 98
 99         function xhrSubmit() {
100             var file_obj = document.getElementById('fafa').files[0];   //获取文件对象
101             var fd = new FormData();
102             fd.append('fafafa',file_obj);
103             var xhr = new XMLHttpRequest();
104             xhr.open('post','/upload_file/',true);
105             xhr.onreadystatechange = function () {
106                 if(xhr.readyState == 4){
107                     var obj = JSON.parse(xhr.responseText);
108                     console.log(obj)
109                 }
110             };
111             xhr.send(fd);
112
113         }
114     </script>
115 </body>
116 </html>
views.py
 1 def ajax_upload(request):
 2     return render(request,'ajax_upload.html')
 3
 4
 5 def upload_file(request):
 6     fafafa = request.FILES.get('fafafa')
 7     import os
 8     img_path = os.path.join('static/imgs/',fafafa.name)
 9     with open(img_path,'wb') as f:
10         for item in fafafa.chunks():
11             f.write(item)
12     ret = {'code':True,'data':img_path}
13     import json
14     return HttpResponse(json.dumps(ret))
验证码:
  1 #!/usr/bin/env python
  2 # -*- coding:utf-8 -*-
  3
  4 import random
  5 from PIL import Image, ImageDraw, ImageFont, ImageFilter
  6
  7 _letter_cases = "abcdefghjkmnpqrstuvwxy"  # 小写字母,去除可能干扰的i,l,o,z
  8 _upper_cases = _letter_cases.upper()  # 大写字母
  9 _numbers = ''.join(map(str, range(3, 10)))  # 数字
 10 init_chars = ''.join((_letter_cases, _upper_cases, _numbers))
 11
 12
 13 def create_validate_code(size=(120, 30),
 14                          chars=init_chars,
 15                          img_type="GIF",
 16                          mode="RGB",
 17                          bg_color=(255, 255, 255),
 18                          fg_color=(0, 0, 255),
 19                          font_size=18,
 20                          font_type="Monaco.ttf",
 21                          length=4,
 22                          draw_lines=True,
 23                          n_line=(1, 2),
 24                          draw_points=True,
 25                          point_chance=2):
 26     """
 27     @todo: 生成验证码图片
 28     @param size: 图片的大小,格式(宽,高),默认为(120, 30)
 29     @param chars: 允许的字符集合,格式字符串
 30     @param img_type: 图片保存的格式,默认为GIF,可选的为GIF,JPEG,TIFF,PNG
 31     @param mode: 图片模式,默认为RGB
 32     @param bg_color: 背景颜色,默认为白色
 33     @param fg_color: 前景色,验证码字符颜色,默认为蓝色#0000FF
 34     @param font_size: 验证码字体大小
 35     @param font_type: 验证码字体,默认为 ae_AlArabiya.ttf
 36     @param length: 验证码字符个数
 37     @param draw_lines: 是否划干扰线
 38     @param n_lines: 干扰线的条数范围,格式元组,默认为(1, 2),只有draw_lines为True时有效
 39     @param draw_points: 是否画干扰点
 40     @param point_chance: 干扰点出现的概率,大小范围[0, 100]
 41     @return: [0]: PIL Image实例
 42     @return: [1]: 验证码图片中的字符串
 43     """
 44
 45     width, height = size  # 宽高
 46     # 创建图形
 47     img = Image.new(mode, size, bg_color)
 48     draw = ImageDraw.Draw(img)  # 创建画笔
 49
 50     def get_chars():
 51         """生成给定长度的字符串,返回列表格式"""
 52         return random.sample(chars, length)
 53
 54     def create_lines():
 55         """绘制干扰线"""
 56         line_num = random.randint(*n_line)  # 干扰线条数
 57
 58         for i in range(line_num):
 59             # 起始点
 60             begin = (random.randint(0, size[0]), random.randint(0, size[1]))
 61             # 结束点
 62             end = (random.randint(0, size[0]), random.randint(0, size[1]))
 63             draw.line([begin, end], fill=(0, 0, 0))
 64
 65     def create_points():
 66         """绘制干扰点"""
 67         chance = min(100, max(0, int(point_chance)))  # 大小限制在[0, 100]
 68
 69         for w in range(width):
 70             for h in range(height):
 71                 tmp = random.randint(0, 100)
 72                 if tmp > 100 - chance:
 73                     draw.point((w, h), fill=(0, 0, 0))
 74
 75     def create_strs():
 76         """绘制验证码字符"""
 77         c_chars = get_chars()
 78         strs = ' %s ' % ' '.join(c_chars)  # 每个字符前后以空格隔开
 79
 80         font = ImageFont.truetype(font_type, font_size)
 81         font_width, font_height = font.getsize(strs)
 82
 83         draw.text(((width - font_width) / 3, (height - font_height) / 3),
 84                   strs, font=font, fill=fg_color)
 85
 86         return ''.join(c_chars)
 87
 88     if draw_lines:
 89         create_lines()
 90     if draw_points:
 91         create_points()
 92     strs = create_strs()
 93
 94     # 图形扭曲参数
 95     params = [1 - float(random.randint(1, 2)) / 100,
 96               0,
 97               0,
 98               0,
 99               1 - float(random.randint(1, 10)) / 100,
100               float(random.randint(1, 2)) / 500,
101               0.001,
102               float(random.randint(1, 2)) / 500
103               ]
104     img = img.transform(size, Image.PERSPECTIVE, params)  # 创建扭曲
105
106     img = img.filter(ImageFilter.EDGE_ENHANCE_MORE)  # 滤镜,边界加强(阈值更大)
107
108     return img, strs