spring整合JDBC
spring提供了很多模板整合Dao技术
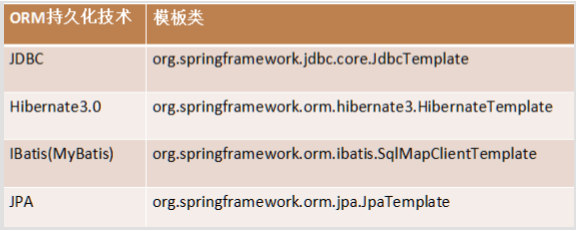
其中JdbcTemplate封装了JDBC技术,其与DBUtils中的QueryRunner非常相似.
与Web结合步骤:
1、导包
4+2
spring-test
spring-aop
junit4类库
c3p0连接池
JDBC驱动
spring-jdbc
spring-tx事务
2、书写Dao
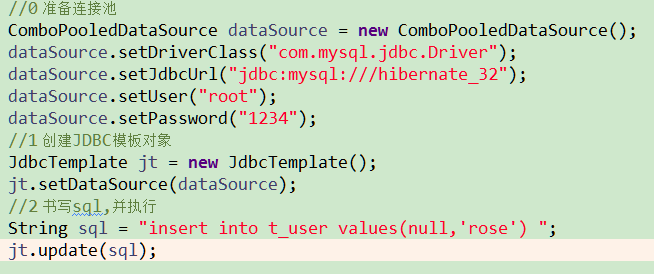
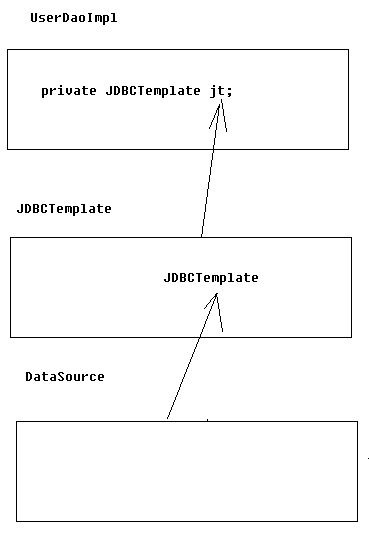
获取JdbcTemplate对象的方法
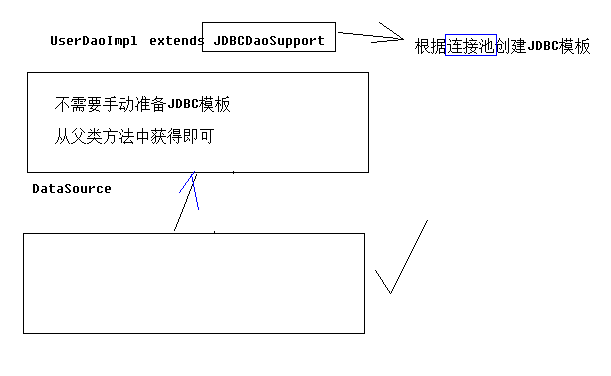
方式一:
继承JdbcDaoSupport类,使用super.getJdbcTemplate()获取
方式二:
定义private JdbcTemplate jt;字段,然后提供set方法,由Spring帮忙注入
public class UserDaoImpl extends JdbcDaoSupport implements UserDao{

//    private JdbcTemplate jt;

//    public void setJt(JdbcTemplate jt) {
//        this.jt = jt;
//    }

    @Override
    public void save(User u) {

        String sql = "insert into user values (null,?) ";
        super.getJdbcTemplate().update(sql,u.getName());

    }

    @Override
    public void delete(Integer id) {
        String sql = "delete from user where id=?";
        super.getJdbcTemplate().update(sql,id);

    }

    @Override
    public void update(User u) {
        String sql = "update user set name=? where id=?";
        super.getJdbcTemplate().update(sql,u.getName(),u.getId());

    }

    @Override
    public User getById(Integer id) {
        String sql = "select * from user where id=?";
        User u = super.getJdbcTemplate().queryForObject(sql, new RowMapper<User>() {
            @Override
            public User mapRow(ResultSet resultSet, int i) throws SQLException {
                User u = new User();
                u.setId(resultSet.getInt("id"));
                u.setName(resultSet.getString("name"));
                return u;
            }
        }, id);

        return u;
    }


    @Override
    public int getTotalCount() {
        String sql = "select count(*) from user";
        Integer count = super.getJdbcTemplate().queryForObject(sql, Integer.class);

        return count;
    }

    @Override
    public List<User> getAll() {
        String sql = "select * from user";
        List<User> list = super.getJdbcTemplate().query(sql, new RowMapper<User>() {

            @Override
            public User mapRow(ResultSet resultSet, int i) throws SQLException {
                User u = new User();
                u.setId(resultSet.getInt("id"));
                u.setName(resultSet.getString("name"));
                return u;
            }
        });

        return list;
    }
}
3、书写配置文件
方式一:
<!--1.创建连接池对象-->
<bean name="dataSource" class="com.mchange.v2.c3p0.ComboPooledDataSource">
    <property name="DriverClass" value="com.mysql.jdbc.Driver"></property>
    <property name="JdbcUrl" value="jdbc:mysql:///xingedb"></property>
    <property name="User" value="root"></property>
    <property name="Password" value="710130520a"></property>
</bean>
<!--2.将UserDaoImpl放入Spring容器中,由于继承了JdbcDaoSupport类,所以要注入连接池对象-->
<bean name="dao" class="cn.x5456.JDBC.impl.UserDaoImpl">
    <property name="dataSource" ref="dataSource"></property>
</bean>
方式二:
<!--1.创建连接池对象-->
<bean name="dataSource" class="com.mchange.v2.c3p0.ComboPooledDataSource">
    <property name="DriverClass" value="com.mysql.jdbc.Driver"></property>
    <property name="JdbcUrl" value="jdbc:mysql:///xingedb"></property>
    <property name="User" value="root"></property>
    <property name="Password" value="710130520a"></property>
</bean>
<!--2.创建JDBC模板对象,并加入连接池对象-->
<bean name="jt" class="org.springframework.jdbc.core.JdbcTemplate">
    <property name="dataSource" ref="dataSource"></property>
</bean>
<!--3.创建UserDaoImpl对象,将JDBC模板对象加入其中-->
<bean name="dao" class="cn.x5456.JDBC.impl.UserDaoImpl">
    <property name="jt" ref="jt"></property>
</bean>
Spring中Xml配置文件读取外部Properties配置
db.properties
#加一个(任意)前缀,防止与关键字冲突
jdbc.jdbcUrl=jdbc:mysql:///xingedb
jdbc.driverClass=com.mysql.jdbc.Driver
jdbc.user=root
jdbc.password=710130520a
.xml
<!-- 指定spring读取db.properties配置 -->
<context:property-placeholder location="classpath:db.properties"  />

<!-- 1.将连接池放入spring容器 -->
<!-- 使用${}读取配置文件中的信息-->
<bean name="dataSource" class="com.mchange.v2.c3p0.ComboPooledDataSource" >
	<property name="jdbcUrl" value="${jdbc.jdbcUrl}" ></property>
	<property name="driverClass" value="${jdbc.driverClass}" ></property>
	<property name="user" value="${jdbc.user}" ></property>
	<property name="password" value="${jdbc.password}" ></property>
</bean>
spring中aop事务
事务操作实际上就是:打开事务,提交事务,回滚事务三种
因为在不同平台,操作事务的代码各不相同,spring提供了一个接口:
PlatformTransactionManager接口
|-DataSourceTransactionManager 操作JDBC
|-HibernateTransitionmanager 操作Hibernate
注意:在spring中玩事务管理,最为核心的对象就是TransactionManager对象
spring管理事务的属性介绍
1)事务的隔离级别:
- 1 读未提交
- 2 读已提交
- 4 可重复读
- 8 串行化
2)是否只读:
- true 只读
- false 可操作
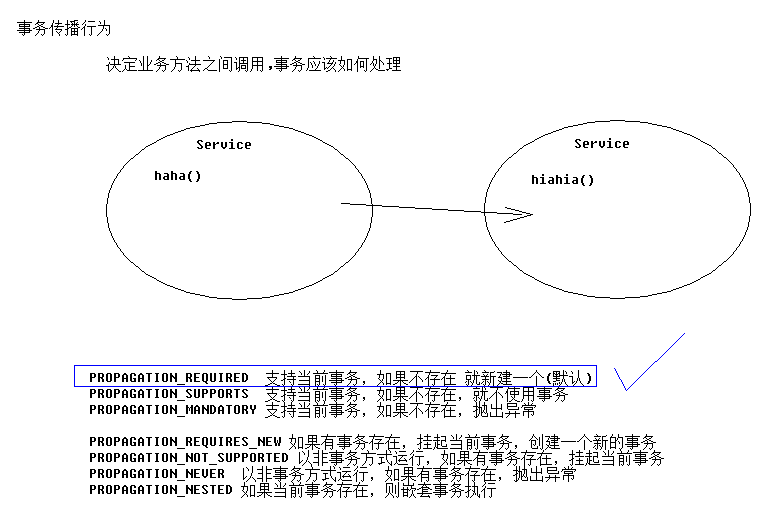
3)事务的传播行为:
AOP管理事务——XML配置文件
1、导包
4+2
aop
aspectaop联盟
weaving织入包
2、导入新的约束(tx)
<?xml version="1.0" encoding="UTF-8"?>
<beans xmlns:xsi="http://www.w3.org/2001/XMLSchema-instance"
xmlns="http://www.springframework.org/schema/beans" <!--beans:最基本-->
xmlns:context="http://www.springframework.org/schema/context" <!--context:读取properties配置+扫描注解-->
xmlns:aop="http://www.springframework.org/schema/aop" <!--aop:配置AOP-->
xmlns:tx="http://www.springframework.org/schema/tx" <!--tx:配置事务-->
xsi:schemaLocation="http://www.springframework.org/schema/beans http://www.springframework.org/schema/beans/spring-beans-4.2.xsd http://www.springframework.org/schema/context http://www.springframework.org/schema/context/spring-context-4.2.xsd http://www.springframework.org/schema/aop http://www.springframework.org/schema/aop/spring-aop-4.2.xsd http://www.springframework.org/schema/tx http://www.springframework.org/schema/tx/spring-tx-4.2.xsd ">
3、配置文件
<?xml version="1.0" encoding="UTF-8"?>
<beans xmlns:xsi="http://www.w3.org/2001/XMLSchema-instance"
xmlns="http://www.springframework.org/schema/beans"
xmlns:context="http://www.springframework.org/schema/context"
xmlns:aop="http://www.springframework.org/schema/aop"
xmlns:tx="http://www.springframework.org/schema/tx"
xsi:schemaLocation="http://www.springframework.org/schema/beans http://www.springframework.org/schema/beans/spring-beans-4.2.xsd http://www.springframework.org/schema/context http://www.springframework.org/schema/context/spring-context-4.2.xsd http://www.springframework.org/schema/aop http://www.springframework.org/schema/aop/spring-aop-4.2.xsd http://www.springframework.org/schema/tx http://www.springframework.org/schema/tx/spring-tx-4.2.xsd ">
<!--1.配置读取properties文件-->
<context:property-placeholder location="db.properties"></context:property-placeholder>
<!--2.配置连接池-->
<bean name="dataSource" class="com.mchange.v2.c3p0.ComboPooledDataSource">
<property name="DriverClass" value="${jdbc.driverClass}"></property>
<property name="JdbcUrl" value="${jdbc.jdbcUrl}"></property>
<property name="User" value="${jdbc.user}"></property>
<property name="Password" value="${jdbc.password}"></property>
</bean>
<!--3.配置目标对象accountService-->
<!--1 配置Dao-->
<bean name="accountDao" class="cn.x5456.dao.AccountDaoImpl" >
<property name="dataSource" ref="dataSource" ></property>
</bean>
<!-- 2 配置Service,将Dao注入-->
<bean name="accountService" class="cn.x5456.service.AccountServiceImpl" >
<property name="ad" ref="accountDao" ></property>
</bean>
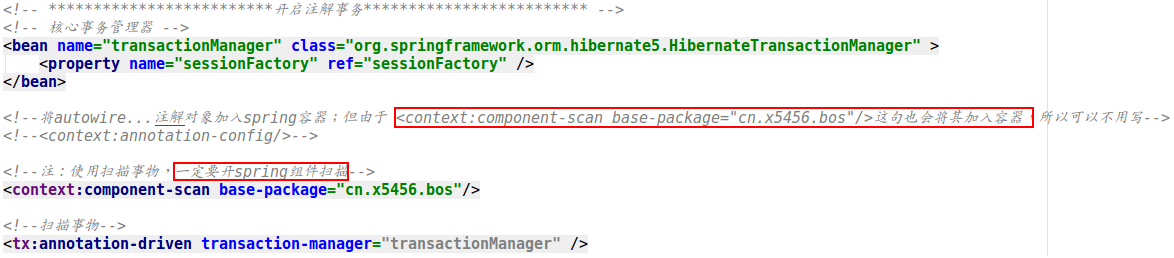
<!-- 4.配置事务核心管理器,封装了所有事务操作. 依赖于连接池 -->
<bean name="transactionManager" class="org.springframework.jdbc.datasource.DataSourceTransactionManager" >
<property name="dataSource" ref="dataSource" ></property>
</bean>
<!--5.配置(官方给好的)事务通知-->
<tx:advice id="txAdvice" transaction-manager="transactionManager" >
<tx:attributes>
<tx:method name="transfer" isolation="REPEATABLE_READ" propagation="REQUIRED" read-only="false" />
</tx:attributes>
</tx:advice>
<!--6.织入-->
<aop:config>
<!--1 配置织入点-->
<aop:pointcut id="txPc" expression="execution(* cn.x5456.service.*ServiceImpl.*(..))"></aop:pointcut>
<!--2 直接用别人写好的通知,可以直接使用aop:advisor进行配置-->
<aop:advisor advice-ref="txAdvice" pointcut-ref="txPc"></aop:advisor>
</aop:config>


 1 //@Transactional(isolation=Isolation.REPEATABLE_READ,propagation=Propagation.REQUIRED,readOnly=true)
 2 public class AccountServiceImpl implements AccountService {
 3
 4     private AccountDao ad ;
 5
 6     //@Transactional(isolation=Isolation.REPEATABLE_READ,propagation=Propagation.REQUIRED,readOnly=false)
 7     public void transfer(final Integer from,final Integer to,final Double money) {
 8         //减钱
 9         ad.decreaseMoney(from, money);
10 //        int i = 1/0;
11         //加钱
12         ad.increaseMoney(to, money);
13     }
14
15
16     public void setAd(AccountDao ad) {
17         this.ad = ad;
18     }
19
20 }
 1 public class AccountDaoImpl extends JdbcDaoSupport implements AccountDao  {
 2
 3     @Override
 4     public void increaseMoney(Integer id, Double money) {
 5
 6         getJdbcTemplate().update("update t_account set money = money+? where id = ? ", money,id);
 7
 8     }
 9
10     @Override
11     public void decreaseMoney(Integer id, Double money) {
12
13         getJdbcTemplate().update("update t_account set money = money-? where id = ? ", money,id);
14     }
15
16 }
 1 @RunWith(SpringJUnit4ClassRunner.class)
 2 @ContextConfiguration("classpath:spring-config.xml")
 3 public class demo {
 4
 5     @Resource(name = "accountService")
 6     private AccountService service;
 7
 8     @Test
 9     public void func(){
10         service.transfer(1,2,100d);
11     }
12 }
AOP管理事务——注解配置
注解配置文件
<?xml version="1.0" encoding="UTF-8"?>
<beans xmlns:xsi="http://www.w3.org/2001/XMLSchema-instance"
       xmlns="http://www.springframework.org/schema/beans"
       xmlns:context="http://www.springframework.org/schema/context"
       xmlns:aop="http://www.springframework.org/schema/aop"
       xmlns:tx="http://www.springframework.org/schema/tx"
       xsi:schemaLocation="http://www.springframework.org/schema/beans http://www.springframework.org/schema/beans/spring-beans-4.2.xsd http://www.springframework.org/schema/context http://www.springframework.org/schema/context/spring-context-4.2.xsd http://www.springframework.org/schema/aop http://www.springframework.org/schema/aop/spring-aop-4.2.xsd http://www.springframework.org/schema/tx http://www.springframework.org/schema/tx/spring-tx-4.2.xsd ">


    <!--1.配置读取properties文件-->
    <context:property-placeholder location="db.properties"></context:property-placeholder>

    <!--2.配置连接池-->
    <bean name="dataSource" class="com.mchange.v2.c3p0.ComboPooledDataSource">
        <property name="DriverClass" value="${jdbc.driverClass}"></property>
        <property name="JdbcUrl" value="${jdbc.jdbcUrl}"></property>
        <property name="User" value="${jdbc.user}"></property>
        <property name="Password" value="${jdbc.password}"></property>
    </bean>

    <!--3.配置目标对象accountService-->
        <!--1 配置Dao-->
    <bean name="accountDao" class="cn.x5456.dao.AccountDaoImpl" >
        <property name="dataSource" ref="dataSource" ></property>
    </bean>
        <!-- 2 配置Service,将Dao注入-->
    <bean name="accountService" class="cn.x5456.service.AccountServiceImpl" >
        <property name="ad" ref="accountDao" ></property>
    </bean>

    <!-- 4.配置事务核心管理器,封装了所有事务操作. 依赖于连接池 -->
    <bean name="transactionManager" class="org.springframework.jdbc.datasource.DataSourceTransactionManager" >
        <property name="dataSource" ref="dataSource" ></property>
    </bean>

    <!-- 5.开启使用注解管理aop事务 -->
    <tx:annotation-driven/>