/*
* Android开发之PopupWindow
*
* Created on: 2011-8-8
* Author: blueeagle
* Email: liujiaxiang@gmail.com
*/
聪明的人善于总结,记录,不知道这是谁说的了,反正要当一个聪明人,我得先学会总结,记录。最近在Android的学习过程中,发现 PopupWindow也是值得研究一番的一个东东,因此拿过来说道说道。与其相似的就归纳到一起说道吧,那就是AlertDialog和Toast。
PopupWindow
java.lang.Object
↳ android.widget.PopupWindow
手册中,对PopupWindow的描述是这样的:它是一个弹出的窗口,可以用来显示一个任意的视图。弹出窗口是当前活动上出现一个浮动容器。
PopupWindow的性质,其实就是我们通常所说的“模态对话框”。只有在其退出之后,才可以进行外部线程的操作。下面对其进行详细说明。
简单的PopupWindow
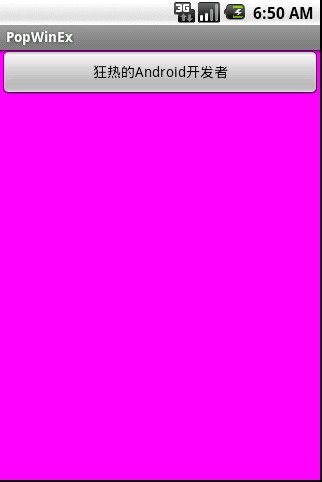

如图所示,通过主Activity中的一个按钮来触发弹出窗口操作。这个窗口什么都不干,就是显示一句话:“狂热的Android开发者”。为了增加可见性,我设置了不同的背景色加以区分。
源码如下:
- /*
- * Android开发之PopupWindow、AlertDialog和Toast
- * PopWinEx.java
- * Created on: 2011-8-8
- * Author: blueeagle
- * Email: liujiaxiang@gmail.com
- */
- package com.blueeagle;
- import android.app.Activity;
- import android.os.Bundle;
- import android.view.View;
- import android.widget.Button;
- import android.widget.PopupWindow;
- public class PopWinEx extends Activity {
- /** Called when the activity is first created. */
- Button MyButton;
- PopupWindow pw;
- View myView;
- @Override
- public void onCreate(Bundle savedInstanceState) {
- super.onCreate(savedInstanceState);
- setContentView(R.layout.main);
- MyButton = (Button)findViewById(R.id.myButton);
- MyButton.setOnClickListener(new Button.OnClickListener(){
- @Override
- public void onClick(View v) {
- // TODO Auto-generated method stub
- myView = getLayoutInflater().inflate(R.layout.pop,null);
- pw = new PopupWindow(myView,500,200,true);
- pw.showAsDropDown(MyButton);
- }
- });
- }
- }
我们给PopupWindow和主界面,分别定义一个layout。对应的XML文件如下:
- pop.xml
- <?xml version="1.0" encoding="utf-8"?>
- <LinearLayout xmlns:android="http://schemas.android.com/apk/res/android"
- android:orientation="vertical"
- android:layout_width="fill_parent"
- android:layout_height="fill_parent"
- android:background="#ffff00"
- >
- <TextView
- android:id="@+id/mytextview"
- android:layout_width="fill_parent"
- android:layout_height="wrap_content"
- android:text="@string/hello"
- />
- </LinearLayout>
- main.xml
- <?xml version="1.0" encoding="utf-8"?>
- <LinearLayout xmlns:android="http://schemas.android.com/apk/res/android"
- android:orientation="vertical"
- android:layout_width="fill_parent"
- android:layout_height="fill_parent"
- android:background="#ff00ff"
- >
- <Button
- android:id="@+id/myButton"
- android:layout_width="fill_parent"
- android:layout_height="wrap_content"
- android:text="@string/hello"
- />
- </LinearLayout>
说明:这里值得注意的是,我们要给弹出窗口设置焦点,pw = new PopupWindow(myView,500,200,true);这句中的true表示弹出窗口可以获得焦点。如果弹出窗口没有获得焦点的时候,不断点击按钮的,最终程序将退出,这时是因为内存耗尽的原因,可以通过查看log得到。
有一定布局的PopupWindow
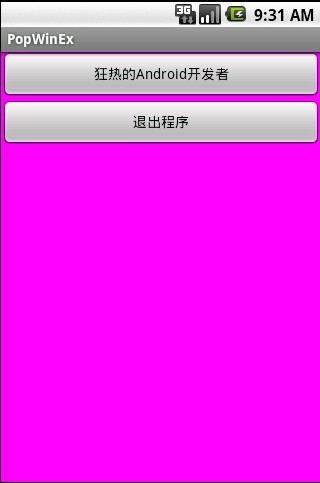
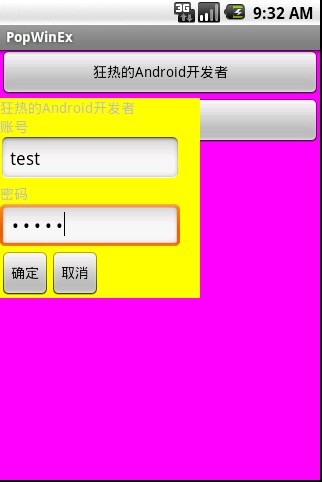

如图所示,同样是通过主Activity中的一个按钮来触发弹出窗口操作。但是现在这个弹出窗口可以进行一些操作,因为其具有了一定的布局,目前我们暂且其可以进行的操作为:
1. 可编辑功能
2. 可传递信息
3. 弹出窗口上再次弹出窗口
4. 可以取消当前弹出窗口
为了增加可见性,我依然设置了不同的背景色加以区分。
源码如下:
- /*
- * Android开发之PopupWindow、AlertDialog和Toast
- * PopWinEx.java
- * Created on: 2011-8-9
- * Author: blueeagle
- * Email: liujiaxiang@gmail.com
- */
- package com.blueeagle;
- import android.app.Activity;
- import android.app.AlertDialog;
- import android.content.Context;
- import android.os.Bundle;
- import android.view.Gravity;
- import android.view.LayoutInflater;
- import android.view.View;
- import android.view.View.OnClickListener;
- import android.widget.Button;
- import android.widget.EditText;
- import android.widget.PopupWindow;
- import android.widget.TextView;
- public class PopWinEx extends Activity {
- /** Called when the activity is first created. */
- Button MyButton;
- Button MyExit;
- @Override
- public void onCreate(Bundle savedInstanceState) {
- super.onCreate(savedInstanceState);
- setContentView(R.layout.main);
- MyButton = (Button)findViewById(R.id.myButton);
- MyExit = (Button)findViewById(R.id.myExit);
- MyButton.setOnClickListener(new clickEvent());
- MyExit.setOnClickListener(new ExitEvent());
- }
- class clickEvent implements OnClickListener {
- @Override
- public void onClick(View v) {
- // TODO Auto-generated method stub
- if(v==MyButton) {
- showPopWindow(PopWinEx.this,MyButton);
- }
- }
- }
- class ExitEvent implements OnClickListener {
- @Override
- public void onClick(View v) {
- // TODO Auto-generated method stub
- if(v==MyExit) {
- finish();
- }
- }
- }
- private void showPopWindow(Context context, View parent) {
- // TODO Auto-generated method stub
- final PopupWindow pw;
- View myView;
- LayoutInflater inflater = (LayoutInflater)context.getSystemService(Context.LAYOUT_INFLATER_SERVICE);
- myView = inflater.inflate(R.layout.pop, null);
- Button pop_OK = (Button)myView.findViewById(R.id.button_ok);
- Button pop_Cancel = (Button)myView.findViewById(R.id.button_cancel);
- final EditText pop_User = (EditText)myView.findViewById(R.id.edittext);
- final EditText pop_Password = (EditText)myView.findViewById(R.id.password);
- pw = new PopupWindow(myView,500,200,true);
- pop_OK.setOnClickListener(new OnClickListener(){
- @Override
- public void onClick(View v) {
- showPop_PopWindow();
- // TODO Auto-generated method stub
- }
- private void showPop_PopWindow() {
- // TODO Auto-generated method stub
- View myView1;
- myView1 = getLayoutInflater().inflate(R.layout.pop1,null);
- TextView User_Is = (TextView)myView1.findViewById(R.id.useris);
- TextView Password_Is = (TextView)myView1.findViewById(R.id.passwordis);
- User_Is.setText(pop_User.getText().toString());
- Password_Is.setText(pop_Password.getText().toString());
- final PopupWindow pw_pw;
- pw_pw = new PopupWindow(myView1,500,200,true);
- Button pop_pop_OK = (Button)myView1.findViewById(R.id.button_ok1);
- Button pop_pop_Cancel = (Button)myView1.findViewById(R.id.button_cancel1);
- pop_pop_Cancel.setOnClickListener(new OnClickListener(){
- @Override
- public void onClick(View v) {
- pw_pw.dismiss();//
- }
- });
- pop_pop_OK.setOnClickListener(new OnClickListener(){
- @Override
- public void onClick(View v) {
- AlertDialog.Builder my_ADialog =new AlertDialog.Builder(PopWinEx.this);
- my_ADialog.setTitle("我是弹出对话框的弹出对话框");
- my_ADialog.setMessage("怎么样?学会了吗?");
- my_ADialog.show();
- }
- });
- pw_pw.showAtLocation(myView1.findViewById(R.id.button_ok1), Gravity.CENTER, 200, 200);
- }
- });
- pop_Cancel.setOnClickListener(new OnClickListener(){
- @Override
- public void onClick(View v) {
- pw.dismiss();//
- }
- });
- pw.showAsDropDown(MyButton);
- }
- }
我们给PopupWindow,弹出窗口的弹出窗口和主界面,分别定义一个layout。对应的XML文件如下:
- main.xml
- <?xml version="1.0" encoding="utf-8"?>
- <LinearLayout xmlns:android="http://schemas.android.com/apk/res/android"
- android:orientation="vertical"
- android:layout_width="fill_parent"
- android:layout_height="fill_parent"
- android:background="#ff00ff"
- >
- <Button
- android:id="@+id/myButton"
- android:layout_width="fill_parent"
- android:layout_height="wrap_content"
- android:text="@string/hello"
- />
- <Button
- android:id="@+id/myExit"
- android:layout_width="fill_parent"
- android:layout_height="wrap_content"
- android:text="退出程序"
- />
- </LinearLayout>
- pop1.xml
- <?xml version="1.0" encoding="utf-8"?>
- <LinearLayout xmlns:android="http://schemas.android.com/apk/res/android"
- android:orientation="vertical"
- android:layout_width="fill_parent"
- android:layout_height="fill_parent"
- android:background="#ffff00"
- >
- <TextView
- android:id="@+id/mytextview"
- android:layout_width="wrap_content"
- android:layout_height="wrap_content"
- android:text="@string/hello"
- />
- <TextView
- android:text="您输入的账号是:"
- android:layout_width="180dip"
- android:layout_height="wrap_content"
- />
- <TextView
- android:id="@+id/useris"
- android:layout_width="wrap_content"
- android:layout_height="wrap_content"
- />
- <TextView
- android:text="您输入的密码是:"
- android:layout_width="180dip"
- android:layout_height="wrap_content"
- />
- <TextView
- android:id="@+id/passwordis"
- android:layout_width="wrap_content"
- android:layout_height="wrap_content"
- />
- <LinearLayout
- android:orientation="horizontal"
- android:layout_width="fill_parent"
- android:layout_height="fill_parent"
- android:background="#ffff00"
- >
- <Button
- android:id="@+id/button_ok1"
- android:layout_width="wrap_content"
- android:layout_height="wrap_content"
- android:text="确定"
- />
- <Button
- android:id="@+id/button_cancel1"
- android:layout_width="wrap_content"
- android:layout_height="wrap_content"
- android:text="取消"
- />
- </LinearLayout>
- </LinearLayout>
- pop.xml
- <?xml version="1.0" encoding="utf-8"?>
- <LinearLayout xmlns:android="http://schemas.android.com/apk/res/android"
- android:orientation="vertical"
- android:layout_width="fill_parent"
- android:layout_height="fill_parent"
- android:background="#ffff00"
- >
- <TextView
- android:id="@+id/mytextview"
- android:layout_width="wrap_content"
- android:layout_height="wrap_content"
- android:text="@string/hello"
- />
- <TextView
- android:id="@+id/mytextview"
- android:layout_width="wrap_content"
- android:layout_height="wrap_content"
- android:text="账号"
- />
- <EditText
- android:id="@+id/edittext"
- android:layout_width="180dip"
- android:layout_height="wrap_content"
- />
- <TextView
- android:layout_width="wrap_content"
- android:layout_height="wrap_content"
- android:text="密码"
- />
- <EditText
- android:id="@+id/password"
- android:layout_width="180dip"
- android:layout_height="wrap_content"
- android:password="true"
- />
- <LinearLayout
- android:orientation="horizontal"
- android:layout_width="fill_parent"
- android:layout_height="fill_parent"
- android:background="#ffff00"
- >
- <Button
- android:id="@+id/button_ok"
- android:layout_width="wrap_content"
- android:layout_height="wrap_content"
- android:text="确定"
- />
- <Button
- android:id="@+id/button_cancel"
- android:layout_width="wrap_content"
- android:layout_height="wrap_content"
- android:text="取消"
- />
- </LinearLayout>
- </LinearLayout>
说明:这里值得注意的是,弹出窗口上再次弹出窗口需要将调用findViewById函数的视图明确。然后将相应的变量设置成final类型。弹出窗口其实是一个View,这个View需要用 LayoutInflater inflater = (LayoutInflater)context.getSystemService(Context.LAYOUT_INFLATER_SERVICE);
myView = inflater.inflate(R.layout.pop, null);来进行索引。找到相应的xml布局文件,来安排弹出窗口是什么样的。当然,在实际开发中,可能会遇见没有xml布局文件的View,这怎么办呢?直接new出来就可以了,比如:
mView = new PopView(mContext, 800, 400);
PopupWindow pw= new PopupWindow(mView,800,400,true);
这里我没有对string做特别的处理,因为时间比较紧张。这并不是一个好的编程习惯。希望大家把语言类的东西都放在string里去,不要硬写在程序代码里。
PopupWindow的特殊效果

PopupWindow的效果可以做的很炫,可以有边框,圆角,透明,渐变色,动画等。下面逐一来实现。
比如我要在上面的例子中实现这些操作,即可添加一个语句:
myView.setBackgroundResource(R.drawable.round_win);
当然,最主要的就是round_win.xml里面所写的内容了:
- round_win.xml
- <?xml version="1.0" encoding="utf-8"?>
- <shape xmlns:android="http://schemas.android.com/apk/res/android"
- android:shape="rectangle">
- <gradient android:startColor="#e0000fff" android:endColor="#e000ff00"
- android:angle="90" /><!--背景颜色渐变 -->
- <stroke android:dashWidth="2dp" android:dashGap="2dp"
- android:width="2dp" android:color="#ff0000"></stroke>
- <!--描边 -->
- <corners android:bottomRightRadius="5dp"
- android:bottomLeftRadius="5dp" android:topLeftRadius="5dp"
- android:topRightRadius="5dp" /><!--设置圆角-->
- </shape>
当然,最主要的就是round_win.xml里面所写的内容了。对于上面,这条 shape 的定义,分别为渐变,在gradient 中startColor属性为开始的颜色,endColor 为渐变结束的颜色,下面的 angle 是角度。接下来是 stroke可以理解为边缘,dashWidth 表示宽度,dashGap 表示断续;corners 为拐角这里radius 属性为半径,最后是相对位置属性 padding。
android:color 是一个16 进制颜色。这个颜色由RGB 值指定,可带Alpha 。必须以“# ”开头,后面跟随Alpha-Red-Green-Blue。Alpha表示的是透明度,0为全透明,ff为全不透明。
以上完成了弹出窗口的边框,渐变色,透明,圆角等操作。
下面进行有意思的动画操作。
先设置一下弹出窗口的进入和退出的xml文件。首先要在res目录下建立文件夹anim,里面建立动画描述文件。如下所示:
- ani_in.xml
- <?xml version="1.0" encoding="utf-8"?>
- <set xmlns:android="http://schemas.android.com/apk/res/android">
- <translate android:interpolator="@android:anim/accelerate_decelerate_interpolator"
- android:fromYDelta="-100"
- android:toYDelta="0"
- android:duration="1000"
- android:fillEnabled="true"
- android:fillAfter="true"
- />
- <scale android:fromXScale="0.6" android:toXScale="1.0"
- android:fromYScale="0.6" android:toYScale="1.0" android:pivotX="50%"
- android:pivotY="50%" android:duration="2000" />
- <alpha android:interpolator="@android:anim/decelerate_interpolator"
- android:fromAlpha="0.0" android:toAlpha="1.0" android:duration="2000" />
- </set>
- ani_out.xml
- <?xml version="1.0" encoding="utf-8"?>
- <set xmlns:android="http://schemas.android.com/apk/res/android"
- android:oneshot="true"
- >
- <translate android:interpolator="@android:anim/accelerate_decelerate_interpolator"
- android:fromYDelta="0"
- android:toYDelta="-100"
- android:duration="1000"
- android:fillEnabled="true"
- android:fillAfter="true"
- />
- <scale android:fromXScale="1.0" android:toXScale="0.4"
- android:fromYScale="1.0" android:toYScale="0.4" android:pivotX="50%"
- android:pivotY="50%" android:duration="2000" />
- <alpha android:interpolator="@android:anim/decelerate_interpolator"
- android:fromAlpha="1.0"
- android:toAlpha="0.0"
- android:duration="2000"
- />
- </set>
在Values文件夹中建立style.xml文件如下:
style.xml
- <?xml version="1.0" encoding="utf-8"?>
- <resources>
- <style name="mytheme" parent="@android:style/Theme.Light">
- <item name="android:windowNoTitle"> true </item>
- </style>
- <style name="PopupAnimation" parent="android:Animation">
- <item name="android:windowEnterAnimation">@anim/ani_in</item>
- <item name="android:windowExitAnimation">@anim/ani_out</item>
- </style>
- </resources>
最后在Activity代码文件中加入:
pw.setAnimationStyle(R.style.PopupAnimation);
动画效果就出来了,怎么样?很炫吧- 上一篇半透明的Popupwindow
- 下一篇Android 滑动效果