转载自:http://www.cnblogs.com/crawl/p/7703679.html
前言:谈起操作数据库,大致可以分为几个阶段:首先是 JDBC 阶段,初学 JDBC 可能会使用原生的 JDBC 的 API,再然后可能会使用数据库连接池,比如:c3p0、dbcp,还有一些第三方工具,比如 dbutils 等,LZ为 JDBC 是贯穿始终的,即使到了框架部分,也会对 JDBC 进行整合,此阶段还是自己手写 SQL 语句;下一个阶段就是 Hibernate,大家体会到了操作数据库可以不用自己手动编写 SQL,调用 Hibernate 提供的 API 即可。今天给大家介绍的是操作数据库的另一个模块 JPA,即 Java 持久层的 API,JPA 如果与 SpringData 结合起来,会发出不一样的“化学反应”,大家拭目以待~
一、JPA 概述
1. Java Persistence API(Java 持久层 API):用于对象持久化的 API
2. 作用:使得应用程序以统一的方式访问持久层
3. 前言中提到了 Hibernate,那么JPA 与 Hibernate究竟是什么关系呢:
1)JPA 是 Hibernate 的一个抽象,就像 JDBC 和 JDBC 驱动的关系
2)JPA 是一种 ORM 规范,是 Hibernate 功能的一个子集 (既然 JPA 是规范,Hibernate 对 JPA 进行了扩展,那么说 JPA 是 Hibernate 的一个子集不为过)
3)Hibernate 是 JPA 的一个实现
4. JPA 包括三个方面的技术:
1)ORM 映射元数据,支持 XML 和 JDK 注解两种元数据的形式
2)JPA 的 API
3)查询语言:JPQL
本文也将详细介绍JPA ORM 映射元数据的注解方式和 JPA 的 API 以及 JPQL 三个方面
二、JPA 的 Helloworld
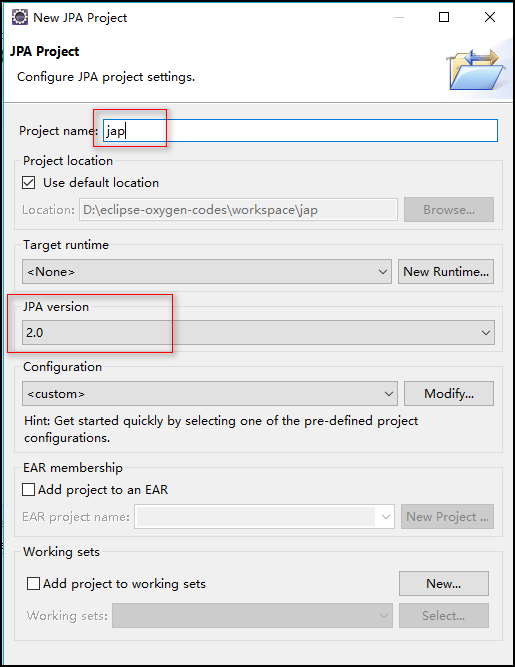
1.在 Eclipse 中创建 JPA 的工程:New ---> Project ---> JPA Project 输入工程名,选择版本为 2.0,点击 Next,
若是初次创建 JPA 的工程,可能会出错,提示必须有一个 user library,导致无法创建工厂,此问题的解决方案,LZ另开一个博客,手把手教你解决无法创建 JPA 工程的问题,大家可前去查看,在此不做赘述。

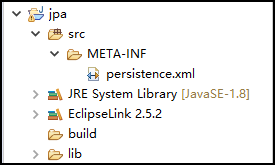
2.在当前工程下新建一个 lib 目录,用来存放各种 jar 包,此时工程的目录结构为:
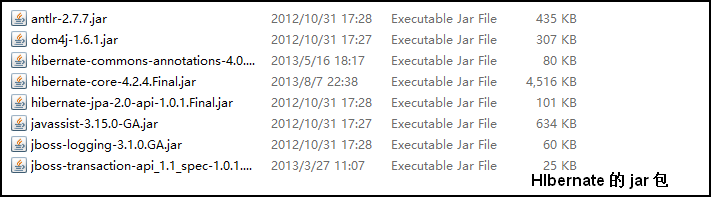
导入 hibernate 的 jar 包和 jpa 的jar包,注意:需要自己手动的 Build Path:

连接数据库,不要忘记添加 MySQL 的驱动。
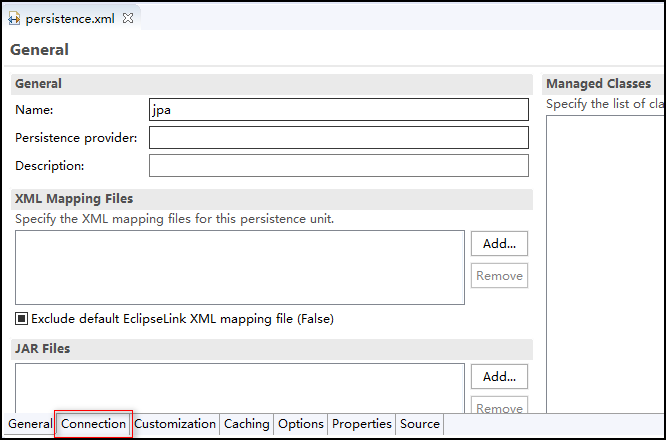
3. 大家会发现当我们创建好 jpa 的工程时在 src 的 META-INF 目录下自动生成了一个 persistence.xml 文件,我们的配置都编写在此文件中,接下来就在此文件中进行各种配置
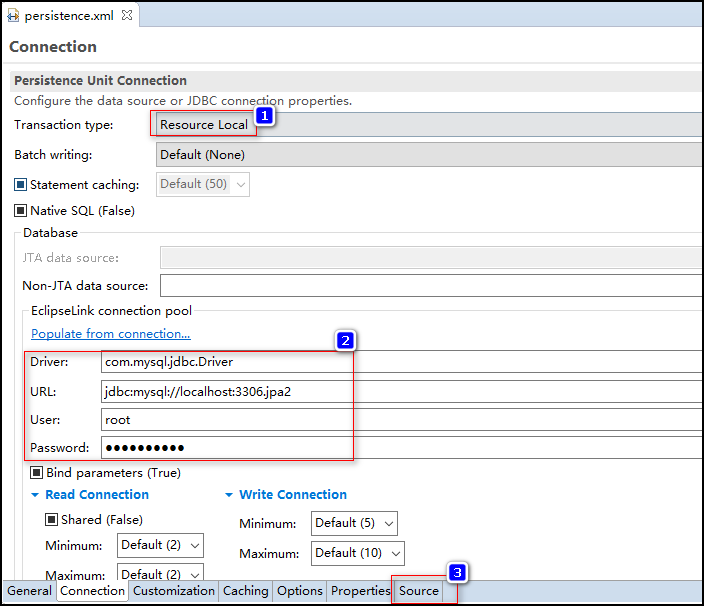
1)打开此文件,选择左下角的 Connection 选项,修改 Transaction Type 为 Resource Local,填写下方的 Driver、Url、User、Password 信息保存后,便会在左下角最后一个 Source 选项中自动生成数据库配置的基本信息 (lZ 创建的数据库为 jpa2)
2)其他配置(大家注意一点配置 ORM 产品时,要把 <provider> 节点放到 <provider> 节点上面,否则会出小红×):

 1 <?xml version="1.0" encoding="UTF-8"?>
 2 <persistence version="2.0"
 3     xmlns="http://java.sun.com/xml/ns/persistence" xmlns:xsi="http://www.w3.org/2001/XMLSchema-instance"
 4     xsi:schemaLocation="http://java.sun.com/xml/ns/persistence http://java.sun.com/xml/ns/persistence/persistence_2_0.xsd">
 5     <persistence-unit name="jpa" transaction-type="RESOURCE_LOCAL">
 6
 7         <!-- 使用什么 ORM 产品作为 JPA 的实现 -->
 8         <provider>org.hibernate.ejb.HibernatePersistence</provider>
 9
10         <properties>
11             <!-- 数据库连接的基本信息 -->
12             <property name="javax.persistence.jdbc.driver" value="com.mysql.jdbc.Driver" />
13             <property name="javax.persistence.jdbc.url" value="jdbc:mysql://localhost:3306/jpa2" />
14             <property name="javax.persistence.jdbc.user" value="root" />
15             <property name="javax.persistence.jdbc.password" value="qiqingqing" />
16             <!-- 配置 JPA 实现产品的基本属性,即 Hibernate 的基本属性 -->
17             <property name="hibernate.show_sql" value="true" />
18             <property name="hibernate.format_sql" value="true" />
19             <property name="hibernate.hbm2ddl.auto" value="update" />
20         </properties>
21
22     </persistence-unit>
23 </persistence>
3)创建持久化类 Customer,并为其添加 JPA 的注解,此时会有错误,原因是没有把 Customer 类添加到 persistence.xml 文件中,添加进去便没有了错误:
 1 package com.software.jpa.helloworld;
 2
 3 import javax.persistence.Column;
 4 import javax.persistence.Entity;
 5 import javax.persistence.GeneratedValue;
 6 import javax.persistence.GenerationType;
 7 import javax.persistence.Id;
 8 import javax.persistence.Table;
 9
10 @Table(name="JPA_CUSTOMERS")
11 @Entity
12 public class Customer {
13
14     private Integer id;
15
16     private String lastName;
17
18     private String email;
19
20     private Integer age;
21
22     @GeneratedValue(strategy=GenerationType.AUTO)
23     @Id
24     public Integer getId() {
25         return id;
26     }
27
28     public void setId(Integer id) {
29         this.id = id;
30     }
31
32     @Column(name="LAST_NAME")
33     public String getLastName() {
34         return lastName;
35     }
36
37     public void setLastName(String lastName) {
38         this.lastName = lastName;
39     }
40
41     public String getEmail() {
42         return email;
43     }
44
45     public void setEmail(String email) {
46         this.email = email;
47     }
48
49     public Integer getAge() {
50         return age;
51     }
52
53     public void setAge(Integer age) {
54         this.age = age;
55     }
56
57     @Override
58     public String toString() {
59         return "Customer [id=" + id + ", lastName=" + lastName + ", email=" + email + ", age=" + age + "]";
60     }
61
62 }
 1 <?xml version="1.0" encoding="UTF-8"?>
 2 <persistence version="2.0"
 3     xmlns="http://java.sun.com/xml/ns/persistence" xmlns:xsi="http://www.w3.org/2001/XMLSchema-instance"
 4     xsi:schemaLocation="http://java.sun.com/xml/ns/persistence http://java.sun.com/xml/ns/persistence/persistence_2_0.xsd">
 5     <persistence-unit name="jpa" transaction-type="RESOURCE_LOCAL">
 6
 7         <!-- 使用什么 ORM 产品作为 JPA 的实现 -->
 8         <provider>org.hibernate.ejb.HibernatePersistence</provider>
 9
10         <!-- 添加持久化类 -->
11         <class>com.software.jpa.helloworld.Customer</class>
12
13         <properties>
14             <!-- 数据库连接的基本信息 -->
15             <property name="javax.persistence.jdbc.driver" value="com.mysql.jdbc.Driver" />
16             <property name="javax.persistence.jdbc.url" value="jdbc:mysql://localhost:3306/jpa2" />
17             <property name="javax.persistence.jdbc.user" value="root" />
18             <property name="javax.persistence.jdbc.password" value="qiqingqing" />
19             <!-- 配置 JPA 实现产品的基本属性,即 Hibernate 的基本属性 -->
20             <property name="hibernate.show_sql" value="true" />
21             <property name="hibernate.format_sql" value="true" />
22             <property name="hibernate.hbm2ddl.auto" value="update" />
23         </properties>
24
25     </persistence-unit>
26 </persistence>
4)创建一个测试类进行测试,生成数据表,插入了数据,至此 JPA 的 Helloworld 完成。
 1 package com.software.jpa.helloworld;
 2
 3 import javax.persistence.EntityManager;
 4 import javax.persistence.EntityManagerFactory;
 5 import javax.persistence.EntityTransaction;
 6 import javax.persistence.Persistence;
 7
 8 public class Main {
 9
10     public static void main(String[] args) {
11
12         //1.创建 EntityManagerFactory
13         String persistenceUnitName = "jpa";
14         EntityManagerFactory entityManagerFactory = Persistence.createEntityManagerFactory(persistenceUnitName);
15
16         //2.创建 EntityManager
17         EntityManager entityManager = entityManagerFactory.createEntityManager();
18
19         //4.开启事务
20         EntityTransaction transaction = entityManager.getTransaction();
21         transaction.begin();
22
23         //5.进行持久化操作
24         Customer customer = new Customer();
25         customer.setLastName("AA");
26         customer.setEmail("aa@163.com");
27         customer.setAge(20);
28
29         entityManager.persist(customer);
30
31         //6.提交事务
32         transaction.commit();
33
34         //7.关闭 EntityManager
35         entityManager.close();
36
37         //8.关闭 EntityManagerFactory
38         entityManagerFactory.close();
39
40     }
41
42 }
三、JPA 的基本注解
看了 JPA 的 Helloworld 之后说一下 JPA 的基本注解
1. @Entity :修饰实体类,指明该类将映射到指定的数据表,例如:Customer 类默认的数据表名为 customer
2. @Table :当实体类与映射的数据库表名不同名时需要使用 @Table 注解,该注解与 @Entity 注解并列使用,使用其 name 属性指明数据库的表名
 1 @Table(name = "JPA_CUSTOMER")
 2 @Entity
 3 public class Customer {
3. @Id :标识该属性为主键,一般标注在该属性的 getter 方法上
4. @GeneratedValue :标注主键的生成策略,通过其 strategy 属性。通常与 @Id 注解一起使用。默认情况下 JPA 会自动选择一个最适合底层数据库的主键生成策略,MySQL 默认为 AUTO,常用策略有:
–IDENTITY:采用数据库 ID自增长的方式来自增主键字段,Oracle 不支持这种方式;
–AUTO: JPA自动选择合适的策略,是默认选项;
–SEQUENCE:通过序列产生主键,通过 @SequenceGenerator 注解指定序列名,MySql 不支持这种方式
–TABLE:通过表产生主键,框架借由表模拟序列产生主键,使用该策略可以使应用更易于数据库移植

5. @Basic :用于没有任何标注的 getXxx() 方法,默认即为 @Basic,所以若一个 getter 方法无任何注解,可以使用 @Basic 注解,也可以不使用
6. @Column :当实体的属性与其映射的数据表的列不同名时使用,一般用于 getter 方法上。其 name 属性用来指明此属性在数据表中对应的列名;unique 属性指明是否为唯一约束;nullable 属性用来指明是否可以为空,false 为不能为空;length 属性指明此列的长度。

7. @Transient :标注此注解后在创建数据表的时候将会忽略该属性 Customer 类并没有 info 这个属性,所以数据库中也不应该有 info 这个字段

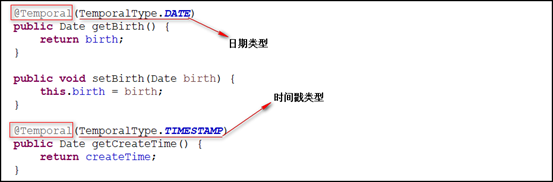
8. @Temporal :向数据库映射日期(Date)属性时用来调整映射的精度。Date 类型的数据有 DATE, TIME, 和 TIMESTAMP 三种精度(即单纯的日期,时间,或者两者兼备).
Birth 属性应该使用 DATE 类型(生日只具体到日即可,如:2015-10-22),而 CreateTime 应该使用 TIMESTAMP 类型(创建时间应该具体到秒,如:2017-10-11 22:39:13)
补冲:使用 TABLE 生成主键详解
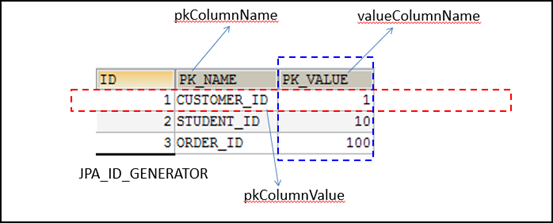
1.创建一个数据表 jpa_id_generators,并添加几条数据

2. 配置使用 TABLE 主键生成策略
 1    //使用 TABLE 主键生成策略
 2     @TableGenerator(name="ID_GENERATOR", //该主键生成策略的名称,与 @GeneratedValue 的 generator 属性值对应
 3     table="jpa_id_generators", // 指明根据哪个表生成主键
 4     pkColumnName="PK_NAME", // 使用 pkColumnName pkColumnValue valueColumnName 三个属性唯一的定位一个点
 5     pkColumnValue="CUSTOMER_ID",
 6     valueColumnName="PK_VALUE",
 7     allocationSize=100) //指定每次增加的数量
 8     @GeneratedValue(strategy=GenerationType.TABLE, generator="ID_GENERATOR")
 9     @Id
10     public Integer getId() {
11         return id;
12     }
附一张表说明:
四、JPA 的 API
1.Persistence :用于获取 EntiryManagerFactory 的实例
1)常用方法:Persistence.createEntityManagerFactory(persistenceUnitName) 方法
1 String persistenceUnitName = "jpa-1";
2 EntityManagerFactory entityManagerFactory = Persistence.createEntityManagerFactory(persistenceUnitName);
2. EntiryManagerFactory :常用方法
1)获取 EntiryManager
1 //创建 EntityManager,类似于 Hibernate 的 SessionFactory
2 EntityManager entityManager = entityManagerFactory.createEntityManager();
2)close() 方法,关闭自身,此方法不再演示
3. EntityManager 的常用 API
1)find() 方法,类似于 Hibernate 中的 Session 的 get() 方法,在执行 find 方法时就发送 SQL 语句
1   //类似于 Hibernate 中 Session 的 get 方法
2     @Test
3     public void testFind() {
4         Customer customer = entityManager.find(Customer.class, 1);
5
6         System.out.println("----------------------------------------");
7
8         System.out.println(customer);
9     }
打印结果为:查看横线的位置便可证明结论。
 1 Hibernate:
 2     select
 3         customer0_.id as id1_2_0_,
 4         customer0_.age as age2_2_0_,
 5         customer0_.birth as birth3_2_0_,
 6         customer0_.createTime as createTi4_2_0_,
 7         customer0_.email as email5_2_0_,
 8         customer0_.LAST_NAME as LAST_NAM6_2_0_
 9     from
10         JPA_CUSTOMER customer0_
11     where
12         customer0_.id=?
13 ----------------------------------------
14 Customer [id=1, lastName=AA, email=aa@163.com, age=21, birth=2015-10-22, createTime=2017-10-11 22:39:13.0]
2)getReference() 方法,类似于 Hibernate 的 Session 的 load() 方法
 1    //相当于 Hibernate 中 Session 的 load 方法,若不使用查询的对象则返回一个代理对象,到真正使用时才发送 SQL 语句查询
 2     //可能会发生懒加载异常
 3     @Test
 4     public void testGetReference() {
 5         Customer customer = entityManager.getReference(Customer.class, 1);
 6         System.out.println(customer.getClass().getName());
 7
 8         System.out.println("---------------------------------------");
 9
10 //      transaction.commit();
11 //      entityManager.close();
12
13         System.out.println(customer);
14     }
打印结果为:打印的是一个代理对象,并且横线打印在 SQL 前面。
com.software.jpa.helloworld.Customer_$$_javassist_1
---------------------------------------
Hibernate:
    select
        customer0_.id as id1_2_0_,
        customer0_.age as age2_2_0_,
        customer0_.birth as birth3_2_0_,
        customer0_.createTime as createTi4_2_0_,
        customer0_.email as email5_2_0_,
        customer0_.LAST_NAME as LAST_NAM6_2_0_
    from
        JPA_CUSTOMER customer0_
    where
        customer0_.id=?
Customer [id=1, lastName=AA, email=aa@163.com, age=21, birth=2015-10-22, createTime=2017-10-11 22:39:13.0]
3)persistence() 方法,类似于 Hibernate 的 save() 方法,与 Hibernate 的 save() 方法不同的是其不能插入一个有 id 属性的对象
 1    //类似于 Hibernate 的 save 方法,使对象由临时状态变为持久化对象
 2     //和 Hibernate 的 save 方法的区别为若有 id 属性,则不会执行插入操作而会抛出异常
 3     @Test
 4     public void testPersistence() {
 5         Customer customer = new Customer();
 6         customer.setLastName("BB");
 7         customer.setEmail("bb@163.com");
 8         customer.setBirth(new Date());
 9         customer.setCreateTime(new Date());
10         customer.setAge(21);
11
12 //      customer.setId(100);
13
14         entityManager.persist(customer);
15
16         System.out.println(customer.getId());
17
18     }
4)remove() 方法,类似于 Hibernate 中 Session 的 delete 方法,但是其不能删除 游离化对象(仅有 id),执行 5,6行会抛出异常,因为 5 行的 customer 对象为游离化对象
 1    //类似于 Hibernate Session 的 delete 方法,把对象对应的记录从数据库中删除
 2     //注:该方法只能移出 持久化 对象,而 Hibernate 的 delete 方法可以移除游离对象
 3     @Test
 4     public void testRemove() {
 5 //      Customer customer = new Customer();
 6 //      customer.setId(2);
 7
 8         Customer customer = entityManager.find(Customer.class, 2);
 9
10         entityManager.remove(customer);
11
12     }
5)merge() 方法,类似于 Hibernate 中 Session 的 saveOrUpdate() 方法
① 传入的是一个临时对象(没有 id):会创建一个新的对象,把临时对象的属性复制到新的对象中,然后对新的对象执行持久化操作,13行执行了 merge() 方法,传入了一个临时对象,返回了一个新的对象,产看 15,16 行的结果可知,新的对象有 id,传入的对象木有id,说明是将新的对象插入了数据库
 1    //1.若传入的是一个临时对象(没有 Id)
 2     //会创建一个新的对象,把临时对象的属性复制到新的对象中,然后对新的对象执行持久化操作
 3     //所以 新的对象中有 id,而之前的临时对象中没有 id
 4     @Test
 5     public void testMerge1() {
 6         Customer customer = new Customer();
 7         customer.setAge(23);
 8         customer.setBirth(new Date());
 9         customer.setCreateTime(new Date());
10         customer.setEmail("cc@126.com");
11         customer.setLastName("CC");
12
13         Customer customer2 = entityManager.merge(customer);
14
15         System.out.println("customer's id:" + customer.getId());// null
16         System.out.println("customer's id:" + customer2.getId());// 2
17     }
② 传入的是一个游离对象(有 ID):若在 EntityManager 缓存中没有该对象,在数据库中也没有对应的记录,JPA 会创建一个新的对象,把当前游离对象的属性复制到新的对象中,对新创建的对象执行 insert 操作,LZ的数据库对应的表中并没有 id 为 100 customer,15 行同样返回了一个新的对象,根据返回结果可知 ,确实插入的是新的对象
 1    //2.若传入的是一个游离对象,即传入的对象有 OID
 2     //若在 EntityManager 缓存中没有该对象,在数据库中也没有对应的记录,JPA 会创建一个新的对象,
 3     //把当前游离对象的属性复制到新的对象中,对新创建的对象执行 insert 操作
 4     @Test
 5     public void testMerge2() {
 6         Customer customer = new Customer();
 7         customer.setAge(23);
 8         customer.setBirth(new Date());
 9         customer.setCreateTime(new Date());
10         customer.setEmail("dd@126.com");
11         customer.setLastName("DD");
12
13         customer.setId(100);
14
15         Customer customer2 = entityManager.merge(customer);
16
17         System.out.println("customer's id:" + customer.getId());// 100
18         System.out.println("customer's id:" + customer2.getId());// 3
19     }
③ 传入的是游离对象,即传入的对象有 OID,缓存中没有,但数据库中有对应的对象:JPA 会查询对应的记录,然后返回该记录对应的对象把当前游离对象的属性复制到查询到的对象中,对查询到的对象执行 update 操作
 1    //3.若传入的是一个游离对象,即传入的对象有 OID
 2     //若在 EntityManager 缓存中没有该对象,在数据库中有对应的记录,JPA 会查询对应的记录,然后返回该记录对应的对象
 3     //把当前游离对象的属性复制到查询到的对象中,对查询到的对象执行 update 操作
 4     @Test
 5     public void testMerge3() {
 6         Customer customer = new Customer();
 7         customer.setAge(23);
 8         customer.setBirth(new Date());
 9         customer.setCreateTime(new Date());
10         customer.setEmail("ff@126.com");
11         customer.setLastName("FF");
12
13         customer.setId(3);
14
15         Customer customer2 = entityManager.merge(customer);
16
17         System.out.println(customer == customer2); //false
18     }
④ 传入的是游离对象,即传入的对象有 OID,EntityManager 缓存中有对应的对象:JPA 会把当前游离对象的属性复制到查询到的 EntityManager 缓存中的对象,对 EntityManager 缓存中的对象执行 update 操作
 1    //4.若传入的是一个游离对象,即传入的对象有 OID
 2     //若在 EntityManager 缓存中有对应的对象,JPA 会把当前游离对象的属性复制到查询到的 EntityManager 缓存中的对象,
 3     //对 EntityManager 缓存中的对象执行 update 操作
 4     @Test
 5     public void testMerge4() {
 6         Customer customer = new Customer();
 7         customer.setAge(23);
 8         customer.setBirth(new Date());
 9         customer.setCreateTime(new Date());
10         customer.setEmail("dd@126.com");
11         customer.setLastName("DD");
12
13         customer.setId(3);
14         Customer customer2 = entityManager.find(Customer.class, 3);
15
16         entityManager.merge(customer);
17
18         System.out.println(customer == customer2); //false
19     }
4.EntityTransaction:JPA 中的事务操作
常用 API: begin() commit() rollback() 代码不再演示
五、JPA 中映射关联关系
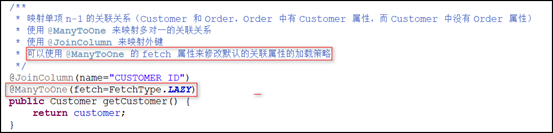
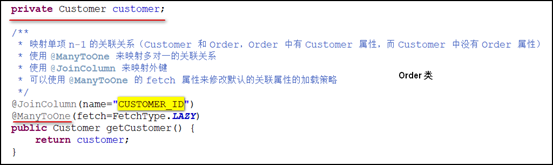
1. 映射单向多对一的关联关系:Order : Customer n:1 ,Order 中有 Customer 属性,而 Customer 中没有 Order 属性(单向多对一区别于单向一对多)
1)创建 Order 实体类,标注注解,生成数据表,使用 @ManyToOne 映射多对一的关联关系,使用 @JoinColumn 来标注外键
 1 package com.software.jpa.helloworld;
 2
 3 import javax.persistence.Column;
 4 import javax.persistence.Entity;
 5 import javax.persistence.FetchType;
 6 import javax.persistence.GeneratedValue;
 7 import javax.persistence.Id;
 8 import javax.persistence.JoinColumn;
 9 import javax.persistence.ManyToOne;
10 import javax.persistence.Table;
11
12 @Table(name="JPA_ORDERS")
13 @Entity
14 public class Order {
15
16     private Integer id;
17
18     private String orderName;
19
20     @GeneratedValue
21     @Id
22     public Integer getId() {
23         return id;
24     }
25
26     public void setId(Integer id) {
27         this.id = id;
28     }
29
30     @Column(name="ORDER_NAME")
31     public String getOrderName() {
32         return orderName;
33     }
34
35     public void setOrderName(String orderName) {
36         this.orderName = orderName;
37     }
38
39     private Customer customer;
40
41     /**
42      * 映射单项 n-1 的关联关系(Customer 和 Order,Order 中有 Customer 属性,而 Customer 中没有 Order 属性)
43      * 使用 @ManyToOne 来映射多对一的关联关系
44      * 使用 @JoinColumn 来映射外键
45      * 可以使用 @ManyToOne 的 fetch 属性来修改默认的关联属性的加载策略
46      */
47     @JoinColumn(name="CUSTOMER_ID")
48     @ManyToOne(fetch=FetchType.LAZY)
49     public Customer getCustomer() {
50         return customer;
51     }
52
53     public void setCustomer(Customer customer) {
54         this.customer = customer;
55     }
56
57 }
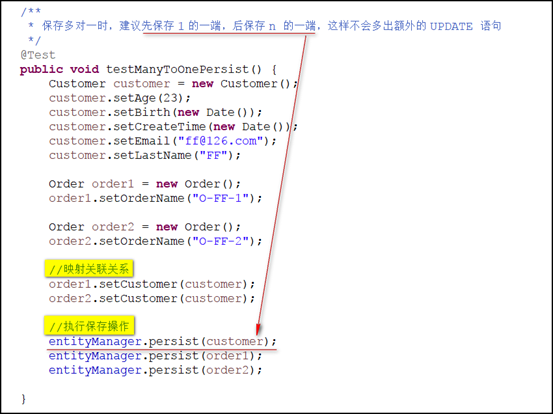
2)单向多对一的保存(persist):保存多对一时,建议先保存 1 的一端,后保存 n 的一端,这样不会多出额外的 UPDATE 语句
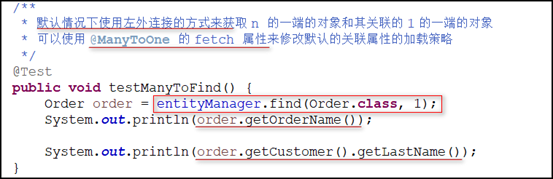
3)获取操作(find):默认情况下使用左外连接的方式来获取 n 的一端的对象和其关联的 1 的一端的对象,可以使用 @ManyToOne 的 fetch 属性来修改默认的关联属性的加载策略
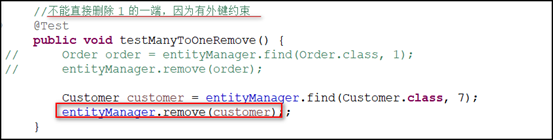
4)删除操作(remove):不能直接删除 1 的一端,因为有外键约束
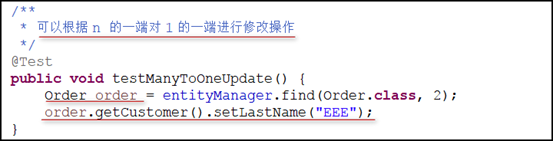
5)修改操作:
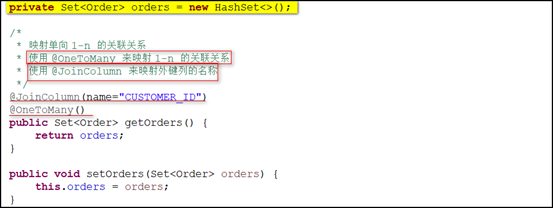
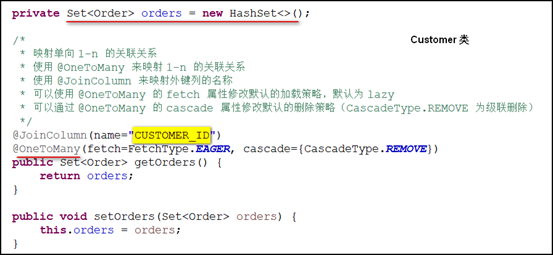
2.映射单向 1-n 的关联关系 Customer :Order 1 : n,Customer 中有 Order 的 Set 集合属性,Order 中没有 Customer的属性
1)在 Customer 中添加 Order 的 Set 集合属性,并映射 1-n 关联关系,重新生成数据表
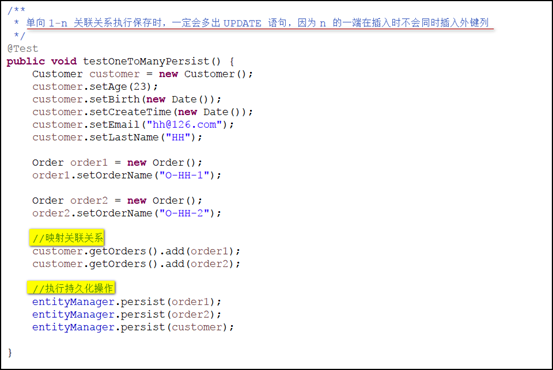
2)保存操作(persist):总会多出 UPDATE 语句,n 的一端在插入时不会同时插入外键列
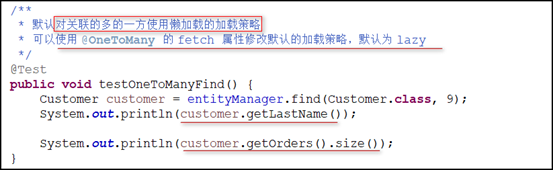
3)查询操作(find):默认使用懒加载
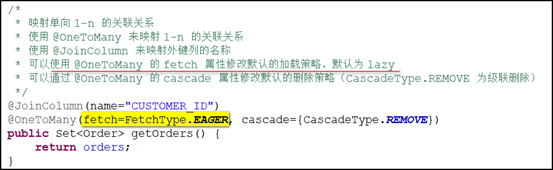
4)删除操作(remove):默认情况下,若删除 1 的一端,会先把关联的 n 的一端的外键置空,然后再进行删除,可以通过 @OneToMany 的 cascade 属性修改默认的删除策略(CascadeType.REMOVE 为级联删除)


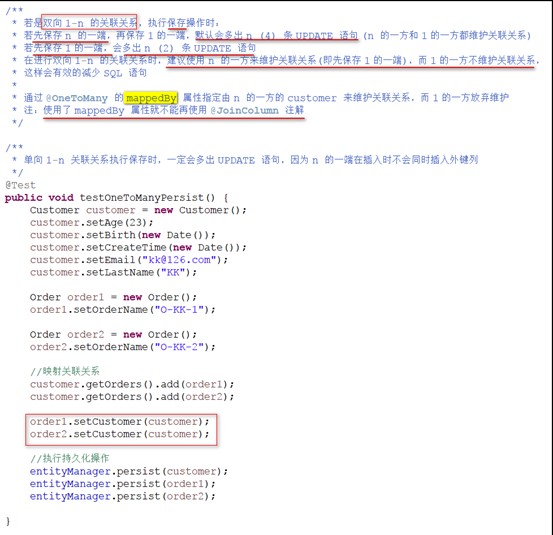
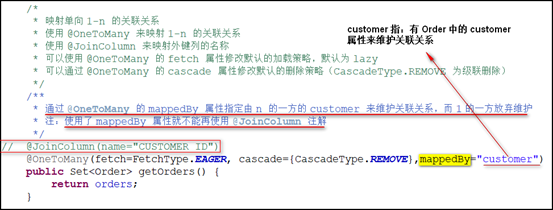
3.映射双向多对一的关联关系(注:双向多对一 同 双向一对多)
1)实体:Customer 中有 Order 的 Set 集合属性,Order 中有 Customer 的属性,注两个实体映射的外键列必须一致,都为 CUSTOMER_ID
2)保存操作(persist):
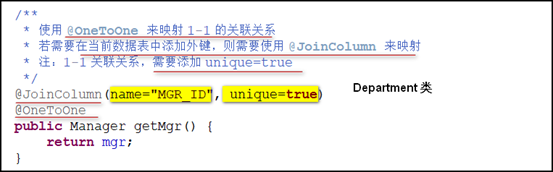
4.映射双向一对一的关联关系
1)实体:Manager 和 Department ,一个部门有一个经理,一个经理管一个部门
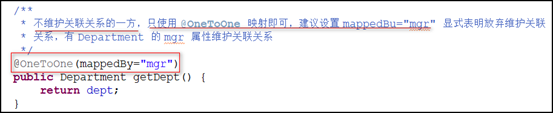
2)创建 Manager 类和 Department 类,Manager 类中有 Department 的引用,Department 中有 Manager 的引用,由 Department 来维护关联关系(实际上双向 1- 1 双方均可以维护关联关系),使用 @OneToOne 来映射 1-1 关联关系。添加必要注解,生成数据表。
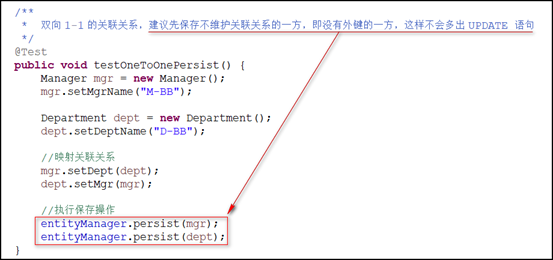
3)保存操作:
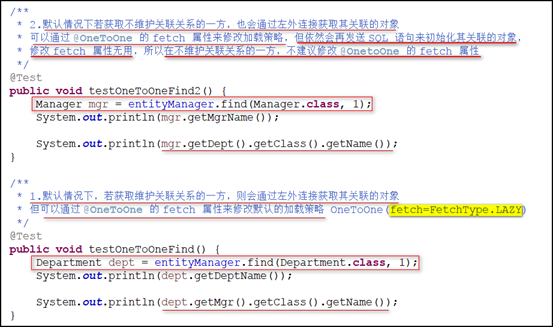
4)查询操作:
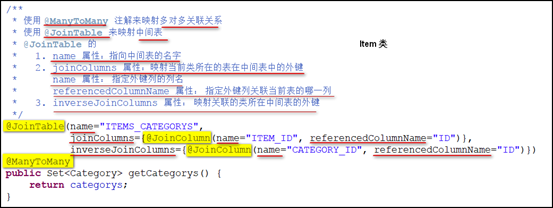
5.映射双向多对多的关联关系
1)实体:Item 和 Category ,一个类别有多个商品,一个商品对应多个类别。双方都包含对方的 Set 集合。创建实体类,添加对应的注解,生成数据表。
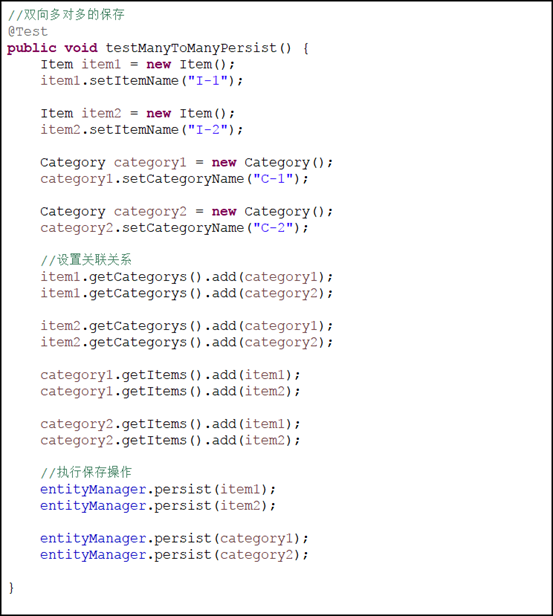
2)保存操作:
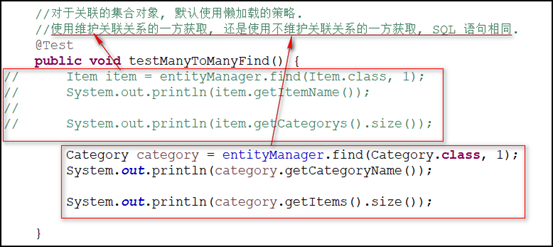
3)查询操作:
经过了前两篇的详细介绍,终于迎来了 JPA 的终结篇,LZ认为如果仅仅了解了 JPA 的话,大家可能感觉与 Hibernate 几乎差不多,没有什么亮点,但是等大家了解了 SpringData 后,JPA 与 SpringData 相结合,便会发挥出它巨大的优势,极大的简化了我们操作数据库的步骤,使我们的代码具有很强的可维护性,LZ随后的博客也将继续介绍。
六、JPA 的二级缓存
1. 大家对一级缓存比较熟悉,即若查询一条同样的记录,因为一级缓存的存在只发送一条 SQL 语句。那么 JPA 的二级缓存又体现在哪呢?LZ给大家解释为:查询一条同样的记录,在第一次查询后关闭 EntityManager、提交事务后,再重新获取 EntityManager 并开启事务再查询同样的记录,因为有二级缓存的存在也会只发送一条记录。如下:
 1    //测试 JPA 的二级缓存
 2     @Test
 3     public void testSecondLevelCache() {
 4         Customer customer1 = entityManager.find(Customer.class, 1);
 5
 6         transaction.commit();
 7         entityManager.close();
 8
 9         entityManager = entityManagerFactory.createEntityManager();
10         transaction = entityManager.getTransaction();
11         transaction.begin();
12
13         Customer customer2 = entityManager.find(Customer.class, 1);
14     }
大家可以看到,4 行和 13 行的查询语句一样,6 行,7 行 提交了事务关闭了 EntityManager。若不进行二级缓存的配置,这样的操作会发送两次一模一样的 SQL 语句,结果就不贴上了,大家可以试一试。若配置了二级缓存,同样的操作便只会发送一条 SQL ,这样可以减小服务器的压力,减少访问数据库的次数。那么如何来配置二级缓存呢?
2. 如何配置二级缓存:
1)persistence.xml 文件中配置二级缓存相关
<?xml version="1.0" encoding="UTF-8"?>
<persistence version="2.0"
    xmlns="http://java.sun.com/xml/ns/persistence" xmlns:xsi="http://www.w3.org/2001/XMLSchema-instance"
    xsi:schemaLocation="http://java.sun.com/xml/ns/persistence http://java.sun.com/xml/ns/persistence/persistence_2_0.xsd">
    <persistence-unit name="jpa-1" transaction-type="RESOURCE_LOCAL">
        <!-- 配置使用什么 ORM 产品来作为 JPA 的实现 1. 实际上配置的是 javax.persistence.spi.PersistenceProvider
            接口的实现类 2. 若 JPA 项目中只有一个 JPA 的实现产品,则可以不配置该节点 -->
        <provider>org.hibernate.ejb.HibernatePersistence</provider>

        <!-- 添加持久化类 -->
        <class>com.software.jpa.helloworld.Customer</class>
        <class>com.software.jpa.helloworld.Order</class>

        <class>com.software.jpa.helloworld.Manager</class>
        <class>com.software.jpa.helloworld.Department</class>

        <class>com.software.jpa.helloworld.Category</class>
        <class>com.software.jpa.helloworld.Item</class>

        <!-- 配置二级缓存的策略
                ALL:所有的实体类都被缓存
                NONE:所有的实体类都不被缓存.
                ENABLE_SELECTIVE:标识 @Cacheable(true) 注解的实体类将被缓存
                DISABLE_SELECTIVE:缓存除标识 @Cacheable(false) 以外的所有实体类
                UNSPECIFIED:默认值,JPA 产品默认值将被使用 -->
        <shared-cache-mode>ENABLE_SELECTIVE</shared-cache-mode>

        <properties>
            <!-- 连接数据库的基本信息 -->
            <!-- 在 Connection 选项中配置后会自动生成如下信息 -->
            <property name="javax.persistence.jdbc.driver" value="com.mysql.jdbc.Driver" />
            <property name="javax.persistence.jdbc.url" value="jdbc:mysql://localhost:3306/jpa" />
            <property name="javax.persistence.jdbc.user" value="root" />
            <property name="javax.persistence.jdbc.password" value="qiqingqing" />

            <!-- 配置 JPA 实现产品的基本属性,即配置 Hibernate 的基本属性 -->
            <property name="hibernate.format_sql" value="true" />
            <property name="hibernate.show_sql" value="true" />
            <property name="hibernate.hbm2ddl.auto" value="update" />

            <!-- 二级缓存相关 -->
            <property name="hibernate.cache.use_second_level_cache"
                value="true" />
            <property name="hibernate.cache.region.factory_class"
                value="org.hibernate.cache.ehcache.EhCacheRegionFactory" />
            <property name="hibernate.cache.use_query_cache" value="true" />
        </properties>
    </persistence-unit>
</persistence>
2)导入 ehcache 的 jar 包和配置文件 ehcache.xml
jar 包:

配置文件:对二级缓存参数的配置
<ehcache>

    <!-- Sets the path to the directory where cache .data files are created.

         If the path is a Java System Property it is replaced by
         its value in the running VM.

         The following properties are translated:
         user.home - User's home directory
         user.dir - User's current working directory
         java.io.tmpdir - Default temp file path -->
    <diskStore path="java.io.tmpdir"/>


    <!--Default Cache configuration. These will applied to caches programmatically created through
        the CacheManager.

        The following attributes are required for defaultCache:

        maxInMemory       - Sets the maximum number of objects that will be created in memory
        eternal           - Sets whether elements are eternal. If eternal,  timeouts are ignored and the element
                            is never expired.
        timeToIdleSeconds - Sets the time to idle for an element before it expires. Is only used
                            if the element is not eternal. Idle time is now - last accessed time
        timeToLiveSeconds - Sets the time to live for an element before it expires. Is only used
                            if the element is not eternal. TTL is now - creation time
        overflowToDisk    - Sets whether elements can overflow to disk when the in-memory cache
                            has reached the maxInMemory limit.

        -->
    <defaultCache
        maxElementsInMemory="10000"
        eternal="false"
        timeToIdleSeconds="120"
        timeToLiveSeconds="120"
        overflowToDisk="true"
        />

    <!--Predefined caches.  Add your cache configuration settings here.
        If you do not have a configuration for your cache a WARNING will be issued when the
        CacheManager starts

        The following attributes are required for defaultCache:

        name              - Sets the name of the cache. This is used to identify the cache. It must be unique.
        maxInMemory       - Sets the maximum number of objects that will be created in memory
        eternal           - Sets whether elements are eternal. If eternal,  timeouts are ignored and the element
                            is never expired.
        timeToIdleSeconds - Sets the time to idle for an element before it expires. Is only used
                            if the element is not eternal. Idle time is now - last accessed time
        timeToLiveSeconds - Sets the time to live for an element before it expires. Is only used
                            if the element is not eternal. TTL is now - creation time
        overflowToDisk    - Sets whether elements can overflow to disk when the in-memory cache
                            has reached the maxInMemory limit.

        -->

    <!-- Sample cache named sampleCache1
        This cache contains a maximum in memory of 10000 elements, and will expire
        an element if it is idle for more than 5 minutes and lives for more than
        10 minutes.

        If there are more than 10000 elements it will overflow to the
        disk cache, which in this configuration will go to wherever java.io.tmp is
        defined on your system. On a standard Linux system this will be /tmp"
        -->
    <cache name="sampleCache1"
        maxElementsInMemory="10000"
        eternal="false"
        timeToIdleSeconds="300"
        timeToLiveSeconds="600"
        overflowToDisk="true"
        />

    <!-- Sample cache named sampleCache2
        This cache contains 1000 elements. Elements will always be held in memory.
        They are not expired. -->
    <cache name="sampleCache2"
        maxElementsInMemory="1000"
        eternal="true"
        timeToIdleSeconds="0"
        timeToLiveSeconds="0"
        overflowToDisk="false"
        /> -->

    <!-- Place configuration for your caches following -->

</ehcache>
3)给需要缓存的类添加 @Cacheable(true) 注解,有前面的代码可知,楼主获取的是 Customer 对象

二级缓存就给大家介绍到这里。
七、JPQL
1.什么是 JPQL:JPQL语言,即 Java Persistence Query Language 的简称。
2.然后来看一个 JPQL 的 Helloworld:
 1    //JPQL 的 HelloWorld
 2     @Test
 3     public void testHelloJPQL() {
 4         String jpql = "FROM Customer c WHERE c.age > ?";
 5         Query query = entityManager.createQuery(jpql);
 6
 7         //占位符的索引是从 1 开始
 8         query.setParameter(1, 21);
 9
10         List<Customer> lists = query.getResultList();
11         System.out.println(lists.size());
12
13     }
乍一看,大家可能感觉 JPQL 像极了 Hibernate 的 HQL 查询,没错,这两种查询的相似度极高。需要注意的是,使用 Query 的 setParameter() 的方法填占位符是,索引是从 1
开始的。
3. 查询部分属性:
 1    @Test
 2     public void testPartlyProperties() {
 3         String jpql = "SELECT new Customer(c.lastName, c.age) FROM Customer c WHERE c.id > ?";
 4         Query query = entityManager.createQuery(jpql);
 5
 6         query.setParameter(1, 1);
 7
 8         List lists = query.getResultList();
 9         System.out.println(lists);
10     }
默认情况下若只查询部分属性,则将返回 Object[] 类型的结果或 Object[] 类型的 List,可以在实体类中创建对应的构造器,然后在 jpql 中利用对应的构造器返回实体类对应的对象,这样得到的结果可以很令人满意,也很方便我们来操作。
4.命名查询 NamedQuery:
1)在需要查询的对象类上添加 @NamedQuery 注解:

2)创建测试方法:

5. 本地 SQL 查询使用 EntityManager 的 createNativeQuery() 方法:
1    //本地 SQL 查询
2     @Test
3     public void testNativeQuery() {
4         String sql = "SELECT age FROM jpa_customer WHERE id = ?";
5         Query query = entityManager.createNativeQuery(sql).setParameter(1, 1);
6         Object result = query.getSingleResult();
7         System.out.println(result);
8     }
6. 可以使用 Order By 字句:
 1    // jpql 中的 Order By 子句
 2     @Test
 3     public void testOrderBy() {
 4         String jpql = "FROM Customer c WHERE c.age > ? ORDER BY c.age DESC";
 5         Query query = entityManager.createQuery(jpql);
 6
 7         //占位符的索引是从 1 开始
 8         query.setParameter(1, 21);
 9
10         List<Customer> lists = query.getResultList();
11         System.out.println(lists.size());
12     }
7.还可以使用 Group By 子句:
1    //查询 order 数量大于 2 的那些 Customer
2     @Test
3     public void testGroupBy() {
4         String jpql = "SELECT o.customer FROM Order o GROUP BY o.customer HAVING count(o.id) >= 2";
5         List<Customer> lists = entityManager.createQuery(jpql).getResultList();
6         System.out.println(lists);
7     }
8.也可以使用子查询
1    //子查询
2     @Test
3     public void testSubQuery() {
4         //查询所有 Customer 的 lastName 为 YY 的 Order
5         String jpql = "SELECT o FROM Order o"
6                 + " WHERE o.customer = (SELECT c FROM Customer c WHERE c.lastName = ?)";
7         List<Order> orders = entityManager.createQuery(jpql).setParameter(1, "YY").getResultList();
8         System.out.println(orders.size());
9     }
八、Spring 整合 JPA
JPA 的一些 API 也可以放到 Spring 的 IOC 容器中,交由 Spring 容器管理,那么如何用 Spring 来整合 JPA 呢?
1.新建 JPA 工程,导入所需的 jar包(Hibernate、JPA、c3p0、Spring、MySQL 驱动)
2.类路径下创建 db.properties 数据库配置文件,配置数据库的链接信息(LZ 在这只配置了必须属性)
1 jdbc.user=root
2 jdbc.password=qiqingqing
3 jdbc.driverClass=com.mysql.jdbc.Driver
4 jdbc.jdbcUrl=jdbc:mysql://localhost:3306/jpa
3.类路径下创建 Spring 的配置文件 applicationContext.xml,配置自动扫描的包,将 db.propertiest 文件导入,并配置 c3p0 数据源
 1    <!-- 配置自动扫描的包 -->
 2     <context:component-scan base-package="com.software.jpa"></context:component-scan>
 3
 4     <!-- 配置数据源 -->
 5     <context:property-placeholder location="classpath:db.properties"/>
 6
 7     <bean id="dataSource" class="com.mchange.v2.c3p0.ComboPooledDataSource">
 8         <property name="user" value="${jdbc.user}"></property>
 9         <property name="password" value="${jdbc.password}"></property>
10         <property name="driverClass" value="${jdbc.driverClass}"></property>
11         <property name="jdbcUrl" value="${jdbc.jdbcUrl}"></property>
12     </bean>
4.在 applicationContext.xml 中配置 JPA 的 EntityManagerFactory
 1    <!-- 配置 EntityManagerFactory -->
 2     <bean id="entityManagerFactory"
 3                  class="org.springframework.orm.jpa.LocalContainerEntityManagerFactoryBean">
 4         <!-- 配置数据源 -->
 5         <property name="dataSource" ref="dataSource"></property>
 6         <!-- 配置 JPA 提供商的适配器,可以通过内部 bean 的方式来配置 -->
 7         <property name="jpaVendorAdapter">
 8             <bean class="org.springframework.orm.jpa.vendor.HibernateJpaVendorAdapter"></bean>
 9         </property>
10         <!-- 配置实体类所在的包 -->
11         <property name="packagesToScan" value="com.software.jpa.spring.entities"></property>
12         <!-- 配置 JPA 的基本属性,比如,JPA 实现产品的属性 -->
13         <property name="jpaProperties">
14             <props>
15                 <prop key="hibernate.show_sql">true</prop>
16                 <prop key="hibernate.format_sql">true</prop>
17                 <prop key="hibernate.hbm2ddl.auto">update</prop>
18             </props>
19         </property>
20     </bean>
5.配置 JPA 使用的事务管理器及配置支持基于注解的事务配置
1    <!-- 配置  JPA 使用的事务管理器 -->
2     <bean id="transactionManager" class="org.springframework.orm.jpa.JpaTransactionManager">
3         <property name="entityManagerFactory" ref="entityManagerFactory"></property>
4     </bean>
5
6     <!-- 配置支持基于注解的事务配置 -->
7     <tx:annotation-driven transaction-manager="transactionManager"/>
6.为了测试创建实体类 Person,添加相应的 JPA 注解,生成对应的数据表
 1 package com.software.jpa.spring.entities;
 2
 3 import javax.persistence.Column;
 4 import javax.persistence.Entity;
 5 import javax.persistence.GeneratedValue;
 6 import javax.persistence.Id;
 7 import javax.persistence.Table;
 8
 9 @Table(name="JPA_PERSONS")
10 @Entity
11 public class Person {
12
13     private Integer id;
14
15     private String lastName;
16
17     private String email;
18
19     private Integer age;
20
21     @GeneratedValue
22     @Id
23     public Integer getId() {
24         return id;
25     }
26
27     public void setId(Integer id) {
28         this.id = id;
29     }
30
31     @Column(name="LAST_NAME")
32     public String getLastName() {
33         return lastName;
34     }
35
36     public void setLastName(String lastName) {
37         this.lastName = lastName;
38     }
39
40     public String getEmail() {
41         return email;
42     }
43
44     public void setEmail(String email) {
45         this.email = email;
46     }
47
48     public Integer getAge() {
49         return age;
50     }
51
52     public void setAge(Integer age) {
53         this.age = age;
54     }
55
56 }
7.创建 PersonDao 使用 @PersistenceContext 获取和当前事务关联的 EntityManager 对象
 1 package com.software.jpa.dao;
 2
 3 import javax.persistence.EntityManager;
 4 import javax.persistence.PersistenceContext;
 5
 6 import org.springframework.stereotype.Repository;
 7
 8 import com.software.jpa.spring.entities.Person;
 9
10 @Repository
11 public class PersonDao {
12
13     //使用 @PersistenceContext 获取和当前事务关联的 EntityManager 对象
14     @PersistenceContext
15     private EntityManager entityManager;
16
17     public void save(Person p) {
18         entityManager.persist(p);
19     }
20
21 }
8.创建 PersonService ,模拟事务操作,20 行 LZ 设计了一个算数异常,若整合成功,因为添加了事务操作,所以 18 行和 22 行的两条记录都没有插入进数据库。
 1 package com.software.jpa.service;
 2
 3 import org.springframework.beans.factory.annotation.Autowired;
 4 import org.springframework.stereotype.Service;
 5 import org.springframework.transaction.annotation.Transactional;
 6
 7 import com.software.jpa.dao.PersonDao;
 8 import com.software.jpa.spring.entities.Person;
 9
10 @Service
11 public class PersonService {
12
13     @Autowired
14     private PersonDao dao;
15
16     @Transactional
17     public void save(Person p1, Person p2) {
18         dao.save(p1);
19
20         int i = 10/0;
21
22         dao.save(p2);
23     }
24
25 }
9.创建测试方法,并执行
 1 package com.software.jpa.spring;
 2
 3 import javax.sql.DataSource;
 4
 5 import org.junit.Test;
 6 import org.springframework.context.ApplicationContext;
 7 import org.springframework.context.support.ClassPathXmlApplicationContext;
 8
 9 import com.software.jpa.service.PersonService;
10 import com.software.jpa.spring.entities.Person;
11
12 public class JPATest {
13
14     private ApplicationContext ctx = null;
15
16     private PersonService personService = null;
17
18     {
19         ctx = new ClassPathXmlApplicationContext("applicationContext.xml");
20
21         personService = ctx.getBean(PersonService.class);
22     }
23
24     @Test
25     public void testSave() {
26         Person p1 = new Person();
27         p1.setAge(11);
28         p1.setEmail("aa@163.com");
29         p1.setLastName("AA");
30
31         Person p2 = new Person();
32         p2.setAge(12);
33         p2.setEmail("bb@163.com");
34         p2.setLastName("BB");
35
36         System.out.println(personService.getClass().getName());
37         personService.save(p1, p2);
38     }
39
40     @Test
41     public void testDataSourct() throws Exception {
42         DataSource dataSource = ctx.getBean(DataSource.class);
43         System.out.println(dataSource.getConnection());
44     }
45
46 }
JPA 的知识介绍到此就完全结束了,LZ 整理了不短的时间,希望可以帮助到需要的朋友。