Android开发中,Google工程师已经给我们封装好了很多的按钮,使得我们在开发中非常的方便和便捷。
那么今天就来认识一下常用的按钮,那么在之前的课程中我已经详细讲过了Button按钮,那么这里就不再重复了
Android开发-之监听button点击事件:http://www.cnblogs.com/xiao-chuan/p/6074075.html
一、常用按钮
1、按钮公共属性
按钮的公共属性包括:1)常用的样式属性
a、background
b、margin
c、……
2)宽高
a、width
b、height
3)大小
a、size
b、max(min)
c、……
4)文本显示内容
a、text
b、hint
5)唯一键ID
a、id
6)点击事件
2、TextView:
TextView:文本框
autoLink:文本的默认路径
<TextView
        android:layout_width="match_parent"
        android:layout_height="50sp"
        android:text="中国移动:10086"
        android:textSize="20sp"
        android:autoLink="phone"
        />
    <TextView
        android:layout_width="match_parent"
        android:layout_height="50sp"
        android:text="站长邮箱:10086@qq.com"
        android:textSize="20sp"
        android:autoLink="email"
        />
    <TextView
        android:layout_width="match_parent"
        android:layout_height="50sp"
        android:text="有事找百度:http://www.baidu.com"
        android:textSize="20sp"
        android:autoLink="web"
        />
那么在这里呢,如果点击第一个 TextView默认效果就是电话啦,那么第二个第三个呢~~一下是实现的效果图,这里大家可以看到我并没有指定文本颜色,这里注意的是autoLink有默认的颜色啦!

3、EditText
EditText输入框
inputType:输入框输入的文本格式
<EditText
        android:id="@+id/userName"
        android:layout_width="match_parent"
        android:layout_height="wrap_content"
        android:hint="请输入用户名"
        android:textColor="@android:color/holo_red_light"
        android:textSize="20sp"
        android:inputType="text"
        android:maxLength="12"
        />

    <EditText
        android:id="@+id/userAge"
        android:layout_width="match_parent"
        android:layout_height="wrap_content"
        android:hint="请输入年龄"
        android:maxLength="3"
        android:numeric="integer"
        android:inputType="number"
        />
    <EditText
        android:id="@+id/userPwd"
        android:layout_width="match_parent"
        android:layout_height="wrap_content"
        android:hint="请输入密码"
        android:maxLength="12"
        android:password="true"
        android:inputType="textPassword"
        />
    <EditText
        android:id="@+id/userAddress"
        android:layout_width="match_parent"
        android:layout_height="wrap_content"
        android:hint="请输入详细地址"
        android:maxLength="500"
        android:lines="3"
        android:inputType="textMultiLine"
        />
inputType:
text:文本格式
textPassword:密码格式
number:数字格式
textMultiLink:地址栏格式
……
注:那么你输入的时候呢输入法也会自动切换输入的方式,以密码格式输入那么输入的内容是不可见的。
4、Bar
这里分为:
1)SeekBar:调度,就比如我们的音量,亮度等
2)RatingBar:选择,常见到的就是在电商网站上面的评论等
3)ProgressBar:加载、下载,加载图片,下载文件等
<TextView
        android:id="@+id/showText"
        android:layout_width="match_parent"
        android:layout_height="wrap_content"
        android:text="我是一个TextView"
        android:textSize="20sp"
        />
    <SeekBar
        android:id="@+id/seekBar"
        android:layout_width="match_parent"
        android:layout_height="wrap_content"
        android:max="50"
        android:progress="20"
        />
    <RatingBar
        android:id="@+id/ratingBar"
        android:layout_width="wrap_content"
        android:layout_height="wrap_content"
        android:numStars="5"
        android:rating="1"
        android:stepSize="1"
        />
    <ProgressBar
        android:id="@+id/progressBar"
        android:layout_width="match_parent"
        android:layout_height="wrap_content"
        android:max="100"
        android:progress="10"
        />
    <ProgressBar
        android:id="@+id/progressBar2"
        android:layout_width="match_parent"
        android:layout_height="wrap_content"
        android:max="100"
        android:progress="10"
        style="?android:attr/progressBarStyleLarge"
        />
    <ProgressBar
        android:id="@+id/progressBar3"
        android:layout_width="match_parent"
        android:layout_height="wrap_content"
        android:max="100"
        android:progress="10"
        style="?android:attr/progressBarStyleHorizontal"
        />
    <LinearLayout android:layout_width="match_parent"
        android:layout_height="wrap_content" android:orientation="horizontal">
        <Button
            android:layout_width="0dp"
            android:layout_weight="1"
            android:layout_height="wrap_content"
            android:text="开始"
            android:onClick="doStart"
            />
        <Button
            android:layout_width="0dp"
            android:layout_weight="1"
            android:layout_height="wrap_content"
            android:text="结束"
            android:onClick="doStop"
            />
    </LinearLayout>
页面效果:
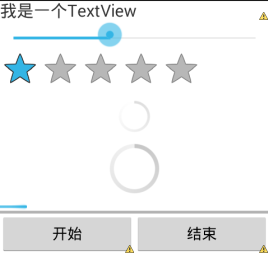
以下是为了让大家更加清楚它们的效果和区别:
private SeekBar sb;
    private TextView showText;
    private RatingBar rb;
    private ProgressBar pb3;
    @Override
    protected void onCreate(Bundle savedInstanceState) {
        super.onCreate(savedInstanceState);
        setContentView(R.layout.activity_seek_bars);

        showText=(TextView)findViewById(R.id.showText);
        sb=(SeekBar)findViewById(R.id.seekBar);
        rb=(RatingBar)findViewById(R.id.ratingBar);
        pb3=(ProgressBar)findViewById(R.id.progressBar3);
        //为seekBar绑定事件
        sb.setOnSeekBarChangeListener(new OnSeekBarChangeListener() {
            @Override
            public void onStopTrackingTouch(SeekBar seekBar) {
            }
            @Override
            public void onStartTrackingTouch(SeekBar seekBar) {
            }
            @Override
            public void onProgressChanged(SeekBar seekBar, int progress,
                    boolean fromUser) {
                //改变showText字体大小
                showText.setTextSize(progress);
            }
        });

        rb.setOnRatingBarChangeListener(new OnRatingBarChangeListener() {
            @Override
            public void onRatingChanged(RatingBar ratingBar, float rating,
                    boolean fromUser) {
                Toast.makeText(SeekBarsActivity.this, "你选择了"+rating+"星", 3000).show();
            }
        });
    }

    //开始下载[注意:除了ProgressBar外,所有的UI都必须在UI主线程中操作]
    boolean isRun=true;
    public void doStart(View view) throws Exception{
        isRun=true;
        //构建一个执行进度条变化的子线程
        new Thread(new Runnable() {
            @Override
            public void run() {
                //耗时操作不能放在主线程中执行
                while(isRun){
                    if(pb3.getProgress()<100){
                        pb3.setProgress(pb3.getProgress()+1);
                        try {
                            Thread.sleep(50);
                        } catch (InterruptedException e) {
                            e.printStackTrace();
                        }
                    }else{
                        isRun=false;
                        //最简单方法实现在多线程更新UI
                        runOnUiThread(new Runnable() {
                            public void run() {
                                Toast.makeText(SeekBarsActivity.this, "下载完毕",3000).show();
                            }
                        });
                    }
                }
            }
        }).start();
    }
    //结束下载
    public void doStop(View view){
        isRun=false;
    }
注意:
  1)除了ProgressBar外,所有的UI都必须在UI主线程中操作,否则会报错
  2)耗时操作不能放在主线程中执行,否则会报错

  3)Google工程师让Android4.0以后的版本都不支持以上两点了,那么有人就要纠结了,那位了维护低版本,要怎么办~~自己想,很简单的问题!
5、Image与单选多选框
1)imageButton:图片按钮
2)imageView:图片视图
imageView与HTML5对比:
imageView:运行更流畅,在没有网络的情况下也可以使用。。
HTML5:运行时不够流畅,没有网就废了……但是优点在于页面更加美观,数据传输更加便捷。。
3)RadioButton:单选框,各元素是互斥的,只能选择一个,比如性别
4)CheckBox:多选按钮,可以选择多个,比如爱好
5)ToggleButton:单个提示按钮,比如开关
<RadioGroup android:id="@+id/rgsex"
        android:layout_width="match_parent"
        android:layout_height="wrap_content"
        android:orientation="horizontal">
        <RadioButton
            android:id="@+id/sexOne"
            android:layout_width="wrap_content"
            android:layout_height="wrap_content"
            android:text="男"
            android:checked="true"
            />
        <RadioButton
            android:id="@+id/sexTwo"
            android:layout_width="wrap_content"
            android:layout_height="wrap_content"
            android:text="女"
            />
    </RadioGroup>
    <LinearLayout android:layout_width="match_parent"
        android:layout_height="wrap_content"
        android:orientation="horizontal">
        <CheckBox
            android:id="@+id/cb1"
            android:layout_width="wrap_content"
            android:layout_height="wrap_content"
            android:text="篮球"
            />
        <CheckBox
            android:id="@+id/cb2"
            android:layout_width="wrap_content"
            android:layout_height="wrap_content"
            android:text="足球"
            />
        <CheckBox
            android:id="@+id/cb3"
            android:layout_width="wrap_content"
            android:layout_height="wrap_content"
            android:text="羽毛球"
            />
    </LinearLayout>

    <ToggleButton
        android:id="@+id/stateButton"
        android:layout_width="wrap_content"
        android:layout_height="wrap_content"
        android:textOn="开灯"
        android:textOff="关灯"
        android:checked="true"
        />
    <ImageButton
        android:layout_width="wrap_content"
        android:layout_height="wrap_content"
        android:src="@drawable/image001"
        android:scaleType="fitXY"
        android:maxWidth="120dp"
        android:maxHeight="60dp"
        android:adjustViewBounds="true"
        android:onClick="getValues"
        />
效果如下:

ps:图片打码了是因为实在找不到合适的图片然后又不想给人家打广告又不得钱……
以下同样为了更加清楚它们的效果和区别:
private RadioGroup rg;
    private CheckBox cb1,cb2,cb3;
    @Override
    protected void onCreate(Bundle savedInstanceState) {
        super.onCreate(savedInstanceState);
        setContentView(R.layout.activity_buttons);

        cb1=(CheckBox)findViewById(R.id.cb1);
        cb2=(CheckBox)findViewById(R.id.cb2);
        cb3=(CheckBox)findViewById(R.id.cb3);
        rg=(RadioGroup)findViewById(R.id.rgsex);
        //监听单选按钮组事件
        rg.setOnCheckedChangeListener(new OnCheckedChangeListener() {
            @Override
            public void onCheckedChanged(RadioGroup group, int checkedId) {
                RadioButton rb=(RadioButton)findViewById(checkedId);
                Toast.makeText(ButtonsActivity.this, "你选择了:"+rb.getText().toString(), 3000).show();
            }
        });
    }

    //取值[单选按钮|复选框]
    public void getValues(View view){
        //单选按钮
        RadioButton rb=(RadioButton)findViewById(rg.getCheckedRadioButtonId());
        StringBuffer sb=new StringBuffer();
        sb.append("性别:"+rb.getText().toString()+"
");

        //复选框
        sb.append("爱好:");
        if(cb1.isChecked())
            sb.append(cb1.getText().toString()+",");
        if(cb2.isChecked())
            sb.append(cb2.getText().toString()+",");
        if(cb3.isChecked())
            sb.append(cb3.getText().toString()+",");
        Toast.makeText(this, sb.toString(), 5000).show();
    }
PS:Google工程师都给我们封装好了,我们可以直接使用。我们也可以自己写一个底层的框架去实现这些按钮,相信大家在学习Java的时候这些按钮的实现都已经自己有写过了,其实Google工程师所封装的底层代码也是那样子实现的。只是说~谁那么无聊啊现成的不用!但是如果大家以后做Android框架开发的时候……就需要自己写了~在基础知识更新完了以后呢……就会涉及到比较高级的内容了哈哈哈哈……完全还没有准备!
二、总结
1、其实还有很多常用的以及一些不常用的,不管怎样都希望大家能够养成自学的习惯……到了公司更是如此!
2、Android框架的开发单纯的就是Java知识,所以跟Android开发没什么关系,但是又要对Android有很高的认知!
3、可以在Android页面中嵌套,但是要区分HTML5与Android palette之间的区别!
4、TextView和EditView的区别,其实很大……
5、palette要与相应的事件和业务逻辑一起使用才会真正的有意义,比如数据的传输~~在以后的课程中我会详细的讲解到。