今天给客户做了个功能需要把网格数据(Gridview)导出成Execl,所以我去网上找了个代码
private void Export(string FileType, string FileName)
...{
try
...{
Response.Charset = "GB2312";
Response.ContentEncoding = System.Text.Encoding.UTF7;
Response.AppendHeader("Content-Disposition", "attachment;filename=" + HttpUtility.UrlEncode(FileName, Encoding.UTF8).ToString());
Response.ContentType = FileType;
this.EnableViewState = false;
StringWriter tw = new StringWriter();
HtmlTextWriter hw = new HtmlTextWriter(tw);
grdSearch.RenderControl(hw);
Response.Write(tw.ToString());
Response.End();
}
catch (Exception err)
...{
DOMUtility.PopAlertWindow("导出Excel出错!错误原因:" + err.Message);
//return false;
}
}
但是这种方法的话只是把当前Gridview页导出到Excel,而客户需要把当前所以分页的数据导出到Excel,并且在客户端打开,所以想了想有几种方案:
1)将execl文件导出到服务器上,再下载。这样的话服务器中有多余的文件了。不通过
2)将DataSet中的数据导出Execl
private void DataTable2Excel(System.Data.DataTable dtData)
...{
System.Web.UI.WebControls.DataGrid dgExport = null;
System.Web.HttpContext curContext = System.Web.HttpContext.Current;
System.IO.StringWriter strWriter = null;
System.Web.UI.HtmlTextWriter htmlWriter = null;
if (dtData != null)
...{
curContext.Response.ContentType = "application/vnd.ms-excel";
curContext.Response.ContentEncoding = System.Text.Encoding.UTF8;
curContext.Response.Charset = "";
strWriter = new System.IO.StringWriter();
htmlWriter = new System.Web.UI.HtmlTextWriter(strWriter);
dgExport = new System.Web.UI.WebControls.DataGrid();
dgExport.DataSource = dtData.DefaultView;
dgExport.AllowPaging = false;
dgExport.DataBind();
dgExport.RenderControl(htmlWriter);
curContext.Response.Write(strWriter.ToString());
curContext.Response.End();
}
}
第一步,引用 com组件 excel.dll
如何生成excel.dll
2.把[C:\Program Files\Microsoft Office\Office:默认安装路径]下的EXCEL9.OLB文件拷贝到[C:\Visual Studio.Net\SDK\v1.1\Bin:VS.Net安装路径]路径下。
3.打开Visual Studio .Net2003命令提示,运行TlbImp Excel9.olb Excel.dll ,就会在[C:\Visual Studio.Net\SDK\v1.1\Bin]下生成Excel.dll组件。
4.在项目中添加Excel.dll引用就OK了。
Excel2003生成Excel.dll的方法
然后运行VS2005命令提示输入TlbImp EXCEL.EXE Excel.dll
然后会在C:\Program Files\Microsoft Visual Studio 8\SDK\v2.0下找到Excel.dll Office.dll 和VBIDE.dll
第二步,调用此方法即可将dataSet的数据导出到本地
public static void ExporToExcel(DataSet ds)
{
if(ds==null) return;
string savefilename="";
bool filesaved=false;
SaveFileDialog savedialog=new SaveFileDialog();
savedialog.DefaultExt ="xls";
savedialog.Filter="excel文件|*.xls";
savedialog.FileName ="sheet1";
savedialog.ShowDialog();
savefilename=savedialog.FileName;
if(savefilename.IndexOf(":")<0) return; //被点了取消
Excel.Application xlapp=new Excel.ApplicationClass();
if(xlapp==null)
{
MessageBox.Show("无法创建excel对象,可能您的机子未安装excel");
return;
}
Excel.Workbooks workbooks=xlapp.Workbooks;
Excel._Workbook workbook=workbooks.Add(Excel.XlWBATemplate.xlWBATWorksheet);
Excel.Worksheet worksheet=(Excel.Worksheet)workbook.Worksheets[1];//取得sheet1
Excel.Range range;
// string oldcaption=this.captiontext;
long totalcount=ds.Tables[0].Rows.Count;
long rowread=0;
float percent=0;
// worksheet.Cells[1,1]=this.captiontext;
//写入字段
for(int i=0;i<ds.Tables[0].Columns.Count;i++)
{
worksheet.Cells[2,i+1]=ds.Tables[0].Columns[i].ColumnName;
range=(Excel.Range)worksheet.Cells[2,i+1];
range.Interior.ColorIndex = 15;
range.Font.Bold = true;
}
//写入数值
// this.captionvisible = true;
for(int r=0;r<ds.Tables[0].Rows.Count;r++)
{
for(int i=0;i<ds.Tables[0].Columns.Count;i++)
{
worksheet.Cells[r+3,i+1]=ds.Tables[0].Rows[r][i];
}
rowread++;
percent=((float)(100*rowread))/totalcount;
// this.captiontext = "正在导出数据["+ percent.tostring("0.00") +"%]";
System.Windows.Forms.Application.DoEvents();
}
// this.captionvisible = false;
// this.captiontext = oldcaption;
range=worksheet.get_Range(worksheet.Cells[2,1],worksheet.Cells[ds.Tables[0].Rows.Count+2,ds.Tables[0].Columns.Count]);
range.BorderAround(Excel.XlLineStyle.xlContinuous,Excel.XlBorderWeight.xlThin,Excel.XlColorIndex.xlColorIndexAutomatic,null);
range.Borders[Excel.XlBordersIndex.xlInsideHorizontal].ColorIndex = Excel.XlColorIndex.xlColorIndexAutomatic;
range.Borders[Excel.XlBordersIndex.xlInsideHorizontal].LineStyle =Excel.XlLineStyle.xlContinuous;
range.Borders[Excel.XlBordersIndex.xlInsideHorizontal].Weight =Excel.XlBorderWeight.xlThin;
if(ds.Tables[0].Columns.Count>1)
{
range.Borders[Excel.XlBordersIndex.xlInsideVertical].ColorIndex =Excel.XlColorIndex.xlColorIndexAutomatic;
range.Borders[Excel.XlBordersIndex.xlInsideVertical].LineStyle = Excel.XlLineStyle.xlContinuous;
range.Borders[Excel.XlBordersIndex.xlInsideVertical].Weight = Excel.XlBorderWeight.xlThin;
}
if(savefilename!="")
{
try
{
workbook.Saved =true;
workbook.SaveCopyAs(savefilename);
filesaved=true;
MessageBox.Show("文件已经成功导出...");
}
catch(Exception ex)
{
filesaved=false;
MessageBox.Show("导出文件时出错,文件可能正被打开!\n"+ex.Message);
}
}
else
{
filesaved=false;
}
xlapp.Quit();
GC.Collect();//强行销毁
}
导入我选择了OLEDB连接方式
第一步 记着引用命名空间
System.Data.OleDb;接下来从Execl 导入到DataSet
代码
try
{
//利用OleDbConnectionStringBuilder对象来构建连接字符串.
OleDbConnectionStringBuilder connectionStringBuilder = new OleDbConnectionStringBuilder();
connectionStringBuilder.DataSource = @"" + textBox1.Text;
connectionStringBuilder.Provider = "Microsoft.Jet.OLEDB.4.0";
connectionStringBuilder.Add("Extended Properties", "Excel 8.0");
using (OleDbConnection cn = new OleDbConnection(connectionStringBuilder.ConnectionString))
{
cn.Open();
DataTable dt = cn.GetOleDbSchemaTable(OleDbSchemaGuid.Tables, null); //(1)
cn.Close();
comboBox1.DataSource = dt;//comboBox1显示sheet名的下拉框
comboBox1.DisplayMember = "TABLE_NAME";//TABLE_NAME就是sheet名集合列
//下面是导入指定的sheet到DataSet 这本来是另一个方法里的 偷懒一下放一起了
ds = new DataSet();
OleDbCommand omd = new OleDbCommand(string.Format("select * from [{0}]", comboBox1.Text), cn);
OleDbDataAdapter oda = new OleDbDataAdapter(omd);
oda.Fill(ds);
dataGridView1.DataSource = ds.Tables[0];
}
}
catch (Exception)
{
MessageBox.Show("连接Excel发生异常,请检查后台代码!");
}(1)在项目中为了让用户选择不同的Sheet表,所以就读取Execl中的Sheet名了
cn.GetOleDbSchemaTable(OleDbSchemaGuid.Tables, null);这个方法可以返回Execl的很多信息,当然我只是要读sheet名,所以就只需要"TABLE_NAME"了 。
至此 从Execl导入DataSet就结束了。DataSet到数据库···就不用说了吧

二、从DataSet导出到Execl
首先必须安装 Office - -!
这里我用了Execl.dll的方式导出,不过这种方式用很大的弊端...貌似要根据office版本来确定引用的类...ps:我也不太明白
第一步 引用命名空间
关于这个命名空间晚上的资料多大直接都写的是
using Excel;其实正确的应该是
using Excel = Microsoft.Office.Interop.Excel;//这种引用方式
using System.Reflection; //Missing类命名空间到命名空间之前请先添加引用,请看图(1)
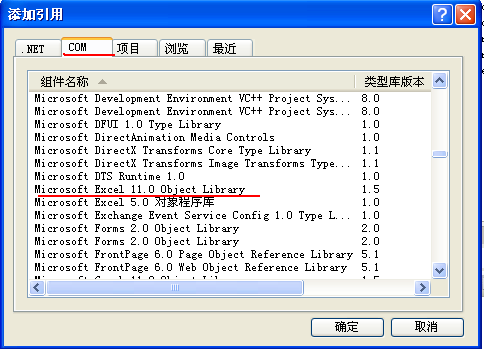
图(1)
额,到这个命名空间还真是费事,我当时也找了半天。
接下来就是导出的代码啦~^_^结合了几个资料做了自己要的效果
#region 从DataSet到出到Excel
/**/
/// <summary>
/// 执行导出
/// </summary>
/// <param name="ds">要导出的DataTable </param>
/// <param name="toFileName">要导出到的execl文件路径+文件名</param>ps:如果是c/s程序,那您直接丢一openFileDialog就方便多了
/// <param name="strExcelFileName">导出到的execl的Sheet名</param>
private void doExport(DataTable dt, string toFileName, string strSheetName)
{
Excel.Application excel = new Excel.Application(); //Execl的操作类
//读取保存目标的对象
Excel.Workbook bookDest = excel.Workbooks._Open(toFileName, Missing.Value, Missing.Value, Missing.Value, Missing.Value
, Missing.Value, Missing.Value, Missing.Value, Missing.Value
, Missing.Value, Missing.Value, Missing.Value, Missing.Value);//打开要导出到的Execl文件的工作薄。--ps:关于Missing类在这里的作用,我也不知道...囧
Excel.Worksheet sheetDest = bookDest.Worksheets.Add(Missing.Value, Missing.Value, Missing.Value, Missing.Value) as Excel.Worksheet;//给工作薄添加一个Sheet
sheetDest.Name = strSheetName;//自己定义名字O(∩_∩)O哈哈~
int rowIndex = 1;
int colIndex = 0;
excel.Application.Workbooks.Add(true);//这句不写不知道会不会报错
foreach (DataColumn col in dt.Columns)
{
colIndex++;
sheetDest.Cells[1, colIndex] = col.ColumnName;//Execl中的第一列,把DataTable的列名先导进去
}
//导入数据行
foreach (DataRow row in dt.Rows)
{
rowIndex++;
colIndex = 0;
foreach (DataColumn col in dt.Columns)
{
colIndex++;
sheetDest.Cells[rowIndex, colIndex] = row[col.ColumnName].ToString();
}
}
bookDest.Saved = true;
bookDest.Save();
excel.Quit();
excel = null;
GC.Collect();//垃圾回收
}
#endregion
当然您也可以不用指定导出文件,直接创建新的Execl文件,不过需要修改一下代码。
代码
#region 从DataSet到出到Excel
/**/
/// <summary>
/// 执行导出
/// </summary>
/// <param name="ds">要导出的DataTable </param>
/// <param name="strExcelFileName">导出到的execl的Sheet名</param>
private void doExport(DataTable dt, string strSheetName)
{
Excel.Application excel = new Excel.Application(); //Execl的操作类
//读取保存目标的对象
Excel.Workbook bookDest = (Excel.WorkbookClass)excel.Workbooks.Add(Missing.Value);
Excel.Worksheet sheetDest = bookDest.Worksheets.Add(Missing.Value, Missing.Value, Missing.Value, Missing.Value) as Excel.Worksheet;//给工作薄添加一个Sheet
sheetDest.Name = strSheetName;//自己定义名字O(∩_∩)O哈哈~
int rowIndex = 1;
int colIndex = 0;
excel.Application.Workbooks.Add(true);//这句不写不知道会不会报错
foreach (DataColumn col in dt.Columns)
{
colIndex++;
sheetDest.Cells[1, colIndex] = col.ColumnName;//Execl中的第一列,把DataTable的列名先导进去
}
//导入数据行
foreach (DataRow row in dt.Rows)
{
rowIndex++;
colIndex = 0;
foreach (DataColumn col in dt.Columns)
{
colIndex++;
sheetDest.Cells[rowIndex, colIndex] = row[col.ColumnName].ToString();
}
}
bookDest.Saved = true;
bookDest.SaveCopyAs("要保存的文件路径+文件名.xls");//方式一
//方式二 bookDest.SaveAs("要保存的文件路径+文件名.xls", Missing.Value, Missing.Value, Missing.Value, Missing.Value, Missing.Value, Microsoft.Office.Interop.Excel.XlSaveAsAccessMode.xlExclusive, Missing.Value, Missing.Value, Missing.Value, Missing.Value, Missing.Value);
excel.Quit();
excel = null;
GC.Collect();//垃圾回收
}
#endregion
窗体下生成的XLS文件
第一步,引用 com组件 excel.dll
如何生成excel.dll
1.要保证机器本身要安装OFFICE.
2.把[C:\Program Files\Microsoft Office\Office:默认安装路径]下的EXCEL9.OLB文件拷贝到[C:\Visual Studio.Net\SDK\v1.1\Bin:VS.Net安装路径]路径下。
3.打开Visual Studio .Net2003命令提示,运行TlbImp Excel9.olb Excel.dll ,就会在[C:\Visual Studio.Net\SDK\v1.1\Bin]下生成Excel.dll组件。
4.在项目中添加Excel.dll引用就OK了。
Excel2003生成Excel.dll的方法
然后运行VS2005命令提示输入TlbImp EXCEL.EXE Excel.dll
然后会在C:\Program Files\Microsoft Visual Studio 8\SDK\v2.0下找到Excel.dll Office.dll 和VBIDE.dll
第二步,调用此方法即可将dataSet的数据导出到本地
public static void ExporToExcel(DataSet ds)
{
if(ds==null) return;
string savefilename="";
bool filesaved=false;
SaveFileDialog savedialog=new SaveFileDialog();
savedialog.DefaultExt ="xls";
savedialog.Filter="excel文件|*.xls";
savedialog.FileName ="sheet1";
savedialog.ShowDialog();
savefilename=savedialog.FileName;
if(savefilename.IndexOf(":")<0) return; //被点了取消
Excel.Application xlapp=new Excel.ApplicationClass();
if(xlapp==null)
{
MessageBox.Show("无法创建excel对象,可能您的机子未安装excel");
return;
}
Excel.Workbooks workbooks=xlapp.Workbooks;
Excel._Workbook workbook=workbooks.Add(Excel.XlWBATemplate.xlWBATWorksheet);
Excel.Worksheet worksheet=(Excel.Worksheet)workbook.Worksheets[1];//取得sheet1
Excel.Range range;
// string oldcaption=this.captiontext;
long totalcount=ds.Tables[0].Rows.Count;
long rowread=0;
float percent=0;
// worksheet.Cells[1,1]=this.captiontext;
//写入字段
for(int i=0;i<ds.Tables[0].Columns.Count;i++)
{
worksheet.Cells[2,i+1]=ds.Tables[0].Columns[i].ColumnName;
range=(Excel.Range)worksheet.Cells[2,i+1];
range.Interior.ColorIndex = 15;
range.Font.Bold = true;
}
//写入数值
// this.captionvisible = true;
for(int r=0;r<ds.Tables[0].Rows.Count;r++)
{
for(int i=0;i<ds.Tables[0].Columns.Count;i++)
{
worksheet.Cells[r+3,i+1]=ds.Tables[0].Rows[r][i];
}
rowread++;
percent=((float)(100*rowread))/totalcount;
// this.captiontext = "正在导出数据["+ percent.tostring("0.00") +"%]";
System.Windows.Forms.Application.DoEvents();
}
// this.captionvisible = false;
// this.captiontext = oldcaption;
range=worksheet.get_Range(worksheet.Cells[2,1],worksheet.Cells[ds.Tables[0].Rows.Count+2,ds.Tables[0].Columns.Count]);
range.BorderAround(Excel.XlLineStyle.xlContinuous,Excel.XlBorderWeight.xlThin,Excel.XlColorIndex.xlColorIndexAutomatic,null);
range.Borders[Excel.XlBordersIndex.xlInsideHorizontal].ColorIndex = Excel.XlColorIndex.xlColorIndexAutomatic;
range.Borders[Excel.XlBordersIndex.xlInsideHorizontal].LineStyle =Excel.XlLineStyle.xlContinuous;
range.Borders[Excel.XlBordersIndex.xlInsideHorizontal].Weight =Excel.XlBorderWeight.xlThin;
if(ds.Tables[0].Columns.Count>1)
{
range.Borders[Excel.XlBordersIndex.xlInsideVertical].ColorIndex =Excel.XlColorIndex.xlColorIndexAutomatic;
range.Borders[Excel.XlBordersIndex.xlInsideVertical].LineStyle = Excel.XlLineStyle.xlContinuous;
range.Borders[Excel.XlBordersIndex.xlInsideVertical].Weight = Excel.XlBorderWeight.xlThin;
}
if(savefilename!="")
{
try
{
workbook.Saved =true;
workbook.SaveCopyAs(savefilename);
filesaved=true;
MessageBox.Show("文件已经成功导出...");
}
catch(Exception ex)
{
filesaved=false;
MessageBox.Show("导出文件时出错,文件可能正被打开!\n"+ex.Message);
}
}
else
{
filesaved=false;
}
xlapp.Quit();
GC.Collect();//强行销毁
}
oWordApplic = New Word.Application
当程序运行到这句时出现下面的错误:
检索 COM 类工厂中 CLSID 为 {000209FF-0000-0000-C000-000000000046} 的组件时失败,原因是出现以下错误: 80070005。
oWordApplic = New Word.Application
当程序运行到这句时出现下面的错误:
检索 COM 类工厂中 CLSID 为 {000209FF-0000-0000-C000-000000000046} 的组件时失败,原因是出现以下错误: 80070005。
解决方法一:
控制面板-》管理工具-》组件服务-》计算机-》我的电脑-》DCom配置-》找到Microsoft Word文档
之后
单击属性打开此应用程序的属性对话框。
2. 单击标识选项卡,然后选择交互式用户。
3.单击"安全"选项卡,分别在"启动和激活权限"和"访问权限"组中选中"自定义",然后
自定义->编辑->添加ASP.NET账户和IUSER_计算机名
* 这些帐户仅在计算机上安装有 IIS 的情况下才存在。
13. 确保允许每个用户访问,然后单击确定。
14. 单击确定关闭 DCOMCNFG。
解决方法二:
如果上述方法不能解决问题,就应该是权限问题,请尝试用下面的方法:
在web.config中使用身份模拟,在<system.web>节中加入 <identity impersonate="true" userName="你的用户名" password="密码"/>
</system.web>
本文来自CSDN博客,转载请标明出处:http://blog.csdn.net/sheshou2/archive/2009/10/28/4737533.aspx