vue+elementUI实战
根据之前创建vue-cli项目一样再来一遍 创建项目
1. 创建一个名为 hello-vue 的工程 vue init webpack hello-vue
2. 安装依赖,我们需要安装 vue-router、element-ui、sass-loader 和 node-sass 四个插件
# 进入工程目录
cd hello-vue
# 安装 vue-router
npm install vue-router --save-dev
# 安装 element-ui
npm i element-ui -S
# 安装依赖
npm install
# 安装 SASS 加载器
cnpm install sass-loader node-sass --save-dev
# 启动测试
npm run dev
创建成功后用idea打开,并删除净东西 创建views和router文件夹用来存放视图和路由
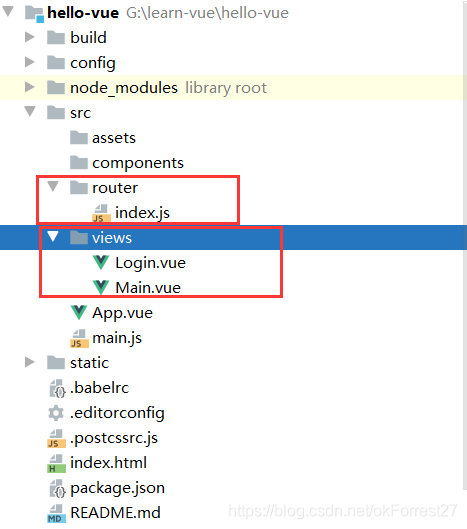
在views创建Main.vue
Main.vue
<template>
  <h1>首页</h1>
</template>
<script>
  export default {
    name: "Main"
  }
</script>
<style scoped>
</style>
在views中创建Login.vue视图组件
Login.vue(用的饿了么UI中的代码)
<template>
  <div>
    <el-form ref="loginForm" :model="form" :rules="rules" label-width="80px" class="login-box">
      <h3 class="login-title">欢迎登录</h3>
      <el-form-item label="账号" prop="username">
        <el-input type="text" placeholder="请输入账号" v-model="form.username"/>
      </el-form-item>
      <el-form-item label="密码" prop="password">
        <el-input type="password" placeholder="请输入密码" v-model="form.password"/>
      </el-form-item>
      <el-form-item>
        <el-button type="primary" v-on:click="onSubmit('loginForm')">登录</el-button>
      </el-form-item>
    </el-form>

    <el-dialog
      title="温馨提示"
      :visible.sync="dialogVisible"
      width="30%"
      :before-close="handleClose">
      <span>请输入账号和密码</span>
      <span slot="footer" class="dialog-footer">
        <el-button type="primary" @click="dialogVisible = false">确 定</el-button>
      </span>
    </el-dialog>
  </div>
</template>

<script>
  export default {
    name: "Login",
    data() {
      return {
        form: {
          username: '',
          password: ''
        },

        // 表单验证,需要在 el-form-item 元素中增加 prop 属性
        rules: {
          username: [
            {required: true, message: '账号不可为空', trigger: 'blur'}
          ],
          password: [
            {required: true, message: '密码不可为空', trigger: 'blur'}
          ]
        },

        // 对话框显示和隐藏
        dialogVisible: false
      }
    },
    methods: {
      onSubmit(formName) {
        // 为表单绑定验证功能
        this.$refs[formName].validate((valid) => {
          if (valid) {
            // 使用 vue-router 路由到指定页面,该方式称之为编程式导航
            this.$router.push("/main");
          } else {
            this.dialogVisible = true;
            return false;
          }
        });
      }
    }
  }
</script>

<style lang="scss" scoped>
  .login-box {
    border: 1px solid #DCDFE6;
    width: 350px;
    margin: 180px auto;
    padding: 35px 35px 15px 35px;
    border-radius: 5px;
    -webkit-border-radius: 5px;
    -moz-border-radius: 5px;
    box-shadow: 0 0 25px #909399;
  }

  .login-title {
    text-align: center;
    margin: 0 auto 40px auto;
    color: #303133;
  }
</style>
创建路由,在 router 目录下创建一个名为 index.js 的 vue-router 路由配置文件
index.js
//导入vue
import Vue from 'vue';
import VueRouter from 'vue-router';
//导入组件
import Main from "../views/Main";
import Login from "../views/Login";
//使用
Vue.use(VueRouter);
//导出
export default new VueRouter({
  routes: [
    {
      //登录页
      path: '/main',
      component: Main
    },
    //首页
    {
      path: '/login',
      component: Login
    },
  ]


})
在main.js中配置相关
main.js main.js是index.html调用的 所以基本上所有东西都导出到这
一定不要忘记扫描路由配置并将其用到new Vue中
import Vue from 'vue'
import App from './App'
import VueRouter from "vue-router";
//扫描路由配置
import router from "./router"
//导入elementUI
import ElementUI from "element-ui"
//导入element css
import 'element-ui/lib/theme-chalk/index.css'
//使用
Vue.use(VueRouter)
Vue.use(ElementUI)
Vue.config.productionTip = false
new Vue({
  el: '#app',
  router,
  render: h => h(App),//ElementUI规定这样使用
})
在App.vue中配置显示视图
App.vue
<template>
  <div id="app">
    <!--展示视图-->
    <router-view></router-view>
  </div>
</template>
<script>
  export default {
    name: 'App',
  }
</script>
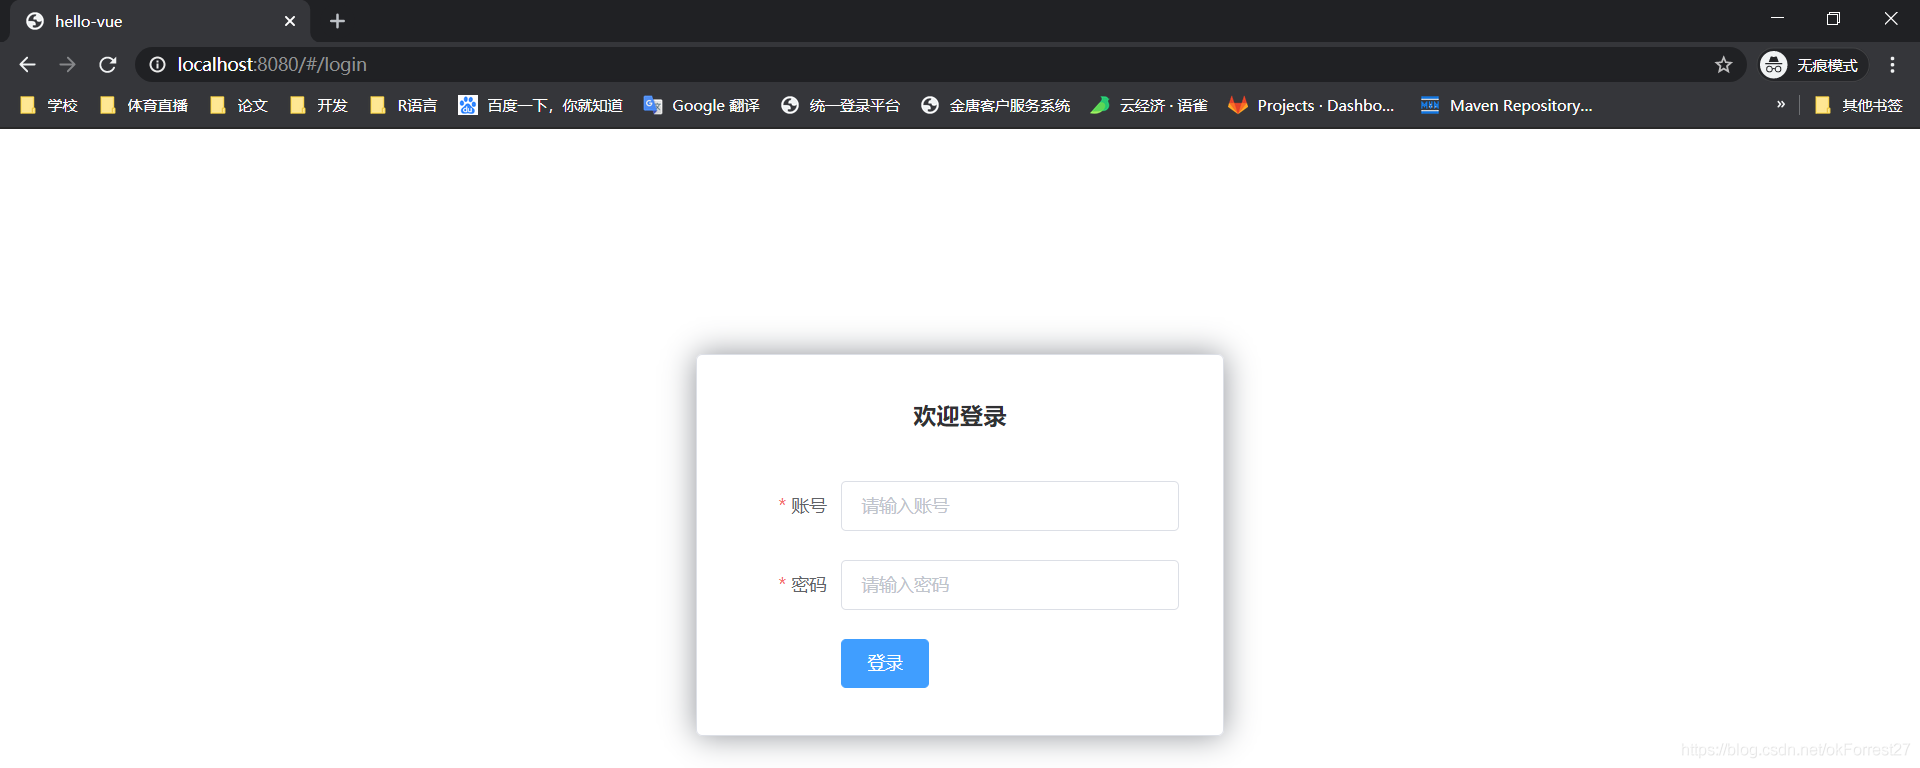
最后效果:
如果出现错误: 可能是因为sass-loader的版本过高导致的编译错误,当前最高版本是8.0.2,需要退回到7.3.1 ;
去package.json文件里面的 "sass-loader"的版本更换成7.3.1,然后重新cnpm install就可以了;
路由嵌套
嵌套路由又称子路由,在实际应用中,通常由多层嵌套的组件组合而成。
demo
1、 创建用户信息组件,在 views/user 目录下创建一个名为 Profile.vue 的视图组件;
Profile.vue
<template>
  <h1>个人信息</h1>
</template>
<script>
  export default {
    name: "UserProfile"
  }
</script>
<style scoped>
</style>
在用户列表组件在 views/user 目录下创建一个名为 List.vue 的视图组件;
List.vue
<template>
  <h1>用户列表</h1>
</template>
<script>
  export default {
    name: "UserList"
  }
</script>
<style scoped>
</style>
修改首页视图,我们修改 Main.vue 视图组件,此处使用了 ElementUI 布局容器组件,代码如下:
Main.vue
<template>
    <div>
      <el-container>
        <el-aside width="200px">
          <el-menu :default-openeds="['1']">
            <el-submenu index="1">
              <template slot="title"><i class="el-icon-caret-right"></i>用户管理</template>
              <el-menu-item-group>
                <el-menu-item index="1-1">
                <!--插入的地方-->
                  <router-link to="/user/profile">个人信息</router-link>
                </el-menu-item>
                <el-menu-item index="1-2">
                <!--插入的地方-->
                  <router-link to="/user/list">用户列表</router-link>
                </el-menu-item>
              </el-menu-item-group>
            </el-submenu>
            <el-submenu index="2">
              <template slot="title"><i class="el-icon-caret-right"></i>内容管理</template>
              <el-menu-item-group>
                <el-menu-item index="2-1">分类管理</el-menu-item>
                <el-menu-item index="2-2">内容列表</el-menu-item>
              </el-menu-item-group>
            </el-submenu>
          </el-menu>
        </el-aside>

        <el-container>
          <el-header style="text-align: right; font-size: 12px">
            <el-dropdown>
              <i class="el-icon-setting" style="margin-right: 15px"></i>
              <el-dropdown-menu slot="dropdown">
                <el-dropdown-item>个人信息</el-dropdown-item>
                <el-dropdown-item>退出登录</el-dropdown-item>
              </el-dropdown-menu>
            </el-dropdown>
          </el-header>
          <el-main>
          <!--在这里展示视图-->
            <router-view />
          </el-main>
        </el-container>
      </el-container>
    </div>
</template>
<script>
    export default {
        name: "Main"
    }
</script>
<style scoped lang="scss">
  .el-header {
    background-color: #B3C0D1;
    color: #333;
    line-height: 60px;
  }
  .el-aside {
    color: #333;
  }
</style>
配置嵌套路由修改 router 目录下的 index.js 路由配置文件,使用children放入main中写入子模块,代码如下
index.js
//导入vue
import Vue from 'vue';
import VueRouter from 'vue-router';
//导入组件
import Main from "../views/Main";
import Login from "../views/Login";
//导入子模块
import UserList from "../views/user/List";
import UserProfile from "../views/user/Profile";

//使用
Vue.use(VueRouter);
//导出
export default new VueRouter({
  routes: [
    {
      //登录页
      path: '/main',
      component: Main,
      //  写入子模块
      children: [
        {
          path: '/user/profile',
          component: UserProfile,
        }, {
          path: '/user/list',
          component: UserList,
        },
      ]
    },
    //首页
    {
      path: '/login',
      component: Login

    },
  ]
})
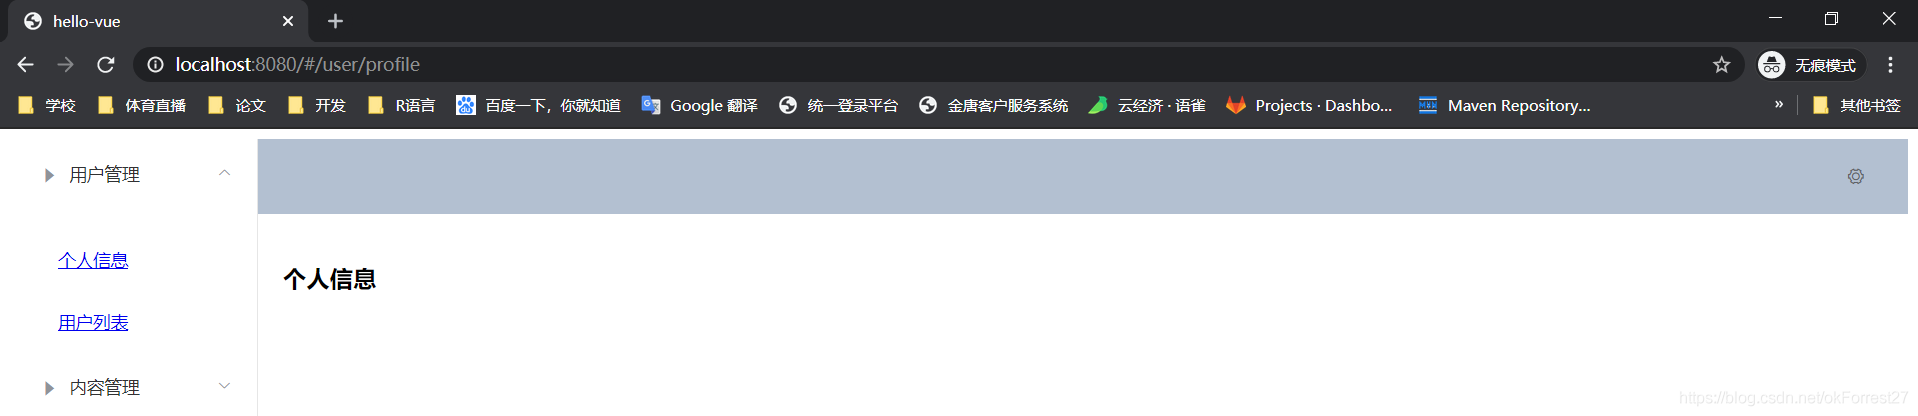
路由嵌套实战效果图
参数传递
这里演示如果请求带有参数该怎么传递
demo
用的还是上述例子的代码 修改一些代码 这里不放重复的代码了
第一种取值方式
1、 修改路由配置, 主要是router下的index.js中的 path 属性中增加了 :id 这样的占位符
{
    path: '/user/profile/:id',
    name:'UserProfile',
    component: UserProfile
}
2.传递参数
此时我们在Main.vue中的route-link位置处 to 改为了 :to,是为了将这一属性当成对象使用,注意 router-link 中的 name 属性名称 一定要和 路由中的 name 属性名称 匹配,因为这样 Vue 才能找到对应的路由路径;
<!--name是组件的名字 params是传的参数 如果要传参数的话就需要用v:bind:来绑定-->
<router-link :to="{name:'UserProfile',params:{id:1}}">个人信息</router-link>
3.在要展示的组件Profile.vue中接收参数 使用 {{$route.params.id}}来接收
Profile.vue 部分代码
<template>
  <!--  所有的元素必须在根节点下-->
  <div>
    <h1>个人信息</h1>
    {{$route.params.id}}
  </div>
</template>
第二种取值方式 使用props 减少耦合
1、修改路由配置 , 主要在router下的index.js中的路由属性中增加了 props: true 属性
{
    path: '/user/profile/:id',
    name:'UserProfile',
    component: UserProfile,
    props: true
}
2.传递参数和之前一样 在Main.vue中修改route-link地址
<!--name是组件的名字 params是传的参数 如果要传参数的话就需要用v:bind:来绑定-->
<router-link :to="{name:'UserProfile',params:{id:1}}">个人信息</router-link>
3.在Profile.vue接收参数为目标组件增加 props 属性
Profile.vue
<template>
  <div>
    个人信息
    {{ id }}
  </div>
</template>
<script>
    export default {
      props: ['id'],
      name: "UserProfile"
    }
</script>
<style scoped>
</style>

组件重定向
重定向的意思大家都明白,但 Vue 中的重定向是作用在路径不同但组件相同的情况下,比如:
在router下面index.js的配置
{
  path: '/main',
  name: 'Main',
  component: Main
},
{
  path: '/goHome',
  redirect: '/main'
}
说明:这里定义了两个路径,一个是 /main ,一个是 /goHome,其中 /goHome 重定向到了 /main 路径,由此可以看出重定向不需要定义组件;
使用的话,只需要在Main.vue设置对应路径即可;
<el-menu-item index="1-3">
    <router-link to="/goHome">回到首页</router-link>
</el-menu-item>
路由模式与 404
路由模式有两种
- hash:路径带 # 符号,如 http://localhost/#/login
- history:路径不带 # 符号,如 http://localhost/login
修改路由配置,代码如下:
export default new Router({
  mode: 'history',
  routes: [
  ]
});
404 demo
1.创建一个NotFound.vue视图组件
NotFound.vue
<template>
    <div>
      <h1>404,你的页面走丢了</h1>
    </div>
</template>
<script>
    export default {
        name: "NotFound"
    }
</script>
<style scoped>
</style>
修改路由配置index.js
import NotFound from '../views/NotFound'
{
   path: '*',
   component: NotFound
}
效果图

路由钩子与异步请求
beforeRouteEnter:在进入路由前执行
beforeRouteLeave:在离开路由前执行
在Profile.vue中写
  export default {
    name: "UserProfile",
    beforeRouteEnter: (to, from, next) => {
      console.log("准备进入个人信息页");
      next();
    },
    beforeRouteLeave: (to, from, next) => {
      console.log("准备离开个人信息页");
      next();
    }
  }
参数说明:
to:路由将要跳转的路径信息
from:路径跳转前的路径信息
next:路由的控制参数
next() 跳入下一个页面
next(’/path’) 改变路由的跳转方向,使其跳到另一个路由
next(false) 返回原来的页面
next((vm)=>{}) 仅在 beforeRouteEnter 中可用,vm 是组件实例
在钩子函数中使用异步请求
1、安装 Axios
cnpm install --save vue-axios
main.js引用 Axios
import axios from 'axios'
import VueAxios from 'vue-axios'
Vue.use(VueAxios, axios)
准备数据 : 只有我们的 static 目录下的文件是可以被访问到的,所以我们就把静态文件放入该目录下。
数据和之前用的json数据一样 需要的去上述axios例子里
// 静态数据存放的位置
static/mock/data.json
在 beforeRouteEnter 中进行异步请求
Profile.vue
  export default {
    //第二种取值方式
    // props:['id'],
    name: "UserProfile",
    //钩子函数 过滤器
    beforeRouteEnter: (to, from, next) => {
      //加载数据
      console.log("进入路由之前")
      next(vm => {
        //进入路由之前执行getData方法
        vm.getData()
      });
    },
    beforeRouteLeave: (to, from, next) => {
      console.log("离开路由之前")
      next();
    },
    //axios
    methods: {
      getData: function () {
        this.axios({
          method: 'get',
          url: 'http://localhost:8080/static/mock/data.json'
        }).then(function (response) {
          console.log(response)
        })
      }
    }
  }
路由钩子和axios结合图
