 集成freemarker,很简单很快捷。
<dependency>
            <groupId>org.springframework.boot</groupId>
            <artifactId>spring-boot-starter-freemarker</artifactId>
</dependency>
注意注意,这里我是没有写版本号的,原因看第一篇,小伙伴们注意下,可以通过集成springboo为父模块,这样就可以不用添加版本号,也可以通过maven的公共版本管理的方法,这样可以不用添加版本号,只需要在管理的地方统一管理就好了。
我这里用的maven分模块开发,在父模块中添加了。最后就是自己手动搜索包,然后找到对应的版本号,添加上去吧。这里提下
 <dependencyManagement>
    <dependencies>
      <dependency>
        <groupId>org.springframework.boot</groupId>
        <artifactId>spring-boot-dependencies</artifactId>
        <version>1.4.1.RELEASE</version>
        <type>pom</type>
        <scope>import</scope>
      </dependency>
    </dependencies>
</dependencyManagement>
记住确认下包有没有进来。
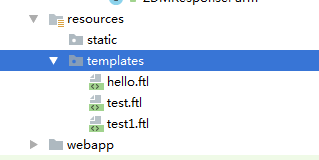
添加完freemarker的依赖后,添加模板页,进行测试,可以运行第一章的最后一个hello例子,试试。

不需要进行任何的配置,可以查看下他源代码试试。因为前几天扩展他freemarker的配置时有看到一点,顺便说下咯。
首先,为什么不需要任何的配置,只要在resources下添加templates,他就能默认匹配到对应的模板页,这是主要的问题。
springboot,他有默认自带的配置文件,在这个配置文件中他集成了常用框架所需要的常用配置,所以我们只需要根据他的配置做开发就好,或者是在resources下添加application.properties 文件,然后设置对应项就好,这个默认配置文件我以前在jar包找到过,这阵子找了很久都没找到,但是没事http://www.tuicool.com/articles/veUjQba 可以去这里看下他默认配置。
这是第一步,他会去读取application.properties文件和默认配置文件,然后加载对应的配置到bean中。
freemarker在springboot中的配置bean的位置
自动配置包


所以他默认会去匹配templates文件夹下以.ftl 结尾的bean.当然还有其他的配置项在其他的地方。
到这里freemarker 的集成基本入门就到这里。
接下会追加一个前几天写的freemarker的扩展配置。
由于springboot中并没有集成freemarker的自动导入和自动包含属性,所以只能自己加载进入相关的配置,这里贴写代码和大概的解释下。
首先在配置文件中加入相关配置
# 如果auto_import和auto_include 空值的话请赋值 _ 下划线
auto_import = test.ftl as t;test1.ftl as t1
auto_include = test.ftl
为什么下划线呢,因为空值后面的注入会报错,所以就硬性规则为下划线,当时做的急,就这样了。
一个自定义异常类,用于捕获自定义加载时的抛出异常,其他几个异常类就不贴了,不然太多了,可以简单的实现下。
public class ConfigException extends BaseException implements RetCodeSupport {
    private final static String code = RetCode.FAIL_CONFIG;
    public ConfigException(String message) {
        super(message);
    }
    public ConfigException(String message, Throwable throwable) {
        super(message,message);
    }
    @Override
    public String getRetCode() {
        return code;
    }
}
重点是freemarker的加载bean,先大概的的看下,后面解释下。
/**
 * Freemarer 配置
 * 增加自动注入和包含配置
 * Created by 灰灰 on 2017/7/1.
 */
@org.springframework.context.annotation.Configuration
public class FreemarkerConfig {
    private static Logger log = LoggerFactory.getLogger(FreemarkerConfig.class);
    @Bean
    public FreeMarkerConfigurer freeMarkerConfigurer(@Value("${auto_import}") String autoImport,@Value("${auto_include}") String autoInclude) {
        FreeMarkerConfigurer config = new FreeMarkerConfigurer();
        writerProperties(config);
        Configuration configuration = null;
        try {
            configuration = config.createConfiguration();
        } catch (IOException e) {
            throw new ConfigException("freemarker配置bean,IO异常",e);
        } catch (TemplateException e) {
            throw new ConfigException("freemarker配置bean异常",e);
        }
        setAutoImport(autoImport,configuration);
        setAutoInclude(autoInclude,configuration);
        config.setConfiguration(configuration);
        return config;
    }
    @Autowired
    private FreeMarkerProperties properties;

    private void writerProperties(FreeMarkerConfigurer config) {
        config.setTemplateLoaderPaths(this.properties.getTemplateLoaderPath());
        config.setPreferFileSystemAccess(this.properties.isPreferFileSystemAccess());
        config.setDefaultEncoding(this.properties.getCharsetName());
        Properties settings = new Properties();
        settings.putAll(this.properties.getSettings());
        config.setFreemarkerSettings(settings);
    }
    private void setAutoImport(String autoImport,Configuration configuration) {
        if("_".equals(autoImport.trim())) {
            return;
        }
        String[] imports = autoImport.split(";");
        Map<String,String> importMap = new HashMap<String,String>(imports.length);
        for (String s : imports) {
            String[] keyValue = s.split("as");
            if (keyValue.length != 2) {
                log.error("freemarker配置auto_import格式不正确 ");
                throw new ConfigException("freemarker配置auto_import格式不正确");
            }
            importMap.put(keyValue[1].trim(),keyValue[0].trim());
        }
        configuration.setAutoImports(importMap);
    }
    private void setAutoInclude(final String autoInclude,Configuration configuration) {
        if ("_".equals(autoInclude.trim())) {
            return;
        }
        String[] includes = autoInclude.split(";");
        for (String s : includes) {
            System.out.println(s);
        }
        List list = new ArrayList<String>(Arrays.asList(includes));
        configuration.setAutoIncludes(list);
    }
}
@Configuration 本来是这样的注解的,但是用于下面有freemarker的同名类,所以这里得这样写了。
这里首先注入配置文件里需要导入和包含的模板路径,然后对模板路径做相对于的格式化,取出对应的信息,然后填充到集合中。通过注入获取到springboot注入的基本信息,然后把这些配置信息都填充的FreeMarkerConfigurer 里,返回return就好了,这里用到了@bean,他会交给spring框架去管理。
大概就这样子。