策略模式
在策略模式(Strategy Pattern)中,一个类的行为或其算法可以在运行时更改。这种类型的设计模式属于行为型模式。
在策略模式中,我们创建表示各种策略的对象和一个行为随着策略对象改变而改变的 context 对象。策略对象改变 context 对象的执行算法。
介绍
意图:定义一系列的算法,把它们一个个封装起来, 并且使它们可相互替换。
主要解决:在有多种算法相似的情况下,使用 if...else 所带来的复杂和难以维护。
何时使用:一个系统有许多许多类,而区分它们的只是他们直接的行为。
如何解决:将这些算法封装成一个一个的类,任意地替换。
关键代码:实现同一个接口。
应用实例: 1、诸葛亮的锦囊妙计,每一个锦囊就是一个策略。 2、旅行的出游方式,选择骑自行车、坐汽车,每一种旅行方式都是一个策略。 3、JAVA AWT 中的 LayoutManager。
优点: 1、算法可以自由切换。 2、避免使用多重条件判断。 3、扩展性良好。
缺点: 1、策略类会增多。 2、所有策略类都需要对外暴露。
使用场景: 1、如果在一个系统里面有许多类,它们之间的区别仅在于它们的行为,那么使用策略模式可以动态地让一个对象在许多行为中选择一种行为。 2、一个系统需要动态地在几种算法中选择一种。 3、如果一个对象有很多的行为,如果不用恰当的模式,这些行为就只好使用多重的条件选择语句来实现。
注意事项:如果一个系统的策略多于四个,就需要考虑使用混合模式,解决策略类膨胀的问题。
角色
Context(环境类):环境类是使用算法的角色,它在解决某个问题(即实现某个方法)时可以采用多种策略。在环境类中维持一个对抽象策略类的引用实例,用于定义所采用的策略。
Strategy(抽象策略类):它为所支持的算法声明了抽象方法,是所有策略类的父类,它可以是抽象类或具体类,也可以是接口。环境类通过抽象策略类中声明的方法在运行时调用具体策略类中实现的算法。
ConcreteStrategy(具体策略类):它实现了在抽象策略类中声明的算法,在运行时,具体策略类将覆盖在环境类中定义的抽象策略类对象,使用一种具体的算法实现某个业务处理。
示例
商场购物场景中,有些商品按原价卖,商场可能为了促销而推出优惠活动,有些商品打九折,有些打八折,有些则是返现10元等。
而优惠活动并不影响结算之外的其他过程,只是在结算的时候需要根据优惠方案结算
如果要写出一个商场优惠场景的Demo可以很快的写出来,譬如
import java.text.MessageFormat;

public class Shopping {
    private String goods;
    private double price;
    private double finalPrice;
    private String desc;

    public Shopping(String goods, double price) {
        this.goods = goods;
        this.price = price;
    }

    public double calculate(String discountType) {
        if ("dis9".equals(discountType)) {
            finalPrice = price * 0.9;
            desc = "打九折";
        } else if ("dis8".equals(discountType)) {
            finalPrice = price * 0.8;
            desc = "打八折";
        } else if ("cash10".equals(discountType)) {
            finalPrice = price >= 10 ? price - 10 : 0;
            desc = "返现10元";
        } else {
            finalPrice = price;
            desc = "不参与优惠活动";
        }
        System.out.println(MessageFormat.format("购买的物品:{0},原始价格:{1},{2},最终价格为:{3}", goods, price, desc, finalPrice));
        return finalPrice;
    }
}
测试
public class Test {
    public static void main(String[] args) {
        Shopping shopping1 = new Shopping("书籍-深入理解Java虚拟机", 54.00);
        shopping1.calculate("dis9"); // 九折

        Shopping shopping2 = new Shopping("Apple 妙控鼠标", 588.00 );
        shopping2.calculate("dis8");

        Shopping shopping3 = new Shopping("戴尔U2417H显示器", 1479.00);
        shopping3.calculate("cash10");

        Shopping shopping4 = new Shopping("索尼ILCE-6000L相机", 3599.00);
        shopping4.calculate(null);
    }
}
以上代码当然完成了我们的需求,但是存在以下问题:
- Shopping 类的 calculate() 方法非常庞大,它包含各种优惠算法的实现代码,在代码中出现了较长的 if…else… 语句,不利于测试和维护。
- 增加新的优惠算法或者对原有打折算法进行修改时必须修改 Shopping 类的源代码,违反了 “开闭原则”,系统的灵活性和可扩展性较差。
- 算法的复用性差,如果在另一个系统中需要重用某些优惠算法,只能通过对源代码进行复制粘贴来重用,无法单独重用其中的某个或某些算法。
- 所以我们需要使用策略模式对 Shopping 类进行重构,将原本庞大的 Shopping 类的职责进行分解,将算法的定义和使用分离。
抽象策略类 Discount,它是所有具体优惠算法的父类,定义了一个 discount 抽象方法
import lombok.Data;

@Data
public abstract class Discount {
    protected double finalPrice;
    protected String desc;

    public Discount(String desc) {
        this.desc = desc;
    }

    abstract double discount(double price);
}
四种具体策略类,继承自抽象策略类 Discount,并在 discount 方法中实现具体的优惠算法
public class Dis9Discount extends Discount {
    public Dis9Discount() {
        super("打九折");
    }

    @Override
    double discount(double price) {
        finalPrice = price * 0.9;
        return finalPrice;
    }
}

public class Dis8Discount extends Discount{
    public Dis8Discount() {
        super("打八折");
    }

    @Override
    double discount(double price) {
        finalPrice = price * 0.8;
        return finalPrice;
    }
}

public class Cash10Discount extends Discount {
    public Cash10Discount() {
        super("返现10元");
    }

    @Override
    public double discount(double price) {
        this.finalPrice = price >= 10 ? price - 10 : 0;
        return finalPrice;
    }
}

public class NoneDiscount extends Discount {
    public NoneDiscount() {
        super("不参与优惠活动");
    }

    @Override
    double discount(double price) {
        finalPrice = price;
        return finalPrice;
    }
}
环境类 Shopping,维护了一个 Discount 引用
 1 public class Shopping {
 2     private String goods;
 3     private double price;
 4     private Discount discount;
 5
 6     public Shopping(String goods, double price, Discount discount) {
 7         this.goods = goods;
 8         this.price = price;
 9         this.discount = discount;
10     }
11
12     public double calculate() {
13         double finalPrice = discount.discount(this.price);
14         String desc = discount.getDesc();
15         System.out.println(MessageFormat.format("购买的物品:{0},原始价格:{1},{2},最终价格为:{3}", goods, price, desc, finalPrice));
16         return finalPrice;
17     }
18 }
测试
public class Test {
    public static void main(String[] args) {
        Shopping shopping1 = new Shopping("书籍-深入理解Java虚拟机", 54.00, new Dis9Discount());
        shopping1.calculate();

        Shopping shopping2 = new Shopping("Apple 妙控鼠标", 588.00, new Dis8Discount());
        shopping2.calculate();

        Shopping shopping3 = new Shopping("戴尔U2417H显示器", 1479.00, new Cash10Discount());
        shopping3.calculate();

        Shopping shopping4 = new Shopping("索尼ILCE-6000L相机", 3599.00, new NoneDiscount());
        shopping4.calculate();
    }
}
结果
购买的物品:书籍-深入理解Java虚拟机,原始价格:54,打九折,最终价格为:48.6
购买的物品:Apple 妙控鼠标,原始价格:588,打八折,最终价格为:470.4
购买的物品:戴尔U2417H显示器,原始价格:1,479,返现10元,最终价格为:1,469
购买的物品:索尼ILCE-6000L相机,原始价格:3,599,不参与优惠活动,最终价格为:3,599
可以看到,使用策略模式重构后,Shopping 类的 calculate 方法简洁了很多,当需要更改优惠算法的时候不需要再修改 Shopping 类的源代码;要扩展出新的优惠算法很方便,只需要继承抽象策略类
Discount 并实现 calculate 方法即可;优惠算法很容易重用。
策略模式总结
策略模式的主要优点如下:
- 策略模式提供了对 “开闭原则” 的完美支持,用户可以在不修改原有系统的基础上选择算法或行为,也可以灵活地增加新的算法或行为。
- 策略模式提供了管理相关的算法族的办法。策略类的等级结构定义了一个算法或行为族,恰当使用继承可以把公共的代码移到抽象策略类中,从而避免重复的代码。
- 策略模式提供了一种可以替换继承关系的办法。如果不使用策略模式而是通过继承,这样算法的使用就和算法本身混在一起,不符合 “单一职责原则”,而且使用继承无法实现算法或行为在程序运行时的动态切换。
- 使用策略模式可以避免多重条件选择语句。多重条件选择语句是硬编码,不易维护。
- 策略模式提供了一种算法的复用机制,由于将算法单独提取出来封装在策略类中,因此不同的环境类可以方便地复用这些策略类。
策略模式的主要缺点如下:
- 客户端必须知道所有的策略类,并自行决定使用哪一个策略类。这就意味着客户端必须理解这些算法的区别,以便适时选择恰当的算法。换言之,策略模式只适用于客户端知道所有的算法或行为的情况。
- 策略模式将造成系统产生很多具体策略类,任何细小的变化都将导致系统要增加一个新的具体策略类。
- 无法同时在客户端使用多个策略类,也就是说,在使用策略模式时,客户端每次只能使用一个策略类,不支持使用一个策略类完成部分功能后再使用另一个策略类来完成剩余功能的情况。
适用场景
- 一个系统需要动态地在几种算法中选择一种,那么可以将这些算法封装到一个个的具体算法类中,而这些具体算法类都是一个抽象算法类的子类。换言之,这些具体算法类均有统一的接口,根据 “里氏代换原则” 和面向对象的多态性,客户端可以选择使用任何一个具体算法类,并只需要维持一个数据类型是抽象算法类的对象。
- 一个对象有很多的行为,如果不用恰当的模式,这些行为就只好使用多重条件选择语句来实现。此时,使用策略模式,把这些行为转移到相应的具体策略类里面,就可以避免使用难以维护的多重条件选择语句。
- 不希望客户端知道复杂的、与算法相关的数据结构,在具体策略类中封装算法与相关的数据结构,可以提高算法的保密性与安全性。
策略模式在Java中的应用及解读
Java Comparator 中的策略模式
java.util.Comparator 接口是比较器接口,可以通过 Collections.sort(List,Comparator) 和 Arrays.sort(Object[],Comparator) 对集合和数据进行排序,下面为示例程序
一个学生类,有两个属性 id 和 name
@Data
@AllArgsConstructor
public class Student {
    private Integer id;
    private String name;

    @Override
    public String toString() {
        return "{id=" + id + ", name='" + name + "'}";
    }
}
实现两个比较器,比较器实现了 Comparator 接口,一个升序,一个降序
// 降序
public class DescSortor implements Comparator<Student> {
    @Override
    public int compare(Student o1, Student o2) {
        return o2.getId() - o1.getId();
    }
}

// 升序
public class AscSortor implements Comparator<Student> {
    @Override
    public int compare(Student o1, Student o2) {
        return o1.getId() - o2.getId();
    }
}
通过 Arrays.sort() 对数组进行排序
public class Test1 {
    public static void main(String[] args) {
        Student[] students = {
                new Student(3, "张三"),
                new Student(1, "李四"),
                new Student(4, "王五"),
                new Student(2, "赵六")
        };
        toString(students, "排序前");

        Arrays.sort(students, new AscSortor());
        toString(students, "升序后");

        Arrays.sort(students, new DescSortor());
        toString(students, "降序后");
    }

    public static void toString(Student[] students, String desc){
        for (int i = 0; i < students.length; i++) {
            System.out.print(desc + ": " +students[i].toString() + ", ");
        }
        System.out.println();
    }
}
输出
排序前: {id=3, name='张三'}, 排序前: {id=1, name='李四'}, 排序前: {id=4, name='王五'}, 排序前: {id=2, name='赵六'},
升序后: {id=1, name='李四'}, 升序后: {id=2, name='赵六'}, 升序后: {id=3, name='张三'}, 升序后: {id=4, name='王五'},
降序后: {id=4, name='王五'}, 降序后: {id=3, name='张三'}, 降序后: {id=2, name='赵六'}, 降序后: {id=1, name='李四'},
通过 Collections.sort() 对集合List进行排序
public class Test2 {
    public static void main(String[] args) {
        List<Student> students = Arrays.asList(
                new Student(3, "张三"),
                new Student(1, "李四"),
                new Student(4, "王五"),
                new Student(2, "赵六")
        );
        toString(students, "排序前");

        Collections.sort(students, new AscSortor());
        toString(students, "升序后");

        Collections.sort(students, new DescSortor());
        toString(students, "降序后");
    }

    public static void toString(List<Student> students, String desc) {
        for (Student student : students) {
            System.out.print(desc + ": " + student.toString() + ", ");
        }
        System.out.println();
    }
}
输出
排序前: {id=3, name='张三'}, 排序前: {id=1, name='李四'}, 排序前: {id=4, name='王五'}, 排序前: {id=2, name='赵六'},
升序后: {id=1, name='李四'}, 升序后: {id=2, name='赵六'}, 升序后: {id=3, name='张三'}, 升序后: {id=4, name='王五'},
降序后: {id=4, name='王五'}, 降序后: {id=3, name='张三'}, 降序后: {id=2, name='赵六'}, 降序后: {id=1, name='李四'},
我们向 Collections.sort() 和 Arrays.sort() 分别传入不同的比较器即可实现不同的排序效果(升序或降序)
这里 Comparator 接口充当了抽象策略角色,两个比较器 DescSortor 和 AscSortor 则充当了具体策略角色,Collections 和 Arrays 则是环境角色
Spring Resource 中的策略模式
Spring 把所有能记录信息的载体,如各种类型的文件、二进制流等都称为资源,譬如最常用的Spring配置文件。
在 Sun 所提供的标准 API 里,资源访问通常由 java.NET.URL 和文件 IO 来完成,尤其是当我们需要访问来自网络的资源时,通常会选择 URL 类。
URL 类可以处理一些常规的资源访问问题,但依然不能很好地满足所有底层资源访问的需要,比如,暂时还无法从类加载路径、或相对于 ServletContext 的路径来访问资源,虽然 Java 允许使用特定的 URL 前缀注册新的处理类(例如已有的 http: 前缀的处理类),但是这样做通常比较复杂,而且 URL 接口还缺少一些有用的功能,比如检查所指向的资源是否存在等。
Spring 改进了 Java 资源访问的策略,Spring 为资源访问提供了一个 Resource 接口,该接口提供了更强的资源访问能力,Spring 框架本身大量使用了 Resource 接口来访问底层资源。
public interface Resource extends InputStreamSource {
    boolean exists();    // 返回 Resource 所指向的资源是否存在
    boolean isReadable();   // 资源内容是否可读
    boolean isOpen();   // 返回资源文件是否打开
    URL getURL() throws IOException;
    URI getURI() throws IOException;
    File getFile() throws IOException;  // 返回资源对应的 File 对象
    long contentLength() throws IOException;
    long lastModified() throws IOException;
    Resource createRelative(String var1) throws IOException;
    String getFilename();
    String getDescription();    // 返回资源的描述信息
}
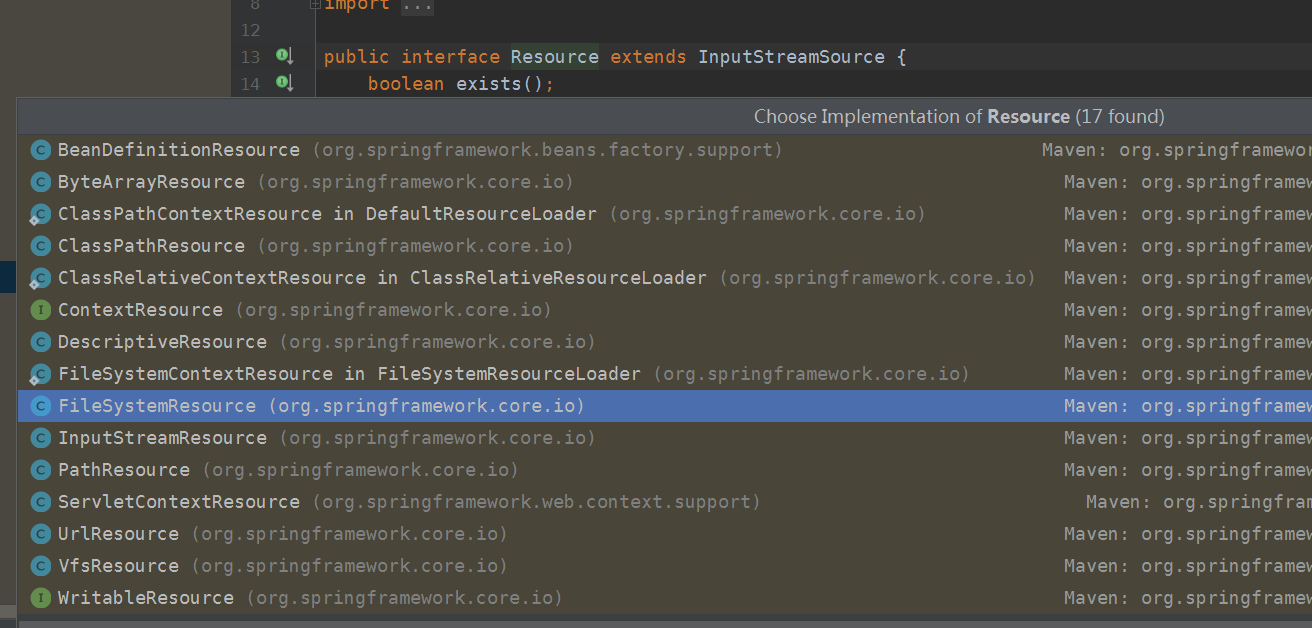
Resource 接口是 Spring 资源访问策略的抽象,它本身并不提供任何资源访问实现,具体的资源访问由该接口的实现类完成——每个实现类代表一种资源访问策略。

Spring 为 Resource 接口提供的部分实现类如下:
- UrlResource:访问网络资源的实现类。
- ClassPathResource:访问类加载路径里资源的实现类。
- FileSystemResource:访问文件系统里资源的实现类。
- ServletContextResource:访问相对于 ServletContext 路径里的资源的实现类:
- InputStreamResource:访问输入流资源的实现类。
- ByteArrayResource:访问字节数组资源的实现类。
- WritableResource:写资源文件
这些 Resource 实现类,针对不同的的底层资源,提供了相应的资源访问逻辑,并提供便捷的包装,以利于客户端程序的资源访问。
AbstractResource 资源抽象类实现了 Resource 接口,为子类通用的操作提供了具体实现,非通用的操作留给子类实现,所以这里也应用了模板方法模式。(只不过缺少了模板方法)
Resource 不仅可在 Spring 的项目中使用,也可直接作为资源访问的工具类使用。意思是说:即使不使用 Spring 框架,也可以使用 Resource 作为工具类,用来代替 URL。
譬如我们可以使用 UrlResource 访问网络资源。
public class Test {
    public static void main(String[] args) throws IOException {
        UrlResource ur = new UrlResource("http://image.laijianfeng.org/hello.txt");

        System.out.println("文件名:" + ur.getFilename());
        System.out.println("网络文件URL:" + ur.getURL());
        System.out.println("是否存在:" + ur.exists());
        System.out.println("是否可读:" + ur.isReadable());
        System.out.println("文件长度:" + ur.contentLength());

        System.out.println("
--------文件内容----------
");
        byte[] bytes = new byte[47];
        ur.getInputStream().read(bytes);
        System.out.println(new String(bytes));
    }
}
输出的内容如下,符合预期
文件名:hello.txt
网络文件URL:http://image.laijianfeng.org/hello.txt
是否存在:true
是否可读:true
文件长度:47

--------文件内容----------

hello world!
welcome to http://laijianfeng.org
Spring Bean 实例化中的策略模式
Spring实例化Bean有三种方式:构造器实例化、静态工厂实例化、实例工厂实例化
譬如通过构造器实例化bean的XML示例如下:
<?xml version="1.0" encoding="UTF-8"?>
<beans xmlns="http://www.springframework.org/schema/beans"
    xmlns:xsi="http://www.w3.org/2001/XMLSchema-instance"
    xsi:schemaLocation="http://www.springframework.org/schema/beans http://www.springframework.org/schema/beans/spring-beans.xsd">

    <bean id="person" class="com.demo.Person"></bean>

    <bean id="personWithParam" class="com.demo.Person">
        <constructor-arg name="name" value="小旋锋"/>
    </bean>

    <bean id="personWirhParams" class="com.demo.Person">
            <constructor-arg name="name" value="小旋锋"/>
            <constructor-arg name="age" value="22"/>
    </bean>
</beans>
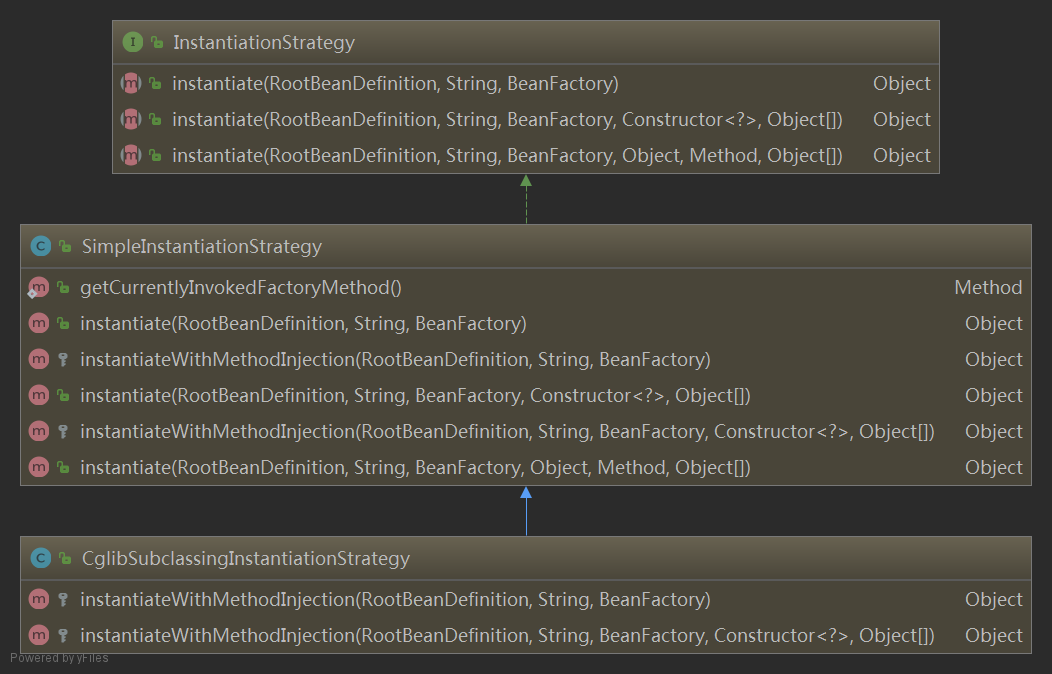
具体实例化Bean的过程中,Spring中角色分工很明确,创建对象的时候先通过 ConstructorResolver 找到对应的实例化方法和参数,再通过实例化策略 InstantiationStrategy 进行实例化,根据创建对象的三个分支( 工厂方法、有参构造方法、无参构造方法 ), InstantiationStrategy 提供了三个接口方法:
public interface InstantiationStrategy {
    // 默认构造方法
    Object instantiate(RootBeanDefinition beanDefinition, String beanName, BeanFactory owner) throws BeansException;

    // 指定构造方法
    Object instantiate(RootBeanDefinition beanDefinition, String beanName, BeanFactory owner, Constructor<?> ctor,
            Object[] args) throws BeansException;

    // 指定工厂方法
    Object instantiate(RootBeanDefinition beanDefinition, String beanName, BeanFactory owner, Object factoryBean,
            Method factoryMethod, Object[] args) throws BeansException;
}
InstantiationStrategy 为实例化策略接口,扮演抽象策略角色,有两种具体策略类,分别为 SimpleInstantiationStrategy 和 CglibSubclassingInstantiationStrategy

在 SimpleInstantiationStrategy 中对这三个方法做了简单实现,如果工厂方法实例化直接用反射创建对象,如果是构造方法实例化的则判断是否有 MethodOverrides,如果有无 MethodOverrides 也是直接用反射,如果有 MethodOverrides 就需要用 cglib 实例化对象,SimpleInstantiationStrategy 把通过 cglib 实例化的任务交给了它的子类 CglibSubclassingInstantiationStrategy。