NioEventLoop
书接上文
SingleThreadEventExecutor的doStartThread()方法,最终调用的是SingleThreadEventExecutor.this.run();
调用了子类NioEventLoop的run方法,该方法没有break,只有个别情况才会continue,所以这个循环一直在运行
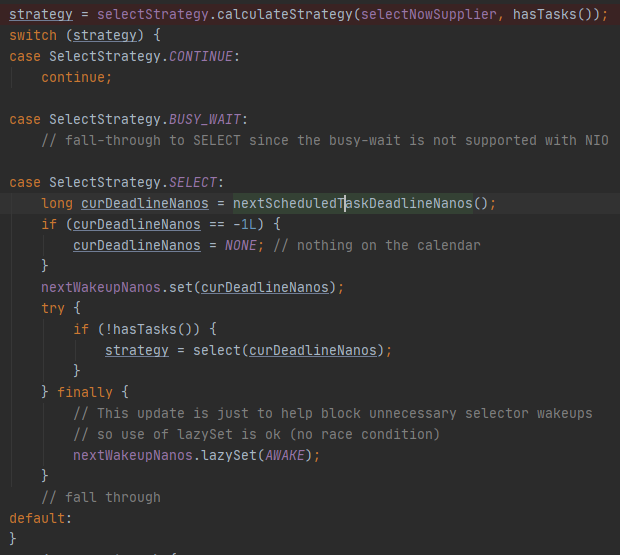
  1 protected void run() {
  2         int selectCnt = 0;
  3         for (;;) {
  4             try {
  5                 int strategy;
  6                 try {
  7                     strategy = selectStrategy.calculateStrategy(selectNowSupplier, hasTasks());
  8                     switch (strategy) {
  9                     case SelectStrategy.CONTINUE:
 10                         continue;
 11
 12                     case SelectStrategy.BUSY_WAIT:
 13                         // fall-through to SELECT since the busy-wait is not supported with NIO
 14
 15                     case SelectStrategy.SELECT:
 16                         long curDeadlineNanos = nextScheduledTaskDeadlineNanos();
 17                         if (curDeadlineNanos == -1L) {
 18                             curDeadlineNanos = NONE; // nothing on the calendar
 19                         }
 20                         nextWakeupNanos.set(curDeadlineNanos);
 21                         try {
 22                             if (!hasTasks()) {
 23                                 strategy = select(curDeadlineNanos);
 24                             }
 25                         } finally {
 26                             // This update is just to help block unnecessary selector wakeups
 27                             // so use of lazySet is ok (no race condition)
 28                             nextWakeupNanos.lazySet(AWAKE);
 29                         }
 30                         // fall through
 31                     default:
 32                     }
 33                 } catch (IOException e) {
 34                     // If we receive an IOException here its because the Selector is messed up. Let's rebuild
 35                     // the selector and retry. https://github.com/netty/netty/issues/8566
 36                     rebuildSelector0();
 37                     selectCnt = 0;
 38                     handleLoopException(e);
 39                     continue;
 40                 }
 41
 42                 selectCnt++;
 43                 cancelledKeys = 0;
 44                 needsToSelectAgain = false;
 45                 final int ioRatio = this.ioRatio;
 46                 boolean ranTasks;
 47                 if (ioRatio == 100) {
 48                     try {
 49                         if (strategy > 0) {
 50                             processSelectedKeys();//如果IO比率100%,并且有事件那就处理事件
 51                         }
 52                     } finally {
 53                         // Ensure we always run tasks.
 54                         ranTasks = runAllTasks();//否则处理所有任务
 55                     }
 56                 } else if (strategy > 0) {
 57                     final long ioStartTime = System.nanoTime();
 58                     try {
 59                         processSelectedKeys();//如果没到比例,但是有事件,优先处理事件,然后在处理任务,但是有超时时间
 60                     } finally {
 61                         // Ensure we always run tasks.
 62                         final long ioTime = System.nanoTime() - ioStartTime;
 63                         ranTasks = runAllTasks(ioTime * (100 - ioRatio) / ioRatio);
 64                     }
 65                 } else {
 66                     ranTasks = runAllTasks(0); // This will run the minimum number of tasks 如果没到比例,又没任务,那就处理任务,没超时时间
 67                 }
 68
 69                 if (ranTasks || strategy > 0) {
 70                     if (selectCnt > MIN_PREMATURE_SELECTOR_RETURNS && logger.isDebugEnabled()) {
 71                         logger.debug("Selector.select() returned prematurely {} times in a row for Selector {}.",
 72                                 selectCnt - 1, selector);
 73                     }
 74                     selectCnt = 0;
 75                 } else if (unexpectedSelectorWakeup(selectCnt)) { // Unexpected wakeup (unusual case)
 76                     selectCnt = 0;
 77                 }
 78             } catch (CancelledKeyException e) {
 79                 // Harmless exception - log anyway
 80                 if (logger.isDebugEnabled()) {
 81                     logger.debug(CancelledKeyException.class.getSimpleName() + " raised by a Selector {} - JDK bug?",
 82                             selector, e);
 83                 }
 84             } catch (Error e) {
 85                 throw (Error) e;
 86             } catch (Throwable t) {
 87                 handleLoopException(t);
 88             } finally {
 89                 // Always handle shutdown even if the loop processing threw an exception.
 90                 try {
 91                     if (isShuttingDown()) {
 92                         closeAll();
 93                         if (confirmShutdown()) {
 94                             return;
 95                         }
 96                     }
 97                 } catch (Error e) {
 98                     throw (Error) e;
 99                 } catch (Throwable t) {
100                     handleLoopException(t);
101                 }
102             }
103         }
104     }
selectStrategy.calculateStrategy(selectNowSupplier, hasTasks());
1 public int calculateStrategy(IntSupplier selectSupplier, boolean hasTasks) throws Exception {
2         return hasTasks ? selectSupplier.get() : SelectStrategy.SELECT;
3     }
如果有任务就执行selectSupplier.get(),即NioEventLoop的selectNow()方法,如果返回0就会开始执行任务;否则就返回-1进入switch case SelectStrategy.SELECT, 执行选择器的select(curDeadlineNanos)方法阻塞。
selectNow()最终调用的是WindowsSelectorImpl.selectNow();方法,这个类是javaNIO类。
1 public int selectNow() throws IOException {
2         selectionKeys.reset();
3         return delegate.selectNow();
4     }
select(curDeadlineNanos)方法
1 private int select(long deadlineNanos) throws IOException {
2         if (deadlineNanos == NONE) {
3             return selector.select();
4         }
5         // Timeout will only be 0 if deadline is within 5 microsecs
6         long timeoutMillis = deadlineToDelayNanos(deadlineNanos + 995000L) / 1000000L;
7         return timeoutMillis <= 0 ? selector.selectNow() : selector.select(timeoutMillis);
8     }
hasTasks()判断任务队列是否有task
在前文已提到 AbstractUnsafe类中register0(promise);为异步执行,会加入到任务队列,所以hasTasks()返回true,执行selectSupplier.get()方法。strategy 返回0,不进入switch。
超时时间是根据ioRatioio运行时间的占比算的,初始值是50,也就是50%,所以下面这段的意思就是先算出ioTime也就是io消耗的时间,然后ioTime * (100 - ioRatio) / ioRatio就是按照比例,运行任务的时间,比如50,就是任务运行跟io一样,如果是10,那算出来刚好是9倍的ioTime,也就是io占10%,任务要90%的时间,netty默认是一半一半:
1 final long ioTime = System.nanoTime() - ioStartTime;
2 ranTasks = runAllTasks(ioTime * (100 - ioRatio) / ioRatio);
ioRatio默认50,所以直接执行
ranTasks = runAllTasks(0);
protected boolean runAllTasks(long timeoutNanos) {
 2     fetchFromScheduledTaskQueue(); //先获取要调度的任务,定时任务队列
 3     Runnable task = pollTask();//获取队列中的任务
 4     if (task == null) {
 5         afterRunningAllTasks();//处理任务后,执行tailtasks的任务
 6         return false;
 7     }
 8    //截至时间,已经花费调度任务的时间+超时时间 ScheduledFutureTask.nanoTime()表示从开始到现在执行任务持续的时间
 9     final long deadline = timeoutNanos > 0 ? ScheduledFutureTask.nanoTime() + timeoutNanos : 0;
10     long runTasks = 0;//统计任务数
11     long lastExecutionTime;//持续执行的时间
12     for (;;) {
13         safeExecute(task);//执行任务,即 AbstractUnsafe类中register0(promise)
14
15         runTasks ++;//任务数+1
16
17         // Check timeout every 64 tasks because nanoTime() is relatively expensive.
18         // XXX: Hard-coded value - will make it configurable if it is really a problem.
19         if ((runTasks & 0x3F) == 0) {//到64个任务 0x3F=0x00111111 位与==0 肯定到64了,单线程,不会有线程安全问题
20             lastExecutionTime = ScheduledFutureTask.nanoTime();//每执行64个任务统计下时间
21             if (lastExecutionTime >= deadline) {//如果调度任务的时间超过截止时间了,那就退出了,否则时间太长了
22                 break;
23             }
24         }
25
26         task = pollTask();//继续获取任务
27         if (task == null) {
28             lastExecutionTime = ScheduledFutureTask.nanoTime();
29             break;
30         }
31     }
32
33     afterRunningAllTasks();
34     this.lastExecutionTime = lastExecutionTime;//保存持续执行任务的时间
35     return true;
36 }
fetchFromScheduledTaskQueue();
从可调度的任务里获得任务,放入任务队列taskQueue中:
 1 private boolean fetchFromScheduledTaskQueue() {
 2         if (scheduledTaskQueue == null || scheduledTaskQueue.isEmpty()) {
 3             return true;
 4         }
 5         long nanoTime = AbstractScheduledEventExecutor.nanoTime();//获取已经执行任务消耗的时间
 6         for (;;) {
 7             Runnable scheduledTask = pollScheduledTask(nanoTime);//获取可以执行的调度任务
 8             if (scheduledTask == null) {
 9                 return true;
10             }
11             if (!taskQueue.offer(scheduledTask)) {//如果无法放入任务队列,就放回去
12                 // No space left in the task queue add it back to the scheduledTaskQueue so we pick it up again.
13                 scheduledTaskQueue.add((ScheduledFutureTask<?>) scheduledTask);
14                 return false;
15             }
16         }
17     }
pollScheduledTask(long nanoTime);
 1 protected final Runnable pollScheduledTask(long nanoTime) {
 2         assert inEventLoop();
 3
 4         ScheduledFutureTask<?> scheduledTask = peekScheduledTask();
 5         if (scheduledTask == null || scheduledTask.deadlineNanos() - nanoTime > 0) {//没有任务或者延迟的时间还没到
 6             return null;
 7         }
 8         scheduledTaskQueue.remove();//从队伍中删除
 9         scheduledTask.setConsumed();//设置没延迟了
10         return scheduledTask;
11     }
pollTask();
 1 protected Runnable pollTask() {
 2         assert inEventLoop();
 3         return pollTaskFrom(taskQueue);
 4     }
 5
 6 protected static Runnable pollTaskFrom(Queue<Runnable> taskQueue) {
 7         for (;;) {
 8             Runnable task = taskQueue.poll();
 9             if (task != WAKEUP_TASK) {
10                 return task;
11             }
12         }
13     }
WAKEUP_TASK是个空任务,即唤醒任务,什么都不做,作为特殊的唤醒任务,用来唤醒线程。
ScheduledFutureTask.nanoTime();
1 private static final long START_TIME = System.nanoTime();
2
3     static long nanoTime() {
4         return System.nanoTime() - START_TIME;
5     }
持续执行任务时间,即从开始到现在执行任务的时间。
START_TIME在NioEventLoopGroup创建的时候,其父类MultithreadEventExecutorGroup初始化,成员变量赋值的时候private final Promise<?> terminationFuture = new DefaultPromise(GlobalEventExecutor.INSTANCE);,然后又是GlobalEventExecutor成员变量赋值:
 1 private final Promise<?> terminationFuture = new DefaultPromise(GlobalEventExecutor.INSTANCE);
 2
 3 public static final GlobalEventExecutor INSTANCE = new GlobalEventExecutor();
 4
 5 final ScheduledFutureTask<Void> quietPeriodTask = new ScheduledFutureTask<Void>(
 6             this, Executors.<Void>callable(new Runnable() {
 7         @Override
 8         public void run() {
 9             // NOOP
10         }
11     }, null), ScheduledFutureTask.deadlineNanos(SCHEDULE_QUIET_PERIOD_INTERVAL), -SCHEDULE_QUIET_PERIOD_INTERVAL);
调用到ScheduledFutureTask的初始化静态常量赋值,所以START_TIME是NioEventLoopGroup的初始化时间。
afterRunningAllTasks();
 1 protected void afterRunningAllTasks() {
 2         runAllTasksFrom(tailTasks);
 3     }
 4
 5 protected final boolean runAllTasksFrom(Queue<Runnable> taskQueue) {
 6         Runnable task = pollTaskFrom(taskQueue);
 7         if (task == null) {
 8             return false;
 9         }
10         for (;;) {
11             safeExecute(task);
12             task = pollTaskFrom(taskQueue);
13             if (task == null) {
14                 return true;
15             }
16         }
17     }
runAllTasks();
 1 protected boolean runAllTasks() {
 2         assert inEventLoop();
 3         boolean fetchedAll;
 4         boolean ranAtLeastOne = false;//是否至少执行了一个任务
 5
 6         do {
 7             fetchedAll = fetchFromScheduledTaskQueue();//获取调度任务
 8             if (runAllTasksFrom(taskQueue)) {//执行所有taskQueue任务
 9                 ranAtLeastOne = true;
10             }
11         } while (!fetchedAll); // keep on processing until we fetched all scheduled tasks.//直到所有的可执行的调度任务都放进任务队列,执行完为止
12
13         if (ranAtLeastOne) {
14             lastExecutionTime = ScheduledFutureTask.nanoTime();//如果有执行任务就更新持续执行的时间
15         }
16         afterRunningAllTasks();
17         return ranAtLeastOne;
18     }
runAllTasksFrom(Queue taskQueue);
执行任务队列
protected final boolean runAllTasksFrom(Queue<Runnable> taskQueue) {
        Runnable task = pollTaskFrom(taskQueue);
        if (task == null) {
            return false;
        }
        for (;;) {
            safeExecute(task);
            task = pollTaskFrom(taskQueue);
            if (task == null) {
                return true;
            }
        }
    }
Epoll的空轮询BUG解决方案
1 if (ranTasks || strategy > 0) {
2                     if (selectCnt > MIN_PREMATURE_SELECTOR_RETURNS && logger.isDebugEnabled()) {
3                         logger.debug("Selector.select() returned prematurely {} times in a row for Selector {}.",
4                                 selectCnt - 1, selector);
5                     }
6                     selectCnt = 0;
7                 } else if (unexpectedSelectorWakeup(selectCnt)) { // Unexpected wakeup (unusual case)
8                     selectCnt = 0;
9                 }
虽然调用了阻塞的selector.select(),但是由于操作系统底层发现socket断开,还是会返回0,然后底下又没能处理相应的事件,而且任务队列也为空的情况下,就会死循环下去,造成CPU100%。netty的解决方案就是用了一个变量selectCnt统计轮询的次数。一旦空循环就会去执行unexpectedSelectorWakeup(selectCnt)检测:
 1  private boolean unexpectedSelectorWakeup(int selectCnt) {
 2         if (Thread.interrupted()) {
 3             // Thread was interrupted so reset selected keys and break so we not run into a busy loop.
 4             // As this is most likely a bug in the handler of the user or it's client library we will
 5             // also log it.
 6             //
 7             // See https://github.com/netty/netty/issues/2426
 8             if (logger.isDebugEnabled()) {
 9                 logger.debug("Selector.select() returned prematurely because " +
10                         "Thread.currentThread().interrupt() was called. Use " +
11                         "NioEventLoop.shutdownGracefully() to shutdown the NioEventLoop.");
12             }
13             return true;
14         }
15         if (SELECTOR_AUTO_REBUILD_THRESHOLD > 0 &&
16                 selectCnt >= SELECTOR_AUTO_REBUILD_THRESHOLD) { //512
17             // The selector returned prematurely many times in a row.
18             // Rebuild the selector to work around the problem.
19             logger.warn("Selector.select() returned prematurely {} times in a row; rebuilding Selector {}.",
20                     selectCnt, selector);
21             rebuildSelector();
22             return true;
23         }
24         return false;
25     }
如果空轮询次数大于一定阈值后,就会重新创建一个选择器,然后把老的事件,通道,都注册到新的上面。阈值在NioEventLoop类的静态代码块中定义。

rebuildSelector()
public void rebuildSelector() {
        if (!inEventLoop()) {
            execute(new Runnable() {
                @Override
                public void run() {
                    rebuildSelector0();
                }
            });
            return;
        }
        rebuildSelector0();
    }
rebuildSelector0();
 1 private void rebuildSelector0() {
 2         final Selector oldSelector = selector;
 3         final SelectorTuple newSelectorTuple;
 4
 5         if (oldSelector == null) {
 6             return;
 7         }
 8
 9         try {
10             newSelectorTuple = openSelector();//重新创建一个electorTuple
11         } catch (Exception e) {
12             logger.warn("Failed to create a new Selector.", e);
13             return;
14         }
15
16         // Register all channels to the new Selector.
17         int nChannels = 0;
18         for (SelectionKey key: oldSelector.keys()) {
19             Object a = key.attachment();
20             try {
21                 if (!key.isValid() || key.channel().keyFor(newSelectorTuple.unwrappedSelector) != null) {
22                     continue;
23                 }
24
25                 int interestOps = key.interestOps();
26                 key.cancel();
27                 SelectionKey newKey = key.channel().register(newSelectorTuple.unwrappedSelector, interestOps, a);
28                 if (a instanceof AbstractNioChannel) {
29                     // Update SelectionKey
30                     ((AbstractNioChannel) a).selectionKey = newKey;
31                 }
32                 nChannels ++;
33             } catch (Exception e) {
34                 logger.warn("Failed to re-register a Channel to the new Selector.", e);
35                 if (a instanceof AbstractNioChannel) {
36                     AbstractNioChannel ch = (AbstractNioChannel) a;
37                     ch.unsafe().close(ch.unsafe().voidPromise());
38                 } else {
39                     @SuppressWarnings("unchecked")
40                     NioTask<SelectableChannel> task = (NioTask<SelectableChannel>) a;
41                     invokeChannelUnregistered(task, key, e);
42                 }
43             }
44         }
45
46         selector = newSelectorTuple.selector;
47         unwrappedSelector = newSelectorTuple.unwrappedSelector;
48
49         try {
50             // time to close the old selector as everything else is registered to the new one
51             oldSelector.close();//关闭旧的选择器
52         } catch (Throwable t) {
53             if (logger.isWarnEnabled()) {
54                 logger.warn("Failed to close the old Selector.", t);
55             }
56         }
57
58         if (logger.isInfoEnabled()) {
59             logger.info("Migrated " + nChannels + " channel(s) to the new Selector.");
60         }
61     }
执行任务一(通道注册register0)
register0(promise)方法:
 1 private void register0(ChannelPromise promise) {
 2             try {
 3                 // check if the channel is still open as it could be closed in the mean time when the register
 4                 // call was outside of the eventLoop
 5                 if (!promise.setUncancellable() || !ensureOpen(promise)) {
 6                     return;
 7                 }
 8                 boolean firstRegistration = neverRegistered;
 9                 doRegister();//调用的是AbstractNioChannel的doRegister
10                 neverRegistered = false;
11                 registered = true;
12
13                 // Ensure we call handlerAdded(...) before we actually notify the promise. This is needed as the
14                 // user may already fire events through the pipeline in the ChannelFutureListener.
15                 pipeline.invokeHandlerAddedIfNeeded(); //DefaultChannelPipeline的invokeHandlerAddedIfNeeded方法
16
17                 safeSetSuccess(promise);
18                 pipeline.fireChannelRegistered();
19                 // Only fire a channelActive if the channel has never been registered. This prevents firing
20                 // multiple channel actives if the channel is deregistered and re-registered.
21                 if (isActive()) { // 此时 Channel 还未注册绑定地址,所以处于非活跃状态
22                     if (firstRegistration) {
23                         pipeline.fireChannelActive();// Channel 当前状态为活跃时,触发 channelActive 事件
24                     } else if (config().isAutoRead()) {
25                         // This channel was registered before and autoRead() is set. This means we need to begin read
26                         // again so that we process inbound data.
27                         //
28                         // See https://github.com/netty/netty/issues/4805
29                         beginRead();
30                     }
31                 }
32             } catch (Throwable t) {
33                 // Close the channel directly to avoid FD leak.
34                 closeForcibly();
35                 closeFuture.setClosed();
36                 safeSetFailure(promise, t);
37             }
38         }
register0() 主要做了四件事:调用 JDK 底层进行 Channel 注册、触发 handlerAdded 事件、触发 channelRegistered 事件、Channel 当前状态为活跃时,触发 channelActive 事件。
AbstractNioChannel的doRegister;这里和NIO的注册选择器差不多。里面的selectionKey就是调用NIO的ServerSocketChannelImpl类来register的,此时注册才算是完成了,不过要注意的是这时候的注册事件是0,不监听事件。
 1 @Override
 2 protected void doRegister() throws Exception {
 3     boolean selected = false;
 4     for (;;) {
 5         try {
 6             selectionKey = javaChannel().register(eventLoop().unwrappedSelector(), 0, this);// 调用 JDK 底层的 register() 进行注册
 7             return;
 8         } catch (CancelledKeyException e) {
 9             if (!selected) {
10                 // Force the Selector to select now as the "canceled" SelectionKey may still be
11                 // cached and not removed because no Select.select(..) operation was called yet.
12                 eventLoop().selectNow();
13                 selected = true;
14             } else {
15                 // We forced a select operation on the selector before but the SelectionKey is still cached
16                 // for whatever reason. JDK bug ?
17                 throw e;
18             }
19         }
20     }
21 }
AbstractSelectableChannel#register
    public final SelectionKey register(Selector sel, int ops,
                                       Object att)
        throws ClosedChannelException
    {
        synchronized (regLock) {
            if (!isOpen())
                throw new ClosedChannelException();
            if ((ops & ~validOps()) != 0)
                throw new IllegalArgumentException();
            if (blocking)
                throw new IllegalBlockingModeException();
            SelectionKey k = findKey(sel);
            if (k != null) {
                k.interestOps(ops);
                k.attach(att);
            }
            if (k == null) {
                // New registration
                synchronized (keyLock) {
                    if (!isOpen())
                        throw new ClosedChannelException();
                    k = ((AbstractSelector)sel).register(this, ops, att);
                    addKey(k);
                }
            }
            return k;
        }
    }
javaChannel().register() 负责调用 JDK 底层,将 Channel 注册到 Selector 上,register() 的第三个入参传入的是 Netty 自己实现的 Channel 对象,调用 register() 方法会将它绑定在 JDK 底层 Channel 的 attachment 上。这样在每次 Selector 对象进行事件循环时,Netty 都可以从返回的 JDK 底层 Channel 中获得自己的 Channel 对象。
完成 Channel 向 Selector 注册后,接下来就会触发 Pipeline 一系列的事件传播。在事件传播之前,用户自定义的业务处理器是如何被添加到 Pipeline 中的呢?答案就在pipeline.invokeHandlerAddedIfNeeded() 当中,我们重点看下 handlerAdded 事件的处理过程。
DefaultChannelPipeline的invokeHandlerAddedIfNeeded方法(含有新任务的提交)
 1 final void invokeHandlerAddedIfNeeded() {
 2     assert channel.eventLoop().inEventLoop();
 3     if (firstRegistration) {
 4         firstRegistration = false;
 5         // We are now registered to the EventLoop. It's time to call the callbacks for the ChannelHandlers,
 6         // that were added before the registration was done.
 7         callHandlerAddedForAllHandlers();
 8     }
 9 }
10
11
12 private void callHandlerAddedForAllHandlers() {
13     final PendingHandlerCallback pendingHandlerCallbackHead;
14     synchronized (this) {
15         assert !registered;
16
17         // This Channel itself was registered.
18         registered = true;
19
20         pendingHandlerCallbackHead = this.pendingHandlerCallbackHead;//对应上文的initchannel中的addlast方法中添加的handle
21         // Null out so it can be GC'ed.
22         this.pendingHandlerCallbackHead = null;
23     }
24
25     // This must happen outside of the synchronized(...) block as otherwise handlerAdded(...) may be called while
26     // holding the lock and so produce a deadlock if handlerAdded(...) will try to add another handler from outside
27     // the EventLoop.
28     PendingHandlerCallback task = pendingHandlerCallbackHead;
29     while (task != null) {
30         task.execute();
31         task = task.next;
32     }
33 }
task.execute();对应 PendingHandlerAddedTask的execute()
 1 @Override
 2 void execute() {
 3     EventExecutor executor = ctx.executor();
 4     if (executor.inEventLoop()) {
 5         callHandlerAdded0(ctx);
 6     } else {
 7         try {
 8             executor.execute(this);
 9         } catch (RejectedExecutionException e) {
10             if (logger.isWarnEnabled()) {
11                 logger.warn(
12                         "Can't invoke handlerAdded() as the EventExecutor {} rejected it, removing handler {}.",
13                         executor, ctx.name(), e);
14             }
15             atomicRemoveFromHandlerList(ctx);
16             ctx.setRemoved();
17         }
18     }
19 }
方法callHandlerAdded0(ctx);
 1 private void callHandlerAdded0(final AbstractChannelHandlerContext ctx) {
 2         try {
 3             ctx.callHandlerAdded();
 4         } catch (Throwable t) {
 5             boolean removed = false;
 6             try {
 7                 atomicRemoveFromHandlerList(ctx);
 8                 ctx.callHandlerRemoved();
 9                 removed = true;
10             } catch (Throwable t2) {
11                 if (logger.isWarnEnabled()) {
12                     logger.warn("Failed to remove a handler: " + ctx.name(), t2);
13                 }
14             }
15
16             if (removed) {
17                 fireExceptionCaught(new ChannelPipelineException(
18                         ctx.handler().getClass().getName() +
19                         ".handlerAdded() has thrown an exception; removed.", t));
20             } else {
21                 fireExceptionCaught(new ChannelPipelineException(
22                         ctx.handler().getClass().getName() +
23                         ".handlerAdded() has thrown an exception; also failed to remove.", t));
24             }
25         }
26     }
方法ctx.callHandlerAdded();
1 final void callHandlerAdded() throws Exception {
2     // We must call setAddComplete before calling handlerAdded. Otherwise if the handlerAdded method generates
3     // any pipeline events ctx.handler() will miss them because the state will not allow it.
4     if (setAddComplete()) {
5         handler().handlerAdded(this);
6     }
7 }
此处的handler()为DefaultChannelHandlerContext的handler,即为上文中addlast的newContext中的handler,也就是ServerBootstrap中的new ChannelInitializer初始化通道任务,提交任务到当前事件循环的taskQueue。
 1 p.addLast(new ChannelInitializer<Channel>() {
 2     @Override
 3     public void initChannel(final Channel ch) {
 4         final ChannelPipeline pipeline = ch.pipeline();
 5         ChannelHandler handler = config.handler();
 6         if (handler != null) {
 7             pipeline.addLast(handler);
 8         }
 9
10         ch.eventLoop().execute(new Runnable() {
11             @Override
12             public void run() {
13                 pipeline.addLast(new ServerBootstrapAcceptor(
14                         ch, currentChildGroup, currentChildHandler, currentChildOptions, currentChildAttrs));
15             }
16         });
17     }
18 });
handlerAdded(this)方法:
 1 @Override
 2 public void handlerAdded(ChannelHandlerContext ctx) throws Exception {
 3     if (ctx.channel().isRegistered()) {
 4         // This should always be true with our current DefaultChannelPipeline implementation.
 5         // The good thing about calling initChannel(...) in handlerAdded(...) is that there will be no ordering
 6         // surprises if a ChannelInitializer will add another ChannelInitializer. This is as all handlers
 7         // will be added in the expected order.
 8         if (initChannel(ctx)) {
 9
10             // We are done with init the Channel, removing the initializer now.
11             removeState(ctx);
12         }
13     }
14 }
initChannel(ctx)方法
 1 private boolean initChannel(ChannelHandlerContext ctx) throws Exception {
 2     if (initMap.add(ctx)) { // Guard against re-entrance.
 3         try {
 4             initChannel((C) ctx.channel());// 调用 ChannelInitializer 实现的 initChannel() 方法
 5         } catch (Throwable cause) {
 6             // Explicitly call exceptionCaught(...) as we removed the handler before calling initChannel(...).
 7             // We do so to prevent multiple calls to initChannel(...).
 8             exceptionCaught(ctx, cause);
 9         } finally {
10             ChannelPipeline pipeline = ctx.pipeline();
11             if (pipeline.context(this) != null) {
12                 pipeline.remove(this);// 将 ChannelInitializer 自身从 Pipeline 中移出
13             }
14         }
15         return true;
16     }
17     return false;
18 }
可以看出 ChannelInitializer 首先会调用 initChannel() 抽象方法,然后 Netty 会把 ChannelInitializer 自身从 Pipeline 移出。其中 initChannel() 抽象方法是在哪里实现的呢?这就要跟踪到 ServerBootstrap 之前的 init() 方法,其中有这么一段代码:
p.addLast(new ChannelInitializer<Channel>() {
    @Override
    public void initChannel(final Channel ch) {
        final ChannelPipeline pipeline = ch.pipeline();
        ChannelHandler handler = config.handler();
        if (handler != null) {
            pipeline.addLast(handler);
        }

        ch.eventLoop().execute(new Runnable() {
            @Override
            public void run() {
                pipeline.addLast(new ServerBootstrapAcceptor(
                        ch, currentChildGroup, currentChildHandler, currentChildOptions, currentChildAttrs));
            }
        });
    }
});
在前面我们已经分析了 initChannel() 方法的实现逻辑,首先向 Pipeline 中添加 ServerSocketChannel 对应的 Handler,然后通过异步 task 的方式向 Pipeline 添加 ServerBootstrapAcceptor 处理器。其中有一个点不要混淆,handler() 方法是添加到服务端的Pipeline 上,而 childHandler() 方法是添加到客户端的 Pipeline 上。
因为添加 ServerBootstrapAcceptor 是一个异步过程,需要 EventLoop 线程负责执行。而当前 EventLoop 线程正在执行 register0() 的注册流程,所以等到 register0() 执行完之后才能被添加到 Pipeline 当中。完成 initChannel() 这一步之后,ServerBootstrapAcceptor 并没有被添加到 Pipeline 中,此时 Pipeline 的内部结构变化如下图所示。

我们回到 register0() 的主流程,接着向下分析。channelRegistered 事件是由 fireChannelRegistered() 方法触发,沿着 Pipeline 的 Head 节点传播到 Tail 节点,并依次调用每个 ChannelHandler 的 channelRegistered() 方法。然而此时 Channel 还未注册绑定地址,所以处于非活跃状态,所以并不会触发 channelActive 事件。
执行完整个 register0() 的注册流程之后,EventLoop 线程会将 ServerBootstrapAcceptor 添加到 Pipeline 当中,此时 Pipeline 的内部结构又发生了变化,如下图所示。

整个服务端 Channel 注册的流程我们已经讲完。
safeSetSuccess(promise);
这个就是要回调啦,设置注册成功了,于是会调用我们在前面监听注册完成的回调:
调转路径:
最终跳转到 private ChannelFuture doBind(final SocketAddress localAddress)方法中
 1 private ChannelFuture doBind(final SocketAddress localAddress) {
 2         final ChannelFuture regFuture = initAndRegister();
 3         final Channel channel = regFuture.channel();
 4         if (regFuture.cause() != null) {
 5             return regFuture;
 6         }
 7
 8         if (regFuture.isDone()) {
 9             // At this point we know that the registration was complete and successful.
10             ChannelPromise promise = channel.newPromise();
11             doBind0(regFuture, channel, localAddress, promise);
12             return promise;
13         } else {
14             // Registration future is almost always fulfilled already, but just in case it's not.
15             final PendingRegistrationPromise promise = new PendingRegistrationPromise(channel);
16             regFuture.addListener(new ChannelFutureListener() {
17                 @Override
18                 public void operationComplete(ChannelFuture future) throws Exception {
19                     Throwable cause = future.cause();
20                     if (cause != null) {
21                         // Registration on the EventLoop failed so fail the ChannelPromise directly to not cause an
22                         // IllegalStateException once we try to access the EventLoop of the Channel.
23                         promise.setFailure(cause);
24                     } else {
25                         // Registration was successful, so set the correct executor to use.
26                         // See https://github.com/netty/netty/issues/2586
27                         promise.registered();
28
29                         doBind0(regFuture, channel, localAddress, promise);
30                     }
31                 }
32             });
33             return promise;
34         }
35     }
里面就要调用doBind0来绑定端口了。
doBind0(含有新任务提交)
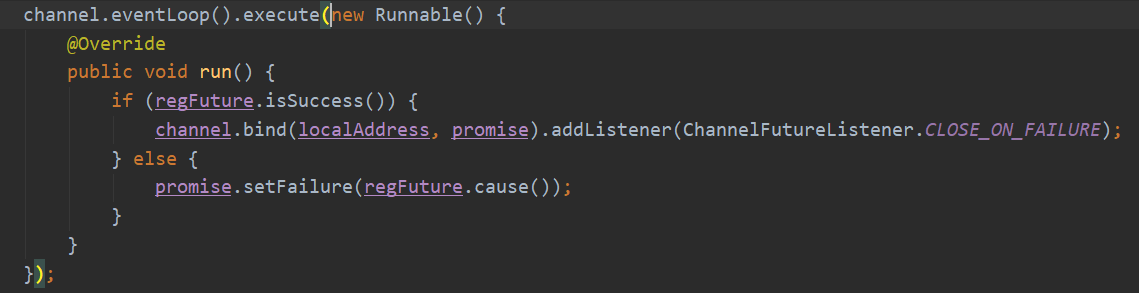
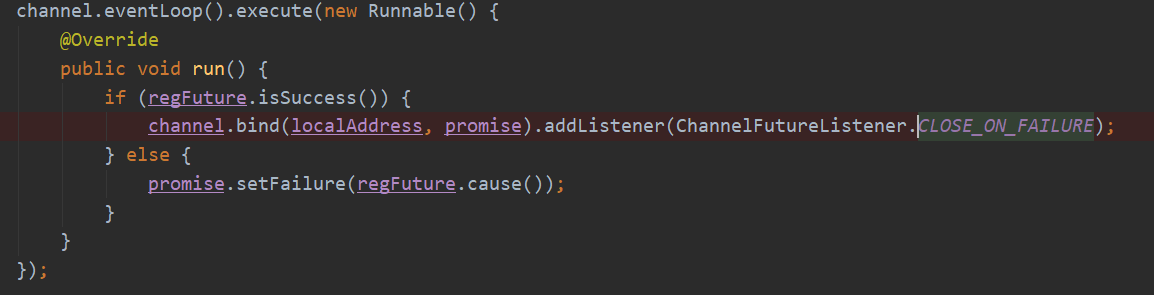
里面会提交任务到当前事件循环的taskQueue,任务里面才是去真正的绑定地址,顺便添加了一个失败关闭的回调:
 1 private static void doBind0(
 2             final ChannelFuture regFuture, final Channel channel,
 3             final SocketAddress localAddress, final ChannelPromise promise) {
 4
 5         // This method is invoked before channelRegistered() is triggered.  Give user handlers a chance to set up
 6         // the pipeline in its channelRegistered() implementation.
 7         channel.eventLoop().execute(new Runnable() {
 8             @Override
 9             public void run() {
10                 if (regFuture.isSuccess()) {
11                     channel.bind(localAddress, promise).addListener(ChannelFutureListener.CLOSE_ON_FAILURE);
12                 } else {
13                     promise.setFailure(regFuture.cause());
14                 }
15             }
16         });
17     }
之后的还会执行一些通知回调,然后任务完成。
执行任务二(管道添加ServerBootstrapAcceptor)
事件循环继续执行任务,这次就是执行刚才添加的第一个任务:
即ServerBootstrap的init(Channel channel)方法
 1 void init(Channel channel) {
 2         setChannelOptions(channel, newOptionsArray(), logger);
 3         setAttributes(channel, newAttributesArray());
 4
 5         ChannelPipeline p = channel.pipeline();
 6
 7         final EventLoopGroup currentChildGroup = childGroup;
 8         final ChannelHandler currentChildHandler = childHandler;
 9         final Entry<ChannelOption<?>, Object>[] currentChildOptions = newOptionsArray(childOptions);
10         final Entry<AttributeKey<?>, Object>[] currentChildAttrs = newAttributesArray(childAttrs);
11
12         p.addLast(new ChannelInitializer<Channel>() {
13             @Override
14             public void initChannel(final Channel ch) {
15                 final ChannelPipeline pipeline = ch.pipeline();
16                 ChannelHandler handler = config.handler();
17                 if (handler != null) {
18                     pipeline.addLast(handler);
19                 }
20
21                 ch.eventLoop().execute(new Runnable() {
22                     @Override
23                     public void run() {
24                         pipeline.addLast(new ServerBootstrapAcceptor(
25                                 ch, currentChildGroup, currentChildHandler, currentChildOptions, currentChildAttrs));
26                     }
27                 });
28             }
29         });
30     }

先添加一个处理器,在倒数第二个位置上,这个就是连接接收器,后面会分发给worker组的,
执行任务三(doBind0中的任务)(含有新任务提交)
事件循环继续执行任务,这次就是执行刚才添加的第二个任务:

调用链路:

最终调用:NioServerSocketChannel的doBind(SocketAddress localAddress)方法
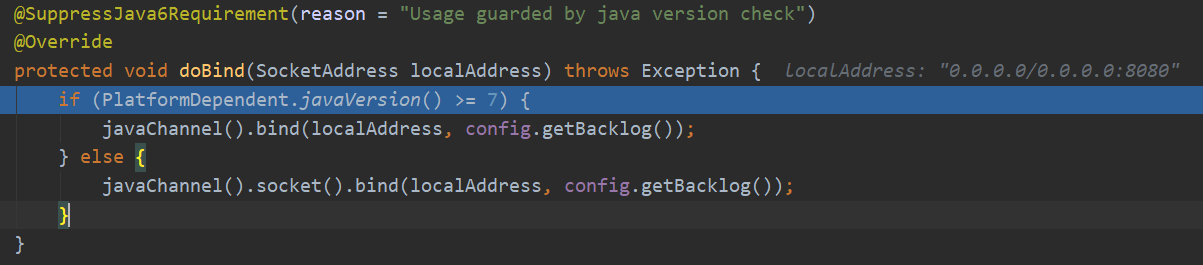
Netty 会根据 JDK 版本的不同,分别调用 JDK 底层不同的 bind() 方法。我使用的是 JDK8,所以会调用 JDK 原生 Channel 的 bind() 方法。执行完 doBind() 之后,服务端 JDK 原生的 Channel 真正已经完成端口绑定了。
内部就是Nio原生的ServerSocketChannelImpl的bind方法:
 1 public ServerSocketChannel bind(SocketAddress var1, int var2) throws IOException {
 2         synchronized(this.lock) {
 3             if (!this.isOpen()) {
 4                 throw new ClosedChannelException();
 5             } else if (this.isBound()) {
 6                 throw new AlreadyBoundException();
 7             } else {
 8                 InetSocketAddress var4 = var1 == null ? new InetSocketAddress(0) : Net.checkAddress(var1);
 9                 SecurityManager var5 = System.getSecurityManager();
10                 if (var5 != null) {
11                     var5.checkListen(var4.getPort());
12                 }
13
14                 NetHooks.beforeTcpBind(this.fd, var4.getAddress(), var4.getPort());
15                 Net.bind(this.fd, var4.getAddress(), var4.getPort());
16                 Net.listen(this.fd, var2 < 1 ? 50 : var2);
17                 synchronized(this.stateLock) {
18                     this.localAddress = Net.localAddress(this.fd);
19                 }
20
21                 return this;
22             }
23         }
24     }
netty最终的注册和绑定都是封装了Nio原生ServerSocketChannelImpl的操作。
中间比较重要的是:AbstractChannel的bind(final SocketAddress localAddress, final ChannelPromise promise)方法
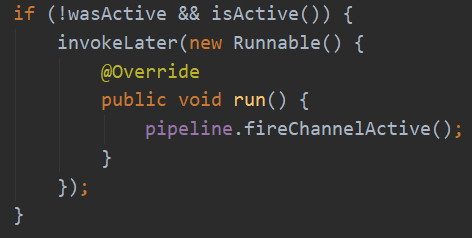
 1 public final void bind(final SocketAddress localAddress, final ChannelPromise promise) {
 2             assertEventLoop();
 3
 4             if (!promise.setUncancellable() || !ensureOpen(promise)) {
 5                 return;
 6             }
 7
 8             // See: https://github.com/netty/netty/issues/576
 9             if (Boolean.TRUE.equals(config().getOption(ChannelOption.SO_BROADCAST)) &&
10                 localAddress instanceof InetSocketAddress &&
11                 !((InetSocketAddress) localAddress).getAddress().isAnyLocalAddress() &&
12                 !PlatformDependent.isWindows() && !PlatformDependent.maybeSuperUser()) {
13                 // Warn a user about the fact that a non-root user can't receive a
14                 // broadcast packet on *nix if the socket is bound on non-wildcard address.
15                 logger.warn(
16                         "A non-root user can't receive a broadcast packet if the socket " +
17                         "is not bound to a wildcard address; binding to a non-wildcard " +
18                         "address (" + localAddress + ") anyway as requested.");
19             }
20
21             boolean wasActive = isActive();
22             try {
23                 doBind(localAddress);//真正的绑定,// 调用 JDK 底层进行端口绑定
24             } catch (Throwable t) {
25                 safeSetFailure(promise, t);
26                 closeIfClosed();
27                 return;
28             }
29
30             if (!wasActive && isActive()) {
31                 invokeLater(new Runnable() {
32                     @Override
33                     public void run() {
34                         pipeline.fireChannelActive();//准备监听连接事件
35                     }
36                 });
37             }
38
39             safeSetSuccess(promise);//绑定完成
40         }
bind() 方法主要做了两件事,分别为调用 JDK 底层进行端口绑定;绑定成功后并触发 channelActive 事件。
完成端口绑定之后,Channel 处于活跃 Active 状态,然后会调用 pipeline.fireChannelActive() 方法触发 channelActive 事件。我们可以一层层跟进 fireChannelActive() 方法,发现其中比较重要的部分:
// DefaultChannelPipeline#channelActive

public void channelActive(ChannelHandlerContext ctx) {

    ctx.fireChannelActive();

    readIfIsAutoRead();

}

// AbstractNioChannel#doBeginRead

protected void doBeginRead() throws Exception {

    // Channel.read() or ChannelHandlerContext.read() was called

    final SelectionKey selectionKey = this.selectionKey;

    if (!selectionKey.isValid()) {

        return;

    }

    readPending = true;

    final int interestOps = selectionKey.interestOps();

    if ((interestOps & readInterestOp) == 0) {

        selectionKey.interestOps(interestOps | readInterestOp); // 注册 OP_ACCEPT 事件到服务端 Channel 的事件集合

    }

}
可以看出,在执行完 channelActive 事件传播之后,会调用 readIfIsAutoRead() 方法触发 Channel 的 read 事件,而它最终调用到 AbstractNioChannel 中的 doBeginRead() 方法,其中 readInterestOp 参数就是在前面初始化 Channel 所传入的 SelectionKey.OP_ACCEPT 事件,所以 OP_ACCEPT 事件会被注册到 Channel 的事件集合中。
还有个新任务invokeLater提交:
方法safeSetSuccess(promise);和前面一样
添加绑定失败的回调:
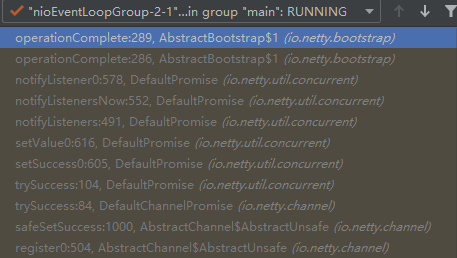
此时前面已经绑定成功了,所以直接就可以回调operationComplete,因为我们自定义的也监听了绑定事件,所以这个时候也会有回调,也就说两个回调:
执行任务四(invokeLater任务)
前面doBind0里添加的任务,触发通道激活事件:
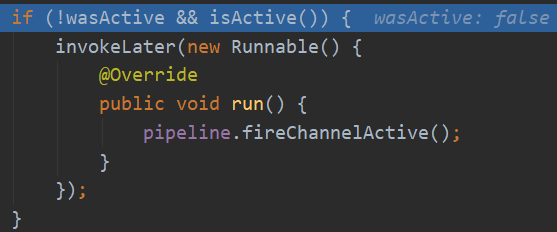
他这个顺序也对,先把注册完成,然后绑定完成,然后再触发通道激活。
然后里面会调用通道的unsafe的beginRead,最终是通道的doBeginRead:
register0(ChannelPromise promise) 方法中的beginRead();

里面会设置关心OP_ACCEPT事件:
 1 protected void doBeginRead() throws Exception {
 2         // Channel.read() or ChannelHandlerContext.read() was called
 3         final SelectionKey selectionKey = this.selectionKey;
 4         if (!selectionKey.isValid()) {
 5             return;
 6         }
 7
 8         readPending = true;
 9
10         final int interestOps = selectionKey.interestOps();
11         if ((interestOps & readInterestOp) == 0) {
12             selectionKey.interestOps(interestOps | readInterestOp);
13         }
14     }
至此通道注册到选择器和通道绑定端口都已经完成。
有可能要执行任务五
不执行任务五的情况
这个任务是可能会提交,也可能不会执行,关键看自定义的写法,如果你是这样写,那就不会有个的方法执行:
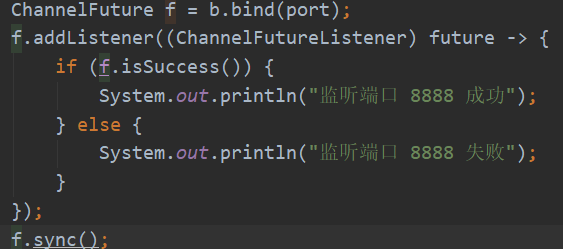
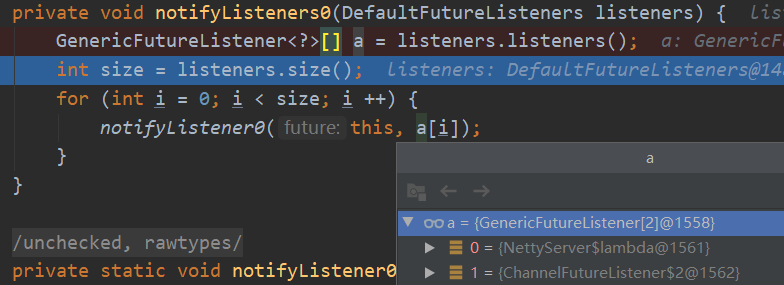
因为addListener的内部会判断是否有完成绑定,有的话才会调用notifyListeners:
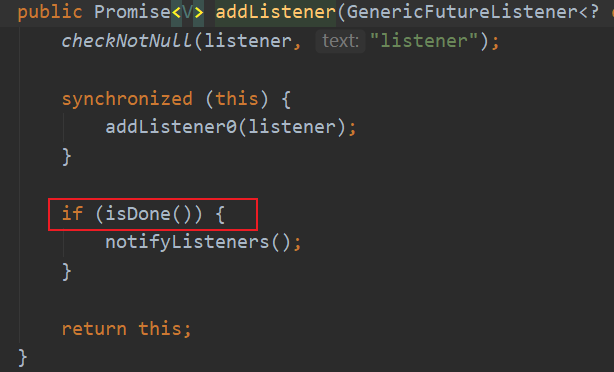
里面才会提交任务:

如果没阻塞添加的时候可能绑定任务没完成。所以也就不会执行进去,也就没有这个任务了。
执行任务五的情况
如果你是这种写法的话:
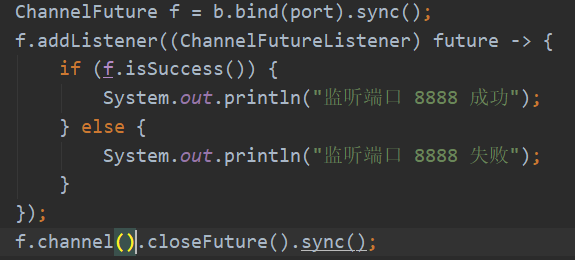
上一篇讲过,先会阻塞,直到绑定完成了调用设置成功结果safeSetSuccess(promise);,会唤醒主线程,然后去addListener的时候,发现已经完成了,所以就会调用notifyListeners,因为会提交任务。

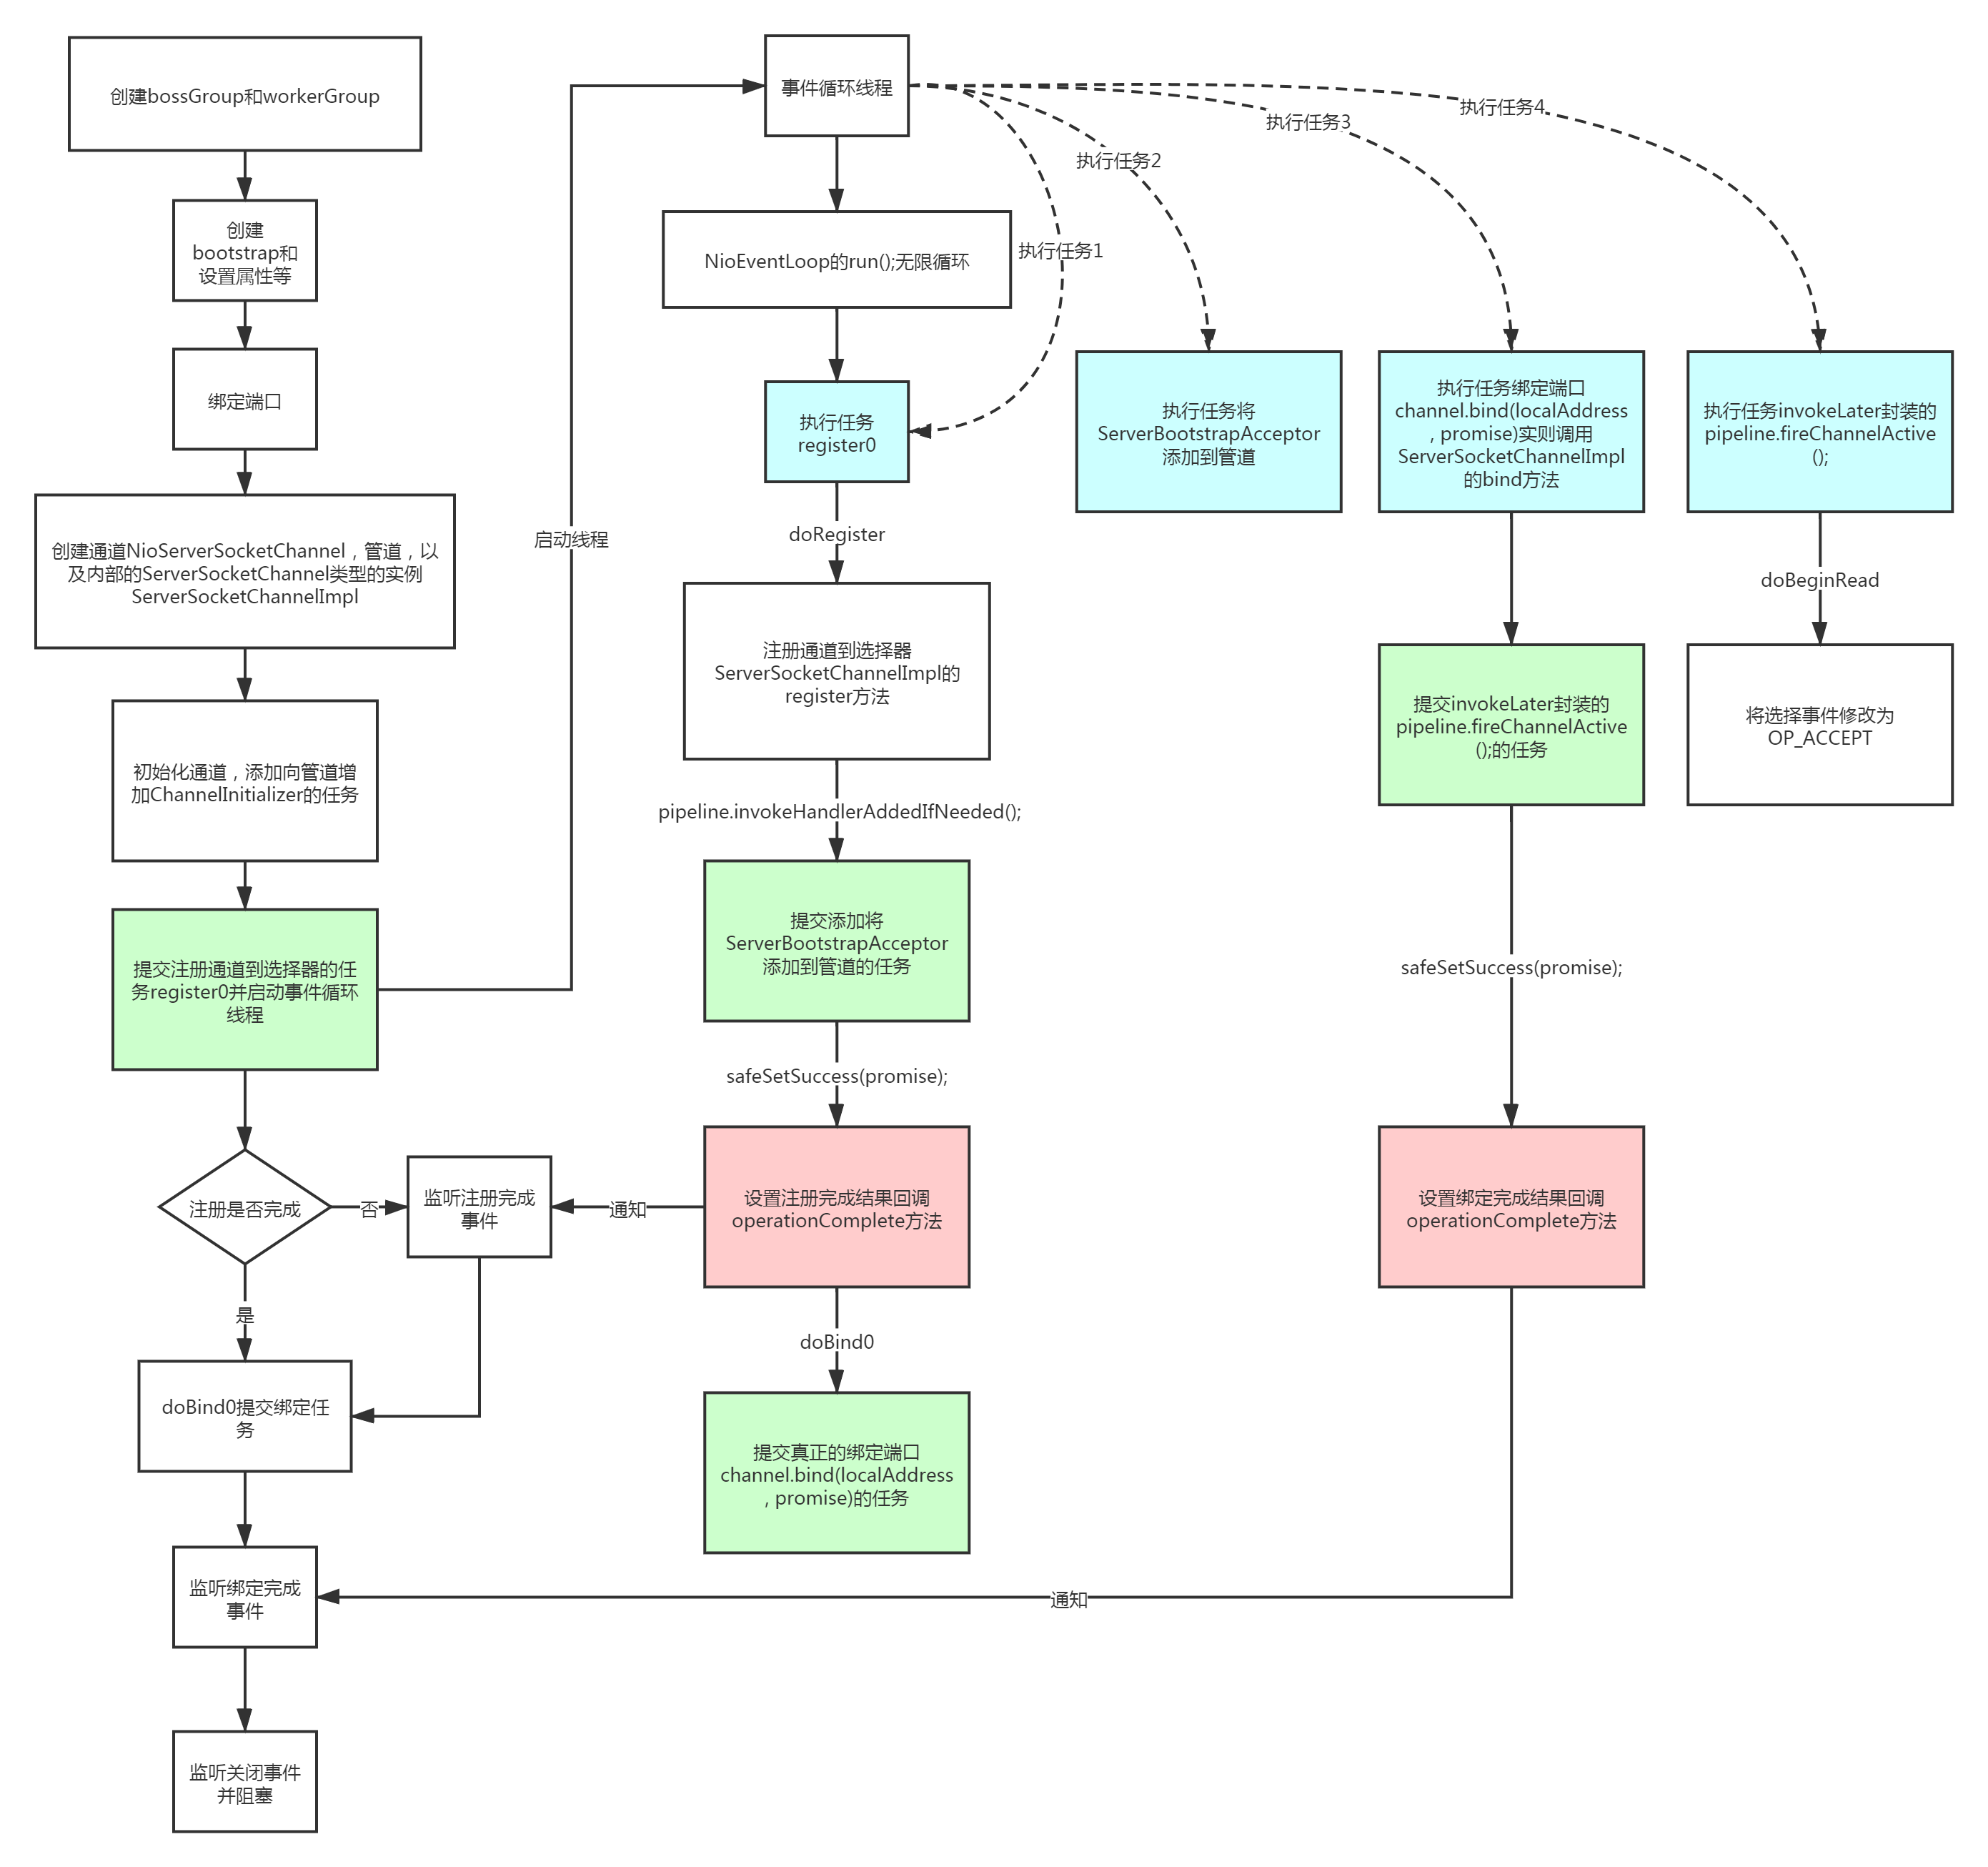
到此为止,整个服务端已经真正启动完毕。我们总结一下服务端启动的全流程,如下图所示。
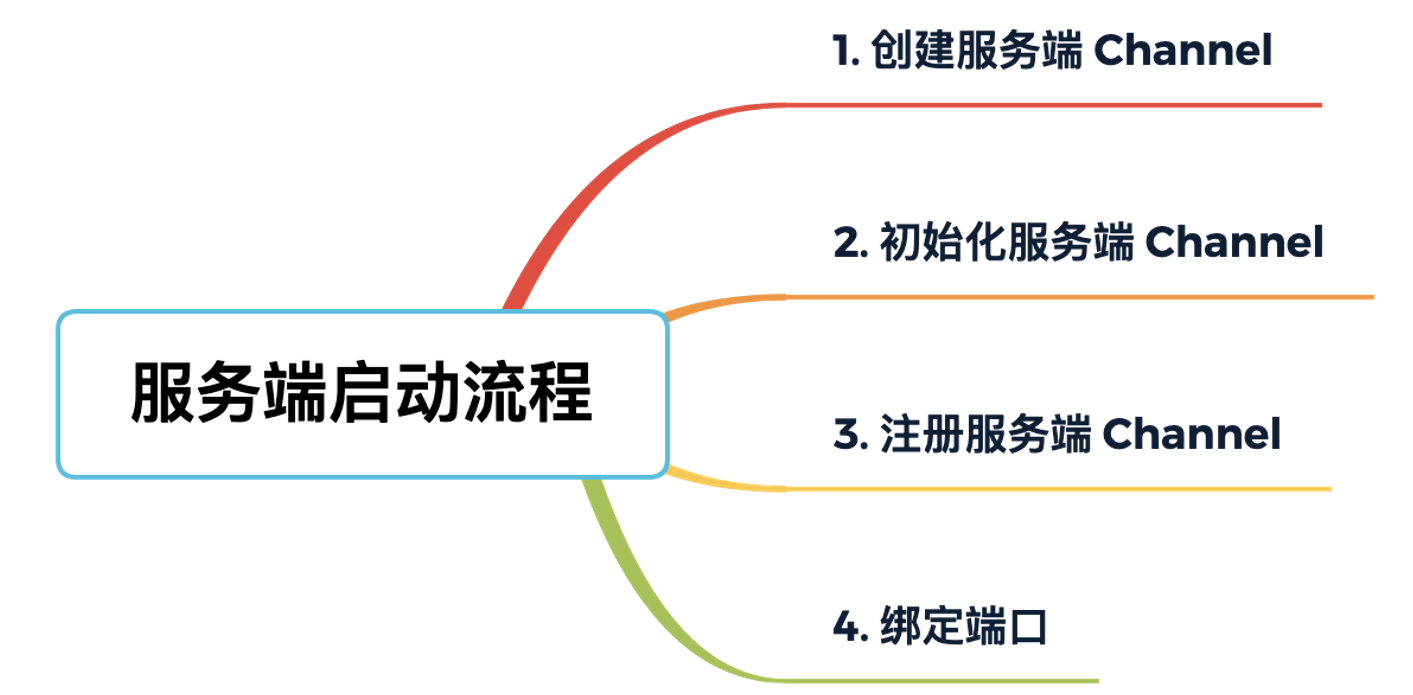
- 创建服务端 Channel:本质是创建 JDK 底层原生的 Channel,并初始化几个重要的属性,包括 id、unsafe、pipeline 等。
- 初始化服务端 Channel:设置 Socket 参数以及用户自定义属性,并添加两个特殊的处理器 ChannelInitializer 和 ServerBootstrapAcceptor。
- 注册服务端 Channel:调用 JDK 底层将 Channel 注册到 Selector 上。
- 端口绑定:调用 JDK 底层进行端口绑定,并触发 channelActive 事件,把 OP_ACCEPT 事件注册到 Channel 的事件集合中。
服务端如何处理客户端新建连接
Netty 服务端完全启动后,就可以对外工作了。接下来 Netty 服务端是如何处理客户端新建连接的呢?主要分为四步:
- Boss NioEventLoop 线程轮询客户端新连接 OP_ACCEPT 事件;
- 构造 Netty 客户端 NioSocketChannel;
- 注册 Netty 客户端 NioSocketChannel 到 Worker 工作线程中;
- 注册 OP_READ 事件到 NioSocketChannel 的事件集合。
Netty 中 Boss NioEventLoop 专门负责接收新的连接。当客户端有新连接接入服务端时,Boss NioEventLoop 会监听到 OP_ACCEPT 事件,源码如下所示:
// NioEventLoop#processSelectedKey

if ((readyOps & (SelectionKey.OP_READ | SelectionKey.OP_ACCEPT)) != 0 || readyOps == 0) {

    unsafe.read();

}
NioServerSocketChannel 所持有的 unsafe 是 NioMessageUnsafe 类型,我们看下 NioMessageUnsafe.read() 方法中做了什么事。
public void read() {

    assert eventLoop().inEventLoop();

    final ChannelConfig config = config();

    final ChannelPipeline pipeline = pipeline();

    final RecvByteBufAllocator.Handle allocHandle = unsafe().recvBufAllocHandle();

    allocHandle.reset(config);

    boolean closed = false;

    Throwable exception = null;

    try {

        try {
            do {

                int localRead = doReadMessages(readBuf);  // while 循环不断读取 Buffer 中的数据

                if (localRead == 0) {

                    break;

                }

                if (localRead < 0) {

                    closed = true;

                    break;

                }

                allocHandle.incMessagesRead(localRead);

            } while (allocHandle.continueReading());

        } catch (Throwable t) {

            exception = t;

        }

        int size = readBuf.size();

        for (int i = 0; i < size; i ++) {

            readPending = false;

            pipeline.fireChannelRead(readBuf.get(i)); // 传播读取事件

        }

        readBuf.clear();

        allocHandle.readComplete();

        pipeline.fireChannelReadComplete(); // 传播读取完毕事件

        // 省略其他代码

    } finally {

        if (!readPending && !config.isAutoRead()) {

            removeReadOp();

        }

    }

}
可以看出 read() 方法的核心逻辑就是通过 while 循环不断读取数据,然后放入 List 中,这里的数据其实就是新连接。需要重点跟进一下 NioServerSocketChannel 的 doReadMessages() 方法。
protected int doReadMessages(List<Object> buf) throws Exception {

    SocketChannel ch = SocketUtils.accept(javaChannel());

    try {

        if (ch != null) {

            buf.add(new NioSocketChannel(this, ch));

            return 1;

        }

    } catch (Throwable t) {

        logger.warn("Failed to create a new channel from an accepted socket.", t);

        try {

            ch.close();

        } catch (Throwable t2) {

            logger.warn("Failed to close a socket.", t2);

        }

    }

    return 0;

}
这时就开始执行第二个步骤:构造 Netty 客户端 NioSocketChannel。Netty 先通过 JDK 底层的 accept() 获取 JDK 原生的 SocketChannel,然后将它封装成 Netty 自己的 NioSocketChannel。新建 Netty 的客户端 Channel 的实现原理与上文中我们讲到的创建服务端 Channel 的过程是类似的,只是服务端 Channel 的类型是 NioServerSocketChannel,而客户端 Channel 的类型是 NioSocketChannel。NioSocketChannel 的创建同样会完成几件事:创建核心成员变量 id、unsafe、pipeline;注册 SelectionKey.OP_READ 事件;设置 Channel 的为非阻塞模式;新建客户端 Channel 的配置。
成功构造客户端 NioSocketChannel 后,接下来会通过 pipeline.fireChannelRead() 触发 channelRead 事件传播。对于服务端来说,此时 Pipeline 的内部结构如下图所示。

上文中我们提到了一种特殊的处理器 ServerBootstrapAcceptor,在这里它就发挥了重要的作用。channelRead 事件会传播到 ServerBootstrapAcceptor.channelRead() 方法,channelRead() 会将客户端 Channel 分配到工作线程组中去执行。具体实现如下:
public void channelRead(ChannelHandlerContext ctx, Object msg) {

    final Channel child = (Channel) msg;

    // 在客户端 Channel 中添加 childHandler,childHandler 是用户在启动类中通过 childHandler() 方法指定的

    child.pipeline().addLast(childHandler);

    setChannelOptions(child, childOptions, logger);

    setAttributes(child, childAttrs);

    try {

        // 注册客户端 Channel

        childGroup.register(child).addListener(new ChannelFutureListener() {

            @Override

            public void operationComplete(ChannelFuture future) throws Exception {

                if (!future.isSuccess()) {

                    forceClose(child, future.cause());

                }

            }

        });

    } catch (Throwable t) {

        forceClose(child, t);

    }

}
ServerBootstrapAcceptor 开始就把 msg 强制转换为 Channel。难道不会有其他类型的数据吗?因为 ServerBootstrapAcceptor 是服务端 Channel 中一个特殊的处理器,而服务端 Channel 的 channelRead 事件只会在新连接接入时触发,所以这里拿到的数据都是客户端新连接。
ServerBootstrapAcceptor 通过 childGroup.register() 方法会完成第三和第四两个步骤,将 NioSocketChannel 注册到 Worker 工作线程中,并注册 OP_READ 事件到 NioSocketChannel 的事件集合。在注册过程中比较有意思的一点是,它会调用 pipeline.fireChannelRegistered() 方法传播 channelRegistered 事件,然后再调用 pipeline.fireChannelActive() 方法传播 channelActive 事件。兜了一圈,这又会回到之前我们介绍的 readIfIsAutoRead() 方法,此时它会将 SelectionKey.OP_READ 事件注册到 Channel 的事件集合。