目录:Tornado其他篇
目录:
- 1.1 Tornado安装与基本使用
- 1.2 tornado各种url写法
- 1.3 配置settings & 获取get,post请求
- 1.4 tornado渲染
- 1.5 自定义UIMethod和UIModule: 类似于djando中simple_tag和自定义filter
- 1.6 模板继承
- 1.7 tornado多文件上传
- 1.8 @gen.coroutine实现异步非阻塞举例及原理解析
1.1 Tornado安装与基本使用 返回顶部
1、 安装tornado
1、pip3安装
pip3 install tornado
2、源码安装
https://pypi.python.org/packages/source/t/tornado/tornado-4.3.tar.gz
2、tornado概述
1、Tornado 是 FriendFeed 使用的可扩展的非阻塞式 web 服务器及其相关工具的开源版本
2、Tornado 和现在的主流 Web 服务器框架(包括大多数 Python 的框架)有着明显的区别:它是非阻塞式服务器,而且速度相当快。
3、得利于其 非阻塞的方式和对 epoll 的运用,Tornado 每秒可以处理数以千计的连接
4、我们开发这个 Web 服务器的主要目的就是为了处理 FriendFeed 的实时功能 ——在 FriendFeed 的应用里
每一个活动用户都会保持着一个服务器连接。
3、tornado快速上手
1、使用pycharm创建一个普通项目s131415文件夹,并创建文件s131415/app.py
2、在app.py中粘贴下列内容,运行app.py文件
3、在浏览器中访问: http://127.0.0.1:8888/index 即可看到“Hello, world!!”请求内容


import tornado.ioloop
import tornado.web

#1、 处理访问/index/的get请求: http://127.0.0.1:8888/index/
class MainHandler(tornado.web.RequestHandler):
   def get(self):
      self.write("I am index!!")
      # self.redirect('http://www.baidu.com')
      # self.render('index.html',k1='v1')

#2、 处理访问 /login/的post请求和get请求: http://127.0.0.1:8888/login/
class LoginHandler(tornado.web.RequestHandler):
   def get(self):
      self.write('login')
   def post(self,*args,**kwargs):
      self.write('login post')

#3、 配置settings
settings = {
    'template_path': 'template',         # 配置html文件模板位置
    'static_path': 'static',             # 配置静态文件路径(图片等)
    'static_url_prefix': '/static/',     # 前端引入静态文件路径
}

#4 路由系统
application = tornado.web.Application([
   (r"/index/", MainHandler),
   (r"/login/", LoginHandler),
],**settings)

#5 启动这个tornado这个程序
if __name__ == "__main__":
   application.listen(8888)
   tornado.ioloop.IOLoop.instance().start()
1.2 tornado各种url写法 返回顶部
1、无正则匹配url (http://127.0.0.1:8000/index/?nid=1&pid=2)
import tornado.ioloop
import tornado.web

class MainHandler(tornado.web.RequestHandler):
    def get(self):
        nid = self.get_query_argument('nid')
        pid = self.get_query_argument('pid')
        self.write("Hello, world")

# http://127.0.0.1:8000/index/?nid=1&pid=2
application = tornado.web.Application([
    (r"/index/", MainHandler),
])

if __name__ == "__main__":
    application.listen(8000)
    tornado.ioloop.IOLoop.instance().start()
2、基于(d+)正则的url
import tornado.ioloop
import tornado.web

class MainHandler(tornado.web.RequestHandler):
    def get(self,nid,pid):
        print(nid,pid)
        self.write("Hello, world")

# http://127.0.0.1:8000/index/1/2/
application = tornado.web.Application([
    (r"/index/(d+)/(d+)/", MainHandler),        # 这种只能传数字
    # (r"/index/(w+)/(w+)/", MainHandler),        # 这种可以传数字、字母、下划线
])

if __name__ == "__main__":
    application.listen(8000)
    tornado.ioloop.IOLoop.instance().start()
3、基于正则分组(?P<nid>d+),可以不考虑接收参数顺序 (推荐)
import tornado.ioloop
import tornado.web

class MainHandler(tornado.web.RequestHandler):
    def get(self,nid,pid):
        print(nid,pid)
        self.write("Hello, world")

# http://127.0.0.1:8000/index/1/2/
application = tornado.web.Application([
    (r"/index/(?P<nid>d+)/(?P<pid>d+)/", MainHandler),        # 这种只能传数字
])

if __name__ == "__main__":
    application.listen(8000)
    tornado.ioloop.IOLoop.instance().start()
1.3 配置settings & 获取get,post请求 返回顶部
1、settings可配置参数
settings = {
    'template_path': 'template',        #配置html文件模板位置
    'static_path': 'static',             #配置静态文件路径(图片等)
    'static_url_prefix': '/static/',    #前端引入静态文件路径
    'ui_methods': mt,
    'ui_modules': md,

    'xsrf_cookies':True,
    'cookie_secret':'xxx',
    'login_url':"/auth/login",
    'autoescape':None,
    'local':"zh_CN",
    'debug':True,
}
2、获取get、post请求
import tornado.ioloop
import tornado.web

#1、 处理访问/index/的get请求: http://127.0.0.1:9999/index
class MainHandler(tornado.web.RequestHandler):
   def get(self):
      self.write("I am index!!")
      # self.redirect('http://www.baidu.com')
      # self.render('index.html',k1='v1')

#2、 处理访问 /login/的post请求和get请求: http://127.0.0.1:9999/login
class LoginHandler(tornado.web.RequestHandler):
   def get(self):

      #2.1 获取url中以get方式传递过来的数据: http://127.0.0.1:9999/login/?username=zhangsan
      # print(self.get_query_argument('username'))        # zhangsan
      # print(self.get_query_arguments('username'))       # ['zhangsan']
      # print( self.get_argument('username') )            # get和post两种请求传递的数据都能获取

      self.render('login.html')
   def post(self,*args,**kwargs):

      #2.2 获取请求体中以post传递的数据
      # print( self.get_body_argument('faver') )     # 仅能获取单选,多选仅能获取最后一个
      # print( self.get_body_arguments('faver') )    # ['1', '2', '3']  获取多选

      #2.3 get和post两种请求传递的数据都能获取
      # print( self.get_argument('username') )

      #2.4 设置和获取cookie
      # self.cookies
      # self.set_cookie()

      #2.5 设置和获取请求头
      # self._headers
      # self.get_header()

      self.write('login post')

#3、 配置settings
settings = {
    'template_path': 'template',         # 配置html文件模板位置
    'static_path': 'static',             # 配置静态文件路径(图片等)
    'static_url_prefix': '/static/',     # 前端引入静态文件路径
}

#4 路由系统
application = tornado.web.Application([
   (r"/index/", MainHandler),
   (r"/login/", LoginHandler),
],**settings)

#5 启动这个tornado这个程序
if __name__ == "__main__":
   application.listen(9999)
   tornado.ioloop.IOLoop.instance().start()
<!DOCTYPE html>
<html lang="en">
<head>
    <meta charset="UTF-8">
    <title>Title</title>
    <link rel="stylesheet" href="/static/base.css">
</head>
<body>
    <form method="POST" action="/login/">
        <input type="text" name="username">

        <h5 class="c1">多选</h5>
            男球:<input type="checkbox" name="faver" value="1" />
            足球:<input type="checkbox" name="faver" value="2" />
            皮球:<input type="checkbox" name="faver" value="3" />
        <input type="submit" value="提交">
    </form>
</body>
</html>
.c1{
    color: red;
}
1.4 tornado渲染 返回顶部
1、for循环
import tornado.ioloop
import tornado.web

class MainHandler(tornado.web.RequestHandler):
   def get(self):
      self.render("index.html", username='tom',list_info=[11, 22, 33],user_dic={'username':'zhangsan','age':77})

application = tornado.web.Application([
   (r"/index", MainHandler),
])

if __name__ == "__main__":
   application.listen(8888)
   tornado.ioloop.IOLoop.instance().start()
<!DOCTYPE html>
<html lang="en">
<head>
    <meta charset="UTF-8">
    <title>Title</title>
</head>
<body>
    <h3>用户名:{{username}}</h3>
    {% for item in list_info %}
        <li>{{item}}</li>
    {% end %}
    <p></p>
    {% for item in user_dic %}
        <li>{{item}} : {{user_dic[item]}}</li>
    {% end %}
</body>
</html>
2、if、in、判断相等
import tornado.ioloop
import tornado.web

class MainHandler(tornado.web.RequestHandler):
   def get(self):
      self.render("index.html", list_info=[11, 22, 33],username='tom')

application = tornado.web.Application([
   (r"/index", MainHandler),
])

if __name__ == "__main__":
   application.listen(8888)
   tornado.ioloop.IOLoop.instance().start()
<!DOCTYPE html>
<html lang="en">
<head>
    <meta charset="UTF-8">
    <title>Title</title>
</head>
<body>
    {% if 11 in list_info %}
        true
    {% else %}
        false
    {% end %}

    {% if username == "tom" %}
        my name is {{username}}
    {% else %}
        not tom
    {% end %}
</body>
</html>
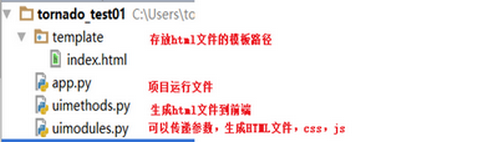
1.5 自定义UIMethod和UIModule: 类似于djando中simple_tag和自定义filter 返回顶部
1、UIModule与UIMethod比较
1. UIModule: 可以传参、可以生成html、css、js代码
2. UIMethod: 这个不能传参数,不能生成css,js等,只能生成html文件
2、UIModule和UIMethod使用举例
import tornado.ioloop
import tornado.web
from tornado.escape import linkify
import uimodules as md     #1.导入uimodules模块
import uimethods as mt     #2.导入uimethods模块

class MainHandler(tornado.web.RequestHandler):
    def get(self):
        self.render('index.html')
settings = {
    'template_path': 'template',
    'static_path': 'static',
    'static_url_prefix': '/static/',
    'ui_methods': mt,      #3.将uimethods模块注册到settings中
    'ui_modules': md,      #4.将uimodules模块注册到settings中
}

application = tornado.web.Application([
    (r"/index", MainHandler),
], **settings)

if __name__ == "__main__":
    application.listen(8888)
    tornado.ioloop.IOLoop.instance().start()
from tornado.web import UIModule
from tornado import escape

# uimodule不仅可以帮生成标签,还可以帮添加css,js样式
class custom(UIModule):
   # def javascript_files(self):
   #    '''1、生成: <script src="base.js"></script> '''
   #    return ['base.js','header.js']
   #
   # def embedded_javascript(self):
   #    '''2、生成:  <script> alert(123); </script> '''
   #    return "alert(123);"
   #
   # def css_files(self):
   #    '''3、在头部生成: <link rel="stylesheet" href="base.css">'''
   #    return ['base.css','header.css']
   #
   # def embedded_css(self):
   #    '''4、在头部style标签生成: <style> .c1{ color:red; } </style>'''
   #    return ".c1{color:red;}"

   def render(self, *args, **kwargs):
      '''5、生成html文件'''
      return escape.xhtml_escape('<h1>tom</h1>')
def tab(self):
    return '<h1>tom</h1>'
<!DOCTYPE html>
<html lang="en">
<head>
    <meta charset="UTF-8">
    <title>Title</title>
</head>
<body>
    <h1>hello</h1>
    <p>{% module custom(123) %}</p>

    {{ tab() }}
</body>
</html>
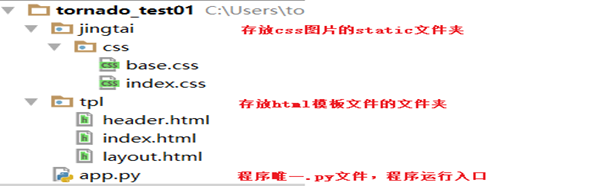
1.6 模板继承 返回顶部
1、模板继承使用
1. 在master.html中定义模板: {% block css %} {% endblock %}
2. 在子类中引入要继承的模板: {% extends 'layout.html' %}
2、模板导入
1. 使用时直接导入即可: {% include "header.html" %}
import tornado.ioloop
import tornado.web

class MainHandler(tornado.web.RequestHandler):
   def get(self):
      self.render("index.html")

settings = {
   'template_path':'template',
   'static_path':'static',
   'static_url_prefix':'/static/',
}

application = tornado.web.Application([
   (r"/index/", MainHandler),
],**settings)

if __name__ == "__main__":
   application.listen(8888)
   tornado.ioloop.IOLoop.instance().start()
<!DOCTYPE html>
<html lang="en">
<head>
    <meta charset="UTF-8">
    <title>Title</title>
    <title>{% block title %}Default title{% end %}</title>

    <link rel="stylesheet" href="/static/css/base.css">
    {% block css %}{% end %}

</head>
<body>
    <div class="c1">这里是layout.html这个母版中的内容</div>
    {% block RenderBody %}{% end %}
</body>
</html>
{% extends 'layout.html'%}
{% block css %}<link rel="stylesheet" href="/static/css/index.css">{% end %}

{% block RenderBody %}
    <h3 class="c1">这个RenderBody块继承的是header.html这个母版</h3>

    <div>
        {% include 'header.html' %}
    </div>
{% end %}
<h3>
     这里是header.html中的内容,需要导入的文件
</h3>
1.7 tornado多文件上传 返回顶部
import tornado.ioloop
import tornado.web

class MainHandler(tornado.web.RequestHandler):
    def get(self):
        self.render('index.html')

    def post(self, *args, **kwargs):
        file_metas = self.request.files["fff"]
        for meta in file_metas:
            file_name = meta['filename']
            with open(file_name,'wb') as up:
                print('hahah')
                up.write(meta['body'])

settings = {
    'template_path': 'template',
}

application = tornado.web.Application([
    (r"/index", MainHandler),
], **settings)


if __name__ == "__main__":
    application.listen(8888)
    tornado.ioloop.IOLoop.instance().start()
<!DOCTYPE html>
<html>
<head>
    <meta http-equiv="Content-Type" content="text/html; charset=UTF-8"/>
    <title>上传文件</title>
</head>
<body>
    <form id="my_form" name="form" action="/index" method="POST"  enctype="multipart/form-data" >
        <input name="fff" id="my_file"  type="file" />
        <input type="submit" value="提交"  />
    </form>
</body>
</html>
1.8 @gen.coroutine实现异步非阻塞举例及原理解析 返回顶部
1、tornado.gen.coroutine和tornado.web.asynchronous比较
1. @tornado.web.asynchronous 实现长连接,调用self.finish()才结束
2. @tornado.gen.coroutine 这个实现异步
3. 你要想异步,就要保持长连接,否则你的handler执行完就自己return了
4. @asynchronous会监听@gen.coroutine的返回结果(Future),并在@gen.coroutine装饰的代码段执行完成后自动调用finish。
5. 从Tornado 3.1版本开始,只使用@gen.coroutine就可以了。
2、tornado实现异步原理
1. 每个请求过来就会创建一个socket对象,并yield一个future对象,然后tornado就处理下一个连接了
2. tornado内部会以socket对象为key,future对象为value加入字典
3. tornado内部调用epoll方法监听这个全局字典,有socket对象变化就会执行future.set_result('...')
4. 执行future.set_result('...')后就会将future.ready标志位变成True,然后就会调用callback方法返回内容
注1:yield 一个 Future对象,那么Tornado会等待,直到执行future.set_result('...')才会释放
注2:epoll实质是不断的轮询所负责的所有socket,当某个socket有数据到达了,就通知用户进程
import tornado.ioloop
import tornado.web
from tornado import gen

class IndexHandler(tornado.web.RequestHandler):
    @gen.coroutine
    def get(self):
        self.write('I am index!!')

application = tornado.web.Application([
   (r"/index/", IndexHandler),
])

if __name__ == "__main__":
    print('http://127.0.0.1:8888/index/')
    application.listen(8888)
    tornado.ioloop.IOLoop.instance().start()
#! /usr/bin/env python
# -*- coding: utf-8 -*-
import tornado.ioloop
import tornado.web
from tornado import gen
from tornado.concurrent import Future


future = None
class IndexHandler(tornado.web.RequestHandler):
    @gen.coroutine
    def get(self):
        global future
        future  = Future()
        future.add_done_callback(self.doing)
        yield future

    def doing(self,*args,**kwargs):
        self.write('async')
        self.finish()


class StopHandler(tornado.web.RequestHandler):
    def get(self):
        future.set_result('.......')


application = tornado.web.Application([
   (r"/index/", IndexHandler),
   (r"/stop/", StopHandler),
])

if __name__ == "__main__":
    print('http://127.0.0.1:8888/index/')
    application.listen(8888)
    tornado.ioloop.IOLoop.instance().start()


'''
http://127.0.0.1:8888/index/          # 只要不返回数据,浏览器就不会返回一直等着保持长连接
http://127.0.0.1:8888/stop/           # 访问/stop/是会调用future.set_result()此时 /index/就会返回数据
'''