1.1 vuex简介
官网:https://vuex.vuejs.org/zh/guide/
参考博客:https://www.cnblogs.com/first-time/p/6815036.html
1、什么是Vuex?
1. 官方说法:Vuex 是一个专为 Vue.js应用程序开发的状态管理模式。
2. 它采用集中式存储管理应用的所有组件的状态,并以相应的规则保证状态以一种可预测的方式发生变化。
3. 个人理解:Vuex是用来管理组件之间通信的一个插件
2、vuex作用
1. 我们知道组件之间是独立的,组件之间想要实现通信,我目前知道的就只有props选项,但这也仅限于父组件和子组件之间的通信。
2. 如果兄弟组件之间想要实现通信呢?当做中大型项目时,面对一大堆组件之间的通信,还有一大堆的逻辑代码,会不会很抓狂??
3. 那为何不把组件之间共享的数据给“拎”出来,在一定的规则下管理这些数据呢? 这就是Vuex的基本思想了。
总结:使用vuex作用就是实现组件间数据共享
3、vuex原理
1. vue团队为了简化组件间的通信,将state抽象成一个单例模式,将其放到全局,让各个组件都能共享使用
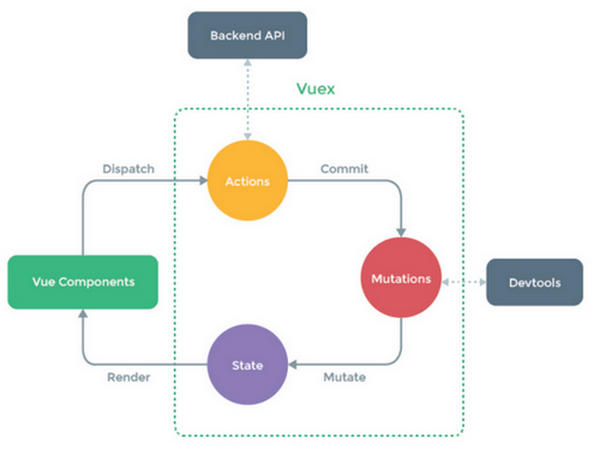
2. vuex数据传递是单向的:action ---> mutation ---> state ---> component ---> action
vue component指的就是我门定义的组件
action 交互中产生的动作
mutations 动作产生的修改数据的行为
state 共享数据
3. vuex设计的时候相对修改的行为做单测(测试),开发了devtools来做测试,只能检测同步的操作
4. 规范定义:只能在mutations中做同步操作,所以增加了action来异步处理数据
5. 将mutations中的异步操作转移到actions中了,这样就可以测试同步的操作了
4、vuex使用场景
1. 如果您需要构建一个中大型单页应用,您很可能会考虑如何更好地在组件外部管理状态,Vuex 将会成为自然而然的选择。
2. 如果您不打算开发大型单页应用,使用 Vuex 可能是繁琐冗余的。
5、vuex流程图
1、vue组件(Vue Components)会 发出(Dispatch)一些动作(Actions)
2、动作会 提交(Commit)一个对数据的改变(Mutations)
3、提交的改变数据存放在 状态(State) 中的
4、最后 State将改变的数据再 渲染(Render)到组件(Vue Components),展示被改变后的数据
1.2 vuex使用(vuex使用分为以下两步)
1、第一步:实例化一个store
注:vuex.store用来创建store,参数对象中,可以定义各个模块
1. state定义状态模块(存储数据的),存放组件之间共享的数据
2. getters定义动态的数据,类似组件中的computed动态数据
3. mutations:定义改动states的动作行为,类似观察者模式中的订阅事件on
4. action:定义这些交互动作(异步),类似观察者模式中的订阅事件方法on(只不过是用来处理异步的)
2、第二步:在vue实例化对象中,注册store
1. 将第一步的实例化对象注册进来,注册路由后,组件实例化对象有了$route属性对象
2. 注册store,组件实例化对象有了$store属性对象,这个store对象有下面这些方法
$.store.commit用来触发mutations订阅的消息
$.store.dispatch用来触发action订阅的消息的
$.store.state使用状态中的数据

<!DOCTYPE html>
<html lang="en">
<head>
    <meta charset="UTF-8">
    <title></title>
</head>
<body>
    <div id="app">
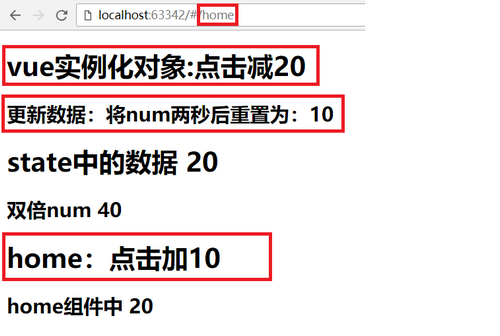
        <h1 @click="$store.commit('reduce', 20);">vue实例化对象:点击减20</h1>
        <h2 @click="$store.dispatch('dealNum', 10, 20, 30)">更新数据:将num两秒后重置为:10</h2>
        <h1>state中的数据 {{$store.state.num}}</h1>
        <h2>双倍num {{$store.getters.doubleNum}}</h2>
        <router-view></router-view>                          <!-- 定义渲染的容器 -->
    </div>
    <template id="home">
        <div>
            <h1 @click="$store.commit('add', 10, 'hello')">home:点击加10</h1>
            <h2>home组件中 {{$store.state.num}}</h2>
            <router-view></router-view>                     <!-- 第一步 定义子路由渲染的容器 -->
        </div>
    </template>
    <script type="text/javascript" src="vue.js"></script>
    <script type="text/javascript" src="vue-router.js"></script>
    <script type="text/javascript" src="vuex.js"></script>
    <script type="text/javascript">
        // 定义组件
        var Home = {
            template: '#home'
        };

        // 第一步 定义路由规则
        var routes = [
            {
                path: '/home',
                name: 'home',
                component: Home
            }
        ];

        // 定义store第一步 定义store实例化对象
        var store = new Vuex.Store({
            state: {                                       // 定义状态
                num: 0
            },
            getters: {                                       // 定义动态绑定的数据
                doubleNum: function(state) {
                    return state.num * 2;
                }
            },
            mutations: {                                   // 修改的消息
                add: function(state, num) {                    // 增加num值
                    state.num += num;
                },
                reduce: function(state, num) {                // 减少num值
                    state.num -= num;
                },
                resetNum: function(state, num) {
                    state.num = num;
                }
            },
            actions: {                                        // 定义actions
                dealNum: function(context, num) {
                    setTimeout(function() {                    // 我们可以异步提交
                        context.commit('resetNum', num)
                    }, 2000)
                }
            }
        });

        // 第二步 实例化路由对象
        var router = new VueRouter({
            routes: routes                    // 定义路由规则
        });

        // 第三步 注册路由 和 store对象
        var app = new Vue({
            el: '#app',                        // 注册路由
            router: router,
            store: store                    // 使用vuex第二步 注册store
        })
    </script>
</body>
</html>
1.3 vuex基本用法
1、初始化环境
vue init webpack-simple vuex-demo
cd vuex-demo
npm install
cnpm install vuex -S # 安装vuex
npm run dev
2、在main.js中导入并配置store.选项(创建 sre/store.js文件,可以是一个空文件)
1. 在main.js中导入 store对象: import store from './store'
2. 配置store选项后,vue就会自动将store对象注入到所有子组件中,在子组件中通过this.$store 访问store对象

import Vue from 'vue'
import App from './App.vue'

import store from './store'  // 导入store对象

new Vue({
  store,  // 配置store选项后,指定为store对象,vue就会自动将store对象注入到所有子组件中
          // 在子组件中通过this.$store 访问store对象
  el: '#app',
  render: h => h(App)
});
3、编辑store.js文件
注1:Vuex的核心是Store(仓库),相当于是一个容器,一个store实例中包含以下属性的方法:
注2:不能直接修改数据,必须显式提交变化,目的是为了追踪到状态的变化
1) state 定义属性(状态、数据)
2) getters 用来获取属性
3) actions 定义方法(动作)
4) commit 提交变化,修改数据的唯一方式就是显式的提交mutations
5) mutations 定义变化

/**
 * vuex配置:store.js
 **/
import Vue from 'vue'
import Vuex from 'vuex'

Vue.use(Vuex);

//1、定义属性(数据)
var state = {
  count:6
};

//2、定义gettters获取属性:在App.vue中使用 辅助函数 访问 vuex 组件中数据调用此函数
var getters={
  count(state){
    return state.count;
  }
};

//3、定义actions提交变化:其他组件中调用的方法()
const actions = {
  increment({commit,state}){       // context包含属性(函数):commit,dispatch,state
    if(state.count<10){           // 当count数值小于10才会提交改变(大于10就不增加了)
      commit('increment');
    }
    // 1、commit提交改变(不能直接修改数据)
    // 2、commit中的参数 'increment' 是自定义的,可以认为是类型名
    // 3、commit提交的改变会给 mutations
  }
};

//4、定义mutations定义变化,处理状态(数据的改变)
const mutations={
  increment(state){
    state.count++;
  }
};

// 创建一个store对象(对象里定义需要导出的变量)
const store=new Vuex.Store({
  state,
  getters,
  actions,
  mutations,
});

// 导出store对象
export default store;
4、 编辑App.vue
1. 在子组件中访问store对象的两种方式
方式1:通过this.$store访问
方式2:通过辅助函数:mapState、mapGetters、mapActions 访问,vuex提供了两个方法
mapState 获取state
mapGetters 获取getters(获取属性:数据)
mapActions 获取actions(获取方法:动作)

<template>
  <div id="app">
    <button @click="increment">增加</button>
    <button>减小</button>
    <p>当前数字为:{{count}}</p>
  </div>
</template>

<script>
  import {mapGetters,mapActions} from 'vuex'

export default {
  name: 'app',
  data () {
    return {
      msg: 'Welcome to Your Vue.js App'
    }
  },

  // 方式二:使用 辅助函数 访问 vuex 组件中数据
  computed:mapGetters([            // 这里定义一个数组,数组中指定要从vuex中获取的属性
    'count',                       // 这里的count就是 store.js中getters定义的属性
  ]),
  methods:mapActions([             // 这里定义一个数组,数组中指定要从vuex中获取的方法
    'increment'                   // 这里的increment就是 store.js中actions定义的函数
  ])

  // // 方式一:通过this.$store访问vuex组件中的数据
  // computed:{
  //   count(){
  //     return this.$store.state.count;
  //   }
  // }
}
</script>

<style>
#app {
  font-family: 'Avenir', Helvetica, Arial, sans-serif;
  -webkit-font-smoothing: antialiased;
  -moz-osx-font-smoothing: grayscale;
  text-align: center;
  color: #2c3e50;
  margin-top: 60px;
}

h1, h2 {
  font-weight: normal;
}

ul {
  list-style-type: none;
  padding: 0;
}

li {
  display: inline-block;
  margin: 0 10px;
}

a {
  color: #42b983;
}
</style>
5、效果图

6、异步操作

import Vue from 'vue'
import App from './App.vue'

import store from './store'  // 导入store对象

new Vue({
  store,  // 配置store选项后,指定为store对象,vue就会自动将store对象注入到所有子组件中
          // 在子组件中通过this.$store 访问store对象
  el: '#app',
  render: h => h(App)
});

/**
 * vuex配置:store.js
 **/
import Vue from 'vue'
import Vuex from 'vuex'

Vue.use(Vuex);

//1、定义属性(数据)
var state = {
  count:6
};

//2、定义gettters获取属性:在App.vue中使用 辅助函数 访问 vuex 组件中数据调用此函数
var getters={
  count(state){
    return state.count;
  }
};

//3、定义actions提交变化:其他组件中调用的方法()
const actions = {
  increment({commit,state}){       // context包含属性(函数):commit,dispatch,state
    if(state.count<10){           // 当count数值小于10才会提交改变(大于10就不增加了)
      commit('increment');
    }
    // 1、commit提交改变(不能直接修改数据)
    // 2、commit中的参数 'increment' 是自定义的,可以认为是类型名
    // 3、commit提交的改变会给 mutations
  },

  /** 定义异步操作 **/
  incrementAsyn({commit,state}){
    var p=new Promise((resolve,reject) => {    // 异步操作
      setTimeout(() => {
        resolve()
      },3000)
    });
    p.then(() => {                             // 上面执行完成后才执行 p.then()
      commit('increment');
    }).catch(() => {                           // 异常处理
      console.log('异步操作失败')
    })
  }
};

//4、定义mutations定义变化,处理状态(数据的改变)
const mutations={
  increment(state){
    state.count++;
  }
};

// 创建一个store对象(对象里定义需要导出的变量)
const store=new Vuex.Store({
  state,
  getters,
  actions,
  mutations,
});

// 导出store对象
export default store;

<template>
  <div id="app">
    <button @click="increment">增加</button>
    <button @click="incrementAsyn">异步增加</button>
    <p>当前数字为:{{count}}</p>
  </div>
</template>

<script>
  import {mapGetters,mapActions} from 'vuex'

export default {
  name: 'app',
  data () {
    return {
      msg: 'Welcome to Your Vue.js App'
    }
  },

  // 方式二:使用 辅助函数 访问 vuex 组件中数据
  computed:mapGetters([            // 这里定义一个数组,数组中指定要从vuex中获取的属性
    'count',                       // 这里的count就是 store.js中getters定义的属性
  ]),
  methods:mapActions([             // 这里定义一个数组,数组中指定要从vuex中获取的方法
    'increment',                   // 这里的increment就是 store.js中actions定义的函数
    'incrementAsyn'                // 异步提交
  ])
}
</script>

<style>
#app {
  font-family: 'Avenir', Helvetica, Arial, sans-serif;
  -webkit-font-smoothing: antialiased;
  -moz-osx-font-smoothing: grayscale;
  text-align: center;
  color: #2c3e50;
  margin-top: 60px;
}

h1, h2 {
  font-weight: normal;
}

ul {
  list-style-type: none;
  padding: 0;
}

li {
  display: inline-block;
  margin: 0 10px;
}

a {
  color: #42b983;
}
</style>

1.4 分模块组织Vuex
1、初始化环境
vue init webpack-simple vuex-demo2
cd vuex-demo2
npm install
cnpm install vuex -S # 安装vuex
npm run dev
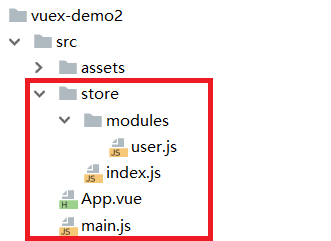
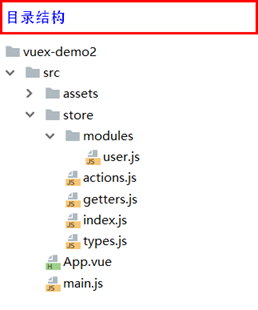
2、Vuex模块化结构

|-src
    |-main.js                       // 项目入口文件
    |-App.vue

    |-store
        |-index.js                  // 我们组装模块并导出 store 的地方
        |-getters.js                // 公共的 getters (用来获取公共属性)
        |-actions.js                // 根级别的 action (提交公共改变)
        |-mutations.js              // 根级别的 mutation (处理状态,数据的改变)
        |-types.js                  // 定义类型常量(commit中提交的常量)

        |-modules                   //分为多个模块,每个模块都可以拥有自己的state、getters、actions、mutations
            |-user.js               // 用户模块(这里仅以user模块作为事例)
3、代码事例

import Vue from 'vue'
import App from './App.vue'

import store from './store/index.js'

new Vue({
  store,
  el: '#app',
  render: h => h(App)
});

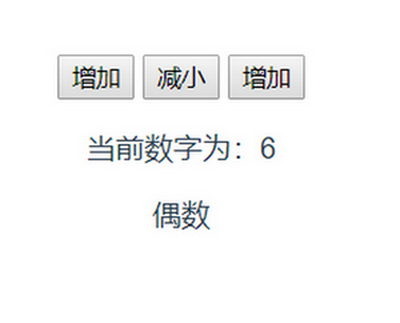
<template>
  <div id="app">

    <button @click="increment">增加</button>
    <button @click="decrement">减小</button>
    <button @click="incrementAsync">增加</button>
    <p>当前数字为:{{count}}</p>
    <p>{{isEvenOrOdd}}</p>

  </div>
</template>

<script>
import {mapState,mapGetters,mapActions} from 'vuex'

export default {
  name: 'app',
  data () {
    return {
      msg: 'Welcome to Your Vue.js App'
    }
  },
  computed:mapGetters([
      'count',
      'isEvenOrOdd'
  ]),
  methods:mapActions([
      'increment',
      'decrement',
      'incrementAsync'
  ])
}
</script>

<style>
#app {
  font-family: 'Avenir', Helvetica, Arial, sans-serif;
  -webkit-font-smoothing: antialiased;
  -moz-osx-font-smoothing: grayscale;
  text-align: center;
  color: #2c3e50;
  margin-top: 60px;
}

h1, h2 {
  font-weight: normal;
}

ul {
  list-style-type: none;
  padding: 0;
}

li {
  display: inline-block;
  margin: 0 10px;
}

a {
  color: #42b983;
}
</style>

import Vue from 'vue'
import Vuex from 'vuex'

Vue.use(Vuex);

import getters from './getters.js'
import actions from './actions.js'
import user from './modules/user.js'

export default new Vuex.Store({
    getters,
    actions,
    modules:{
        user
    }
});

const getters={
    isEvenOrOdd(state){
        return state.user.count%2==0?'偶数':'奇数';  // user模块中的count
    }
};

export default getters;

import types from './types.js'

const actions={
    incrementAsync({commit,state}){
        //异步操作
        var p=new Promise((resolve,reject) => {
            setTimeout(() => {
                resolve();
            },3000);
        });

        p.then(() => {
            commit(types.INCREMENT);
        }).catch(() => {
            console.log('异步操作');
        });
    }
};

export default actions;

/**
 * 定义类型常量
 */

const INCREMENT='INCREMENT';
const DECREMENT='DECREMENT';

export default {
    INCREMENT,
    DECREMENT
}

/**
 * 用户模块
 */

import types from '../types.js'

 const state={
     count:6
 };

var getters={
    count(state){
        return state.count;
    }
};

const actions = {
    increment({commit,state}){
        commit(types.INCREMENT); //提交一个名为increment的变化,名称可自定义,可以认为是类型名
    },
    decrement({commit,state}){
        if(state.count>10){
            commit(types.DECREMENT);
        }
    }
};

const mutations={
    [types.INCREMENT](state){   // ES6中中括号里表示 变量
        state.count++;
    },
    [types.DECREMENT](state){
        state.count--;
    }
};

export default {
    state,
    getters,
    actions,
    mutations
}
4、项目结构
5、简化版

import Vue from 'vue'
import App from './App.vue'

import store from './store/index'

new Vue({
  store,
  el: '#app',
  render: h => h(App)
})

<template>
  <div id="app">
    <h1>app</h1>
    <p>数据:{{count}}</p>
    <p @click="increment">增加</p>
  </div>
</template>

<script>
  import {mapGetters, mapActions} from 'vuex'

export default {
  name: 'app',
  data () {
    return {
      msg: 'Welcome to Your Vue.js App'
    }
  },
  computed:mapGetters([
    'count',
  ]),
  methods:mapActions([
    'increment'
  ])
}
</script>

<style>
#app {
  font-family: 'Avenir', Helvetica, Arial, sans-serif;
  -webkit-font-smoothing: antialiased;
  -moz-osx-font-smoothing: grayscale;
  text-align: center;
  color: #2c3e50;
  margin-top: 60px;
}

h1, h2 {
  font-weight: normal;
}

ul {
  list-style-type: none;
  padding: 0;
}

li {
  display: inline-block;
  margin: 0 10px;
}

a {
  color: #42b983;
}
</style>

import Vue from 'vue'
import Vuex from 'vuex'

Vue.use(Vuex);

// import getters from './getters.js'
// import actions from './actions.js'
import user from './modules/user.js'

export default new Vuex.Store({
  // getters,
  // actions,
  modules:{
    user
  }
});

//1、定义属性(数据)
var state = {
  count:6
};

//2、定义gettters获取属性:在App.vue中使用 辅助函数 访问 vuex 组件中数据调用此函数
var getters = {
  count(state){
    return state.count
  }
};

//3、定义actions提交变化:其他组件中调用的方法()
var actions = {
  increment({commit,state}){
    commit('increment')
  }
};

//4、定义mutations定义变化,处理状态(数据的改变)
var mutations = {
  increment(state){
    state.count++
  }
};

//5、导出store对象
export default {
  state,
  getters,
  actions,
  mutations
}
