1.下载安装包
下载地址
https://dev.mysql.com/get/Downloads/MySQL-5.7/mysql-5.7.17-linux-glibc2.5-x86_64.tar.gz

安装文档
https://dev.mysql.com/doc/refman/5.7/en/binary-installation.html
2.创建用户和组
groupadd mysql
useradd -g mysql -s /sbin/nologin mysql
3.解压到指定目录
tar -zxvf mysql-5.7.17-linux-glibc2.5-x86_64.tar.gz -C /usr/local
cd /usr/local/
ln -s mysql-5.7.17-linux-glibc2.5-x86_64 mysql
或者
mv  mysql-5.7.17-linux-glibc2.5-x86_64 mysql
4.配置PATH
echo "export PATH=$PATH:/usr/local/mysql/bin" >> /etc/profile
source /etc/profile
5.数据库目录规划
| 文件类型 | 实例3306 | 软链 |
|---|---|---|
| 数据datadir | /usr/local/mysql/data | /data/mysql/data |
| 参数文件my.cnf | /usr/local/mysql/etc/my.cnf | |
| 错误日志log-error | /usr/local/mysql/log/mysql_error.log | |
| 二进制日志log-bin | /usr/local/mysql/binlogs/mysql-bin | /data/mysql/binlogs/mysql-bin |
| 慢查询日志slow_query_log_file | /usr/local/mysql/log/mysql_slow_query.log | |
| 套接字socket文件 | /usr/local/mysql/run/mysql.sock | |
| pid文件 | /usr/local/mysql/run/mysql.pid |
备注:考虑到数据和二进制日志比较大,需要软链
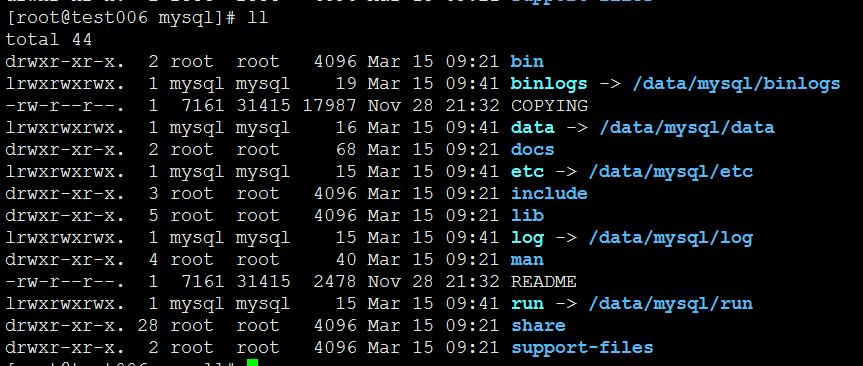
mkdir -p /data/mysql/{data,binlogs,log,etc,run}
ln -s /data/mysql/data    /usr/local/mysql/data
ln -s /data/mysql/binlogs    /usr/local/mysql/binlogs
ln -s /data/mysql/log    /usr/local/mysql/log
ln -s /data/mysql/etc    /usr/local/mysql/etc
ln -s /data/mysql/run    /usr/local/mysql/run
chown -R mysql.mysql     /data/mysql/
chown -R mysql.mysql     /usr/local/mysql/{data,binlogs,log,etc,run}
也可以只对数据目录和二进制日志目录软链
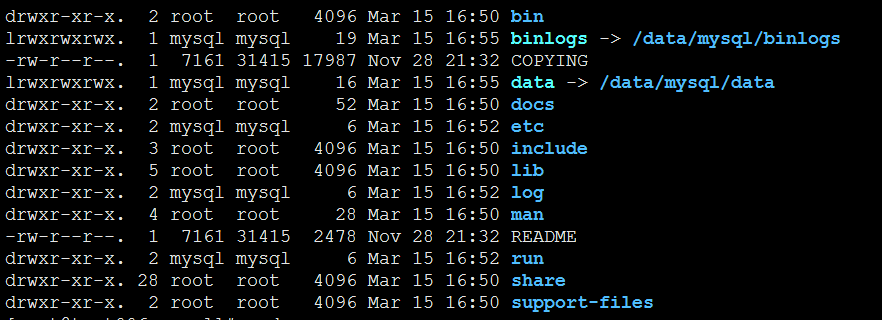
mkdir -p /usr/local/mysql/{log,etc,run}
mkdir -p /data/mysql/{data,binlogs}
ln -s /data/mysql/data  /usr/local/mysql/data
ln -s /data/mysql/binlogs   /usr/local/mysql/binlogs
chown -R mysql.mysql /usr/local/mysql/{data,binlogs,log,etc,run}
chown -R mysql.mysql /data/mysql
6.配置my.cnf参数文件
删除系统自带的my.cnf
rm -f /etc/my.cnf
在/usr/local/mysql/etc/下创建my.cnf文件,加入如下参数,其他参数根据需要配置
[client]
port = 3306
socket = /usr/local/mysql/run/mysql.sock

[mysqld]
port = 3306
socket = /usr/local/mysql/run/mysql.sock
pid_file = /usr/local/mysql/run/mysql.pid
datadir = /usr/local/mysql/data
default_storage_engine = InnoDB
max_allowed_packet = 512M
max_connections = 2048
open_files_limit = 65535

skip-name-resolve
lower_case_table_names=1

character-set-server = utf8mb4
collation-server = utf8mb4_unicode_ci
init_connect='SET NAMES utf8mb4'


innodb_buffer_pool_size = 1024M
innodb_log_file_size = 2048M
innodb_file_per_table = 1
innodb_flush_log_at_trx_commit = 0


key_buffer_size = 64M

log-error = /usr/local/mysql/log/mysql_error.log
log-bin = /usr/local/mysql/binlogs/mysql-bin
slow_query_log = 1
slow_query_log_file = /usr/local/mysql/log/mysql_slow_query.log
long_query_time = 5


tmp_table_size = 32M
max_heap_table_size = 32M
query_cache_type = 0
query_cache_size = 0

server-id=1
7.初始化数据库
执行:
mysqld --initialize --user=mysql --basedir=/usr/local/mysql --datadir=/usr/local/mysql/data
在日志文件里会提示一个临时密码,记录这个密码
grep 'temporary password' /usr/local/mysql/log/mysql_error.log
2017-03-12T13:26:30.619610Z 1 [Note] A temporary password is generated for root@localhost: b#uhQy*=d7yH
8.生成ssl
mysql_ssl_rsa_setup --basedir=/usr/local/mysql --datadir=/usr/local/mysql/data/
9.设置启动项
CentOS 6
cd /usr/local/mysql
cp support-files/mysql.server /etc/init.d/mysql.server
chkconfig --add mysql.server
chkconfig  mysql.server on
chkconfig --list
CentOS 7
cd /usr/lib/systemd/system
touch mysqld.service
编辑内容如下
shell> cat mysqld.service
# Copyright (c) 2015, 2016, Oracle and/or its affiliates. All rights reserved.
#
# This program is free software; you can redistribute it and/or modify
# it under the terms of the GNU General Public License as published by
# the Free Software Foundation; version 2 of the License.
#
# This program is distributed in the hope that it will be useful,
# but WITHOUT ANY WARRANTY; without even the implied warranty of
# MERCHANTABILITY or FITNESS FOR A PARTICULAR PURPOSE.  See the
# GNU General Public License for more details.
#
# You should have received a copy of the GNU General Public License
# along with this program; if not, write to the Free Software
# Foundation, Inc., 51 Franklin St, Fifth Floor, Boston, MA  02110-1301 USA
#
# systemd service file for MySQL forking server
#

[Unit]
Description=MySQL Server
Documentation=man:mysqld(8)
Documentation=http://dev.mysql.com/doc/refman/en/using-systemd.html
After=network.target
After=syslog.target

[Install]
WantedBy=multi-user.target

[Service]
User=mysql
Group=mysql

Type=forking

PIDFile=/usr/local/mysql/run/mysqld.pid

# Disable service start and stop timeout logic of systemd for mysqld service.
TimeoutSec=0

# Execute pre and post scripts as root
PermissionsStartOnly=true

# Needed to create system tables
#ExecStartPre=/usr/bin/mysqld_pre_systemd

# Start main service
ExecStart=/usr/local/mysql/bin/mysqld --daemonize --pid-file=/usr/local/mysql/run/mysqld.pid $MYSQLD_OPTS

# Use this to switch malloc implementation
EnvironmentFile=-/etc/sysconfig/mysql

# Sets open_files_limit
LimitNOFILE = 65535

Restart=on-failure

RestartPreventExitStatus=1

PrivateTmp=false
加载
systemctl daemon-reload
systemctl enable mysqld.service
systemctl is-enabled mysqld
10. 启动mysql
systemctl start mysqld.service
11. Securing the Initial MySQL Accounts
重置密码(上一步已经重置过了 这次可以忽略)
删除匿名用户
关闭root用户的远程登录
删除测试数据库
shell> /usr/local/mysql/bin/mysql_secure_installation

Securing the MySQL server deployment.

Enter password for user root:

The existing password for the user account root has expired. Please set a new password.

New password:

Re-enter new password:

VALIDATE PASSWORD PLUGIN can be used to test passwords
and improve security. It checks the strength of password
and allows the users to set only those passwords which are
secure enough. Would you like to setup VALIDATE PASSWORD plugin?

Press y|Y for Yes, any other key for No: Y

There are three levels of password validation policy:

LOW    Length >= 8
MEDIUM Length >= 8, numeric, mixed case, and special characters
STRONG Length >= 8, numeric, mixed case, special characters and dictionary                  file

Please enter 0 = LOW, 1 = MEDIUM and 2 = STRONG: 2
Using existing password for root.

Estimated strength of the password: 100
Change the password for root ? ((Press y|Y for Yes, any other key for No) : N

 ... skipping.
By default, a MySQL installation has an anonymous user,
allowing anyone to log into MySQL without having to have
a user account created for them. This is intended only for
testing, and to make the installation go a bit smoother.
You should remove them before moving into a production
environment.

Remove anonymous users? (Press y|Y for Yes, any other key for No) : Y
Success.


Normally, root should only be allowed to connect from
'localhost'. This ensures that someone cannot guess at
the root password from the network.

Disallow root login remotely? (Press y|Y for Yes, any other key for No) : Y
Success.

By default, MySQL comes with a database named 'test' that
anyone can access. This is also intended only for testing,
and should be removed before moving into a production
environment.


Remove test database and access to it? (Press y|Y for Yes, any other key for No) : Y
 - Dropping test database...
Success.

 - Removing privileges on test database...
Success.

Reloading the privilege tables will ensure that all changes
made so far will take effect immediately.

Reload privilege tables now? (Press y|Y for Yes, any other key for No) : Y
Success.

All done!
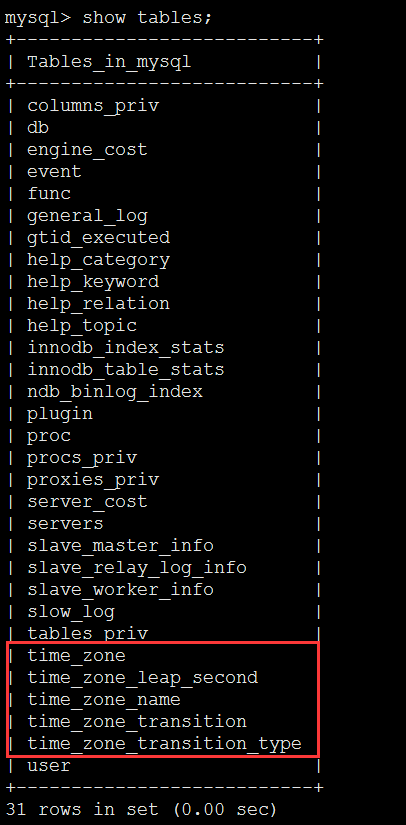
12.Populating the Time Zone Tables
导入时区信息
mysql_tzinfo_to_sql /usr/share/zoneinfo | mysql -u root -p mysql
13.测试
shell> mysqladmin version -uroot -p
Enter password:
mysqladmin  Ver 8.42 Distrib 5.7.17, for linux-glibc2.5 on x86_64
Copyright (c) 2000, 2016, Oracle and/or its affiliates. All rights reserved.

Oracle is a registered trademark of Oracle Corporation and/or its
affiliates. Other names may be trademarks of their respective
owners.

Server version		5.7.17-log
Protocol version	10
Connection		Localhost via UNIX socket
UNIX socket		/usr/local/mysql/run/mysql.sock
Uptime:			4 min 0 sec

Threads: 1  Questions: 8681  Slow queries: 0  Opens: 122  Flush tables: 1  Open tables: 103  Queries per second avg: 36.170
查看变量
shell> mysqladmin variables -uroot -p
14.开放3306端口
##Add
firewall-cmd --permanent --zone=public --add-port=3306/tcp

##Reload
firewall-cmd --reload

## 检查是否生效
firewall-cmd --zone=public --query-port=3306/tcp

## 列出所有的开放端口
firewall-cmd --list-all
15.利用logrotate对MySQL日志进行轮转
shell > cat /root/.my.cnf
[mysqladmin]
password = password
user= root

chmod 600 /root/.my.cnf
cp  /usr/local/mysql/support-files/mysql-log-rotate /etc/logrotate.d/
chmod 644  /etc/logrotate.d/mysql-log-rotate
修改内容如下
shell > cat /etc/logrotate.d/mysql-log-rotate
# The log file name and location can be set in
# /etc/my.cnf by setting the "log-error" option
# in either [mysqld] or [mysqld_safe] section as
# follows:
#
# [mysqld]
# log-error=/usr/local/mysql/data/mysqld.log
#
# In case the root user has a password, then you
# have to create a /root/.my.cnf configuration file
# with the following content:
#
# [mysqladmin]
# password = <secret>
# user= root
#
# where "<secret>" is the password.
#
# ATTENTION: The /root/.my.cnf file should be readable
# _ONLY_ by root !

/usr/local/mysql/log/mysql_*.log {
        # create 600 mysql mysql
        notifempty
        weekly
        rotate 52
        missingok
        compress
    postrotate
	# just if mysqld is really running
	if test -x /usr/local/mysql/bin/mysqladmin &&
	   /usr/local/mysql/bin/mysqladmin ping &>/dev/null
	then
	   /usr/local/mysql/bin/mysqladmin flush-logs
	fi
    endscript
}
测试
/usr/sbin/logrotate -fv /etc/logrotate.d/mysql-log-rotate