1、耗时操作(IO)处理
在开发中针对如何处理耗时的操作,不同的语言有不同的处理方式
-
处理方式一: 多线程,比如Java、C++,我们普遍的做法是开启一个新的线程(Thread),在新的线程中完成这些异步的操作,再通过线程间通信的方式,将拿到的数据传递给主线程。
-
处理方式二: 单线程+事件循环,比如JavaScript、Dart都是基于单线程加事件循环来完成耗时操作的处理。不过单线程如何能进行耗时的操作呢?!
2、Dart是单线程的
dart 中对异步的支持
1)Future
2) Stream
3、Future
Future 对象是一个异步执行并且在未来的某一个时刻完成(或失败)的任务。
-
该 Future 的一个实例被创建并记录在由 Dart 管理的内部数组中;
-
需要由此 Future 执行的代码直接推送到 Event 队列中去;
-
该 future 实例 返回一个状态(= incomplete,|| completion);
-
如果存在下一个同步代码,执行它(非 Future 的执行代码)
当该代码将被执行并将完成(或失败)时,then() 或 catchError() 方法将直接被触发。
4、Async
声明异步函数 async
当你使用 async 关键字作为方法声明的后缀时,Dart 会将其理解为:
-
该方法的返回值是一个 Future 对象;(这个Future对象才是真正的异步代码 async 只是一个标志,并不代表它的整个函数都是异步执行的);
-
它同步执行该方法的代码直到第一个 await 关键字,然后它暂停(用词不太恰当)该方法其他部分的执行;
-
一旦由 await 关键字引用的 Future 执行完成,下一行代码将立即执行。
异步函数是函数体被用async修饰符标记的函数。必须返回一个Future 对象
5、创建Future
- async 异步函数
函数的主体不需要使用Future的API。如果需要,Dart将创建Future的对象。
如果您的函数没有返回一个有用的值,那么将其返回Future类型。
函数的返回值不需要使用Future的API。如果需要,Dart将创建Future的对象。
如果您的函数没有返回一个有用的值,那么将其返回Future
Future<int> testxxx()  async{
  return 3;//返回一个Future对象
}


 testxxx()  async{
  return 3;
}

main(){
 print(testxxx());//Instance of '_Future<dynamic>'
}
注意 async 并没有建立异步,只是一个标记,真正的异步是Future
它的作用有两个-1 return的结果 自动Future 封装;
-2 await 必须在异步函数中使用;
Future<int> foo(x) async {
      print(x);//这一行不是异步,async 不在Future 中,所以这句话输出之后 把 Future(x+1)放入evenloop
      return x + 1;// return   Future(x+1)
}

main() {
  foo(499).then(print);
  print("after foo call");
}


499
after foo call
500

  /* ******************************************** */

  这个和上面一样,证明了只有返回值 才是Future 对象 那pa这个值在返回前已经生成。。不可思议
Future<int> foo(x) async {
    print(x);
    int a = x * 5;
    print("x* 5 = $a");
    print(x + 1);
    return a;
}

main() {
  foo(4).then(print);
  print("after foo call");
}

4
x* 5 = 20
5
after foo call
20
-
使用Future API
Future(() => print('f1'));
6、Future对象的处理
1)async + await
2)then
- then
Future<int> testxxx()  async{
  return 3;
}
 testxxx().then((value) => print(value));
- async await
让我们用同步的代码格式,去实现异步的调用过程。
1、await关键字必须存在于async函数中。
2、async 函数必须返回一个Future对象
3、执行到await标记的函数时 会将异步函数返回的Future对象连同 await和await的下文一起放入eventloop ,当从event loop中拿出时,先执行await Future对象,再执行下文。 这个会在下文有具体的分析
4、使用await声明的表达式,等同于同步代码,可以用try-catch-finally捕获异常
Future<String> getNetworkData() async {
  var result = await Future.delayed(Duration(seconds: 3), () {
    return "network data";
  });

  return  "请求到的数据:" + result;
}
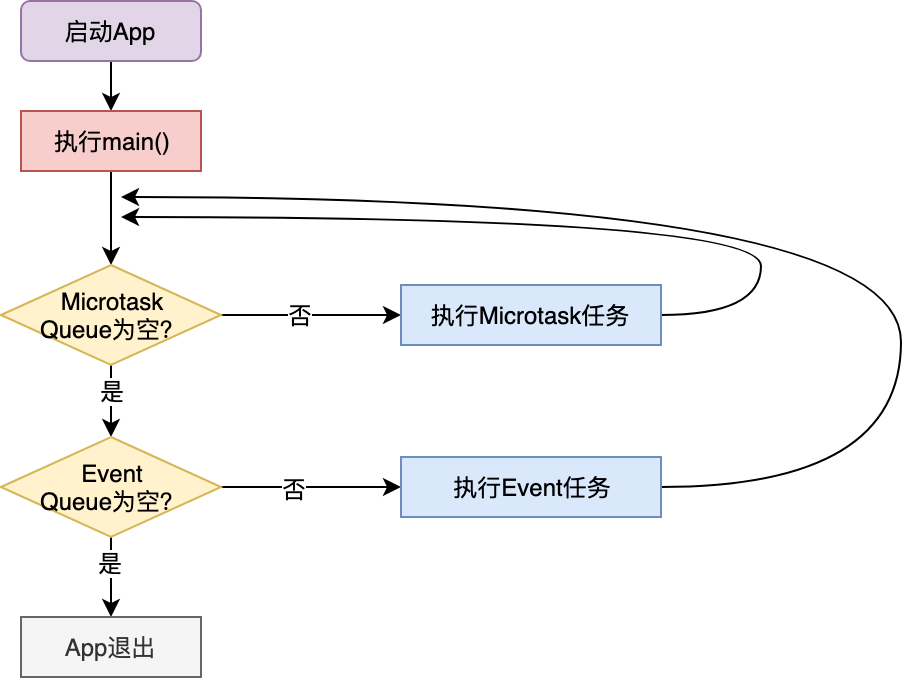
7、Event Loop
启动一个 Flutter(或任何 Dart)应用时,将创建并启动一个新的线程进程(在 Dart 中为 「Isolate」)
所以,此线程创建后,Dart 会自动:
- 初始化 2 个 FIFO(先进先出)队列(「MicroTask」和 「Event」);
- 并且当该方法执行完成后,执行 main() 方法,
- 启动事件循环。
在 Dart 中,有两个队列,一个事件队列(Event Queue),另一个则是微任务队列(Microtask Queue)。在每一次事件循环中,Dart 总是先去第一个微任务队列中查询是否有可执行的任务,如果没有,才会处理后续的事件队列的流程。
Event Loop 完整版的流程图:
7.1、微任务队列
表示一个短时间内就会完成的异步任务。从上面的流程图可以看到,微任务队列在事件循环中的优先级是最高的,只要队列中还有任务,就可以一直霸占着事件循环。
微任务是由 scheduleMicroTask 建立的。如下所示,这段代码会在下一个事件循环中输出一段字符串:
scheduleMicrotask(() => print('This is a microtask'));
7.2、Event Queue
Dart 为 Event Queue 的任务建立提供了一层封装,叫作 Future。从名字上也很容易理解,它表示一个在未来时间才会完成的任务。
把一个函数体放入 Future,就完成了从同步任务到异步任务的包装,会自动放入到 Event Queue中
7.3、实例分析
知识点
1、Future 对象 自动放入Event Queue中;(使用 new Future 将任务加入 event 队列。)
2、then 与 Future 函数体共用一个事件循环
3、如果在 then() 调用之前 Future 就已经执行完毕了即(null.then),那么会把then任务会被加入到 microtask 队列中
4、使用 Future.value 构造函数的时候,把then直接放入 microtask Queue 中。
一般直接放入 结果 而不是 函数
Future.value
new Future.sync(() => value).
(new) Future Future.value([FutureOr value])
Creates a future completed with [value].
If [value] is a future, the created future waits for the [value] future to complete, and then completes with the same result. Since a [value] future can complete with an error, so can the future created by [Future.value], even if the name suggests otherwise.
If [value] is not a [Future], the created future is completed with the [value] value, equivalently to
new Future.sync(() => value).Use [Completer] to create a future and complete it later.
5、Future.sync 构造函数执行了它传入的函数之后,也会立即创建 then的Task 放入 microtask Queue 中执行。
6、当任务需要延迟执行时,可以使用 new Future.delay() 来将任务延迟执行。
7、dart是单线程的,一旦开始执行,就不会停止,除非把里面的代码处理(而不是执行)完(或者是放入event loop中)
8、微队列 的优先级比event loop 高 只要微队列中有事件,就一直会执行微队列
根据这几条规则 看下下面的例子
main() {
  print("start");
  Future(() => print('f1'));
  Future(() => print('f2'));

  var fx = Future(() => print('f5'));

  Future.delayed(Duration(seconds:0),(){print("t3");});

  Future.value(4).then((_) => print('t1'));

  Future(() => print('f3')).then((_) => print('then 1'));

  Future(() => null).then((_) => print('then 2'));


  Future.sync((){print('t2');}).then((_){print('t4');});

  fx.then((_){print('t5');});

  print("end");
}
Console:
start
t2
end
t1
t4
f1
f2
f5
t5
t3
f3
then 1
then 2
main 只有main执行完才会开始 其它事件,(其实 main也可以是一个事件 ? 那它放在什么队列里面呢?)
1、先输出 start // start
2、f1 使用Future() 放入 EventLoop
3、f2 使用Future() 放入 EventLoop
4、f5 使用Future() 放入 EventLoop
5、t3 使用 Future.delayed 放入 EventLoop
6、t1 使用了 Future.value(4)立即执行并返回这个future 然后把future.then 放入 EventLoop
7、f3 使用Future() 把then和future 一起 放入 EventLoop (共用同一个事件)
8、then 2 也是一个Future 把future 和then一起放入EventLoop
9、t2 使用 Future.sync立即执行 并把then放入微任务队列 // t2
10、t5 直接是fx的then,加入到f5的EventLoop中,当f5执行完,立即执行t5
11、 直接输出 end // end
这一轮的输出是
start t2 end
微队列是
t1 t2.then即t4
输出 t1 t4
值的注意的是 Future.delayed 执行到这一个会立即执行 什么时候时间到了就输出,这个时间不一样,输出顺序就不一样
例子 2:两个比较着看
 methodA(String str){
    print("A start from $str");
    Future.delayed(Duration(seconds:4),(){
        print("延迟4s后才执行");
    });

    print("A end from $str");

}

main() {
  print("func before");
  methodA('B');
  print("func after");
}


func before
A start from B
A end from B
func after
延迟4s后才执行

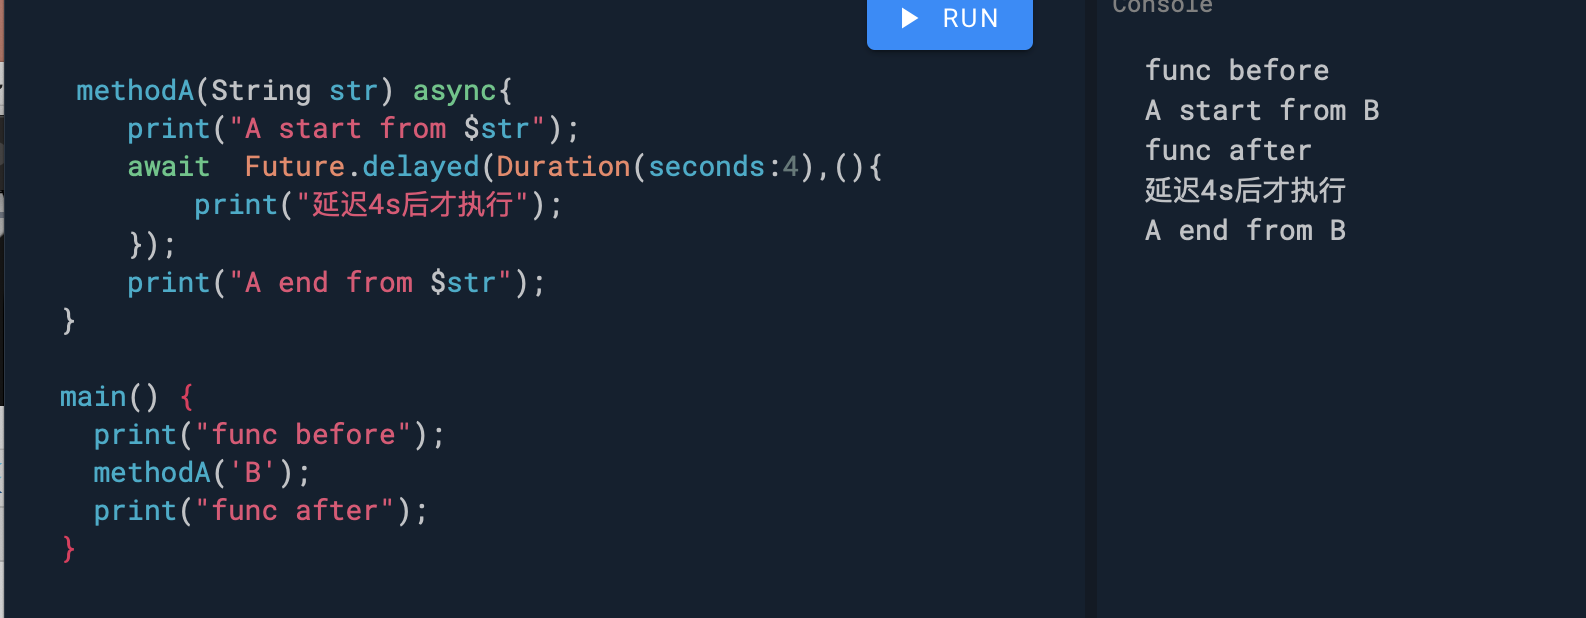
 methodA(String str) async{
    print("A start from $str");
    await  Future.delayed(Duration(seconds:4),(){
        print("延迟4s后才执行");
    });
    print("A end from $str");
}

main() {
  print("func before");
  methodA('B');
  print("func after");
}


func before
A start from B
func after
延迟4s后才执行
A end from B
 methodA(String str) async{
    print("A start from $str");
    await  Future.delayed(Duration(seconds:4),(){
        print("延迟4s后才执行");
    });
    print("A end from $str");
}

main() {
  print("func before");

  methodA('B');
  methodA('C');

  print("func after");
}
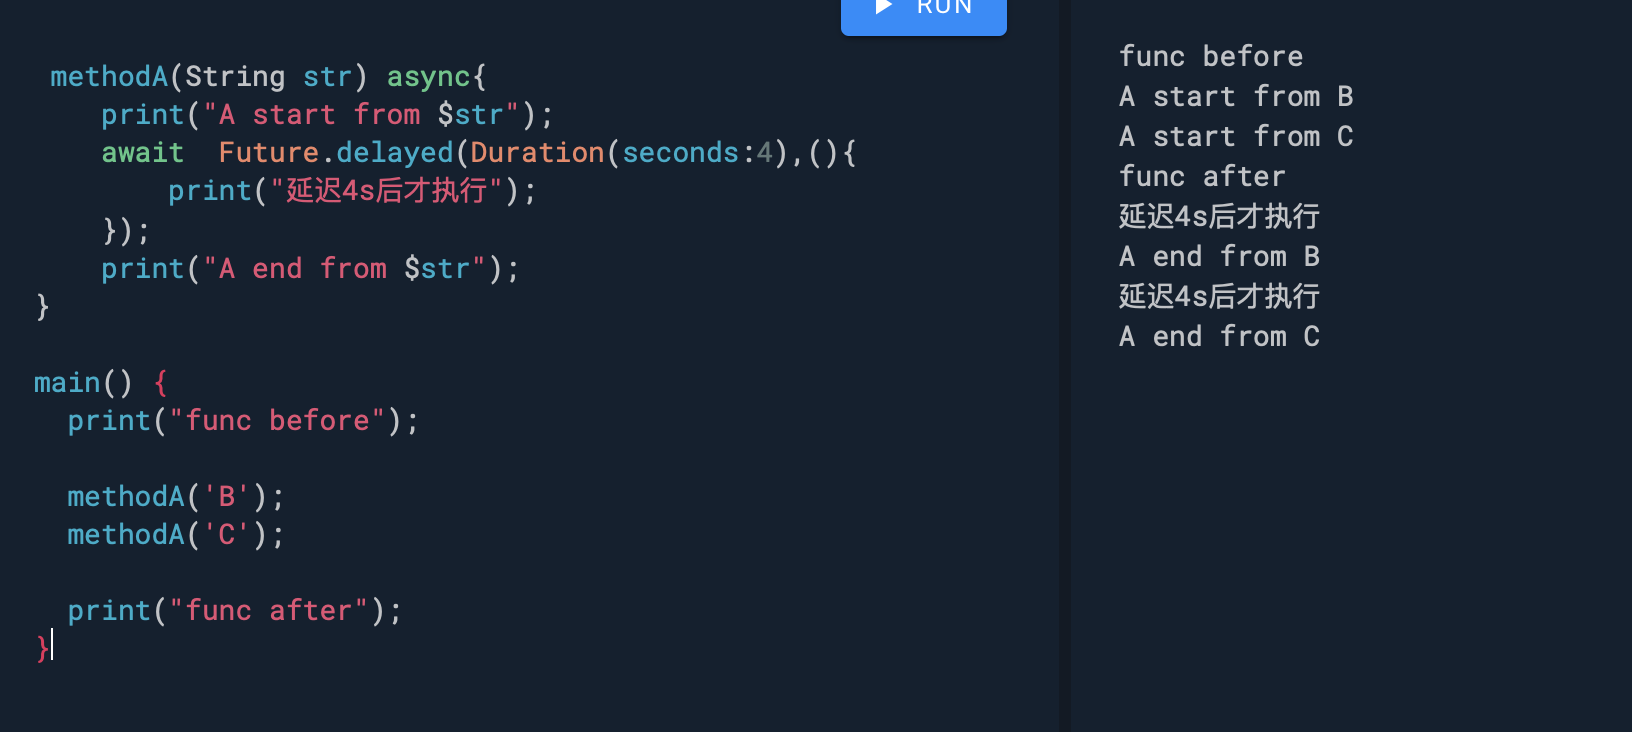
知识点
1、await 把当前 Future 和 await 上下文一起放入event loop
methodA(String str) async{
    print("A start from $str");
    await  Future.delayed(Duration(seconds:4),(){
        print("延迟4s后才执行");
    });
    print("A end from $str");
}
流程分析:
1、 print("func before");
2、 methodA('B');
输出A start from B
把
await  Future.delayed(Duration(seconds:4),(){
        print("延迟4s后才执行");
    });
    print("A end from $str");
放入 event loop中
3、
methodA('C');
输出A start from C
把
await  Future.delayed(Duration(seconds:4),(){
        print("延迟4s后才执行");
    });
    print("A end from $str");
放入 event loop中
print("func after");
4、执行 2、加入的Event Loop中
输出 : print("延迟4s后才执行"); 执行 await 同步,这些执行完之后执行 await后的内容 print("A end fromB");
5、执行 3、加入的Event Loop中
输出 : print("延迟4s后才执行"); 执行 await 同步,这些执行完之后执行 await后的内容 print("A end fromC");
例子 3:
知识点
1、Future.error的then不执行。。。。 标志着then 结束。。。
2、then结束执行whenComplete()
3、Future.error会在 catchError‘的时候执行
void doAsyncs() async{
  //then catchError whenComplete
  new Future(() => futureTask()) //  异步任务的函数
      .then((m) => "1-:$m") //   任务执行完后的子任务
      .then((m) => print('2-$m')) //  其中m为上个任务执行完后的返回的结果
      .then((_) => new Future.error('3-:error'))
      .then((m) => print('4-'))
      .whenComplete(() => print('5-')) //不是最后执行whenComplete,通常放到最后回调

//      .catchError((e) => print(e))//如果不写test默认实现一个返回true的test方法
      .catchError((e) => print('6-catchError:' + e), test: (Object o) {
           print('7-:' + o);
    return true; //返回true,会被catchError捕获
//        return false; //返回false,继续抛出错误,会被下一个catchError捕获
  })
  .then((_) => new Future.error('11-:error'))
      .then((m) => print('10-'))
      .catchError((e) => print('8-:' + e))
      ;
}

 futureTask() {
//  throw 'error';
  return Future.delayed(Duration(seconds: 5),()  => "9-走去跑步");
}

main(){
  doAsyncs();
}
2-1-:9-走去跑步
5-
7-:3-:error
6-catchError:3-:error
8-:11-:error
当异步函数 futureTask() 执行完会在内存中保存 ‘9-走去跑步’ 接着执行它的.then
然后继续执行下一步 这个时候遇见了 then 现在会在内存中保存 “1-: 9-走去跑步 ” 继续执行 这个时候遇见了打印输出 2-1-:9-走去跑步 。现在第一个打印出来了。
接着执行下一个 then() 这个时候遇见了一个 error 异常,Dart 会把这个异常保存在内存直到遇见捕获异常的地方。
下面执行 whenComplete 这个函数 打印 5- 。
然后遇见了一个捕获异常的函数 catchError 如果 test 返回 true ,会被 catchError 捕获 打印 7-:3-:error 6-catchError:3-:error。如果返回 false 只打印 7-:3-:error,会把 error 抛给下一个 catchError 。
继续执行 又遇见了一个 error 11-:error ,现在出现 error 了 所以 then 10- 就不会执行了 。最后就直接捕获异常 打印 "8-11-error"。
7.3、Dart 中的 await 并不是阻塞等待,而是异步等待
Dart 中的 await 并不是阻塞等待,而是异步等待。Dart 会将调用体的函数也视作异步函数,将等待语句的上下文放入 Event Queue 中,一旦有了结果,Event Loop 就会把它从 Event Queue 中取出,等待代码继续执行。接下来,为了帮助你加深印象,我准备了两个具体的案例。我们先来看下这段代码。第二行的 then 执行体 f2 是一个 Future,为了等它完成再进行下一步操作,我们使用了 await,期望打印结果为 f1、f2、f3、f4:
Future(
() => print('f1')
) .then(
  (_) async => await Future(
           () => print('f2')
           )
  ) .then((_) => print('f3'));


  Future(() => print('f4'));
实际上,当你运行这段代码时就会发现,打印出来的结果其实是 f1、f4、f2、f3!我来给你分析一下这段代码的执行顺序:按照任务的声明顺序,f1 和 f4 被先后加入事件队列。f1 被取出并打印;然后到了 then。then 的执行体是个 future f2,于是放入 Event Queue。然后把 await 也放到 Event Queue 里。这个时候要注意了,Event Queue 里面还有一个 f4,我们的 await 并不能阻塞 f4 的执行。因此,Event Loop 先取出 f4,打印 f4;然后才能取出并打印 f2,最后把等待的 await 取出,开始执行后面的 f3。由于 await 是采用事件队列的机制实现等待行为的,所以比它先在事件队列中的 f4 并不会被它阻塞。
Isolate尽管 Dart 是基于单线程模型的,但为了进一步利用多核 CPU,将 CPU 密集型运算进行隔离,Dart 也提供了多线程机制,即 Isolate。在 Isolate 中,资源隔离做得非常好,每个 Isolate 都有自己的 Event Loop 与 Queue,Isolate 之间不共享任何资源,只能依靠消息机制通信,因此也就没有资源抢占问题。
和其他语言一样,Isolate 的创建非常简单,我们只要给定一个函数入口,创建时再传入一个参数,就可以启动 Isolate 了。如下所示,我们声明了一个 Isolate 的入口函数,然后在 main 函数中启动它,并传入了一个字符串参数:
doSth(msg) => print(msg);

main() {
  Isolate.spawn(doSth, "Hi");
  ...
}
但更多情况下,我们的需求并不会这么简单,不仅希望能并发,还希望 Isolate 在并发执行的时候告知主 Isolate 当前的执行结果。
对于执行结果的告知,Isolate 通过发送管道(SendPort)实现消息通信机制。我们可以在启动并发 Isolate 时将主 Isolate 的发送管道作为参数传给它,这样并发 Isolate 就可以在任务执行完毕后利用这个发送管道给我们发消息了。下面我们通过一个例子来说明:在主 Isolate 里,我们创建了一个并发 Isolate,在函数入口传入了主 Isolate 的发送管道,然后等待并发 Isolate 的回传消息。在并发 Isolate 中,我们用这个管道给主 Isolate 发了一个 Hello 字符串:
Isolate isolate;

start() async {
  ReceivePort receivePort= ReceivePort();//创建管道
  //创建并发Isolate,并传入发送管道
  isolate = await Isolate.spawn(getMsg, receivePort.sendPort);
  //监听管道消息
  receivePort.listen((data) {
    print('Data:$data');
    receivePort.close();//关闭管道
    isolate?.kill(priority: Isolate.immediate);//杀死并发Isolate
    isolate = null;
  });
}
//并发Isolate往管道发送一个字符串
getMsg(sendPort) => sendPort.send("Hello");
这里需要注意的是,在 Isolate 中,发送管道是单向的:我们启动了一个 Isolate 执行某项任务,Isolate 执行完毕后,发送消息告知我们。如果 Isolate 执行任务时,需要依赖主 Isolate 给它发送参数,执行完毕后再发送执行结果给主 Isolate,这样双向通信的场景我们如何实现呢?答案也很简单,让并发 Isolate 也回传一个发送管道即可。
接下来,我们以一个并发计算阶乘的例子来说明如何实现双向通信。
在下面的例子中,我们创建了一个异步函数计算阶乘。在这个异步函数内,创建了一个并发 Isolate,传入主 Isolate 的发送管道;并发 Isolate 也回传一个发送管道;主 Isolate 收到回传管道后,发送参数 N 给并发 Isolate,然后立即返回一个 Future;并发 Isolate 用参数 N,调用同步计算阶乘的函数,返回执行结果;最后,主 Isolate 打印了返回结果:
//并发计算阶乘
Future<dynamic> asyncFactoriali(n) async{
  final response = ReceivePort();//创建管道
  //创建并发Isolate,并传入管道
  await Isolate.spawn(_isolate,response.sendPort);
  //等待Isolate回传管道


  这个通道用来 传递参数
  final sendPort = await response.first as SendPort;
  //创建了另一个管道answer
  这个通道用来返回结果;
  final answer = ReceivePort();
  //往Isolate回传的管道中发送参数,同时传入answer管道
  sendPort.send([n,answer.sendPort]);
  return answer.first;//等待Isolate通过answer管道回传执行结果
}

//Isolate函数体,参数是主Isolate传入的管道
_isolate(initialReplyTo) async {
  final port = ReceivePort();//创建管道
  initialReplyTo.send(port.sendPort);//往主Isolate回传管道
  final message = await port.first as List;//等待主Isolate发送消息(参数和回传结果的管道)
  final data = message[0] as int;//参数
  final send = message[1] as SendPort;//回传结果的管道
  send.send(syncFactorial(data));//调用同步计算阶乘的函数回传结果
}

//同步计算阶乘
int syncFactorial(n) => n < 2 ? n : n * syncFactorial(n-1);
main() async => print(await asyncFactoriali(4));//等待并发计算阶乘结果
上面相当于创建了三个通道 一个用来传递两个线程的通道, 然后一个传参通道,一个等待结果通道
下面这个创建两个通道
testIsolate() async{
  print(await asyncFactoriali(4));
}
// 同步计算阶乘
int syncFactorial(n) => n < 2 ? n : n * syncFactorial(n-1);


// 并发计算阶乘
Future<dynamic> asyncFactoriali(n) async{
  final response = ReceivePort();// 创建管道
  // 创建并发 Isolate,并传入管道
  await Isolate.spawn(_isolate,response.sendPort);
  response.listen((data){
    if (data is SendPort){
      data.send(n);
    } else {
      print(">>>>>>$data");
    }
  });
}

//Isolate 函数体,参数是主 Isolate 传入的管道
_isolate(initialReplyTo) async {
  final port = ReceivePort();// 创建管道
  initialReplyTo.send(port.sendPort);// 往主 Isolate 回传管道
  final message = await port.first as int;// 等待主 Isolate 发送消息 (参数和回传结果的管道)
  initialReplyTo.send(syncFactorial(message));// 调用同步计算阶乘的函数回传结果
}
flutter提供的 封装后的;
//同步计算阶乘
int syncFactorial(n) => n < 2 ? n : n * syncFactorial(n-1);
//使用compute函数封装Isolate的创建和结果的返回
main() async => print(await compute(syncFactorial, 4));
Isolate.spawn expects to be passed a static or top-level function
static 函数 或者顶级函数,即全局函数