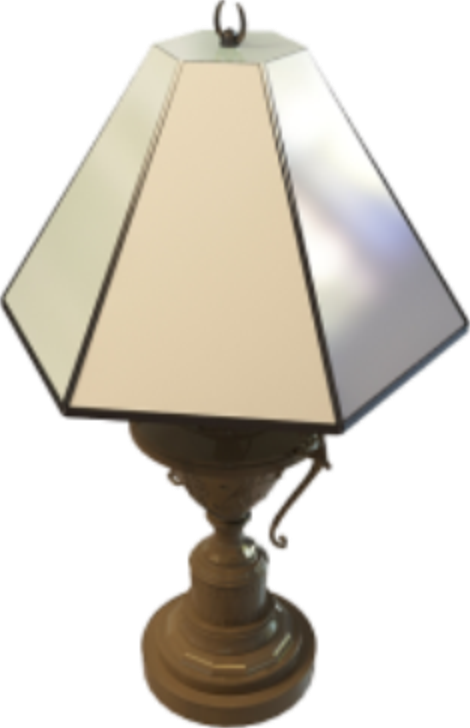
今天客户提了一个需求: 需要结合摄像头将拍照的图片和自己的产品(图片)整合到一张图片上面,如下图:
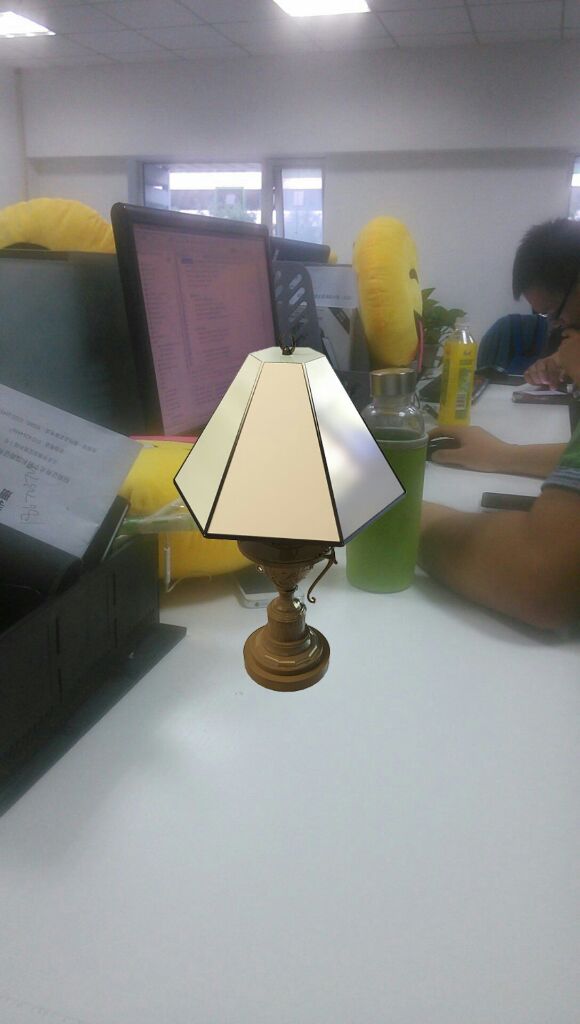
针对这个功能需要做自定义相机,根据Camera相机类和SurfaceView类来实现自定义图形预览拍照功能。
但在实现过程中出现几个难点:
1.如何将自己产品图片(上图的台灯)和摄像头预览的图片结合成一张图片。
2.拍照的图片在有些手机上面出现旋转了90度的情况(Android兼容性问题)。
3.某些手机会出现在camera.setParameters(parameters)的调用时候出现设置失败的异常java.lang.RuntimeException: setParameters failed
针对第一个问题:
开始的考虑是在布局中SurfaceView上加一层ImageView来显示产品图片,然后通过截取View的方法截取SurfaceView和ImageView的父布局来实现,但截取view的时候发现只能截取静态的方法,对于像surfaceview之类的动态的view是不能够截取的(具体的截取方法请参考下面的源码),后来才有的是绘图的方式将预览图片的bitmap和产品图片的bitmap绘制到一张图片实现图片的合并(具体方法请参考下面源码)。
针对第二个问题:
这个显然是android手机的兼容性问题,网上也有很大类似的网友提出此类问题,但给出的解决方法大都是先通过ExifInterface类来读取bitmap的旋转角度,然后根据旋转角度旋转bitmap实现,我也用这个方法检验过,但实际上此方法并不靠谱,原因是读取bitmap的角度始终为0,即使我图片在拍照后出现的旋转了90度,也是读取不了的。后来找一篇文章:http://www.xuebuyuan.com/1223069.html 该文章介绍了ExifInterface类在某些机型的有兼容性问题,并指出了问题产生的原因,我采用,拍照完成后,强制调用setPictureDegreeZero方法(具体实现参考下面源码)来重新将图片的旋转角度设置为0,终于以次方解决了问题。终于松了口气,啊哈哈。
针对第三个问题:
某些机型出现了设置拍照参数失败,是因为某些参数设置对应该机型不支持,这里我需要做到的是需要确认哪些参数有兼容性问题的,经测试发现,
// parameters.setPreviewFrameRate(3);// 每秒3帧 每秒从摄像头里面获得3个画面, 此参数在小米2上面支持,在红米note2上面不支持,
// parameters.setPreviewSize(PreviewWidth,PreviewHeight);// 获得摄像区域的大小
// parameters.setPictureSize(PreviewWidth,PreviewHeight);// 获得保存图片的大小 ----这个两个参数也会有兼容性问题。 目前发现这里3个参数有兼容性问题,其它若有发现在补充,同时如果网友们发现了其它参数存在兼容性问题也烦请指出,谢谢。
针对不兼容性问题,尽量避免去设置它,对应setPreviewSize和setPictureSize可以通过以下方式取得合适的预览尺寸进行设置,具体方法请参考下面源代码。// 选择合适的预览尺寸List<Camera.Size> sizeList = parameters.getSupportedPreviewSizes();
具体实现代码:
-
package com.example.eclipsetest;

import java.io.BufferedOutputStream;
import java.io.File;
import java.io.FileOutputStream;
import java.io.IOException;
import java.lang.reflect.Method;
import java.util.Iterator;
import java.util.List;

import android.app.Activity;
import android.content.Context;
import android.graphics.Bitmap;
import android.graphics.Bitmap.Config;
import android.graphics.BitmapFactory;
import android.graphics.Canvas;
import android.graphics.Matrix;
import android.graphics.PixelFormat;
import android.graphics.drawable.Drawable;
import android.hardware.Camera;
import android.hardware.Camera.AutoFocusCallback;
import android.hardware.Camera.Parameters;
import android.hardware.Camera.PictureCallback;
import android.hardware.Camera.ShutterCallback;
import android.hardware.Camera.Size;
import android.media.ExifInterface;
import android.os.Build;
import android.os.Bundle;
import android.os.Environment;
import android.util.DisplayMetrics;
import android.util.Log;
import android.view.Display;
import android.view.Gravity;
import android.view.SurfaceHolder;
import android.view.SurfaceView;
import android.view.View;
import android.view.View.MeasureSpec;
import android.view.View.OnClickListener;
import android.view.WindowManager;
import android.widget.Button;
import android.widget.FrameLayout;
import android.widget.ImageView;
import android.widget.ImageView.ScaleType;
import android.widget.Toast;

/**
 * 自定义拍照,将特定图片添加到预览图片中保存起来
 *
 * @ClassName: MyCameraDemo
 * @Description:
 * @author xiaoxiao
 * @date modify by 2015-9-8 下午2:09:16
 *
 */
public class MyCameraDemo extends Activity {
	private SurfaceView surface = null;
	private Button but = null;
	private SurfaceHolder holder = null;
	private Camera cam = null;
	private boolean previewRunning = true;
	private Button but2;
	private ImageView iv_img;
	private FrameLayout flay_view;

	@Override
	public void onCreate(Bundle savedInstanceState) {
		super.onCreate(savedInstanceState);
		super.setContentView(R.layout.main);
		this.but = (Button) super.findViewById(R.id.but);
		this.but2 = (Button) super.findViewById(R.id.but2);
		this.surface = (SurfaceView) super.findViewById(R.id.surface);
		iv_img = (ImageView) findViewById(R.id.iv_img);
		flay_view = (FrameLayout) findViewById(R.id.flay_view);
		this.holder = this.surface.getHolder();
		this.holder.addCallback(new MySurfaceViewCallback());
		this.holder.setType(SurfaceHolder.SURFACE_TYPE_PUSH_BUFFERS);
		this.holder.setFixedSize(500, 350);
		this.but.setOnClickListener(new OnClickListenerImpl());
		but2.setOnClickListener(new OnClickListener() {

			@Override
			public void onClick(View v) {
				iv_img.setVisibility(View.VISIBLE);
				iv_img.setImageResource(R.drawable.taideng);
			}
		});
	}

	private class OnClickListenerImpl implements OnClickListener {

		@Override
		public void onClick(View v) {
			if (cam != null) {
				cam.autoFocus(new AutoFocusCallbackImpl());
			}
		}

	}

	private class MySurfaceViewCallback implements SurfaceHolder.Callback {

		@Override
		public void surfaceChanged(SurfaceHolder holder, int format, int width,
				int height) {

		}

		@Override
		public void surfaceCreated(SurfaceHolder holder) {
			if (cam != null) {
				cam.stopPreview();// 停掉原来摄像头的预览
				cam.release();// 释放资源
				cam = null;// 取消原来摄像头
			}
			try {
				cam = Camera.open(0); // 取得第一个摄像头
			} catch (Exception e) {
				// TODO: handle exception
				Toast.makeText(MyCameraDemo.this, "摄像头打开失败", 0).show();
				return;
			}
			cam = deal2(cam);
		}

		@Override
		public void surfaceDestroyed(SurfaceHolder holder) {
			if (cam != null) {
				if (MyCameraDemo.this.previewRunning) {
					cam.stopPreview(); // 停止预览
					MyCameraDemo.this.previewRunning = false;
				}
				cam.stopPreview();
				cam.release();
				cam = null;
			}
		}

	}

	private class AutoFocusCallbackImpl implements AutoFocusCallback {

		@Override
		public void onAutoFocus(boolean success, Camera camera) {
			if (success) { // 成功
				cam.takePicture(sc, pc, jpgcall);
			}
		}

	}

	private PictureCallback jpgcall = new PictureCallback() {

		@Override
		public void onPictureTaken(byte[] data, Camera camera) { // 保存图片的操作
			Bitmap bmp = BitmapFactory.decodeByteArray(data, 0, data.length);
			// Bitmap bmp2 = new BitmapDrawable(iv_img).getDrawable();
			// Bitmap bmp2 = BitmapFactory.decodeResource(getResources(),
			// R.drawable.taideng);
			// Bitmap bmp2 = drawableToBitamp(iv_img.getDrawable());
			String fileName = "test_" + System.currentTimeMillis() + ".jpg";
			String filePath = Environment.getExternalStorageDirectory()
					.toString()
					+ File.separator
					+ "xiao"
					+ File.separator
					+ fileName;
			bmp = rotateBitmapByDegree(bmp, 90);

			save(bmp, filePath, fileName);
			bmp = loadBitmap(filePath, true);
			setPictureDegreeZero(filePath);

			Bitmap bmp2 = getSmallBitmap(MyCameraDemo.this,
					R.drawable.taideng, dip2px(MyCameraDemo.this, 200),
					dip2px(MyCameraDemo.this, 200));
			Bitmap bmp3 = combineBitmap(bmp, bmp2);
			save(bmp3, filePath, fileName);
			cam.stopPreview();
			cam.startPreview();
		}

	};

	private ShutterCallback sc = new ShutterCallback() {
		@Override
		public void onShutter() {
			// 按下快门之后进行的操作
		}
	};
	private PictureCallback pc = new PictureCallback() {

		@Override
		public void onPictureTaken(byte[] data, Camera camera) {

		}

	};

	/**
	 * 开始考虑用剪切的方法,但是截取只适合静态界面,这里surfaceView是动态的(在不断重绘)不能剪切,后来考虑用绘图的方式将两个bitmap合在一起。
	 *
	 * @param view
	 * @return
	 */
	private Bitmap cropView(View view) {
		view.measure(MeasureSpec.makeMeasureSpec(100, MeasureSpec.UNSPECIFIED),
				MeasureSpec.makeMeasureSpec(100, MeasureSpec.UNSPECIFIED));
		view.layout(0, 0, view.getMeasuredWidth(), view.getMeasuredHeight());
		view.buildDrawingCache();
		Bitmap bitmap = view.getDrawingCache();
		return bitmap;
	}


	/**
	 * 合并两张bitmap为一张
	 *
	 * @param background
	 * @param foreground
	 * @return Bitmap
	 */
	public static Bitmap combineBitmap(Bitmap background, Bitmap foreground) {
		if (background == null) {
			return null;
		}
		int bgWidth = background.getWidth();
		int bgHeight = background.getHeight();
		int fgWidth = foreground.getWidth();
		int fgHeight = foreground.getHeight();
		Bitmap newmap = Bitmap
				.createBitmap(bgWidth, bgHeight, Config.ARGB_8888);
		Canvas canvas = new Canvas(newmap);
		canvas.drawBitmap(background, 0, 0, null);
		canvas.drawBitmap(foreground, (bgWidth - fgWidth) / 2,
				(bgHeight - fgHeight) / 2, null);
		canvas.save(Canvas.ALL_SAVE_FLAG);
		canvas.restore();
		return newmap;
	}

	private void save(Bitmap bitmap, String filePath, String fileName) {
		File file = new File(filePath);
		if (!file.getParentFile().exists()) {
			file.getParentFile().mkdirs(); // 创建文件夹
		}
		try {
			BufferedOutputStream bos = new BufferedOutputStream(
					new FileOutputStream(file));
			bitmap.compress(Bitmap.CompressFormat.JPEG, 80, bos); // 向缓冲区之中压缩图片
			bos.flush();
			bos.close();
			Toast.makeText(MyCameraDemo.this,
					"拍照成功,照片已保存在" + fileName + "文件之中!", Toast.LENGTH_SHORT)
					.show();
		} catch (Exception e) {
			Toast.makeText(MyCameraDemo.this, "拍照失败!", Toast.LENGTH_SHORT)
					.show();
		}
	}

	private Bitmap bitmap;

	private Bitmap drawableToBitamp(Drawable drawable) {
		int w = drawable.getIntrinsicWidth();
		int h = drawable.getIntrinsicHeight();
		System.out.println("Drawable转Bitmap");
		Bitmap.Config config = drawable.getOpacity() != PixelFormat.OPAQUE ? Bitmap.Config.ARGB_8888
				: Bitmap.Config.RGB_565;
		bitmap = Bitmap.createBitmap(w, h, config);
		// 注意,下面三行代码要用到,否在在View或者surfaceview里的canvas.drawBitmap会看不到图
		Canvas canvas = new Canvas(bitmap);
		drawable.setBounds(0, 0, w, h);
		drawable.draw(canvas);
		return bitmap;
	}

	/**
	 * 读取图片的旋转的角度, 某些机型此方法无效
	 *
	 * @param path
	 *            图片绝对路径
	 * @return 图片的旋转角度
	 */
	private int getBitmapDegree(String path) {
		int degree = 0;
		try {
			// 从指定路径下读取图片,并获取其EXIF信息
			ExifInterface exifInterface = new ExifInterface(path);
			// 获取图片的旋转信息
			int orientation = exifInterface.getAttributeInt(
					ExifInterface.TAG_ORIENTATION,
					ExifInterface.ORIENTATION_NORMAL);
			switch (orientation) {
			case ExifInterface.ORIENTATION_ROTATE_90:
				degree = 90;
				break;
			case ExifInterface.ORIENTATION_ROTATE_180:
				degree = 180;
				break;
			case ExifInterface.ORIENTATION_ROTATE_270:
				degree = 270;
				break;
			}
		} catch (IOException e) {
			e.printStackTrace();
		}
		return degree;
	}

	/**
	 * 将图片按照某个角度进行旋转
	 *
	 * @param bm
	 *            需要旋转的图片
	 * @param degree
	 *            旋转角度
	 * @return 旋转后的图片
	 */
	public static Bitmap rotateBitmapByDegree(Bitmap bm, int degree) {
		Bitmap returnBm = null;

		// 根据旋转角度,生成旋转矩阵
		Matrix matrix = new Matrix();
		matrix.postRotate(degree);
		try {
			// 将原始图片按照旋转矩阵进行旋转,并得到新的图片
			returnBm = Bitmap.createBitmap(bm, 0, 0, bm.getWidth(),
					bm.getHeight(), matrix, true);
		} catch (OutOfMemoryError e) {
		}
		if (returnBm == null) {
			returnBm = bm;
		}
		if (bm != returnBm) {
			bm.recycle();
		}
		return returnBm;
	}

	// 控制图像的正确显示方向
	private void setDispaly(Camera.Parameters parameters, Camera camera) {
		if (Integer.parseInt(Build.VERSION.SDK) >= 8) {
			setDisplayOrientation(camera, 90);
		} else {
			parameters.setRotation(90);
		}

	}

	// 实现的图像的正确显示
	private void setDisplayOrientation(Camera camera, int i) {
		Method downPolymorphic;
		try {
			downPolymorphic = camera.getClass().getMethod(
					"setDisplayOrientation", new Class[] { int.class });
			if (downPolymorphic != null) {
				downPolymorphic.invoke(camera, new Object[] { i });
			}
		} catch (Exception e) {
			Log.e("Came_e", "图像出错");
		}
	}

	private Camera deal2(Camera mCamera) {
		// 设置camera预览的角度,因为默认图片是倾斜90度的
		// mCamera.setDisplayOrientation(90);

		int PreviewWidth = 0;
		int PreviewHeight = 0;
		WindowManager wm = (WindowManager) getSystemService(Context.WINDOW_SERVICE);// 获取窗口的管理器
		Display display = wm.getDefaultDisplay();// 获得窗口里面的屏幕
		Camera.Parameters parameters = mCamera.getParameters();
		// parameters.setFlashMode(Parameters.FLASH_MODE_TORCH); //开启闪光灯,支持
		setDispaly(parameters, mCamera);
		// parameters.setRotation(90);
		// parameters.setPreviewFrameRate(3);// 每秒3帧 每秒从摄像头里面获得3个画面,
		// 某些机型(红米note2)不支持
		parameters.setPictureFormat(PixelFormat.JPEG);// 设置照片输出的格式
		parameters.set("jpeg-quality", 100);// 设置照片质量
		try {
			// 选择合适的预览尺寸
			List<Camera.Size> sizeList = parameters.getSupportedPreviewSizes();
			// 如果sizeList只有一个我们也没有必要做什么了,因为就他一个别无选择
			if (sizeList.size() > 1) {
				Iterator<Camera.Size> itor = sizeList.iterator();
				while (itor.hasNext()) {
					Camera.Size cur = itor.next();
					if (cur.width >= PreviewWidth
							&& cur.height >= PreviewHeight) {
						PreviewWidth = cur.width;
						PreviewHeight = cur.height;
						break;
					}
				}
			}
			parameters.setPreviewSize(PreviewWidth, PreviewHeight); // 获得摄像区域的大小
			parameters.setPictureSize(PreviewWidth, PreviewHeight); // 获得保存图片的大小
			// parameters.setPreviewSize(display.getWidth(),
			// display.getWidth()); // 获得摄像区域的大小
			// parameters.setPictureSize(display.getWidth(),
			// display.getWidth());// 设置拍出来的屏幕大小

		} catch (Exception e) {
			Log.e("MyCameraDemo", e.toString());
		}
		try {
			cam.setPreviewDisplay(MyCameraDemo.this.holder);
		} catch (IOException e) {
			// TODO Auto-generated catch block
			e.printStackTrace();
		}
		mCamera.setParameters(parameters);// 把上面的设置 赋给摄像头
		mCamera.startPreview();// 开始预览
		mCamera.cancelAutoFocus();// 2如果要实现连续的自动对焦,这一句必须加上
		previewRunning = true;
		return mCamera;
	}

	/** 从给定路径加载图片 */
	public Bitmap loadBitmap(String imgpath) {
		return BitmapFactory.decodeFile(imgpath);
	}

	/** 从给定的路径加载图片,并指定是否自动旋转方向 */
	public Bitmap loadBitmap(String imgpath, boolean adjustOritation) {
		if (!adjustOritation) {
			return loadBitmap(imgpath);
		} else {
			Bitmap bm = loadBitmap(imgpath);
			int digree = 0;
			ExifInterface exif = null;
			try {
				exif = new ExifInterface(imgpath);
			} catch (IOException e) {
				e.printStackTrace();
				exif = null;
			}
			if (exif != null) {
				// 读取图片中相机方向信息
				// int ori = exif.getAttributeInt(ExifInterface.TAG_ORIENTATION,
				// ExifInterface.ORIENTATION_NORMAL);
				int ori = exif.getAttributeInt(ExifInterface.TAG_ORIENTATION,
						ExifInterface.ORIENTATION_FLIP_VERTICAL);
				// 计算旋转角度
				switch (ori) {
				case ExifInterface.ORIENTATION_ROTATE_90:
					digree = 90;
					break;
				case ExifInterface.ORIENTATION_ROTATE_180:
					digree = 180;
					break;
				case ExifInterface.ORIENTATION_ROTATE_270:
					digree = 270;
					break;
				default:
					digree = 0;
					break;
				}
			}
			if (digree != 0) {
				// 旋转图片
				Matrix m = new Matrix();
				m.postRotate(digree);
				bm = Bitmap.createBitmap(bm, 0, 0, bm.getWidth(),
						bm.getHeight(), m, true);
			}
			return bm;
		}
	}

	/**
	 * 将图片的旋转角度置为0  ,此方法可以解决某些机型拍照后图像,出现了旋转情况
	 *
	 * @Title: setPictureDegreeZero
	 * @param path
	 * @return void
	 * @date 2012-12-10 上午10:54:46
	 */
	private void setPictureDegreeZero(String path) {
		try {
			ExifInterface exifInterface = new ExifInterface(path);
			// 修正图片的旋转角度,设置其不旋转。这里也可以设置其旋转的角度,可以传值过去,
			// 例如旋转90度,传值ExifInterface.ORIENTATION_ROTATE_90,需要将这个值转换为String类型的
			exifInterface.setAttribute(ExifInterface.TAG_ORIENTATION, "no");
			exifInterface.saveAttributes();
		} catch (IOException e) {
			// TODO Auto-generated catch block
			e.printStackTrace();
		}

	}

	/**
	 * 根据路径获取图片并压缩返回bitmap用于显示
	 *
	 * @param context
	 * @param id
	 * @return
	 */

	private  Bitmap getSmallBitmap(Context context, int id,int width,int height) {
		final BitmapFactory.Options options = new BitmapFactory.Options();
		options.inJustDecodeBounds = true;
		BitmapFactory.decodeResource(context.getResources(), id, options);
		// 计算 缩略图大小为原始图片大小的几分之一 inSampleSize:缩略图大小为原始图片大小的几分之一
		options.inSampleSize = calculateInSampleSize(options, width, height);
		options.inJustDecodeBounds = false;

		return BitmapFactory.decodeResource(context.getResources(), id, options);
	}

	/**
	 * 计算图片的缩放值
	 *
	 * @param options
	 * @param reqWidth
	 * @param reqHeight
	 * @return
	 */
	private  int calculateInSampleSize(BitmapFactory.Options options, int reqWidth, int reqHeight) {
		// Raw height and width of image
		final int height = options.outHeight;
		final int width = options.outWidth;
		int inSampleSize = 1;

		if (height > reqHeight || width > reqWidth) {
			final int heightRatio = Math.round((float) height / (float) reqHeight);
			final int widthRatio = Math.round((float) width / (float) reqWidth);
			inSampleSize = heightRatio < widthRatio ? heightRatio : widthRatio;

		}
		return inSampleSize;

	}
	/**
	 * 根据手机的分辨率从 dp 的单位 转成为 px(像素)
	 */
	public static int dip2px(Context context, float dpValue) {
		final float scale = context.getResources().getDisplayMetrics().density;
		return (int) (dpValue * scale + 0.5f);
	}

	/**
	 * 根据手机的分辨率从 px(像素) 的单位 转成为 dp
	 */
	public static int px2dip(Context context, float pxValue) {
		final float scale = context.getResources().getDisplayMetrics().density;
		return (int) (pxValue / scale + 0.5f);
	}
}
布局文件:
-
<?xml version="1.0" encoding="utf-8"?>
<LinearLayout xmlns:android="http://schemas.android.com/apk/res/android"
    android:layout_width="fill_parent"
    android:layout_height="fill_parent"
    android:orientation="vertical" >
    <FrameLayout
        android:id="@+id/flay_view"
        android:layout_width="fill_parent"
        android:layout_height="fill_parent"
        android:layout_weight="1000" >
        <SurfaceView
            android:id="@+id/surface"
            android:layout_width="fill_parent"
            android:layout_height="fill_parent"
            android:layout_weight="1000" />
        <ImageView
            android:id="@+id/iv_img"
            android:layout_width="200dp"
            android:layout_height="200dp"
            android:layout_gravity="center"
            android:visibility="gone"
            android:src="@drawable/taideng"
            android:scaleType="fitCenter"/>
    </FrameLayout>
    <LinearLayout
        android:layout_width="match_parent"
        android:layout_height="wrap_content"
        android:layout_weight="1"
        android:orientation="horizontal" >
        <Button
            android:id="@+id/but"
            android:layout_width="wrap_content"
            android:layout_height="wrap_content"
            android:layout_weight="1"
            android:text="照相" />
        <Button
            android:id="@+id/but2"
            android:layout_width="wrap_content"
            android:layout_height="wrap_content"
            android:layout_weight="1"
            android:text="添加图片" />
    </LinearLayout>
</LinearLayout>
最后不要忘了权限:
-
<uses-feature android:name="android.hardware.camera" />
    <uses-feature android:name="android.hardware.camera.autofocus" />
    <uses-permission android:name="android.permission.CAMERA" />
    <uses-permission android:name="android.permission.MOUNT_UNMOUNT_FILESYSTEMS" />
    <uses-permission android:name="android.permission.WRITE_EXTERNAL_STORAGE" />