转载于:https://www.yuque.com/ant-h5/sourcecode/zfu699
作者: ant-h5, 蚂蚁金服前端团队
转载方式: 手打
转载者: lemon-Xu
虚拟组件
组件初始化
组件创建
组件创建流程
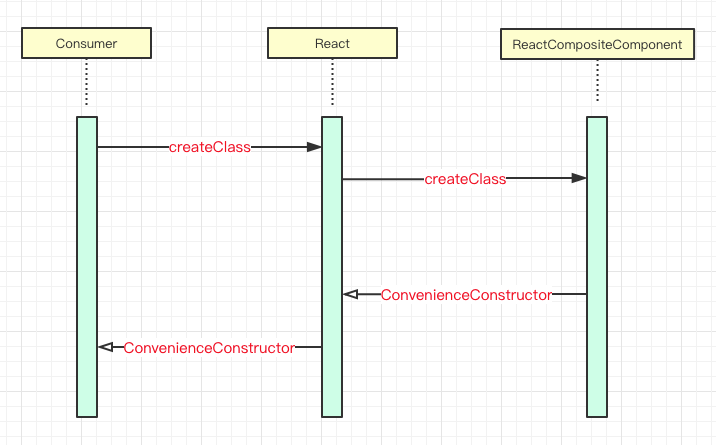
组件创建流程并不复杂, 消费者需要调用createClass,把配置的回调函数(包含初始化、属性、状态、生命周期钩子、渲染、自定义函数等、以下统称spec)传入即可
1. 消费者配置回调声明
var ExampleApplication = React.createClass({
    getInitialState(){
        return { }
    }

    componentWillMount(){

    },

    componentDidMount(){

    },

    render: function(){
        return <div>hello world</div>
    }
})
在声明阶段,用户可以声明react的生命周期的钩子函数、状态和渲染函数等。
spec的渲染函数(render)不能为空,react组件需要根据render的返回值来渲染最终的页面元素。
应该有一些读者很熟悉这个API的使用方法,不再累述。
2. 编译阶段
初涉react的会有这样的疑问,jsx并不是js规范,浏览器的js解析引擎不能识别
执行消费者配置的代码之前,react代码需要经过一次预编译阶段,把jsx编译成js解析引擎能识别的js。
在上一章初<探React源码>中, 讲解编译后的结果。这里介绍下各个版本编译的区别:
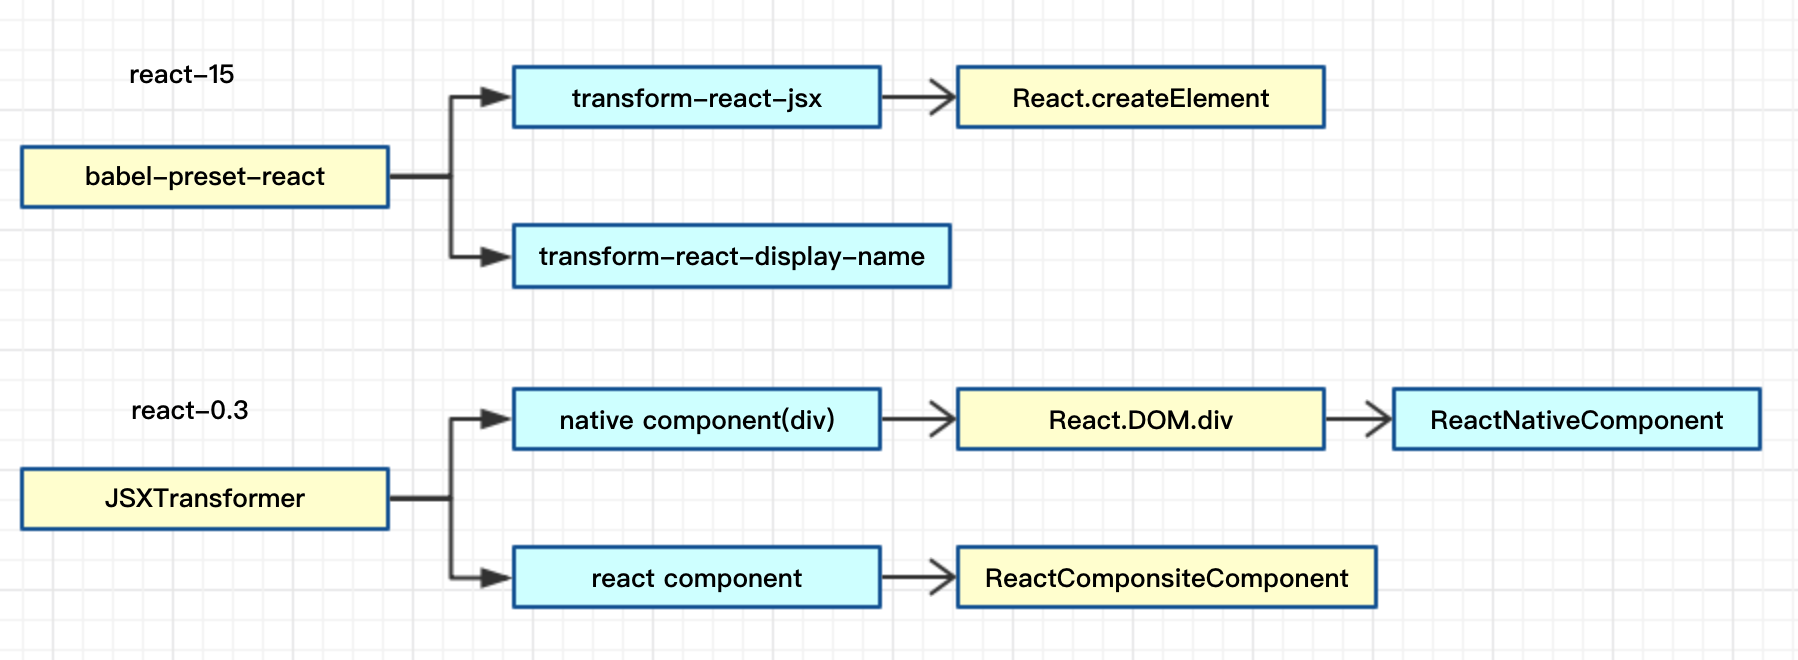
- 在react-15里,使用babel-preset-react来编译jsx,这个preset又包含了4个插件,其中transform-react-jsx负责编译jsx,调用了React.createElement函数生成虚拟组件。
- 在react-0.3里,编译结果稍稍有些不同,官方给出的示例文件,使用JSXTransformer.js编译jsx,对于native组件和composite组件编译的方式也不一致,结果如下

- native组件:编译成React.DOM.xxx(xxx如div),函数运行返回一个ReactNativeComponent实例。
- composite组件:编译成createClass返回的函数调用,函数返回一个ReactCompositeComponent实例。
3. 组件创建
createClass: function(spec){
    var Constructor = function(initialProps, children){
        this.construct(initialProps, children);
    };
    Constructor.prototype = new ReactCompositeComponentBase();
    Constructor.prototype.constructor = Constructor;
    mixSpecIntoComponent(Constructor, spec);
    invariant(
        Constructor.prototype.render,
        'createClass(...): class specification must implement a 'render' method'
    );

    var ConvenienceConstructor = function(props, children){
        return new Constructor(props, children);
    }
    ConvenienceConstructor.componentConstructor = Constructor;
    ConvenienceConstructor.originalSpec = spec;
    return ConvenienceConstructor;

}
代码短短不到20行,却可圈可点。最终返回ConvenienceConstructor,这个函数调用了Constructor,传入了props,children两个参数,也就是编译时生成ExampleApplication传入的参数。然后把spec和Constructor分别挂载到ConvenienceConstructor函数上。
Constuctor是每个React组件的原型函数,原型指向ReactCompositeComponentBase,又把构造器指向Constructor自己。然后把消费者声明配置spec合并到Constructor.prototype中。判断合并后的结果有没有render,如果没有render,抛出一个异常’createClass(...): Class specification must implement a 'render' method‘
ReactCompositeComponentBase是React复合组件的原型函数,稍后会详细介绍它。
有的读者已经发现了,为什么不使用以下写法?
new ReactCompositeComponentBase(props, children);
而中间套了两层函数对象呢?
- 我们先来看看第一个嵌套,以下两种写法有什么不同。
// 写法1
const createClass = function(spec){
    mixSpecIntoComponent(ReactCompositeComponentBase, spec)
    return ReactCompositeComponentBase
}

const Table1 = new createClass(spec)(props, children);
const Table2 = new createClass(spec)(props, children);

// 写法2
const createClass = function(){
    var Constructor = function(initialProps, children) {
        this.construct(initialProps, children);
    };

    Constructor.prototype = new ReactComsiteComponentBase();
    Constructor.prototype.constructor = Constructor;
    mixSpecIntoComponent(ReactCompositeComponentBase, spec)
    return Constructor
}

const Table1 = new createClass(spec)(props, children);
const Table2 = new createCkass(spec)(props, children);
起到了包装作用?如果你开心,Constructor外面可以再包无限层,当然不是包装。
写法1的两个组件,constructor都指向ReactCompositeComponentBase,这样做diff时候,区分不出来Table1和Table2是否类型相同。
而方法2的constructor指向新创建的Constructor函数,所以 每个createClass创建出来的组件都是一个新的Constructor。
写法1还有个致命的缺点:任何创建出来的组件的原型修改,都会影响到ReactCompositeComponentBase。
react做dom-diff时候,使用constructor来判断组件是否相同。
- 我们继续看第二个嵌套,这个写法又有什么不同
// 写法1
const createClass = function(spec){
    var Constructor = function(initialProps, children){
        this.construct(initialProps, children);
    }
    Constructor.prototype = new ReactCompositeComponentBase();
    Constructor.prototype.constructor = Constructor;
    mixSpecIntoComponent(ReactCompositeComponentBase, spec);
    return Constructor;
}

const Table1 = new createClass(spec)(props, children);

// 写法2
const createClass = function(){
    var Constructor = function(initialProps, children){
        this.construct(inititalProps, children);
    };
    Constructor.prototype = new ReactCompositeComponentBase();
    Constructor.prototype.constructor = Constructor;
    mixSpeIntoCompoent(Constructor, spec);

    var ConvenienceConstructor = function(props, children){
        return new Constructor(props, children);
    }
    ConvenienceConstructor.componentConstructor = Constructor;
    ConvenienceConstructor.originalSpec = spec;
    return ConvenienceConstructor;

}

const Table1 = new createClass(spec)(props, children);
- 很多人(包括我在内)第一次看到得时候,并不理解为什么又包装了一层ConvenienConstructor。的确,写法1在大多情况下并不会产生什么问题,但是,当团队里的人无意修改错点什么,比如:
Table1.prototype.onClick = null;
这样,所有Table1实例化的组件,onClick全部为修改后的控制。
<Table1 />
<Table1 />
我们知道,js是动态解释型语言,函数可以运行时被随意篡改。而静态编译语言在运行时期间,函数不可修改(某些静态语言也可以修改)。所以采用这种方式防御用户对代码的篡改。
4. 组件实例化
construct: function(initialProps, children){
    this.props = initialProps || {};
    if(typeof children !== 'undefined'){
        this.porps.children = children;
    }
    // Record the component responsible for creating this component。
    this.props[OWNER] = ReactCurrentOwner.current;
    // All components start unmounted.
    this._lifeCycleState = ComponentLifeCycle.UNMOUNTED;
}
分别挂载prosp和children,注意这里把children也挂载到this.props属性上。在语义上,children也属于属性。children用来在虚拟组件转dom的渲染阶段递归使用。然后赋值了OWNER,最后设置了组件的生命周期为ComponentLifeCycle.UNMOUNTED。
这里特别说明下
this.props[OWNER] = ReactCurrentOwner.current;
this.porps[OWNER]指的是当前组件的容器(父)组件实例,比如
const Children = React.createClass({
    componentDidMount = () => console.log(this.porps["{owner}"]),
    render = () => null
})

const Parent = React.createClass({
    render: () => <Children />
})
这里输出的就是Parent组件实例。
ReactCurrentOwner.current在哪里赋值呢?
_renderValidatedComponent: function(){
    ReactCurrentOwner.current = this;
    var renderedComponent = this.render();
    ReactCurrentOwner.current = null;
    invariant(
        ReactComponent.isValidComponent(renderedComponent)
    '%s.render(): A valid ReactComponent must be returned.',
    this.constructor.displayName || 'ReactCompositeComponent'
    ),
    return renderedComponent;
}
_renderValidatedComponent函数会在调用rebderComponent函数调用(我们会在下一章讲解)。可以看出来, 在执行render前后,分别设置了ReactCurrentOwner.current的值,这样就能保证render函数内的子组件能赋上当前组件的实例,也就是this。