1.安装redux 使用 npm install -save redux 安装redux,注意使用-save 表示安装到依赖中;
2. 创建store文件夹,下面创建 index.js 和 reducer.js文件;
index.js:
import { createStore } from 'redux';
import reducer from './reducer';
const store = createStore(reducer);
export default store;
reducer.js
const defaultState ={
    inputValue:'默认信息',
    list:[]
};
export default (state = defaultState ,action)=>{
  return state;
}
在html中调用:
constructor(props){
    super(props);
    this.state = store.getState();//redux 提供的获取数据的方法
    console.log(this.state);
}
3. 安装chrome扩展工具: redux devtools
4.
用state 初始化 input 的 value 值,并且value改变后改变state,反过来更新input的值
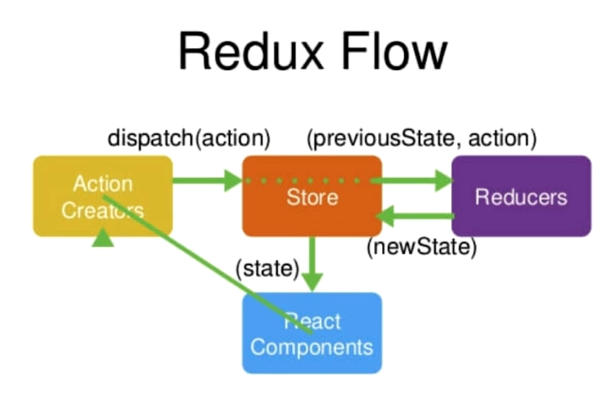
首先 this.state = store.getState(); store.getState() 函数获取store中保存的状态state ,然后初始化input的value值,改变input触发onChange事件,通过action向store发送 函数的命令 ,然后store对reducers发送原state和actoin。之后reducer通过action的type在改变state,返回state,组件subscribe监听到state发生变化,
注意的是,store是改变维护状态的,而不是reducer,他只是返回一个新的状态给store。
此外,reducer是纯函数,何为纯函数?就是给定固定的输入,肯定会输出同样的出,不会有任何副作用(对输入参数的修改,如改变state);
如 new date()则不是纯函数!
redux中,store相当于管理员,reducer相当于其管理手册。
4.1 创建store和reducer,在组件中使用store.getState() 函数获取store中保存的状态state。
4.2 一旦组件想改变store中保存的状态,就要定义一个action,该action是一个对象,包含了type和value值,dispatch发给store;
4.3 store接受到后,自动把当前的state值和action,发给其管理手册——reducers
4.4 reducer接收到后,根据action的type,改变state,并返回state给store;
4.5 store的状态发生变化之后,组件通过 store.subscribe(()=>{}) ,监听store的状态变化,然后进行下一步的渲染;
store.dispatch(); -----------组件向store传递action的唯一方法
store.subscribe(); ----------监听store中的数据,一旦数据变化,就执行这个函数
store.getState(); ------------获取store中的最新的数据
react components如下:
class App extends Component {
  constructor(props){
    super(props);
    store.subscribe(()=>{this.handleStoreChange()})//通过subscribe监听 store 状态改变
    this.state = store.getState(); //初始化时获取store的state
  }

render() {
    return (
        <input id="box"
        value = {this.state.inputValue}
        onChange = {(e)=>{
            this.handleInputChange(e)
        }}
        />
    );
}
handleInputChange(e){
    const action ={   //组件创建action这句话,也就是告诉store,我要做什么事情。
      type:'change_input_value',
      value:e.target.value
    }
    store.dispatch(action); //这里是把这句话发送给store
  }
  handleStoreChange(){
    this.setState(store.getState())//更新组件的状态
  }
}
export default App;
对应的reducer:
const defaultState ={
    inputValue:'默认信息',
    list:[]
};
export default (state = defaultState ,action)=>{
  if(action.type === 'change_input_value'){
    let newState = JSON.parse(JSON.stringify(state));
    newState.inputValue = action.value;
    return newState;
  }
  return state;
}
5 actionType的拆分,由于在组件中和reducer中,均使用到了action的type类型,在两个页面中,一不小心写错,不容易查看,可以将type拆写成actionType的定义:
因此在store中定义actionType中定义:
export const CHANGE_INPUT_VALUE = 'change_input_value'
export const ADD_INPUT_VALUE = 'add_input_value'
export const DELETE_LIST_ITEM = 'delete_list_item'
从而在组件和reducer中使用常量的定义:
  submitData(){
    const action = {
      type:ADD_INPUT_VALUE,
    }
    store.dispatch(action);
  }
  deleteList(index){
    const action = {
      type:DELETE_LIST_ITEM,
      index
    }
    store.dispatch(action);
  }
6 使用actionCreator.js 提取组件中定义的所有action;
由于组件中定义了多个action
submitData(){
    const action = {
      type:ADD_INPUT_VALUE,
    }
    store.dispatch(action);
  }
  deleteList(index){
    const action = {
      type:DELETE_LIST_ITEM,
      index
    }
    store.dispatch(action);
  }
故,可以把这些提取到一个单独的文件中:
import {CHANGE_INPUT_VALUE,} from './actionType.js'

export const changeInputValue = (value)=> {
    return (
        {
            type:CHANGE_INPUT_VALUE,
            value
        }
    )
}
//这两种方式是一样的
export const changeInputValues = (value)=> ({
    type:CHANGE_INPUT_VALUE,
    value
})
然后在组件中定义: