一、基本介绍
1,canvas是画布,可以描画线条,图片等,现代的浏览器大部分都支持。
canvas的width,height默认为300*150,要指定画布大小,不能用css样式的widh,height。只能在html标签中指定,或是用js对canvas对象设置。
        <canvas id="wfPicture" width=300px; height=300px;>
        </canvas>
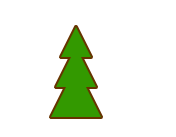
2,canvas的Path描画


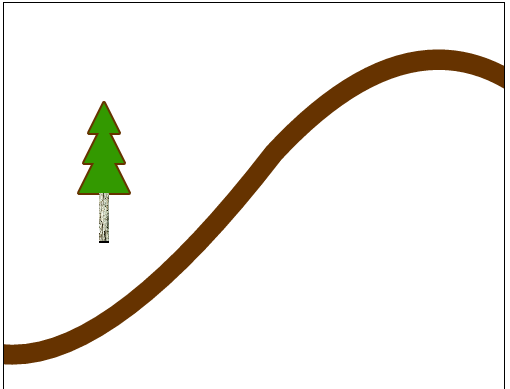
<!DOCTYPE html>
<html>
    <head>
        <meta charset="utf-8" />
        <style>
            #wfPicture{
                border: 1px solid;
            }
        </style>
        <script>
            function drawWorkflowPicture(){
                var canvas = document.getElementById("wfPicture");
                console.log("canvas:",canvas);
                var ctx = canvas.getContext("2d");

                // 保存平移前的状态
                ctx.save();

                // 平移到 100, 100
                ctx.translate(100, 100);

                // 创建树冠
                createCanopyPath(ctx);

                // 描画当前路径
                ctx.stroke();

                // 恢复状态到平移前
                ctx.restore();
            }

            function createCanopyPath(ctx){
                ctx.beginPath();

                // 画一个树冠底部为50px,每层高30px,共3层的树冠
                // 树冠的顶点
                ctx.moveTo(0,0);
                // 左边的点
                ctx.lineTo(-15, 30);
                ctx.lineTo(-5, 30);
                ctx.lineTo(-20, 60);
                ctx.lineTo(-10, 60);
                ctx.lineTo(-25, 90);

                // 右边的点
                ctx.lineTo(25, 90);
                ctx.lineTo(10, 60);
                ctx.lineTo(20, 60);
                ctx.lineTo(5, 30);
                ctx.lineTo(15, 30);

                ctx.closePath();
            }

            window.addEventListener("load", function(){
                drawWorkflowPicture();
            });
        </script>
    </head>
    <body>
        <canvas id="wfPicture" width=300px; height=300px;>
        </canvas>
    </body>
</html>

<!DOCTYPE html>
<html>
    <head>
        <meta charset="utf-8" />
        <style>
            #wfPicture{
                border: 1px solid;
            }
        </style>
        <script>
            function drawWorkflowPicture(){
                var canvas = document.getElementById("wfPicture");
                console.log("canvas:",canvas);
                var ctx = canvas.getContext("2d");

                // 保存平移前的状态
                ctx.save();

                // 平移到 100, 100
                ctx.translate(100, 100);

                // 创建树冠
                createCanopyPath(ctx);

                //线条宽度
                ctx.lineWidth=4;

                //结合点平滑效果 "bevel|round|miter"; bevel:斜角 miter:尖角(默认)
                ctx.lineJoin="round";

                // 线条样式棕色
                ctx.strokeStyle="#663300";

                // 描画当前路径
                ctx.stroke();

                // 用绿色填充闭合路径
                ctx.fillStyle="#339900";
                ctx.fill();

                // 填充色恢复成棕色
                ctx.fillStyle="#663300";

                // 填充树干
                ctx.fillRect(-5,90,10,50);

                // 恢复状态到平移前
                ctx.restore();

                // 保存状态,绘制曲线
                ctx.save();

                ctx.translate(0, 350);

                // 画路径前,这一句话必须有
                ctx.beginPath();
                //小路左下的起点
                ctx.moveTo(-10, 0);
                // 100,20 为第一条曲线的控制点。270, -200为终点
                ctx.quadraticCurveTo(100, 20, 270, -200);
                // 400, -340 为第二条曲线的控制点。
                //上一条曲线的270, -200为第二条曲线的起点,510, -270为终点
                ctx.quadraticCurveTo(400, -340, 510, -270);
                ctx.strokeStyle="#663300";
                ctx.lineWidth=20;
                ctx.stroke();

                // 恢复状态到平移前
                ctx.restore();

                //用背景图替换掉树干的颜色
                var backImg = new Image();
                backImg.src="trunk.jpg";//
                // 保证图片加载完后,再描画
                backImg.onload=function(){
                   //这里是异步调用,里面的坐标最好用绝对坐标,不要translate
                   // 不然里面和外面的代码会互相干扰
                   ctx.drawImage(backImg,95,190,10,50);
                };
            }

            function createCanopyPath(ctx){
                ctx.beginPath();

                // 画一个树冠底部为50px,每层高30px,共3层的树冠
                // 树冠的顶点
                ctx.moveTo(0,0);
                // 左边的点
                ctx.lineTo(-15, 30);
                ctx.lineTo(-5, 30);
                ctx.lineTo(-20, 60);
                ctx.lineTo(-10, 60);
                ctx.lineTo(-25, 90);

                // 右边的点
                ctx.lineTo(25, 90);
                ctx.lineTo(10, 60);
                ctx.lineTo(20, 60);
                ctx.lineTo(5, 30);
                ctx.lineTo(15, 30);

                ctx.closePath();
            }

            window.addEventListener("load", function(){
                drawWorkflowPicture();
            });
        </script>
    </head>
    <body>
        <canvas id="wfPicture" width=500px; height=500px;>
        </canvas>
    </body>
</html>
3,文字描画
1)空心文字
<!DOCTYPE html>
<html>
<body>

<canvas id="myCanvas" width="300" height="150" style="border:1px solid #d3d3d3;">
Your browser does not support the HTML5 canvas tag.</canvas>

<script type="text/javascript">

var c=document.getElementById("myCanvas");
var ctx=c.getContext("2d");

ctx.font="30px  Verdana";
// Create gradient
var gradient=ctx.createLinearGradient(0,0,c.width,0);
gradient.addColorStop("0","magenta");
gradient.addColorStop("0.5","blue");
gradient.addColorStop("1.0","red");
// Fill with gradient
ctx.strokeStyle=gradient;
ctx.strokeText("w3school.com.cn",10,50);

ctx.font="30px  微软雅黑";
ctx.strokeStyle="#000";
ctx.strokeText("w3school.com.cn",10,80);
</script>

</body>
</html>

4,填充
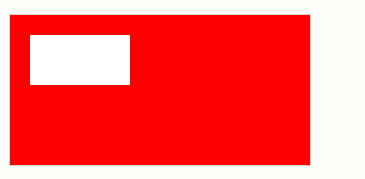
1)直接填充矩形
var c=document.getElementById("myCanvas");
var ctx=c.getContext("2d");
ctx.fillStyle="red";
ctx.fillRect(0,0,300,150);
ctx.clearRect(20,20,100,50);
2)填充闭合的path
// 描画当前路径
ctx.stroke();

// 用绿色填充闭合路径
ctx.fillStyle="#339900";
ctx.fill();
5,旋转
图片旋转一定要等图片加载完成才可以。
                //旋转图片
                var backImg2 = new Image();
                backImg2.src="road2.jpg";//
                backImg2.onload=function(){
                   //这里是异步调用,里面的坐标最好用绝对坐标,不要translate
                   // 不然里面和外面的代码会互相干扰,下面渐变色的颜色,暂时注释
                   ctx.save();
                   ctx.translate(0,0);
                   ctx.rotate(0.57);
                   ctx.drawImage(backImg2, 0,0,100,100);
                   ctx.restore();
                };
6,支持对像素的操作
canvas上的每个像素都可以取得和设定值,这提供了极大的灵活性。
主要通过getImageData,putImageData,createImageData来完成。
function copy()
{
var imgData=ctx.getImageData(10,10,50,50);
ctx.putImageData(imgData,10,70);
}
var c=document.getElementById("myCanvas");
var ctx=c.getContext("2d");
var imgData=ctx.createImageData(100,100);
for (var i=0;i<imgData.data.length;i+=4)
  {
  imgData.data[i+0]=255;
  imgData.data[i+1]=0;
  imgData.data[i+2]=0;
  imgData.data[i+3]=255;
  }
ctx.putImageData(imgData,10,10);
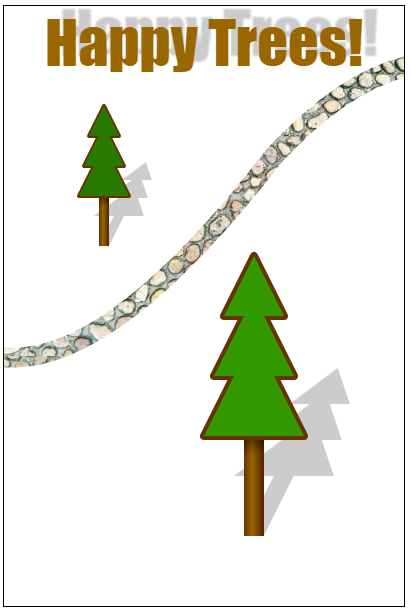
二、一个综合的例子
<!DOCTYPE html>
<html>
    <head>
        <meta charset="utf-8" />
        <style>
            #wfPicture{
                border: 1px solid;
            }
        </style>
        <script>
            function drawWorkflowPicture(){
                var canvas = document.getElementById("wfPicture");
                console.log("canvas:",canvas);
                var ctx = canvas.getContext("2d");

                // 画第一棵树
                ctx.save();// 保存平移前的状态
                ctx.translate(100, 100);// 平移到 100, 100
                drawTree(ctx);//画树
                ctx.restore();// 恢复状态到平移前

                // 画第一棵树
                ctx.save();// 保存平移前的状态
                ctx.translate(250, 250);// 平移到 100, 100

                ctx.scale(2,2);
                drawTree(ctx);//画树

                ctx.restore();// 恢复状态到平移前

                //用图片画小路
                var backImg = new Image();
                backImg.src="road.jpg";//
                // 保证图片加载完后,再描画
                backImg.onload=function(){
                   //这里是异步调用,里面的坐标最好用绝对坐标,不要translate
                   // 不然里面和外面的代码会互相干扰,下面渐变色的颜色,暂时注释
                   ctx.save();
                   ctx.translate(0, 350);
                   drawRoad(ctx, backImg);
                   ctx.restore();
                };

                // 添加文字标题
                ctx.save();
                ctx.font="60px impact";
                ctx.fillStyle="#996600";
                ctx.textAlign="center";
                // 添加文字阴影
                ctx.shadowColor="rgba(0,0,0,0.2)";
                ctx.shadowOffsetX=15;
                ctx.shadowOffsetY=-10;
                ctx.shadowBlur=2;
                ctx.fillText("Happy Trees!", 200, 60);

                ctx.restore();
            }

            // 画树
            function drawTree(ctx){
                ctx.save();
                // 画树的阴影
                // 下面这一步是因为我画树是以树顶端作为原点0,0来画的,有偏移,必须这样矫正。!doctype
                // 正确的做法,还是应该以树根作为基准点,这样树的倾斜才会以根部为基础。
                ctx.translate(Math.tan(0.5) * 140 * 0.6 -4, 140 * 0.4);
                ctx.transform(1,0,-0.5,1,0,0);
                ctx.scale(1,0.6);
                ctx.fillStyle="rgba(0,0,0,0.2)";
                ctx.fillRect(-5,90,10,50);
                ctx.fill();

                createCanopyPath(ctx);
                ctx.fill();
                ctx.restore();

                // 创建树干用渐变色
                var trunkGradient = ctx.createLinearGradient(-5, 90, 5, 90);
                trunkGradient.addColorStop(0, '#663300');
                trunkGradient.addColorStop(0.4, '#996600');
                //树干最右边,颜色最深
                trunkGradient.addColorStop(1, '#552200');
                ctx.fillStyle=trunkGradient;
                ctx.fillRect(-5,90,10,50);

                //创建垂直渐变,用作树冠在树干上的投影
                var canopyShadow = ctx.createLinearGradient(-5, 90, -5, 140);
                canopyShadow.addColorStop(0, 'rgba(0,0,0,0.5)');//黑色半透明
                canopyShadow.addColorStop(0.2, 'rgba(0,0,0,0.0)');//全透明
                ctx.fillStyle=canopyShadow;
                ctx.fillRect(-5,90,10,50);

                // 创建树冠
                createCanopyPath(ctx);

                //线条宽度
                ctx.lineWidth=4;
                //结合点平滑效果 "bevel|round|miter"; bevel:斜角 miter:尖角(默认)
                ctx.lineJoin="round";
                // 线条样式棕色
                ctx.strokeStyle="#663300";
                // 描画当前路径
                ctx.stroke();
                // 用绿色填充闭合路径
                ctx.fillStyle="#339900";
                ctx.fill();

                // 画树的阴影
                // 下面这一步是因为我画树是以树顶端作为原点0,0来画的,有偏移,必须这样矫正。!doctype
                // 正确的做法,还是应该以树根作为基准点,这样树的倾斜才会以根部为基础。
//                ctx.translate(Math.tan(0.5) * 140 * 0.6, 140 * 0.4);
//                ctx.transform(1,0,-0.5,1,0,0);
//                ctx.scale(1,0.6);
//                ctx.fillStyle="rgba(0,0,0,0.2)";
//                ctx.fillRect(-5,90,10,50);
//                ctx.fill();
//
//                createCanopyPath(ctx);
//                ctx.fill();
            }

            // 画树冠
            function createCanopyPath(ctx){
                ctx.beginPath();

                // 画一个树冠底部为50px,每层高30px,共3层的树冠
                // 树冠的顶点
                ctx.moveTo(0,0);
                // 左边的点
                ctx.lineTo(-15, 30);
                ctx.lineTo(-5, 30);
                ctx.lineTo(-20, 60);
                ctx.lineTo(-10, 60);
                ctx.lineTo(-25, 90);

                // 右边的点
                ctx.lineTo(25, 90);
                ctx.lineTo(10, 60);
                ctx.lineTo(20, 60);
                ctx.lineTo(5, 30);
                ctx.lineTo(15, 30);

                ctx.closePath();
            }

            function drawRoad(ctx, backImg){
                // 画路径前,这一句话必须有
                ctx.beginPath();
                //小路左下的起点
                ctx.moveTo(-10, 0);
                // 100,20 为第一条曲线的控制点。270, -200为终点
                ctx.quadraticCurveTo(100, 20, 270, -200);
                // 400, -340 为第二条曲线的控制点。
                //上一条曲线的270, -200为第二条曲线的起点,510, -270为终点
                ctx.quadraticCurveTo(400, -340, 510, -270);
                ctx.strokeStyle= ctx.createPattern(backImg, 'repeat'); // "#663300";
                ctx.lineWidth=20;
                ctx.stroke();
            }

            window.addEventListener("load", function(){
                drawWorkflowPicture();
            });
        </script>
    </head>
    <body>
        <canvas id="wfPicture" width=400px; height=600;>
        </canvas>
    </body>
</html>