最近有朋友问到在winform程序上要做换肤功能的话,该如何处理,刚好前一段时间在项目中主导了程序换肤的这个功能.那就借这个机会整理一下,以分享给有需要的朋友.
1. 在winform程序上换肤,需要处理的涉及到每个控件及窗体.熟悉前端的朋友应该知道,在网页上实现换肤主要通过在每个元素上定义指定的标识符(如class,id等特性),然后页面通过加载不同的样式文件去渲染不同的皮肤效果,其实在winform程序中实现的思想应该是一致.
2.如上描述,我们可能需要定制使用到的每个控件,以便能读取指定的样式,并能根据样式渲染效果.
3.描述样式特征,我们可主要从以下几个方面考虑: 字体,颜色,图片,边框(当然延伸一下应该有对应的各种事件效果支持).
4.作为扩展,我们可能还希望样式可以在外面灵活的配置样式.
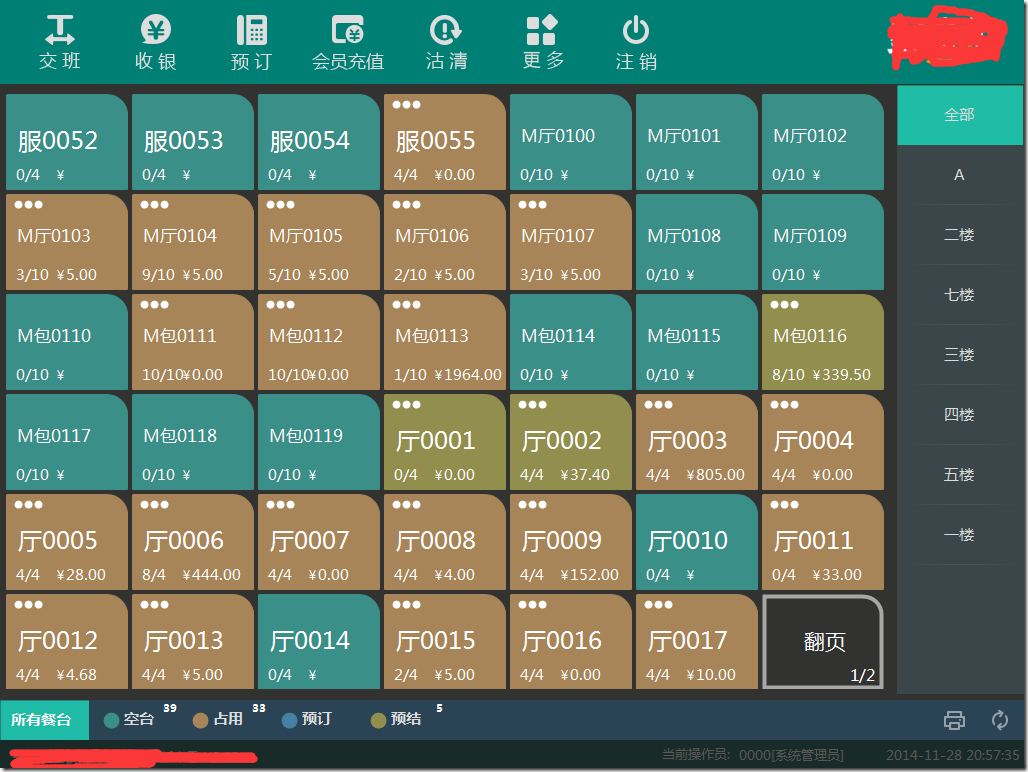
当然,市面上已经有很多成熟的winform皮肤组件产品,这类用于处理标准的后台管理类软件是已经很足够了,各位如果有类似需求也比较推荐这种形式.只不过我们的项目有些特殊(触摸屏),里面大部分的功能不能使用原生态的控件得以完成.如下面的展示效果.各位,看到这里,如果觉得不合胃口,请绕道,有兴趣的再往下看.
- 简单分析一下这个的实现.
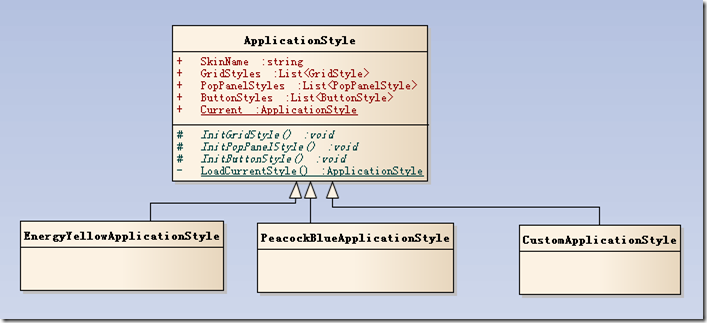
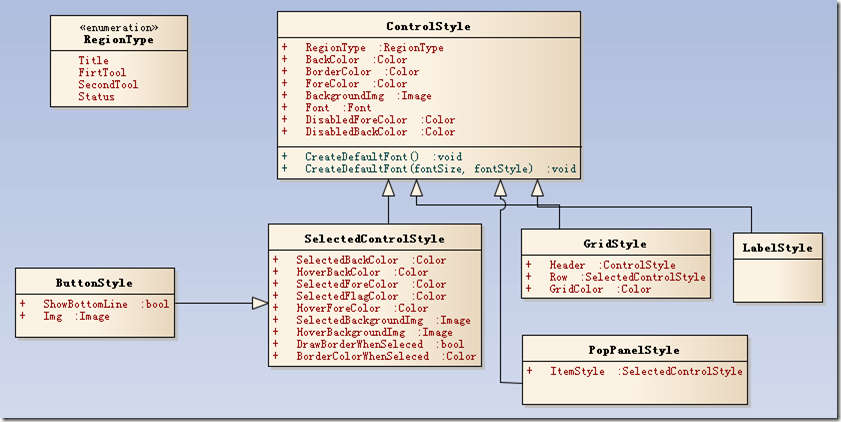
- 在上面的分析中,我们大致明白完成这个功能需要有一个承载控件展示效果的样式集合,以及各个控件根据自己对应的主题样式分别渲染.在这里,姑且我们将这里的样式管理者定义为ApplicationStyle, 它负责对外提供某个主题下各个控件样式的定义以及作为每个具体主题的基类.基于此,我们得到了类似如下的UML草图.

- 基于以上的分析,简单看一下这个ApplicationStyle实现.
/// <summary>
    /// 应用程序样式
    /// </summary>
    public abstract class ApplicationStyle
    {
        private static string _currentSkinName;       //当前主题名称
        private static ApplicationStyle _current;       //缓存当前样式
        private static object sync = new object();     //单例锁

        /// <summary>
        /// 默认主题名称
        /// </summary>
        protected static readonly string DefaultSkinName = "EnergyYellowApplicationStyle";

        /// <summary>
        /// 皮肤名称 Tag
        /// </summary>
        protected static string SkinNameTag { get; set; }

        /// <summary>
        /// 获取或设置当前主题名称
        /// </summary>
        public static string CurrentSkinName
        {
            get
            {
                if (string.IsNullOrWhiteSpace(_currentSkinName))
                {
                    _currentSkinName = DefaultSkinName;
                }
                return _currentSkinName;
            }
            set
            {
                if (!string.IsNullOrWhiteSpace(value) && !string.Equals(value, _currentSkinName))
                {
                    //如果为自定义皮肤
                    if (value.StartsWith("CustomApplicationStyle|", StringComparison.CurrentCultureIgnoreCase) && value.Length > "CustomApplicationStyle|".Length)
                    {
                        _currentSkinName = "CustomApplicationStyle";
                        SkinNameTag = value.Substring("CustomApplicationStyle|".Length);

                        //判断自定义文件是否存在
                        var cusSkinFile = Path.Combine(AppDomain.CurrentDomain.BaseDirectory, "Skins", SkinNameTag, "Skin.skn");
                        if (!File.Exists(cusSkinFile))
                        {
                            _currentSkinName = DefaultSkinName;
                        }
                    }
                    else
                    {
                        _currentSkinName = value;
                    }
                    var temp = Current;             //临时加载皮肤
                }
            }
        }

        /// <summary>
        /// 获取当前正在使用的样式主题
        /// </summary>
        public static ApplicationStyle Current
        {
            get
            {
                if (_current == null)
                {
                    lock (sync)
                    {
                        if (_current == null)
                        {
                            _current = LoadCurrentStyle();
                        }
                    }
                }
                return _current;
            }
        }

        /// <summary>
        /// 皮肤标题
        /// </summary>
        public abstract string SkinTitle { get; }

        /// <summary>
        /// 皮肤名称
        /// </summary>
        public abstract string SkinName { get; }

        /// <summary>
        /// 主题颜色
        /// </summary>
        public Color MainThemeColor { get; protected set; }

        /// <summary>
        /// Grid 样式集合
        /// </summary>
        public List<GridStyle> GridStyles { get; protected set; }

        /// <summary>
        /// Pop 弹出类型样式集合
        /// </summary>
        public List<PopPanelStyle> PopPanelStyles { get; protected set; }

        /// <summary>
        /// 按钮样式集合
        /// </summary>
        public List<ButtonStyle> ButtonStyles { get; protected set; }

        protected ApplicationStyle()
        {

        }

        /// <summary>
        /// 加载当前样式
        /// </summary>
        /// <returns></returns>
        private static ApplicationStyle LoadCurrentStyle()
        {
            ApplicationStyle temp = null;

           //通过反射实例化当前正在使用的主题样式
            try
            {
                var type = Type.GetType(string.Format("Skins.{0}", CurrentSkinName));
                temp = Activator.CreateInstance(type) as ApplicationStyle;
                temp.InitStyles();    //初始化样式
            }
            catch
            {
                temp = new PeacockBlueApplicationStyle();
                temp.InitStyles();
            }

            if (temp == null)
            {
                temp = new PeacockBlueApplicationStyle();
                temp.InitStyles();
            }
            return temp;
        }

        /// <summary>
        /// 初始化样式
        /// </summary>
        public virtual void InitStyles()
        {
            try
            {
                InitOrderDishGridStyles();
            }
            catch (Exception ex)
            {
                LogUtil.Error("初始化点菜界面已点列表样式失败", ex);
            }

            try
            { InitGridStyles(); }
            catch (Exception ex)
            {
                LogUtil.Error("初始化Grid样式失败", ex);
            }
            try
            { InitButtonStyles(); }
            catch (Exception ex)
            {
                LogUtil.Error("初始化Button样式失败", ex);
            }
        }

        #region 初始化样式集合   protected abstract void InitGridStyles();
        protected abstract void InitButtonStyles();
        protected abstract void InitPopPanelStyles();
        #endregion
    }
- 有了以上的基础,我们来尝试着改写一个控件的渲染效果,这里以DataGridView控件为例.
/// <summary>
    /// ExDataGridView
    /// </summary>
    public class ExDataGridView : DataGridView
    {
        private BodyOrDialogRegionType _regionType = BodyOrDialogRegionType.None;
        private GridStyle _style;

        /// <summary>
        /// 应用主题样式
        /// </summary>
        private void ApplyStyle()
        {
            if (_regionType != RMS.Skins.ControlStyles.BodyOrDialogRegionType.None && _style != null)
            {
                this.ColumnHeadersDefaultCellStyle.BackColor = _style.Header.BackColor;
                this.ColumnHeadersDefaultCellStyle.ForeColor = _style.Header.ForeColor;
                this.ColumnHeadersDefaultCellStyle.Font = _style.Header.Font;
                this.BorderStyle = System.Windows.Forms.BorderStyle.FixedSingle;
                this.BackgroundColor = _style.BackColor;

                this.RowsDefaultCellStyle.BackColor = _style.Row.BackColor;
                this.RowsDefaultCellStyle.ForeColor = _style.Row.ForeColor;
                this.Font = _style.Row.Font;

                this.RowsDefaultCellStyle.SelectionBackColor = _style.Row.SelectedBackColor;
                this.RowsDefaultCellStyle.SelectionForeColor = _style.Row.SelectedForeColor;
                this.RowsDefaultCellStyle.Font = _style.Row.Font;
                this.RowTemplate.DefaultCellStyle.BackColor = _style.Row.BackColor;
                this.RowTemplate.DefaultCellStyle.ForeColor = _style.Row.ForeColor;
                this.RowTemplate.DefaultCellStyle.Font = _style.Row.Font;
                this.BorderColor = _style.BorderColor;
                this.GridColor = _style.GridColor;

            }
        }

        /// <summary>
        /// 设置或获取控件所处区域
        /// </summary>
        public BodyOrDialogRegionType RegionType
        {
            get { return _regionType; }
            set
            {
                _regionType = value;

                //加载当前区域所对应的样式
                _style = ApplicationStyle.Current.GridStyles.FirstOrDefault(t => t.RegionType == _regionType);

                ApplyStyle();
                this.Invalidate();
            }
        }

        /// <summary>
        /// 构造函数
        /// </summary>
        public POSDataGridView()
        {
            this.EnableHeadersVisualStyles = false;
            this.ColumnHeadersHeightSizeMode = DataGridViewColumnHeadersHeightSizeMode.EnableResizing;
            this.CellBorderStyle = DataGridViewCellBorderStyle.SingleHorizontal;
            this.ColumnHeadersHeight = 37;
            this.ShowRowErrors = false;
            this.RowHeadersVisible = false;

            this.SetStyle(ControlStyles.OptimizedDoubleBuffer | ControlStyles.AllPaintingInWmPaint, true);
        }

        /// <summary>
        /// 在展示布局的时候,重新应用样式
        /// </summary>
        /// <param name="e"></param>
        protected override void OnLayout(LayoutEventArgs e)
        {
            base.OnLayout(e);
            ApplyStyle();
        }

        /// <summary>
        /// 边框颜色
        /// </summary>
        public Color BorderColor { get; set; }

        /// <summary>
        /// 处理绘制事件
        /// </summary>
        /// <param name="e"></param>
        protected override void OnPaint(PaintEventArgs e)
        {
            base.OnPaint(e);

            //绘制边框
            using (var p = new Pen(BorderColor))
            {
                e.Graphics.DrawRectangle(p, 0, 0, this.Width - 1, this.Height - 1);
            }
        }

        /// <summary>
        /// 处理单元格绘制事件,应用自定义样式效果
        /// </summary>
        /// <param name="e"></param>
        protected override void OnCellPainting(DataGridViewCellPaintingEventArgs e)
        {
            base.OnCellPainting(e);

            //表头
            if (e.RowIndex == -1)
            {
                DrawCellLine(e, this.GridColor, DashStyle.Solid);
            }
            else
            {
                DrawCellLine(e, this.GridColor, DashStyle.Dot);
            }
        }

        /// <summary>
        /// 绘制表格边框
        /// </summary>
        /// <param name="e"></param>
        /// <param name="borderColor"></param>
        /// <param name="backgroundColor"></param>
        /// <param name="lineMode"></param>
        private void DrawCellLine(DataGridViewCellPaintingEventArgs e, Color borderColor, DashStyle lineStyle)
        {
            if (_style != null && _regionType != BodyOrDialogRegionType.None)
            {
                var backgroundColor = _style.Header.BackColor;// this.ColumnHeadersDefaultCellStyle.BackColor;
                if (e.RowIndex > -1)
                {
                    backgroundColor = this.RowsDefaultCellStyle.BackColor;
                    if (this.Rows[e.RowIndex].Selected)
                    {
                        backgroundColor = this.RowsDefaultCellStyle.SelectionBackColor;
                    }
                }

                e.Graphics.FillRectangle(new SolidBrush(backgroundColor), e.CellBounds);
                e.PaintContent(e.CellBounds);

                var rect = e.CellBounds;
                rect.Offset(new Point(-1, -1));
                var pen = new Pen(new SolidBrush(borderColor));
                pen.DashStyle = lineStyle;
                e.Graphics.DrawLine(pen, rect.X, rect.Y + rect.Height, rect.X + rect.Width, rect.Y + rect.Height);

                e.Handled = true;
            }
        }
- 最后,我们仅需要在程序开始运行的时候,设置当前配置主题样式名称即可.如:ApplicationStyle.CurrentSkinName = Configs.SkinName;
后记, 在程序中,换肤是一个比较常见的功能,也有很多成熟的实现方案,本处仅提供一种方案供大家参考. 另外,在我们的UML图里有一个自定义的主题CustomApplicationStyle对象,这个就不打算深入讨论了,无非就是从指定的配置中读取样式主题需要的东西来组合成系统期望的样式集合而已.

