1. 企业常用的Nginx重要功能模块
1.1 Nginx核心功能模块(Core functionality)
Nginx核心功能模块负责Nginx的全局应用,主要对应主配置文件的Main区块和Events区块区域,这里有很多Nginx必须的全局参数配置。
详情见:nginx.org/en/docs/ngx_core_module.html
1.2 标准的HTTP功能模块集合
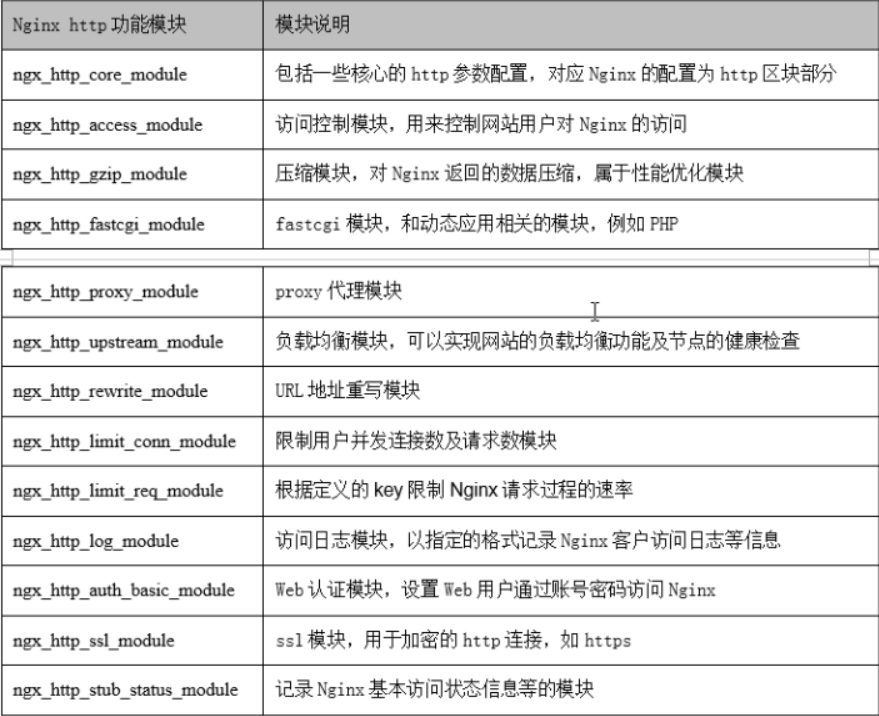
上述这些模块,大部分在默认情况下都安装好了,新手不建议擅自改动。
通过http://nginx.org/en/docs可查看到上述更多模块的详细使用。
2. nginx相关文件介绍
# rpm -ql 查看整体目录结构及对应功能

###############主配置文件
/etc/nginx/nginx.conf	                   #主配置文件
/etc/nginx/conf.d/default.conf		   #默认网站配置文件

###############nginx代理相关参数文件
/etc/nginx/fastcgi_params		    #php代理文件
/etc/nginx/scgi_params			    #AJAX前后分离
/etc/nginx/uwsgi_params			    #Python代理文件

###############nginx编码相关参数文件
/etc/nginx/win-utf			    #Nginx编码转换映射文件
/etc/nginx/koi-utf			    #Nginx编码转换映射文件
/etc/nginx/koi-win			    #Nginx编码转换映射文件

###############浏览器支持的直接打开的文件格式
/etc/nginx/mime.types

###############nginx管理相关命令
/usr/sbin/nginx			            #Nginx命令行管理终端工具
/usr/sbin/nginx-debug		            #Nginx命令行与终端调试工具

###############nginx日志相关目录与文件
/var/log/nginx				    #Nginx默认存放日志目录
/etc/logrotate.d/nginx		            #Nginx默认的日志切割
3. Nginx主配置文件(nginx.conf)介绍
[root@web01 ~]# egrep -v "^$|#" /application/nginx/conf/nginx.conf|cat -n
     1	worker_processes  1;                   # worker进程的数量。
     2	events {                               # 事件区块开始。
     3	    worker_connections  1024;          # 每个worker进程支持最大连接数。
     4	}                                      # 事件区块结束。
     5	http {                                 # HTTP区块开始。
     6	    include       mime.types;          # Nginx支持的媒体类型库文件。
     7	    default_type  application/octet-stream;  # 默认的媒体类型。
     8	    sendfile        on;                # 开启高效传输模式。
     9	    keepalive_timeout  65;             # 连接超时时间。
    10	    server {                           # 第一个server区块的开始,表示第一个独立的虚拟主机站点。
    11	        listen       80;               # 提供服务的端口,默认为80。
    12	        server_name  localhost;        # 提供服务的域名主机名。
    13	        location / {                   # 第一个location区块开始。
    14	            root   html;               # 站点的根目录,相当于nginx的安装目录。
    15	            index  index.html index.htm; # 默认的网站首页文件,用多个空格分开。
    16	        }                              # location区块结束。
    17	        error_page   500 502 503 504  /50x.html;  # 出现对应的http状态码时,使用50x.html回应客户。
    18	        location = /50x.html {         # location区块开始,访问50x.html。
    19	            root   html;               # 指定对应的站点根目录为html。
    20	        }                              # location区块结束。
    21	    }                                  # server区块结束。
    22	}                                      # http区块结束
4. Nginx虚拟主机配置实战
4.1 虚拟主机概念及类型介绍
所谓虚拟主机,就是Web服务里一个独立的网站站点,它可以对应独立的域名(也可能是IP或端口),具有独立的程序及资源,又可以独立的对外提供服务供用户访问。
Nginx使用server{}标签来表示一个虚拟主机,一个Web服务里可以有多个虚拟主机标签,即可以同时支持多个虚拟主机站点。
Apache使用<VirtuaHost></VirtuaHost>表示虚拟主机。
4.2 虚拟主机类型
(1)基于域名的虚拟主机(重点)
基于域名的虚拟主机,就是通过不同的域名区分不同的虚拟主机。
是企业应用最广的虚拟主机类型。
(2)基于端口的虚拟主机
基于端口的虚拟主机,就是通过不同的端口来区分不同的虚拟主机。
主要应用于公司内部网站,或不希望对外提供服务用户访问的网站后台等,访问基于端口的虚拟主机地址里要带有端口,
如:http://www.etiantian.org:9000
(3)基于IP的虚拟主机
基于IP的虚拟主机,就是通过不同的IP来区分不同的虚拟主机,企业应用较少。
4.3 基于域名的虚拟主机配置
(1)配置基于域名的nginx.conf内容
[root@web01 /application/nginx/conf]# egrep -v "#|^$" nginx.conf.default > nginx.conf
[root@web01 /application/nginx/conf]# vim nginx.conf
[root@web01 /application/nginx/conf]# cat nginx.conf
worker_processes  1;
events {
    worker_connections  1024;
}
http {
    include       mime.types;
    default_type  application/octet-stream;
    sendfile        on;
    keepalive_timeout  65;
    server {
        listen       80;
        server_name  www.etiantian.org;    # 添加域名
        location / {
            root   html/www;               # 添加虚拟主机目录
            index  index.html index.htm;
        }
        error_page   500 502 503 504  /50x.html;
        location = /50x.html {
            root   html;
        }
    }
}
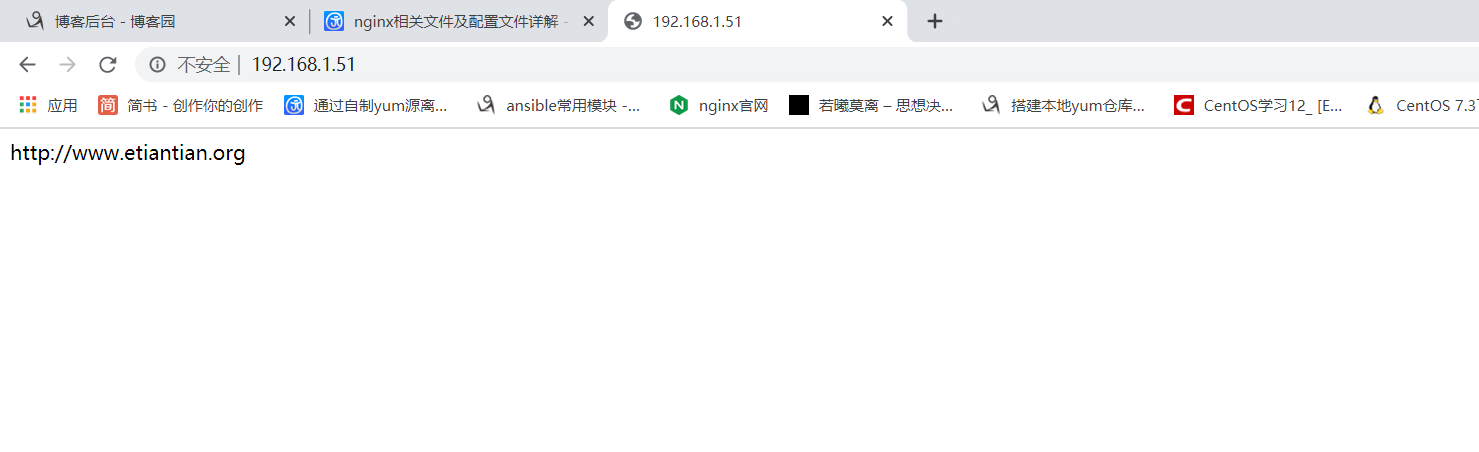
(2)创建域名对应的站点目录文件
[root@web01 /application/nginx/conf]# mkdir -p ../html/www                                      # 创建www站点目录。
[root@web01 /application/nginx/conf]# echo "http://www.etiantian.org" > ../html/www/index.html  # 追加内容到首页文件,也就是网页显示的内容。
[root@web01 /application/nginx/conf]# cat ../html/www/index.html                                # 检查
http://www.etiantian.org
(3)设置环境变量
[root@web01 /application/nginx/conf]# echo 'PATH="/application/nginx/sbin/:$PATH"' >> /etc/profile
[root@web01 /application/nginx/conf]# tail -1 /etc/profile
PATH="/application/nginx/sbin/:$PATH"
[root@web01 /application/nginx/conf]# . /etc/profile                           # 重载配置文件,使配置生效
[root@web01 /application/nginx/conf]# echo $PATH
/application/nginx/sbin/:/usr/local/sbin:/usr/local/bin:/usr/sbin:/usr/bin:/root/bin   # 只要出现/application/nginx/sbin/,就表示配置成功
(3)检查语法并重新加载Nginx
[root@web01 /application/nginx/conf]# nginx -t                                                 # 检查修改后的Nginx配置文件语法是否正确
nginx: the configuration file /application/nginx-1.18.0//conf/nginx.conf syntax is ok          # syntax is ok 表示正确
nginx: configuration file /application/nginx-1.18.0//conf/nginx.conf test is successful        # successful 表示正确
[root@web01 /application/nginx/conf]# nginx -s reload                                          # 平滑重启Nginx,即重新加载配置文件
[root@web01 /application/nginx/conf]# netstat -lntup|grep 80                                   # 检查端口和进程是否正常
tcp        0      0 0.0.0.0:80              0.0.0.0:*               LISTEN      6727/nginx: master
[root@web01 /application/nginx/conf]# echo "192.168.1.51 www.etiantian.org" >> /etc/hosts      # 追加www.etiantian.org到hosts文件进行测试
[root@web01 /application/nginx/conf]# tail -1 /etc/hosts
192.168.1.51 www.etiantian.org
[root@web01 /application/nginx/conf]# ping www.etiantian.org                                    # ping通,并且解析的IP为本机IP,表示成功
PING www.etiantian.org (192.168.1.51) 56(84) bytes of data.
64 bytes from www.etiantian.org (192.168.1.51): icmp_seq=1 ttl=64 time=0.015 ms
64 bytes from www.etiantian.org (192.168.1.51): icmp_seq=2 ttl=64 time=0.030 ms
^C
--- www.etiantian.org ping statistics ---
2 packets transmitted, 2 received, 0% packet loss, time 999ms
rtt min/avg/max/mdev = 0.015/0.022/0.030/0.008 ms
[root@web01 /application/nginx/conf]# curl -I www.etiantian.org                                 # 访问测试,只要返回的状态码为200,表示成功
HTTP/1.1 200 OK
Server: nginx/1.18.0
Date: Wed, 20 May 2020 15:24:59 GMT
Content-Type: text/html
Content-Length: 25
Last-Modified: Wed, 20 May 2020 15:20:35 GMT
Connection: keep-alive
ETag: "5ec54ac3-19"
Accept-Ranges: bytes
win10电脑端访问测试
先修改hosts文件,把IP和域名加入进去
路径为:C盘>Windows>System32>drivers>etc>hosts
hosts文件介绍
不管是WIN和Linux,只要域名访问,都要在客户端配置hosts文件做解析。
hosts文件一般比喻为本地DNS文件,功能是把域名解析成IP,多个域名可以对应一个IP。
默认情况下,hosts文件中配置的解析优先于DNS服务器,多用于公司中开发测试使用。
4.4 配置多个基于域名的虚拟主机
(1)增加新域名对应的配置
增加bbs.etiantian.org和blog.etiantian.org

[root@web01 /application/nginx/conf]# vim nginx.conf
[root@web01 /application/nginx/conf]# cat nginx.conf
worker_processes  1;
events {
    worker_connections  1024;
}
http {
    include       mime.types;
    default_type  application/octet-stream;
    sendfile        on;
    keepalive_timeout  65;
    server {
        listen       80;
        server_name  www.etiantian.org;
        location / {
            root   html/www;
            index  index.html index.htm;
        }
        error_page   500 502 503 504  /50x.html;
        location = /50x.html {
            root   html;
        }
    }
    server {                                           # 新增加的server标签
        listen       80;
        server_name  blog.etiantian.org;               # 新增加的域名
        location / {
            root   html/blog;                          # 新增加的站点目录
            index  index.html index.htm;
        }
        error_page   500 502 503 504  /50x.html;
        location = /50x.html {
            root   html;
        }
    }
    server {                                          # 新增加的server标签
        listen       80;
        server_name  bbs.etiantian.org;               # 新增加的域名
        location / {
            root   html/bbs;                          # 新增加的站点目录
            index  index.html index.htm;
        }
        error_page   500 502 503 504  /50x.html;
        location = /50x.html {
            root   html;
        }
    }
}
(2)创建新的虚拟主机对应的站点目录和首页文件
[root@web01 /application/nginx/conf]# mkdir ../html/blog -p
[root@web01 /application/nginx/conf]# mkdir ../html/bbs -p
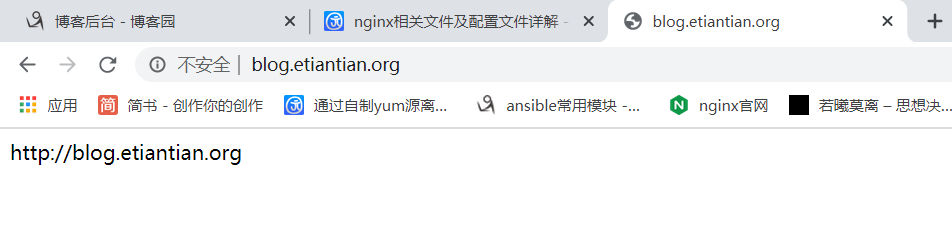
[root@web01 /application/nginx/conf]# echo 'http://blog.etiantian.org' > ../html/blog/index.html
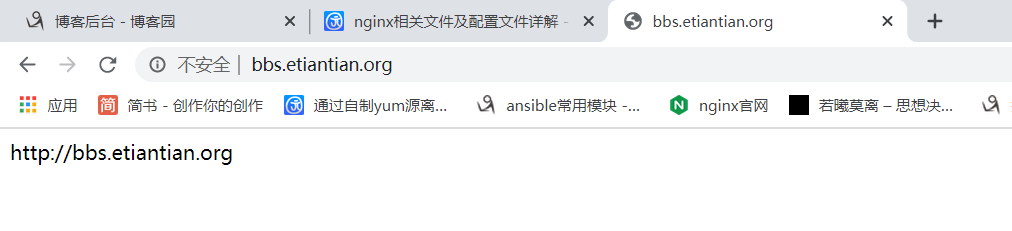
[root@web01 /application/nginx/conf]# echo 'http://bbs.etiantian.org' > ../html/bbs/index.html
[root@web01 /application/nginx/conf]# cat ../html/blog/index.html
http://blog.etiantian.org
[root@web01 /application/nginx/conf]# cat ../html/bbs/index.html
http://bbs.etiantian.org
(3)重载Nginx配置
[root@web01 /application/nginx/conf]# nginx -t
nginx: the configuration file /application/nginx-1.18.0//conf/nginx.conf syntax is ok
nginx: configuration file /application/nginx-1.18.0//conf/nginx.conf test is successful
[root@web01 /application/nginx/conf]# nginx -s reload

# 每次更改Nginx的配置后都需要用管理员重新加载配置文件,让配置生效。
# 因为Nignx在启动时,已经把所有配置都加载到内存中了,若更改了主配置文件,都需要重新加载一下,让新的配置加载到内存中。
# 大幅度提升了nginx的性能。
(4)添加域名到hosts文件中
[root@web01 /application/nginx/conf]# vim /etc/hosts
[root@web01 /application/nginx/conf]# cat /etc/hosts
127.0.0.1   localhost localhost.localdomain localhost4 localhost4.localdomain4
::1         localhost localhost.localdomain localhost6 localhost6.localdomain6
192.168.1.51 www.etiantian.org bbs.etiantian.org blog.etiantian.org             # 同一个IP,不同域名的情况下,可以写一行,空格分开域名即可。
(5)在客户端测试访问
# Linux客户端
[root@web01 /application/nginx/conf]# curl www.etiantian.org
http://www.etiantian.org
[root@web01 /application/nginx/conf]# curl bbs.etiantian.org
http://bbs.etiantian.org
[root@web01 /application/nginx/conf]# curl blog.etiantian.org
http://blog.etiantian.org
Win客户端
4.5 基于域名的虚拟主机通信原理介绍
Nginx客户端发起请求过程如下:
(1)浏览器输入www.etiantian.org,并回车。
(2)浏览器请求LDNS,通过LDNS最终找到授权DNS获取IP。
(3)请求Web服务器发起TCP三次握手。
(4)建立HTTP请求(192.168.1.51的80端口)
(5)发起HTTP请求报文(请求头携带:host www.etiantian.org 字段)
Nginx服务端处理请求过程如下:
(1)监听本地所有网卡上对80端口的请求
(2)读取接收到的HTTP请求报文里的信息。
(3)读取Nginx配置文件虚拟主机Server标签。
(4)先匹配Server标签中请求的端口号。
(5)相同端口再去匹配Server标签对应server_name指定的域名(和读取请求头里host字段对比)。
(6)把对应域名下面站点目录下的首页文件(index.html)发给客户端。
(7)如果没有匹配的域名,就把排在第一个顺序的Server标签虚拟机对应的内容发给客户端。
4.6 基于端口的虚拟主机配置
(1)修改配置文件
[root@web01 ~]# cp /application/nginx/conf/nginx.conf{,_basename}   # 备份原有配置文件
[root@web01 ~]# vim /application/nginx/conf/nginx.conf
[root@web01 ~]# cat /application/nginx/conf/nginx.conf
worker_processes  1;
events {
    worker_connections  1024;
}
http {
    include       mime.types;
    default_type  application/octet-stream;
    sendfile        on;
    keepalive_timeout  65;
    server {
        listen       80;
        server_name  www.etiantian.org;
        location / {
            root   html/www;
            index  index.html index.htm;
        }
        error_page   500 502 503 504  /50x.html;
        location = /50x.html {
            root   html;
        }
    }
    server {
        listen       81;                                  # 更改端口
        server_name  blog.etiantian.org;
        location / {
            root   html/blog;
            index  index.html index.htm;
        }
        error_page   500 502 503 504  /50x.html;
        location = /50x.html {
            root   html;
        }
    }
    server {
        listen       82;                                  # 更改端口
        server_name  bbs.etiantian.org;
        location / {
            root   html/bbs;
            index  index.html index.htm;
        }
        error_page   500 502 503 504  /50x.html;
        location = /50x.html {
            root   html;
        }
    }
}
(2)检查端口和配置,并重载配置文件
[root@web01 ~]# netstat -lntup|grep nginx
tcp        0      0 0.0.0.0:80              0.0.0.0:*               LISTEN      6766/nginx: master
tcp        0      0 0.0.0.0:81              0.0.0.0:*               LISTEN      6766/nginx: master
tcp        0      0 0.0.0.0:82              0.0.0.0:*               LISTEN      6766/nginx: master
[root@web01 ~]# nginx -t
nginx: the configuration file /application/nginx-1.18.0//conf/nginx.conf syntax is ok
nginx: configuration file /application/nginx-1.18.0//conf/nginx.conf test is successful
[root@web01 ~]# nginx -s reload
(3)访问测试
[root@web01 ~]# curl www.etiantian.org
http://www.etiantian.org
[root@web01 ~]# curl blog.etiantian.org:81
http://blog.etiantian.org
[root@web01 ~]# curl bbs.etiantian.org:82
http://bbs.etiantian.org
4.7 基于IP的虚拟主机配置
(1)在服务器网卡上增加多个IP地址
[root@web01 ~]# ip addr add 192.168.1.52/24 dev eth0 label eth0:9                    # 临时添加的辅助IP
[root@web01 ~]# ip addr add 192.168.1.53/24 dev eth0 label eth0:10                   # 临时添加的辅助IP
[root@web01 ~]# ip a
1: lo: <LOOPBACK,UP,LOWER_UP> mtu 65536 qdisc noqueue state UNKNOWN group default qlen 1000
    link/loopback 00:00:00:00:00:00 brd 00:00:00:00:00:00
    inet 127.0.0.1/8 scope host lo
       valid_lft forever preferred_lft forever
    inet6 ::1/128 scope host
       valid_lft forever preferred_lft forever
2: eth0: <BROADCAST,MULTICAST,UP,LOWER_UP> mtu 1500 qdisc pfifo_fast state UP group default qlen 1000
    link/ether 00:0c:29:f9:89:43 brd ff:ff:ff:ff:ff:ff
    inet 192.168.1.51/24 brd 192.168.1.255 scope global noprefixroute eth0
       valid_lft forever preferred_lft forever
    inet 192.168.1.52/24 scope global secondary eth0:9                    # 添加成功
       valid_lft forever preferred_lft forever
    inet 192.168.1.53/24 scope global secondary eth0:10                   # 添加成功
       valid_lft forever preferred_lft forever
    inet6 fe80::1c4b:d47c:218a:daf1/64 scope link noprefixroute
       valid_lft forever preferred_lft forever

[root@web01 ~]# ping 192.168.1.52                                         # 连通性测试
PING 192.168.1.52 (192.168.1.52) 56(84) bytes of data.
64 bytes from 192.168.1.52: icmp_seq=1 ttl=64 time=0.026 ms
^C
--- 192.168.1.52 ping statistics ---
1 packets transmitted, 1 received, 0% packet loss, time 0ms
rtt min/avg/max/mdev = 0.026/0.026/0.026/0.000 ms
[root@web01 ~]# ping 192.168.1.53                                         # 连通性测试
PING 192.168.1.53 (192.168.1.53) 56(84) bytes of data.
64 bytes from 192.168.1.53: icmp_seq=1 ttl=64 time=0.027 ms
^C
--- 192.168.1.53 ping statistics ---
1 packets transmitted, 1 received, 0% packet loss, time 0ms
rtt min/avg/max/mdev = 0.027/0.027/0.027/0.000 ms
(2)更改主配置文件
[root@web01 ~]# cp /application/nginx/conf/nginx.conf{,_basePort}         # 先备份
[root@web01 ~]# vim /application/nginx/conf/nginx.conf
nginx.conf           nginx.conf_basename  nginx.conf_basePort  nginx.conf.default
[root@web01 ~]# vim /application/nginx/conf/nginx.conf
[root@web01 ~]# cat /application/nginx/conf/nginx.conf
worker_processes  1;
events {
    worker_connections  1024;
}
http {
    include       mime.types;
    default_type  application/octet-stream;
    sendfile        on;
    keepalive_timeout  65;
    server {
        listen       192.168.1.51:80;                                   # 添加IP,并把监听端口改成80(默认的80端口,不加也行)
        server_name  www.etiantian.org;
        location / {
            root   html/www;
            index  index.html index.htm;
        }
        error_page   500 502 503 504  /50x.html;
        location = /50x.html {
            root   html;
        }
    }
    server {
        listen       192.168.1.52:80;                                   # 添加IP,并把监听端口改成80(默认的80端口,不加也行)
        server_name  blog.etiantian.org;
        location / {
            root   html/blog;
            index  index.html index.htm;
        }
        error_page   500 502 503 504  /50x.html;
        location = /50x.html {
            root   html;
        }
    }
    server {
        listen       192.168.1.53:80;                                   # 添加IP,并把监听端口改成80(默认的80端口,不加也行)
        server_name  bbs.etiantian.org;
        location / {
            root   html/bbs;
            index  index.html index.htm;
        }
        error_page   500 502 503 504  /50x.html;
        location = /50x.html {
            root   html;
        }
    }
}
[root@web01 ~]# nginx -t                                                     # 检查配置是否正确
nginx: the configuration file /application/nginx-1.18.0//conf/nginx.conf syntax is ok
nginx: configuration file /application/nginx-1.18.0//conf/nginx.conf test is successful
[root@web01 ~]# nginx -s reload                                              # 重载配置文件
[root@web01 ~]# netstat -lntup|grep nginx                                    # 这里出现了问题,监听端口没有改变,而且新的配置也没有生效。解决办法如下:
tcp        0      0 0.0.0.0:80              0.0.0.0:*               LISTEN      6766/nginx: master
tcp        0      0 0.0.0.0:81              0.0.0.0:*               LISTEN      6766/nginx: master
tcp        0      0 0.0.0.0:82              0.0.0.0:*               LISTEN      6766/nginx: master

# 重启Nignx
[root@web01 ~]# nginx -s stop
[root@web01 ~]# nginx
[root@web01 ~]# netstat -lntup|grep nginx
tcp        0      0 192.168.1.53:80         0.0.0.0:*               LISTEN      7025/nginx: master
tcp        0      0 192.168.1.52:80         0.0.0.0:*               LISTEN      7025/nginx: master
tcp        0      0 192.168.1.51:80         0.0.0.0:*               LISTEN      7025/nginx: master
(3)访问测试
[root@web01 ~]# curl 192.168.1.51
http://www.etiantian.org
[root@web01 ~]# curl 192.168.1.52
http://blog.etiantian.org
[root@web01 ~]# curl 192.168.1.53
http://bbs.etiantian.org
防止网站被恶意解析优化
(1)更改配置文件
[root@web01 ~]# cat /application/nginx/conf/nginx.conf
worker_processes  1;
events {
    worker_connections  1024;
}
http {
    include       mime.types;
    default_type  application/octet-stream;
    sendfile        on;
    keepalive_timeout  65;
    server {                          # 新添加一个server标签
       listen 80;
       server_name _default;
       return 500;
    }
    server {
        listen       80;
        server_name  www.etiantian.org;
        location / {
            root   html/www;
            index  index.html index.htm;
        }
        error_page   500 502 503 504  /50x.html;
        location = /50x.html {
            root   html;
        }
    }
    server {
        listen       80;
        server_name  blog.etiantian.org;
        location / {
            root   html/blog;
            index  index.html index.htm;
        }
        error_page   500 502 503 504  /50x.html;
        location = /50x.html {
            root   html;
        }
    }
    server {
        listen       80;
        server_name  bbs.etiantian.org;
        location / {
            root   html/bbs;
            index  index.html index.htm;
        }
        error_page   500 502 503 504  /50x.html;
        location = /50x.html {
            root   html;
        }
    }
}
(2)重启nginx
[root@web01 ~]# nginx -s stop
[root@web01 ~]# nginx
(3)在客户端hosts添加一个新域名
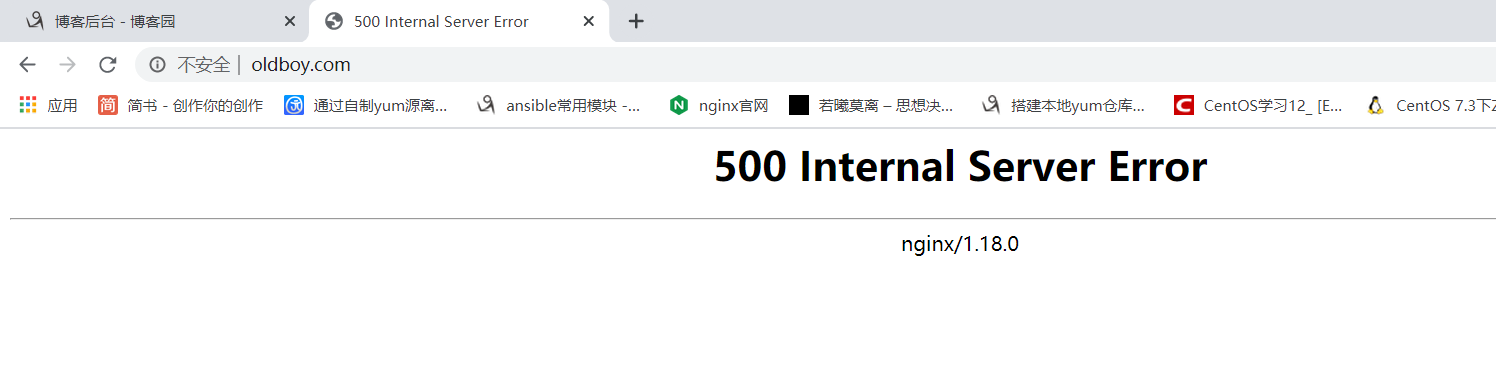
如:www.oldboy.com
(4)访问测试
恶意解析扩展
一:什么是恶意域名解析
        一般情况下,要使域名能访问到网站需要两步,第一步,将域名解析到网站所在的主机,第二步,在web服务器中将域名与相应的网站绑定。但是,如果通过主机IP能直接访问某网站,那么把域名解析到这个IP也将能访问到该网站,而无需在主机上绑定,也就是说任何人将任何域名解析到这个IP就能访问到这个网站。

二:恶意域名解析的危害
        可能您并不介意通过别人的域名访问到您的网站,但是如果这个域名是未备案域名呢?

        假如那域名是不友善的域名,比如曾经指向非法网站,容易引发搜索引擎惩罚,连带IP受到牵连。即使域名没什么问题,但流量也会被劫持到别的域名,从而遭到广告联盟的封杀。

三:防止域名恶意解析方法,配置第一个server标签如下:
    server {
       listen 80;
       server_name _default;
       return 500;
    }
5. Nginx常用功能配置
5.1 规范优化Nginx配置文件(include file | mask;)
优化步骤如下:
[root@web01 ~]# cd /application/nginx/conf/
[root@web01 /application/nginx/conf]# mkdir extra
[root@web01 /application/nginx/conf]# /bin/cp nginx.conf_basename nginx.conf        # 强制覆盖不提示,这里采用基于域名的虚拟主机为例

# 打印www.etiantian.org虚拟主机配置内容
[root@web01 /application/nginx/conf]# sed -n '10,21p' nginx.conf
    server {
        listen       80;
        server_name  www.etiantian.org;
        location / {
            root   html/www;
            index  index.html index.htm;
        }
        error_page   500 502 503 504  /50x.html;
        location = /50x.html {
            root   html;
        }
    }
[root@web01 /application/nginx/conf]# sed -n '10,21p' nginx.conf > extra/01_www.conf   # 把www.etiantian.org虚拟主机的配置写入extra/01_www.conf中。

# 打印blog.etiantian.org虚拟主机配置内容
[root@web01 /application/nginx/conf]# sed -n '22,33p' nginx.conf
    server {
        listen       80;
        server_name  blog.etiantian.org;
        location / {
            root   html/blog;
            index  index.html index.htm;
        }
        error_page   500 502 503 504  /50x.html;
        location = /50x.html {
            root   html;
        }
    }
[root@web01 /application/nginx/conf]# sed -n '22,33p' nginx.conf > extra/02_blog.conf  # 把blog.etiantian.org虚拟主机的配置写入extra/01_www.conf中。

# 打印bbs.etiantian.org虚拟主机配置内容
[root@web01 /application/nginx/conf]# sed -n '34,45p' nginx.conf
    server {
        listen       80;
        server_name  bbs.etiantian.org;
        location / {
            root   html/bbs;
            index  index.html index.htm;
        }
        error_page   500 502 503 504  /50x.html;
        location = /50x.html {
            root   html;
        }
    }
[root@web01 /application/nginx/conf]# sed -n '34,45p' nginx.conf > extra/03_bbs.conf  # 把bbs.etiantian.org虚拟主机的配置写入extra/01_www.conf中。

# 删除主配置文件nginx.conf中所有虚拟主机配置,这里是10到45行,需要提前确认好行号
[root@web01 /application/nginx/conf]# sed -n '10,45p' nginx.conf
    server {
        listen       80;
        server_name  www.etiantian.org;
        location / {
            root   html/www;
            index  index.html index.htm;
        }
        error_page   500 502 503 504  /50x.html;
        location = /50x.html {
            root   html;
        }
    }
    server {
        listen       80;
        server_name  blog.etiantian.org;
        location / {
            root   html/blog;
            index  index.html index.htm;
        }
        error_page   500 502 503 504  /50x.html;
        location = /50x.html {
            root   html;
        }
    }
    server {
        listen       80;
        server_name  bbs.etiantian.org;
        location / {
            root   html/bbs;
            index  index.html index.htm;
        }
        error_page   500 502 503 504  /50x.html;
        location = /50x.html {
            root   html;
        }

[root@web01 /application/nginx/conf]# sed -i '10,45d' nginx.conf    # 删除主配置文件中的3个server标签
[root@web01 /application/nginx/conf]# cat nginx.conf                # 删除后的效果
worker_processes  1;
events {
    worker_connections  1024;
}
http {
    include       mime.types;
    default_type  application/octet-stream;
    sendfile        on;
    keepalive_timeout  65;
}

# 添加虚拟主机配置文件信息到nginx.cof中,这里有两种办法,此处采取第一种方法
# 方法1
include extra/01_www.conf;
include extra/02_blog.conf;
include extra/03_bbs.conf;

#方法2
include extra/*.conf   # 这样配置后,默认按照文件名开头的数字顺序加载

# 最终效果如下
[root@web01 /application/nginx/conf]# cat nginx.conf
worker_processes  1;
events {
    worker_connections  1024;
}
http {
    include       mime.types;
    default_type  application/octet-stream;
    sendfile        on;
    keepalive_timeout  65;
include extra/01_www.conf;
include extra/02_blog.conf;
include extra/03_bbs.conf;
}

# 重新加载配置,并测试结果
[root@web01 /application/nginx/conf]# nginx -t
nginx: the configuration file /application/nginx-1.18.0//conf/nginx.conf syntax is ok
nginx: configuration file /application/nginx-1.18.0//conf/nginx.conf test is successful
[root@web01 /application/nginx/conf]# nginx -s reload
[root@web01 /application/nginx/conf]# curl www.etiantian.org
http://www.etiantian.org
[root@web01 /application/nginx/conf]# curl blog.etiantian.org
http://blog.etiantian.org
[root@web01 /application/nginx/conf]# curl bbs.etiantian.org
http://bbs.etiantian.org
5.2 Nginx虚拟主机的别名配置
(1)虚拟主机别名介绍
所谓虚拟主机别名,就是为虚拟主机设置出了主域名以外的一个或多个域名的名名字,这样就能实现用户访问的多个域名对应同一个虚拟主机网站的功能。
如www.etiantian.org,增加一个别名为etiantian.org,而后用户不管访问的是哪个域名,最终访问的内容都一样。
(2)配置过程
[root@web01 /application/nginx/conf/extra]# vim 01_www.conf
[root@web01 /application/nginx/conf/extra]# cat 01_www.conf
    server {
        listen       80;
        server_name  www.etiantian.org               # 去掉最后的分号
                     etiantian.org;                   # 增加的别名,并在最后加上结尾分号
        location / {
            root   html/www;
            index  index.html index.htm;
        }
        error_page   500 502 503 504  /50x.html;
        location = /50x.html {
            root   html;
        }
    }

# 重新加载配置文件
[root@web01 /application/nginx/conf/extra]# nginx -t
nginx: the configuration file /application/nginx-1.18.0//conf/nginx.conf syntax is ok
nginx: configuration file /application/nginx-1.18.0//conf/nginx.conf test is successful
[root@web01 /application/nginx/conf/extra]# nginx -s reload

# 添加新域名到hosts
[root@web01 /application/nginx/conf/extra]# tail -1 /etc/hosts
192.168.1.51 www.etiantian.org bbs.etiantian.org blog.etiantian.org etiantian.org

# 访问测试
[root@web01 /application/nginx/conf/extra]# curl etiantian.org
http://www.etiantian.org
[root@web01 /application/nginx/conf/extra]# curl  www.etiantian.org
http://www.etiantian.org
5.3 Nginx状态信息配置
(1)Nginx status配置过程
[root@web01 ~]# vim /application/nginx/conf/nginx.conf
[root@web01 /application/nginx/conf/extra]# cat ../nginx.conf
worker_processes  1;
events {
    worker_connections  1024;
}
http {
    include       mime.types;
    default_type  application/octet-stream;
    sendfile        on;
    keepalive_timeout  65;
include extra/01_www.conf;
include extra/02_blog.conf;
include extra/03_bbs.conf;
include extra/04_status.conf;           # 新添加一个include
}

[root@web01 /application/nginx/conf/extra]# vim 04_status.conf        # 新添加一个status.conf文件
[root@web01 /application/nginx/conf/extra]# cat 04_status.conf
# status
server {
         listen 80;
         server_name status.etiantian.org;
         location / {
                      stub_status on;
                      access_log off;
    }
}

[root@web01 /application/nginx/conf/extra]# nginx -t          # 检查语法
nginx: the configuration file /application/nginx-1.18.0//conf/nginx.conf syntax is ok
nginx: configuration file /application/nginx-1.18.0//conf/nginx.conf test is successful
[root@web01 /application/nginx/conf/extra]# nginx -s reload   # 重载配置文件

[root@web01 /application/nginx/conf/extra]# cat /etc/hosts
127.0.0.1   localhost localhost.localdomain localhost4 localhost4.localdomain4
::1         localhost localhost.localdomain localhost6 localhost6.localdomain6
192.168.1.51 www.etiantian.org bbs.etiantian.org blog.etiantian.org etiantian.org blog bbs status.etiantian.org # 新添加status.etiantian.org域名

[root@web01 /application/nginx/conf/extra]# curl status.etiantian.org   # 访问测试
Active connections: 1
server accepts handled requests
 1 1 1
Reading: 0 Writing: 1 Waiting: 0

# status显示结果详解
server:表示Nginx启动到现在共处理了多少个请求,此处为1。
accepts:表示Nginx启动到现在共成功创建了多少次握手,此处为1。请求丢失数=握手数-连接数。
handled requests:表示总共处理了多少次请求。此处为1。
Reading:为Nginx读取到客户端的Header信息数。
Writing:为Nginx返回给客户端的Header信息数。
Waiting:为Nginx已经处理完正在等候下一次请求指令的驻留连接。在开启keep-alive的情况下,这个值等于active-(reading+writing)。

# 提示:为了安全起见,这个值要防止被外部用户查看。
5.4 为Nginx增加错误日志(error_log)
5.4.1 Nginx错误日志介绍
Nginx错误日志属于核心功能模块(ngx_core_module)的参数,名为error_log,可以放在Main区块中全局配置,也可以放在不同的虚拟主机中单独记录虚拟主机的错误信息。

# error_log的语法格式及参数如下:
error_log filr level;
error_log:关键字
file:日志文件
level:错误日志级别

上述error_log是不能改变的固定写法,日志文件的路径可自定义,错误日志级别常见的有[debug|info|notice|warn|error|crit|alert|emerg],级别越高记录的信息越少。
生产场景一般用warn|error|crit这三个级别,注意不要配置info等较低级别,会带来巨大磁盘IO和空间占用。

# error_log的默认值为:
error_log logs/error.log error;

# 可放置的标签段为:
main、http、server、location
5.4.2 Nginx错误日志配置
[root@web01 /application/nginx/conf/extra]# vim ../nginx.conf
[root@web01 /application/nginx/conf/extra]# cat -n ../nginx.conf
     1	worker_processes  1;
     2	error_log logs/error.log;                          # 配置这一行即可,在主配置里增加,所有虚拟主机都生效。
     3	events {
     4	    worker_connections  1024;
     5	}
     6	http {
     7	    include       mime.types;
     8	    default_type  application/octet-stream;
     9	    sendfile        on;
    10	    keepalive_timeout  65;
    11	include extra/01_www.conf;
    12	include extra/02_blog.conf;
    13	include extra/03_bbs.conf;
    14	include extra/04_status.conf;
    15	}
6. Nginx访问日志(access_log)
6.1 Nginx访问日志介绍
主要作用是分析用户浏览行为。
由ngx_http_log_module模块负责。
6.2 Nginx访问日志参数
Nginx访问日志的主要又下列两个参数控制
| 参数 | 说明 |
|---|---|
| log_format | 用来定义记录日志的格式(可以定义多种日志格式,取不同名字即可) |
| access_log | 用来指定日志文件的路径及使用的何种日志格式记录日志 |
Nginx错误日志记录格式与记录日志默认的参数配置如下:
[root@web01 /application/nginx/conf]# cat nginx.conf.default
……省略部分内容
 #log_format  main  '$remote_addr - $remote_user [$time_local] "$request" '
    #                  '$status $body_bytes_sent "$http_referer" '
    #                  '"$http_user_agent" "$http_x_forwarded_for"';

    #access_log  logs/access.log  main;
……省略部分内容
6.3 访问日志变量说明
log_format  main  '$remote_addr - $remote_user [$time_local] "$request" '
                      '$status $body_bytes_sent "$http_referer" '
                      '"$http_user_agent" "$http_x_forwarded_for"';
| Nginx日志变量 | 说明 |
|---|---|
| $remote_addr | 记录访问网站的客户端地址 |
| $http_x_forwarded_for | 当前端有代理服务器时,设置web节点记录客户端地址的配置,此参数生效的前提是代理服务器上也要进行相关的x_forwarded_for设置 |
| $remote_user | 记录客户端用户名称 |
| $time_local | 记录访问时间与时区 |
| $request | 用户的http请求起始行信息 |
| $status | HTTP状态码,记录请求返回的状态 |
| $body_bytes_sent | 服务器发给客户端的响应body字节数 |
| $http_referer | 记录此次请求是从哪个链接访问过来的,可以根据referer进行防盗链设置 |
| $http_user_agent | 记录客户端访问信息,如浏览器、手机客户端等 |
在没有特殊的要求下,采用默认配置即可
6.4 配置Nginx访问日志
[root@web01 /application/nginx/conf]# cat nginx.conf.default
……省略部分内容
 #log_format  main  '$remote_addr - $remote_user [$time_local] "$request" '
    #                  '$status $body_bytes_sent "$http_referer" '
    #                  '"$http_user_agent" "$http_x_forwarded_for"';

    #access_log  logs/access.log  main;
……省略部分内容

# 把上述内容放到nginx.conf中
[root@web01 /application/nginx/conf]# cat nginx.conf
worker_processes  1;
error_log logs/error.log;
events {
    worker_connections  1024;
}
http {
    include       mime.types;
    default_type  application/octet-stream;
    sendfile        on;
    keepalive_timeout  65;
    log_format  main  '$remote_addr - $remote_user [$time_local] "$request" '        # 加在http标签的这个位置
                      '$status $body_bytes_sent "$http_referer" '
                      '"$http_user_agent" "$http_x_forwarded_for"';
include extra/01_www.conf;
include extra/02_blog.conf;
include extra/03_bbs.conf;
include extra/04_status.conf;
}

# 然后编辑虚拟主机配置文件,添加记录日志参数
[root@web01 /application/nginx/conf/extra]# cat 01_www.conf
    server {
        listen       80;
        server_name  www.etiantian.org
                     etiantian.org;
        location / {
            root   html/www;
            index  index.html index.htm;
        }
        error_page   500 502 503 504  /50x.html;
        location = /50x.html {
            root   html;
        }
        access_log logs/access_www.log main;             # 添加在此处
    }
检查语法,并重启nginx
[root@web01 /application/nginx/conf/extra]# nginx -t
nginx: the configuration file /application/nginx-1.18.0//conf/nginx.conf syntax is ok
nginx: configuration file /application/nginx-1.18.0//conf/nginx.conf test is successful
[root@web01 /application/nginx/conf/extra]# nginx -s stop
[root@web01 /application/nginx/conf/extra]# nginx
Linux访问测试
[root@web01 /application/nginx/conf/extra]# curl www.etiantian.org
http://www.etiantian.org
[root@web01 /application/nginx/conf/extra]# cat ../../logs/access_www.log
192.168.1.51 - - [26/May/2020:00:05:44 +0800] "GET / HTTP/1.1" 200 25 "-" "curl/7.29.0" "-"
谷歌浏览器访问测试

[root@web01 /application/nginx/conf/extra]# cat ../../logs/access_www.log
192.168.1.51 - - [26/May/2020:00:05:44 +0800] "GET / HTTP/1.1" 200 25 "-" "curl/7.29.0" "-"
192.168.1.1 - - [26/May/2020:00:07:27 +0800] "GET / HTTP/1.1" 200 25 "-" "Mozilla/5.0 (Windows NT 10.0; Win64; x64) AppleWebKit/537.36 (KHTML, like Gecko) Chrome/79.0.3945.88 Safari/537.36" "-"
192.168.1.1 - - [26/May/2020:00:07:27 +0800] "GET /favicon.ico HTTP/1.1" 404 555 "http://www.oldboy.com/" "Mozilla/5.0 (Windows NT 10.0; Win64; x64) AppleWebKit/537.36 (KHTML, like Gecko) Chrome/79.0.3945.88 Safari/537.36" "-"
192.168.1.1 - - [26/May/2020:00:07:28 +0800] "GET / HTTP/1.1" 304 0 "-" "Mozilla/5.0 (Windows NT 10.0; Win64; x64) AppleWebKit/537.36 (KHTML, like Gecko) Chrome/79.0.3945.88 Safari/537.36" "-"
192.168.1.1 - - [26/May/2020:00:07:28 +0800] "GET /favicon.ico HTTP/1.1" 404 555 "http://www.etiantian.org/" "Mozilla/5.0 (Windows NT 10.0; Win64; x64) AppleWebKit/537.36 (KHTML, like Gecko) Chrome/79.0.3945.88 Safari/537.36" "-"
日志格式说明
192.168.1.1 - - [26/May/2020:00:07:27 +0800] "GET / HTTP/1.1" 200 25 "-" "Mozilla/5.0 (Windows NT 10.0; Win64; x64) AppleWebKit/537.36 (KHTML, like Gecko) Chrome/79.0.3945.88 Safari/537.36" "-"

# $remote_addr:对应的是真实日志里的客户端IP,192.168.1.1。
# $remote_user:对应的是第二个中杠"-",没有远程用户,所以用"-"填充。
# $time_local:对应的是[26/May/2020:00:07:27 +0800]。
# $request:对应的是"GET / HTTP/1.1"。
# $status:对应的是200状态码
# body_bytes_sent:对应的是25字节,响应body的大小。
# $http_referer:对应的是“-”,直接打开的域名浏览,因此没有值。
# $http_user_agent:对应的是"Mozilla/5.0 (Windows NT 10.0; Win64; x64) AppleWebKit/537.36 (KHTML, like Gecko) Chrome/79.0.3945.88 Safari/537.36"。
# $http_x_forwarded_for:对应的是“-”,因为web服务器没有使用代理,所以此处为“-”。
扩展:可以在记录日志参数中加上buffer和flush选项,可以在高并发场景下提升网站访问性能。
[root@web01 /application/nginx/conf/extra]# cat 01_www.conf
    server {
        listen       80;
        server_name  www.etiantian.org
                     etiantian.org;
        location / {
            root   html/www;
            index  index.html index.htm;
        }
        error_page   500 502 503 504  /50x.html;
        location = /50x.html {
            root   html;
        }
        access_log logs/access_www.log main gzip buffer=32k flush=5s;            # 配置如此处,gzip:压缩日志。buffer:缓冲压缩的日志。flush=5s:每5秒刷新一次缓冲到磁盘
    }
6.5 Nginx访问日志轮询切割
(1)什么进行日志切割
默认情况下Nginx会把所有访问日志都写到一个文件中,时间久了,该文件就会越来越大,不利于后期的查看和处理。
(2)编写切割脚本,并手动执行查看结果
[root@web01 /application/nginx/logs]# vim cut_nginx_log.sh
#!/bin/bash
Date=`date +%F -d -1day`
Basedir="/application/nginx"
Nginxlogdir="$Basedir/logs"
Logname="access_www.log"

[ -d $Nginxlogdir ] && cd $Nginxlogdir || exit 1
[ -f $Logname ] || exit 1
/bin/mv $Logname ${Date}_${Logname}
${Basedir}/sbin/nginx -s reload

[root@web01 /application/nginx/logs]# sh cut_nginx_log.sh
[root@web01 /application/nginx/logs]# ls
2020-06-03_access_www.log    # 这就是执行脚本后,生成的脚本
access.log
cut_nginx_log.sh
error.log  nginx.pid
(3)编写定时任务,每天0点执行
[root@web01 /application/nginx/logs]# crontab -e
# Every day at 0, cut the Nginx access log
00 00 * * * /bin/sh /application/nginx/logs/cut_nginx_log.sh &> /dev/null
7. Nginx Location
7.1 Location的作用
根据用户请求的网站地址URL匹配,匹配成功即进行相关操作。
7.2 Location语法
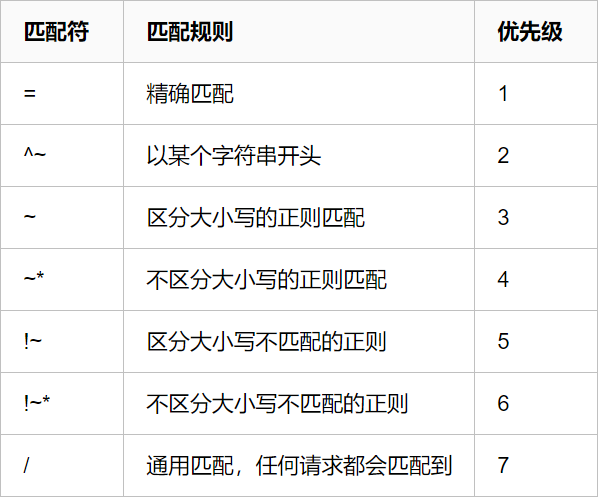
Location语法示例
location [ = | ~ | ~* | ^~ ] uri {
    …………
}
Location语法含义
location:指令。
[ = | ~ | ~* | ^~ ]:匹配标识。
uri:匹配的网站地址。
{…………}:匹配URI后要执行的配置段,也就是要显示给用户的内容。
7.3 Location匹配优先级
8. Nginx Rewrite
8.1 什么是 Nginx Rewrite
URL地址重写,典型的企业应用就是做伪静态。
需要PCRE软件支持。
8.2 Rewrite作用
(1)80强转443。
(2)提高用户体验。
(3)伪静态。
8.3 Rewrite的使用
(1)Rewrite语法
指令语法:Rewrite regex replacement [flag];
默认值:none;
应用位置:server、location、if。

# 具体语法如下
rewrite ^/(.*) http://www.etiantian.org/$1 permanent;

# rewrite: 固定关键字,表示开启一条Rewrite匹配规则。
# ^/(.*):正则表达式,这里表示匹配所有。
# http://www.etiantian.org/$1:匹配成功后跳转到这个地址。这里的$1是取regex部分()括号里的内容。
permanent:表示永久301重定向标记,即跳转到http://www.etiantian.org/$1地址上。
8.4 Rewrite 指令结尾的flag标记说明
| flag 标记符号 | 说明 |
|---|---|
| last | 本条规则匹配完后,不再匹配后面的任何规则,但是会重新向服务器发起一次页面请求。 |
| break | 本条规则匹配完即终止,不再匹配后面的任何规则。 |
| redirect | 返回302临时重定向,浏览器地址栏会显示跳转后的URL地址。如果nginx服务关闭,则地址跳转失效。 |
| permanent | 返回301永久重定向,浏览器地址栏会显示跳转后的URL地址。只要不清空浏览器缓存,就算nginx服务关闭,地址跳转依然生效。 |
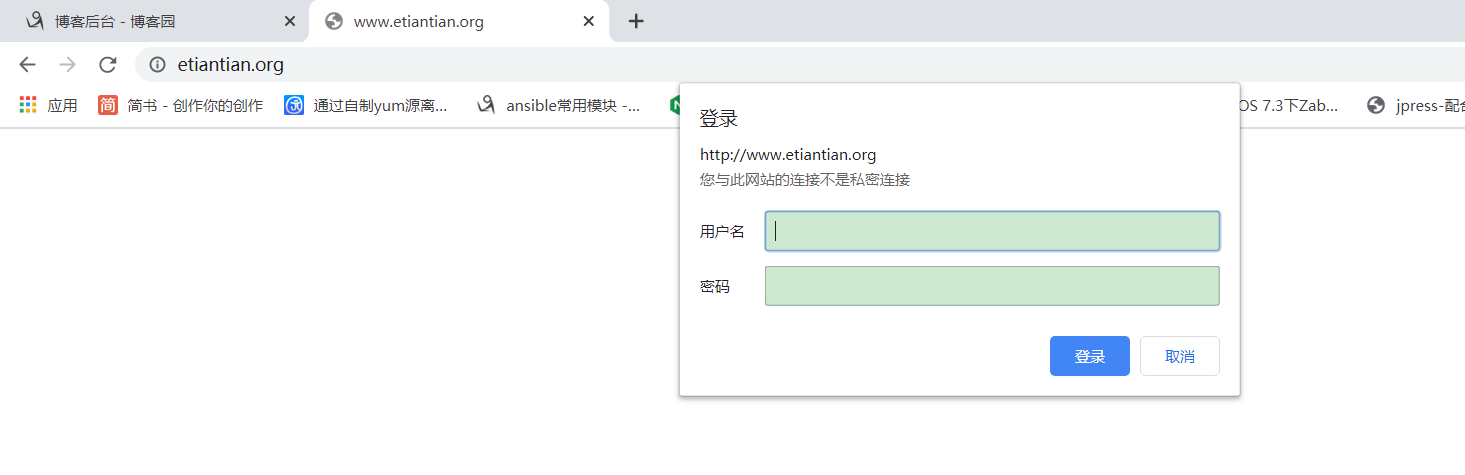
9. Nginx访问认证
9.1 语法示例
location / {
    auth_basic "closed site";
    auth_basic_user_file conf/httpasswd;
}

# 参数说明
## auth_basic:
语法:auth_basic string | off;
默认值:auth_basic off;
使用位置:http,server,location,limit_except

## auth_basic_user_file
语法:auth_basic_user_file;
默认值:-
使用位置:http,server,location,limit_except

# auth_basic_user_file参数后面接认证密码文件,file的内容如下
name1:password1
name2:password2
name3:password3
9.2 配置开始
9.2.1 修改配置文件
[root@web01 /application/nginx/conf/extra]# cat 01_www.conf
    server {
        listen       80;
        server_name  www.etiantian.org;
        location / {
            root   html/www;
            index  index.html index.htm;
            auth_basic    "xietangsheng";                              # 设置认证提示字符串“xietangsheng”
            auth_basic_user_file /application/nginx/conf/htpasswd;     # 设置认证的密码文件,登录的时候会去比对这个文件里面的内容。
        }
        error_page   500 502 503 504  /50x.html;
        location = /50x.html {
            root   html;
        }
        access_log logs/access_www.log main gzip buffer=32k flush=5s;
    }
9.2.2 获取htpasswd设置账号密码命令
[root@web01 /etc/yum.repos.d]# yum -y install httpd-tools  # 安装软件包
[root@web01 /etc/yum.repos.d]# which htpasswd
/usr/bin/htpasswd
9.2.3 创建登录时的账号密码
[root@web01 /etc/yum.repos.d]# htpasswd -bc /application/nginx/conf/htpasswd xietangsheng 123456
Adding password for user xietangsheng
[root@web01 /etc/yum.repos.d]# chmod 400 /application/nginx/conf/htpasswd.pass
[root@web01 /etc/yum.repos.d]# chown nginx /application/nginx/conf/htpasswd.pass
[root@web01 /etc/yum.repos.d]# cat /application/nginx/conf/htpasswd.pass
xietangsheng:$apr1$UtxFLnQJ$QIk8FcwHD2mQklaXQXsJR0
9.2.4 生效配置
[root@web01 /etc/yum.repos.d]# nginx -s reload
9.2.5 浏览器访问测试