zoukankan      html  css  js  c++  java
  • 开源单点登录系统CAS入门 (转)

    一、什么是CAS

      CAS 是 Yale 大学发起的一个开源项目,旨在为 Web 应用系统提供一种可靠的单点登录方法,CAS 在 2004 年 12 月正式成为 JA-SIG 的一个项目。CAS 具有以下特点:

      【1】开源的企业级单点登录解决方案。

      【2】CAS Server 为需要独立部署的 Web 应用。

      【3】CAS Client 支持非常多的客户端(这里指单点登录系统中的各个 Web 应用),包括 Java, .Net, PHP, Perl, Apache, uPortal, Ruby 等。

      从结构上看,CAS 包含两个部分: CAS Server 和 CAS Client。CAS Server 需要独立部署,主要负责对用户的认证工作;CAS Client 负责处理对客户端受保护资源的访问请求,需要登录时,重定向到 CAS Server。下图是 CAS 最基本的协议过程:
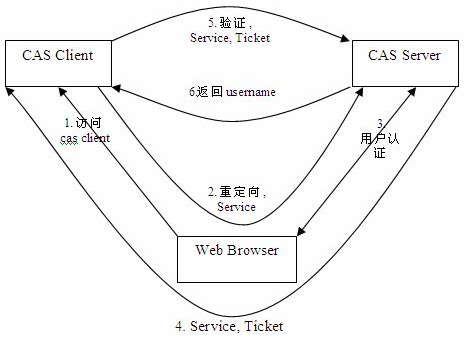
      

      SSO单点登录访问流程主要有以下步骤:

      1. 访问服务:SSO客户端发送请求访问应用系统提供的服务资源。

      2. 定向认证:SSO客户端会重定向用户请求到SSO服务器。

      3. 用户认证:用户身份认证。

      4. 发放票据:SSO服务器会产生一个随机的Service Ticket。

      5. 验证票据:SSO服务器验证票据Service Ticket的合法性,验证通过后,允许客户端访问服务。

      6. 传输用户信息:SSO服务器验证票据通过后,传输用户认证结果信息给客户端。

    二、CAS服务端部署

      下载CAS4.0.0(选择4.0.0 的原因是:4.0.0以后打包比较麻烦,4.0.0版本内有打包好的war)。

      下载地址为:


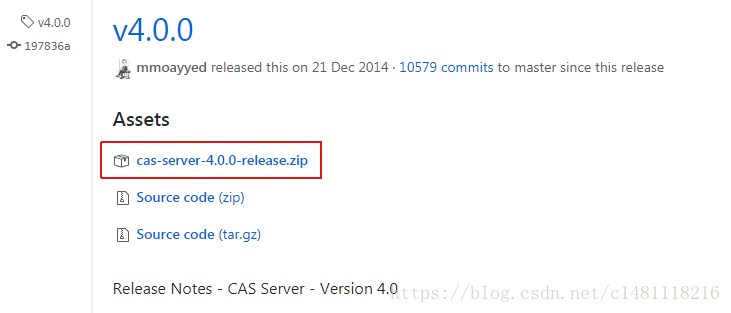
      解压cas-server-4.0.0-release.zip,将cas-server-4.0.0-releasecas-server-4.0.0modules目录下的cas-server-webapp-4.0.0.war改名为cas.war,并放入tomcat目录下的webapps下。启动tomcat自动解压war包。浏览器输入http://localhost:8080/cas ,即可看到登录页面


      这里有个固定的用户名和密码:casuser /Mellon

    复制代码
    这个初始用户名和密码在caswebappscasWEB-INFdeployerConfigContext.xml中有配置  


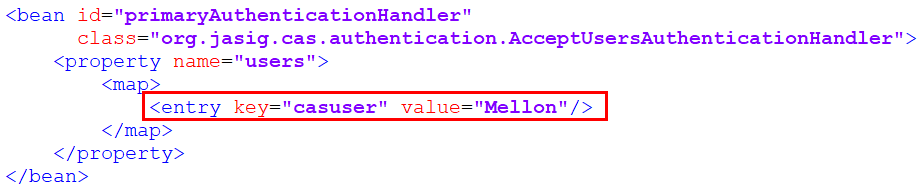
      如果想新增一个用户,增加一个<entry>标签即可。
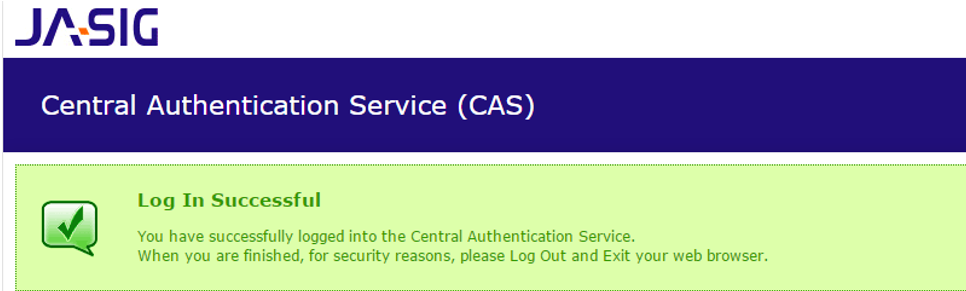
    复制代码

      登录成功后会跳到登录成功的提示页面


    三、CAS服务端配置

    3.1 端口修改

      如果我们不希望用8080端口访问CAS, 可以修改端口。

      (1)修改TOMCAT的端口

      打开tomcat 目录 confserver.xml  找到下面的配置


      将端口8080,改为9100

      (2)修改CAS配置文件

      修改cas的WEB-INF/cas.properties 

    server.name=http://localhost:9100

    3.2 去除https认证

      CAS默认使用的是HTTPS协议,如果使用HTTPS协议需要SSL安全证书(需向特定的机构申请和购买)。如果对安全要求不高或是在开发测试阶段,可使用HTTP协议。我们这里讲解通过修改配置,让CAS使用HTTP协议。

      (1)修改cas的WEB-INF/deployerConfigContext.xml

      找到下面的配置


      这里需要增加参数p:requireSecure="false",requireSecure属性意思为是否需要安全验证,即HTTPS,false为不采用。

      (2)修改cas的/WEB-INF/spring-configuration/ticketGrantingTicketCookieGenerator.xml

      找到下面配置


      参数p:cookieSecure="true",同理为HTTPS验证相关,TRUE为采用HTTPS验证,FALSE为不采用https验证。

      参数p:cookieMaxAge="-1",是COOKIE的最大生命周期,-1为无生命周期,即只在当前打开的窗口有效,关闭或重新打开其它窗口,仍会要求验证。可以根据需要修改为大于0的数字,比如3600等,意思是在3600秒内,打开任意窗口,都不需要验证。

      我们这里将cookieSecure改为false ,  cookieMaxAge 改为3600

      (3)修改cas的WEB-INF/spring-configuration/warnCookieGenerator.xml

      找到下面配置


      我们这里将cookieSecure改为false ,  cookieMaxAge 改为3600

    四、CAS客户端入门案例

    4.1 客户端工程1搭建

      (1)创建Maven工程 (war)casclient_demo1  引入cas客户端依赖并制定tomcat运行端口为9001

    复制代码
    <dependencies>
            <!-- cas -->  
            <dependency>  
                <groupId>org.jasig.cas.client</groupId>  
                <artifactId>cas-client-core</artifactId>  
                <version>3.3.3</version>  
            </dependency>          
            <dependency>
                <groupId>javax.servlet</groupId>
                <artifactId>servlet-api</artifactId>
                <version>2.5</version>  
                <scope>provided</scope>
            </dependency>
        </dependencies>  
      <build>  
          <plugins>
              <plugin>  
                  <groupId>org.apache.maven.plugins</groupId>  
                  <artifactId>maven-compiler-plugin</artifactId>  
                  <version>2.3.2</version>  
                  <configuration>  
                      <source>1.7</source>  
                      <target>1.7</target>  
                  </configuration>  
              </plugin>  
              <plugin>
                    <groupId>org.apache.tomcat.maven</groupId>
                    <artifactId>tomcat7-maven-plugin</artifactId>
                    <configuration>
                        <!-- 指定端口 -->
                        <port>9001</port>
                        <!-- 请求路径 -->
                        <path>/</path>
                    </configuration>
                </plugin>
          </plugins>  
        </build>
    复制代码

      (2)添加web.xml

    复制代码
    <?xml version="1.0" encoding="UTF-8"?>
    <web-app xmlns:xsi="http://www.w3.org/2001/XMLSchema-instance"
             xmlns="http://java.sun.com/xml/ns/javaee"
             xsi:schemaLocation="http://java.sun.com/xml/ns/javaee http://java.sun.com/xml/ns/javaee/web-app_2_5.xsd"
             version="2.5">
        <!-- 用于单点退出,该过滤器用于实现单点登出功能,可选配置 -->
        <listener>
            <listener-class>org.jasig.cas.client.session.SingleSignOutHttpSessionListener</listener-class>
        </listener>
        <!-- 该过滤器用于实现单点登出功能,可选配置。 -->
        <filter>
            <filter-name>CAS Single Sign Out Filter</filter-name>
            <filter-class>org.jasig.cas.client.session.SingleSignOutFilter</filter-class>
        </filter>
        <filter-mapping>
            <filter-name>CAS Single Sign Out Filter</filter-name>
            <url-pattern>/*</url-pattern>
        </filter-mapping>
        <!-- 该过滤器负责用户的认证工作,必须启用它 -->
        <filter>
            <filter-name>CASFilter</filter-name>
            <filter-class>org.jasig.cas.client.authentication.AuthenticationFilter</filter-class>
            <init-param>
                <param-name>casServerLoginUrl</param-name>
                <param-value>http://localhost:9100/cas/login</param-value>
                <!--这里的server是服务端的IP -->
            </init-param>
            <init-param>
                <param-name>serverName</param-name>
                <param-value>http://localhost:9001</param-value>
            </init-param>
        </filter>
        <filter-mapping>
            <filter-name>CASFilter</filter-name>
            <url-pattern>/*</url-pattern>
        </filter-mapping>
        <!-- 该过滤器负责对Ticket的校验工作,必须启用它 -->
        <filter>
            <filter-name>CAS Validation Filter</filter-name>
            <filter-class>org.jasig.cas.client.validation.Cas20ProxyReceivingTicketValidationFilter</filter-class>
            <init-param>
                <param-name>casServerUrlPrefix</param-name>
                <param-value>http://localhost:9100/cas</param-value>
            </init-param>
            <init-param>
                <param-name>serverName</param-name>
                <param-value>http://localhost:9001</param-value>
            </init-param>
        </filter>
        <filter-mapping>
            <filter-name>CAS Validation Filter</filter-name>
            <url-pattern>/*</url-pattern>
        </filter-mapping>
        <!-- 该过滤器负责实现HttpServletRequest请求的包裹, 比如允许开发者通过HttpServletRequest的getRemoteUser()方法获得SSO登录用户的登录名,可选配置。 -->
        <filter>
            <filter-name>CAS HttpServletRequest Wrapper Filter</filter-name>
            <filter-class>
                org.jasig.cas.client.util.HttpServletRequestWrapperFilter
            </filter-class>
        </filter>
        <filter-mapping>
            <filter-name>CAS HttpServletRequest Wrapper Filter</filter-name>
            <url-pattern>/*</url-pattern>
        </filter-mapping>
        <!-- 该过滤器使得开发者可以通过org.jasig.cas.client.util.AssertionHolder来获取用户的登录名。 比如AssertionHolder.getAssertion().getPrincipal().getName()。 -->
        <filter>
            <filter-name>CAS Assertion Thread Local Filter</filter-name>
            <filter-class>org.jasig.cas.client.util.AssertionThreadLocalFilter</filter-class>
        </filter>
        <filter-mapping>
            <filter-name>CAS Assertion Thread Local Filter</filter-name>
            <url-pattern>/*</url-pattern>
        </filter-mapping>
    </web-app>
    复制代码

      (3)编写index.jsp

    复制代码
    <%@ page language="java" contentType="text/html; charset=utf-8"
             pageEncoding="utf-8"%>
    <!DOCTYPE html PUBLIC "-//W3C//DTD HTML 4.01 Transitional//EN" "http://www.w3.org/TR/html4/loose.dtd">
    <html>
    <head>
        <meta http-equiv="Content-Type" content="text/html; charset=utf-8">
        <title>一品优购</title>
    </head>
    <body>
    欢迎来到一品优购
    <%=request.getRemoteUser()%>
    </body>
    </html>
    复制代码

      request.getRemoteUser()为获取远程登录名

    4.2 客户端工程2搭建

      (1)创建Maven工程 (war)casclient_demo2  引入cas客户端依赖并制定tomcat运行端口为9002

      (2)创建web.xml,参照casclient_demo1  ,将serverName的值改为http://localhost:9002,一共两处

      (3)创建index.jsp  ,内容显示“欢迎来到二品优购”

    4.3 单点登录测试

      (1)启动cas部署的tomcat 

      (2)启动客户端工程1和客户端工程2

      (3)地址栏输入http://localhost:9001/ 和http://localhost:9002/ ,地址均会跳转到CAS登录页

      (4)输入用户名和密码后,页面跳转回9002,再次访问9001也可以打开主页面。

    4.4 单点退出登录

      地址栏输入  http://localhost:9100/cas/logout

      即可看到退出后的提示页面


      我们可以将这个链接添加到index.jsp中

    <a href="http://localhost:9100/cas/logout">退出登录</a>

      但我们更希望退出登录后,能自动跳转到某个页面,那如何处理呢?

      修改cas系统的配置文件cas-servlet.xml


      改为true后,可以在退出时跳转页面到目标页面,修改index.jsp的退出链接

    <a href="http://localhost:9100/cas/logout?service=http://www.baidu.com">退出登录</a>

    五、CAS服务端数据源设置

    【需求分析】  

      我们现在让用户名密码从我们的品优购的user表里做验证

    【配置数据源】

      (1)修改cas服务端中WEB-INF下deployerConfigContext.xml ,添加如下配置

    复制代码
    <bean id="dataSource" class="com.mchange.v2.c3p0.ComboPooledDataSource"  
              p:driverClass="com.mysql.jdbc.Driver"  
              p:jdbcUrl="jdbc:mysql://127.0.0.1:3306/pinyougoudb?characterEncoding=utf8"  
              p:user="root"  
              p:password="root" /> 
    <bean id="passwordEncoder" 
            class="org.jasig.cas.authentication.handler.DefaultPasswordEncoder"  
            c:encodingAlgorithm="MD5"  
            p:characterEncoding="UTF-8" />  
    <bean id="dbAuthHandler"  
              class="org.jasig.cas.adaptors.jdbc.QueryDatabaseAuthenticationHandler"  
              p:dataSource-ref="dataSource"  
              p:sql="select password from tb_user where username = ?"  
              p:passwordEncoder-ref="passwordEncoder"/>  
    复制代码

      然后在配置文件开始部分找到如下配置


      其中

      是使用固定的用户名和密码,我们在下面可以看到这两个bean ,如果我们使用数据库认证用户名和密码,需要将这句注释掉。

      添加下面这一句配置:

    <entry key-ref="dbAuthHandler" value-ref="primaryPrincipalResolver"/>


      (2)将以下三个jar包放入webappscasWEB-INFlib下  


      用数据库中的用户名和密码进行测试

    六、CAS服务端界面改造 

      我们现在动手将CAS默认的登录页更改为自己的品优购登陆页

    6.1 改头换面

    【拷贝资源】

      (1)将品优购的登陆页login.html拷贝到cas系统下WEB-INFviewjspdefaultui 目录下

      (2)将css  js等文件夹拷贝到  cas目录下

      (3) 将原来的casLoginView.jsp 改名(可以为之后的修改操作做参照),将login.html改名为casLoginView.jsp 

    【修改页面】

      编辑casLoginView.jsp 内容

       (1)添加指令

    复制代码
    <%@ page pageEncoding="UTF-8" %>
    <%@ page contentType="text/html; charset=UTF-8" %>
    <%@ taglib prefix="c" uri="http://java.sun.com/jsp/jstl/core" %>
    <%@ taglib prefix="spring" uri="http://www.springframework.org/tags" %>
    <%@ taglib prefix="form" uri="http://www.springframework.org/tags/form" %>
    <%@ taglib prefix="fn" uri="http://java.sun.com/jsp/jstl/functions" %>
    复制代码

      (2)修改form标签

    <form:form method="post" id="fm1" commandName="${commandName}" htmlEscape="true" class="sui-form">
    ......
    </form:form>

      (3)修改用户名框

    <form:input id="username" tabindex="1" 
        accesskey="${userNameAccessKey}" path="username" autocomplete="off" htmlEscape="true" 
        placeholder="邮箱/用户名/手机号" class="span2 input-xfat" />

      (4)修改密码框

     <form:password  id="password" tabindex="2" path="password" 
          accesskey="${passwordAccessKey}" htmlEscape="true" autocomplete="off" 
          placeholder="请输入密码" class="span2 input-xfat"   />

      (5)修改登陆按钮

    <input type="hidden" name="lt" value="${loginTicket}" />
    <input type="hidden" name="execution" value="${flowExecutionKey}" />
    <input type="hidden" name="_eventId" value="submit" />
    <input class="sui-btn btn-block btn-xlarge btn-danger" accesskey="l" value="登陆" type="submit" />

      修改后效果如下:


    6.2 错误提示

      在表单内加入错误提示框

    <form:errors path="*" id="msg" cssClass="errors" element="div" htmlEscape="false" />

      测试:输入错误的用户名和密码,提示是英文:


      这个提示信息是在WEB-INFclasses目录下的messages.properties文件中

    authenticationFailure.AccountNotFoundException=Invalid credentials.
    authenticationFailure.FailedLoginException=Invalid credentials.

      设置国际化为zn_CN  ,修改cas-servlet.xml

    <bean id="localeResolver" class="org.springframework.web.servlet.i18n.CookieLocaleResolver" p:defaultLocale="zh_CN" />

      我们需要将此信息拷贝到messages_zh_CN.properties下,并改为中文提示(转为Unicode编码)

    authenticationFailure.AccountNotFoundException=u7528u6237u4E0Du5B58u5728.
    authenticationFailure.FailedLoginException=u5BC6u7801u9519u8BEF.

      第一个是用户名不存在时的错误提示

      第二个是密码错误的提示


    七、CAS客户端与SpringSecurity集成

    7.1 Spring Security测试工程搭建

       (1)建立Maven项目casclient_demo3(war) ,引入spring依赖和spring secrity 相关依赖 ,tomcat端口设置为9003

    复制代码
     <properties>
            <spring.version>4.2.4.RELEASE</spring.version>
        </properties>
    
        <dependencies>
            <dependency>
                <groupId>org.springframework</groupId>
                <artifactId>spring-core</artifactId>
                <version>${spring.version}</version>
            </dependency>
            <dependency>
                <groupId>org.springframework</groupId>
                <artifactId>spring-web</artifactId>
                <version>${spring.version}</version>
            </dependency>
            <dependency>
                <groupId>org.springframework</groupId>
                <artifactId>spring-webmvc</artifactId>
                <version>${spring.version}</version>
            </dependency>
            <dependency>
                <groupId>org.springframework</groupId>
                <artifactId>spring-context-support</artifactId>
                <version>${spring.version}</version>
            </dependency>
            <dependency>
                <groupId>org.springframework</groupId>
                <artifactId>spring-test</artifactId>
                <version>${spring.version}</version>
            </dependency>
            <dependency>
                <groupId>org.springframework</groupId>
                <artifactId>spring-jdbc</artifactId>
                <version>${spring.version}</version>
            </dependency>
            <dependency>
                <groupId>javax.servlet</groupId>
                <artifactId>servlet-api</artifactId>
                <version>2.5</version>
                <scope>provided</scope>
            </dependency>
    
            <dependency>
                <groupId>org.springframework.security</groupId>
                <artifactId>spring-security-web</artifactId>
                <version>4.1.0.RELEASE</version>
            </dependency>
            <dependency>
                <groupId>org.springframework.security</groupId>
                <artifactId>spring-security-config</artifactId>
                <version>4.1.0.RELEASE</version>
            </dependency>
    
        </dependencies>
        <build>
            <plugins>
                <!-- java编译插件 -->
                <plugin>
                    <groupId>org.apache.maven.plugins</groupId>
                    <artifactId>maven-compiler-plugin</artifactId>
                    <version>3.2</version>
                    <configuration>
                        <source>1.7</source>
                        <target>1.7</target>
                        <encoding>UTF-8</encoding>
                    </configuration>
                </plugin>
                <plugin>
                    <groupId>org.apache.tomcat.maven</groupId>
                    <artifactId>tomcat7-maven-plugin</artifactId>
                    <configuration>
                        <!-- 指定端口 -->
                        <port>9003</port>
                        <!-- 请求路径 -->
                        <path>/</path>
                    </configuration>
                </plugin>
            </plugins>
        </build>
    复制代码

      (2)建立web.xml ,添加过滤器等配置

    复制代码
    <?xml version="1.0" encoding="UTF-8"?>
    <web-app xmlns:xsi="http://www.w3.org/2001/XMLSchema-instance"
             xmlns="http://java.sun.com/xml/ns/javaee"
             xsi:schemaLocation="http://java.sun.com/xml/ns/javaee http://java.sun.com/xml/ns/javaee/web-app_2_5.xsd"
             version="2.5">
        <context-param>
            <param-name>contextConfigLocation</param-name>
            <param-value>classpath:spring-security.xml</param-value>
        </context-param>
        <listener>
            <listener-class>org.springframework.web.context.ContextLoaderListener</listener-class>
        </listener>
        <filter>
            <filter-name>springSecurityFilterChain</filter-name>
            <filter-class>org.springframework.web.filter.DelegatingFilterProxy</filter-class>
        </filter>
        <filter-mapping>
            <filter-name>springSecurityFilterChain</filter-name>
            <url-pattern>/*</url-pattern>
        </filter-mapping>
    </web-app>
    复制代码

      (3)创建配置文件spring-security.xml

    复制代码
    <?xml version="1.0" encoding="UTF-8"?>
    <beans:beans xmlns="http://www.springframework.org/schema/security"
                 xmlns:beans="http://www.springframework.org/schema/beans" xmlns:xsi="http://www.w3.org/2001/XMLSchema-instance"
                 xsi:schemaLocation="http://www.springframework.org/schema/beans http://www.springframework.org/schema/beans/spring-beans.xsd
                            http://www.springframework.org/schema/security http://www.springframework.org/schema/security/spring-security.xsd">
    
        <!--以下页面不拦截-->
        <http pattern="/login.html" security="none"></http>
        <http pattern="/login_error.html" security="none"></http>
    
        <!-- 页面拦截规则,use-expressions:是否启动SPEL表达式 默认是true -->
        <http use-expressions="false">
            <!-- 当前用户必须有ROLE_USER的角色 才可以访问根目录及所属子目录的资源
                    /*  表示的是该目录下的资源,只包括本级目录不包括下级目录
                    /** 表示的是该目录以及该目录下所有级别子目录的资源
            -->
            <intercept-url pattern="/**" access="ROLE_USER" />
            <!--开启表单登陆-->
            <!--login-page:指定登录页面
                default-target-url:指定了成功进行身份验证和授权后默认呈现给用户的页面。
                authentication-failure-url:指定了身份验证失败时跳转到的页面。
            -->
            <form-login login-page="/login.html" default-target-url="/index.html" authentication-failure-url="/login_error.html"/>
            <!--csrf disabled="true",关闭csrf -->
            <csrf disabled="true"/>
        </http>
    
        <!-- 认证管理器 -->
        <authentication-manager>
            <authentication-provider>
                <user-service>
                    <user name="admin" password="123456" authorities="ROLE_USER"/>
                </user-service>
            </authentication-provider>
        </authentication-manager>
    </beans:beans>
    复制代码

      (4)添加html页面(详细见Spring Security 入门


    7.2 Spring Security与 CAS集成

      (1)引入依赖

    复制代码
    <dependency>  
           <groupId>org.springframework.security</groupId>  
           <artifactId>spring-security-cas</artifactId>  
           <version>4.1.0.RELEASE</version>  
    </dependency>     
    <dependency>  
            <groupId>org.jasig.cas.client</groupId>  
            <artifactId>cas-client-core</artifactId>  
            <version>3.3.3</version>  
            <exclusions>  
                <exclusion>  
                    <groupId>org.slf4j</groupId>  
                    <artifactId>log4j-over-slf4j</artifactId>  
                </exclusion>  
            </exclusions>  
    </dependency> 
    复制代码

       (2)修改spring-security.xml

    复制代码
    <?xml version="1.0" encoding="UTF-8"?>
    <beans:beans xmlns="http://www.springframework.org/schema/security"
                 xmlns:beans="http://www.springframework.org/schema/beans"
                 xmlns:xsi="http://www.w3.org/2001/XMLSchema-instance"
                 xsi:schemaLocation="http://www.springframework.org/schema/beans http://www.springframework.org/schema/beans/spring-beans.xsd
                            http://www.springframework.org/schema/security http://www.springframework.org/schema/security/spring-security.xsd">
    
        <!--   entry-point-ref  入口点引用 -->
        <http use-expressions="false" entry-point-ref="casProcessingFilterEntryPoint">
            <intercept-url pattern="/**" access="ROLE_USER"/>
            <csrf disabled="true"/>
            <!-- custom-filter为过滤器,position 表示将过滤器放在指定的位置上,before表示放在指定位置之前,after表示放在指定的位置之后(Spring Security 内置过滤器表)  -->
            <custom-filter ref="casAuthenticationFilter" position="CAS_FILTER"/>
            <custom-filter ref="requestSingleLogoutFilter" before="LOGOUT_FILTER"/>
            <custom-filter ref="singleLogoutFilter" before="CAS_FILTER"/>
        </http>
    
        <!-- CAS入口点 开始 -->
        <beans:bean id="casProcessingFilterEntryPoint"
                    class="org.springframework.security.cas.web.CasAuthenticationEntryPoint">
            <!-- 单点登录服务器登录URL -->
            <beans:property name="loginUrl" value="http://localhost:9100/cas/login"/>
            <beans:property name="serviceProperties" ref="serviceProperties"/>
        </beans:bean>
        <beans:bean id="serviceProperties" class="org.springframework.security.cas.ServiceProperties">
            <!--service 配置自身工程的根地址+/login/cas   -->
            <beans:property name="service" value="http://localhost:9003/login/cas"/>
        </beans:bean>
        <!-- CAS入口点 结束 -->
    
        <!-- 认证过滤器 开始 -->
        <beans:bean id="casAuthenticationFilter" class="org.springframework.security.cas.web.CasAuthenticationFilter">
            <beans:property name="authenticationManager" ref="authenticationManager"/>
        </beans:bean>
        <!-- 认证管理器 -->
        <authentication-manager alias="authenticationManager">
            <authentication-provider ref="casAuthenticationProvider">
            </authentication-provider>
        </authentication-manager>
        <!-- 认证提供者 -->
        <beans:bean id="casAuthenticationProvider"
                    class="org.springframework.security.cas.authentication.CasAuthenticationProvider">
            <beans:property name="authenticationUserDetailsService">
                <beans:bean class="org.springframework.security.core.userdetails.UserDetailsByNameServiceWrapper">
                    <beans:constructor-arg ref="userDetailsService"/>
                </beans:bean>
            </beans:property>
            <beans:property name="serviceProperties" ref="serviceProperties"/>
            <!-- ticketValidator 为票据验证器 -->
            <beans:property name="ticketValidator">
                <beans:bean class="org.jasig.cas.client.validation.Cas20ServiceTicketValidator">
                    <beans:constructor-arg index="0" value="http://localhost:9100/cas"/>
                </beans:bean>
            </beans:property>
            <beans:property name="key" value="an_id_for_this_auth_provider_only"/>
        </beans:bean>
        <!-- 认证类 -->
        <beans:bean id="userDetailsService" class="cn.itcast.demo.service.UserDetailServiceImpl"/>
    
        <!-- 认证过滤器 结束 -->
        <!-- 单点登出  开始  -->
        <beans:bean id="singleLogoutFilter" class="org.jasig.cas.client.session.SingleSignOutFilter"/>
        <beans:bean id="requestSingleLogoutFilter"
                    class="org.springframework.security.web.authentication.logout.LogoutFilter">
            <beans:constructor-arg value="http://localhost:9100/cas/logout?service=http://www.baidu.com"/>
            <beans:constructor-arg>
                <beans:bean class="org.springframework.security.web.authentication.logout.SecurityContextLogoutHandler"/>
            </beans:constructor-arg>
            <beans:property name="filterProcessesUrl" value="/logout/cas"/>
        </beans:bean>
        <!-- 单点登出  结束 -->
    </beans:beans>
    复制代码

       (3)创建UserDetailsServiceImpl  

    复制代码
    /**
     * 认证类
     */
    public class UserDetailServiceImpl implements UserDetailsService {
        @Override
        public UserDetails loadUserByUsername(String username) throws UsernameNotFoundException {
            System.out.println("经过认证类:" + username);
            //构建角色集合
            List<GrantedAuthority> authorities = new ArrayList<>();
            authorities.add(new SimpleGrantedAuthority("ROLE_USER"));
            //这个类在此处的作用不是认证,因此password的参数可以为""
            return new User(username, "", authorities);
        }
    }
    复制代码

      注意:这个类在此处的作用不是认证,CAS在认证返回来的时候才调用这个类的方法,即这个类在执行这个方法的时候已经是通过认证了。它的主要作用是:登陆后得到用户名,根据用户名查询角色列表或执行一些逻辑。

    7.3 获取登录名 

       我们在处理后端逻辑需要获得登录名,那么如何获取单点登录的用户名呢? 我们下面来做个测试。

      (1)web.xml 添加springmvc

    复制代码
      <servlet>
          <servlet-name>springmvc</servlet-name>
          <servlet-class>org.springframework.web.servlet.DispatcherServlet</servlet-class>
          <!-- 指定加载的配置文件 ,通过参数contextConfigLocation加载-->
          <init-param>
              <param-name>contextConfigLocation</param-name>
              <param-value>classpath:springmvc.xml</param-value>
          </init-param>
      </servlet>
      
      <servlet-mapping>
          <servlet-name>springmvc</servlet-name>
          <url-pattern>*.do</url-pattern>
      </servlet-mapping>
    复制代码

      (2)创建springmvc.xml

    复制代码
    <?xml version="1.0" encoding="UTF-8"?>
    <beans xmlns="http://www.springframework.org/schema/beans"
        xmlns:xsi="http://www.w3.org/2001/XMLSchema-instance" xmlns:p="http://www.springframework.org/schema/p"
        xmlns:context="http://www.springframework.org/schema/context"
        xmlns:dubbo="http://code.alibabatech.com/schema/dubbo" xmlns:mvc="http://www.springframework.org/schema/mvc"
        xsi:schemaLocation="http://www.springframework.org/schema/beans http://www.springframework.org/schema/beans/spring-beans.xsd
            http://www.springframework.org/schema/mvc http://www.springframework.org/schema/mvc/spring-mvc.xsd
            http://code.alibabatech.com/schema/dubbo http://code.alibabatech.com/schema/dubbo/dubbo.xsd
            http://www.springframework.org/schema/context http://www.springframework.org/schema/context/spring-context.xsd">
       
       
        <context:component-scan base-package="cn.itcast.demo" />
        <mvc:annotation-driven />    
    
    </beans>
    复制代码

      (3)创建UserController

    复制代码
    @RestController
    public class UserController {
    
        @RequestMapping("/findLoginUser")
        public void findLoginUser() {
            String name = SecurityContextHolder.getContext().getAuthentication().getName();
            System.out.println(name);
        }
    }
    复制代码

      地址栏输入http://localhost:9003/findLoginUser.do 即可在控制台看到输出的登录名。

    7.4 退出登录

      修改spring-security.xml  


      在页面上添加链接

    <a href="/logout/cas">退出登录</a>

      创建index2.html,将index2.html设置为可匿名访问

    <http pattern="/index2.html" security="none"></http>

    https://www.cnblogs.com/yft-javaNotes/p/10645023.html

  • 相关阅读:
    【探路者】团队Alpha周贡献分数分配结果
    2017秋-软件工程第七次作业-第八周例行总结
    2017秋-软件工程第七次作业(2)-【探路者】Alpha周(2017年10月19)贡献分配规则和分配结果
    2017秋-软件工程第七次作业(1)-【探路者】贪吃蛇阿尔法发布展示(视频展示)
    2017秋-软件工程第七次作业(1)-【探路者】贪吃蛇阿尔法发布
    名词1
    Jsp1
    代码,python1
    关于键盘
    代码,java_web
  • 原文地址:https://www.cnblogs.com/xihong2014/p/14211858.html
Copyright © 2011-2022 走看看