一.Condition 的基本使用
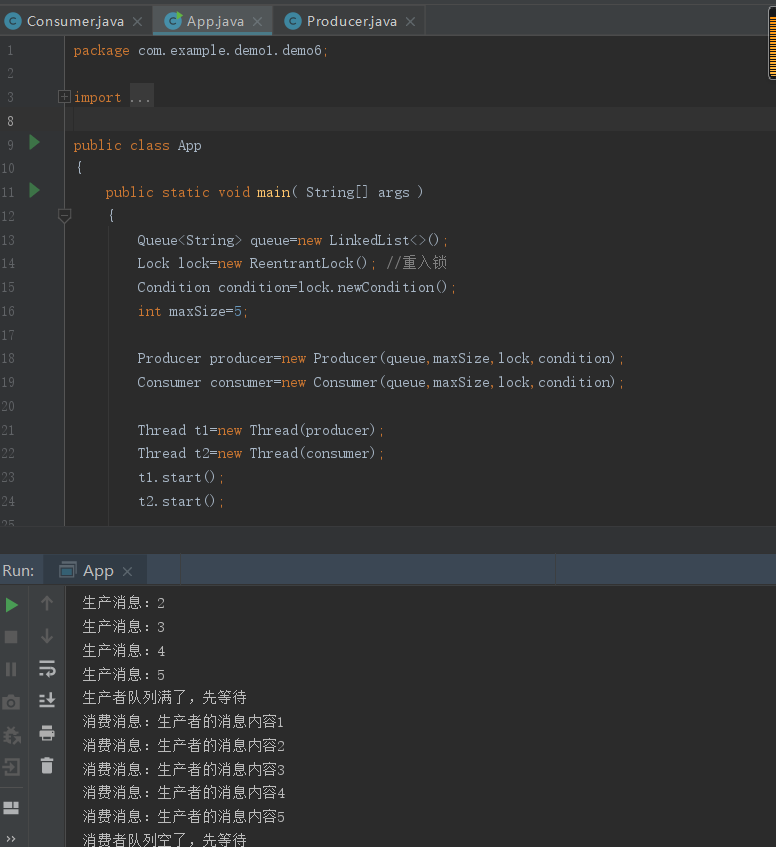
和以前一样,开篇先用一个例子来演示,我们就拿以前写的wait/notify的例子结合Lock进行改造下
public class Producer implements Runnable{

    private Queue<String> msg;

    private int maxSize;

    Lock lock;
    Condition condition;

    public Producer(Queue<String> msg, int maxSize, Lock lock, Condition condition) {
        this.msg = msg;
        this.maxSize = maxSize;
        this.lock = lock;
        this.condition = condition;
    }

    @Override
    public void run() {
        int i=0;
        while(true){
            i++;
            lock.lock();
                while(msg.size()==maxSize){
                    System.out.println("生产者队列满了,先等待");
                    try {
                        condition.await(); //阻塞线程并释放锁
                    } catch (InterruptedException e) {
                        e.printStackTrace();
                    }
                }
            try {
                Thread.sleep(1000);
            } catch (InterruptedException e) {
                e.printStackTrace();
            }
            System.out.println("生产消息:"+i);
                msg.add("生产者的消息内容"+i);
                condition.signal(); //唤醒阻塞状态下的线程
            lock.unlock();
        }
    }
}
public class Consumer implements Runnable{
    private Queue<String> msg;

    private int maxSize;

    Lock lock;
    Condition condition;

    public Consumer(Queue<String> msg, int maxSize, Lock lock, Condition condition) {
        this.msg = msg;
        this.maxSize = maxSize;
        this.lock = lock;
        this.condition = condition;
    }

    @Override
    public void run() {
        int i=0;
        while(true){
            i++;
            lock.lock(); //synchronized
            while(msg.isEmpty()){
                System.out.println("消费者队列空了,先等待");
                try {
                    condition.await(); //阻塞线程并释放锁   wait
                } catch (InterruptedException e) {
                    e.printStackTrace();
                }
            }
            try {
                Thread.sleep(1000);
            } catch (InterruptedException e) {
                e.printStackTrace();
            }
            System.out.println("消费消息:"+msg.remove());
            condition.signal(); //唤醒阻塞状态下的线程
            lock.unlock();
        }
    }
}
有了以前篇幅的介绍,我们现在应该很清楚lock.lock();做了啥事情,下面我们就condition.await();做了啥事情分析下,进入 condition.await();方法;
  public final void await() throws InterruptedException {
            if (Thread.interrupted())
                throw new InterruptedException();
            //有Node我第一个想到的节点,这段代码其实就是构造一个Condition的队列,我们可以点击进去分析下
            Node node = addConditionWaiter();
            //解决重入问题,跟进代码看下
            int savedState = fullyRelease(node);
            int interruptMode = 0;
            while (!isOnSyncQueue(node)) {
                LockSupport.park(this);
                if ((interruptMode = checkInterruptWhileWaiting(node)) != 0)
                    break;
            }
            if (acquireQueued(node, savedState) && interruptMode != THROW_IE)
                interruptMode = REINTERRUPT;
            if (node.nextWaiter != null) // clean up if cancelled
                unlinkCancelledWaiters();
            if (interruptMode != 0)
                reportInterruptAfterWait(interruptMode);
        }
 private Node addConditionWaiter() {
            //lastWaiter表示最后一个等待节点,我们看在ConeitionObject类可以发现其实他定义了一个首节点和一个尾节点分别是firstWaiter和lastWaiter;
            Node t = lastWaiter;
            //刚刚初始化时t一定是空的
            // If lastWaiter is cancelled, clean out.
            if (t != null && t.waitStatus != Node.CONDITION) {
                //判断是否是偏锁状态
                unlinkCancelledWaiters();
                t = lastWaiter;
            }
            //构造一个Node节点,传的是当前线程,当前线程表示的是获得锁的线程,CONDITION是一个条件队列;这里面New Node()和我们上一篇幅讲的一样会初始一个waitStatus值,初始值是0
            Node node = new Node(Thread.currentThread(), Node.CONDITION);

            if (t == null)
                firstWaiter = node;
            else
                t.nextWaiter = node;
            lastWaiter = node;
            return node;
        }
    final int fullyRelease(Node node) {
        boolean failed = true;
        try {
            //得到state值
            int savedState = getState();
           //进入判断的relelase方法会发现这是一个释放锁的过程;释放完成后他会叫醒阻梗的线程
            if (release(savedState)) {
                failed = false;
                return savedState;
            } else {
                throw new IllegalMonitorStateException();
            }
        } finally {
            if (failed)
                node.waitStatus = Node.CANCELLED;
        }
    }
走到这一步阻塞的队列就会唤醒,新的线程会重新走await方法
 public final void await() throws InterruptedException {
            if (Thread.interrupted())
                throw new InterruptedException();
            //有Node我第一个想到的节点,这段代码其实就是构造一个Condition的队列,我们可以点击进去分析下
            Node node = addConditionWaiter();
            //解决重入问题,跟进代码看下
            int savedState = fullyRelease(node);
            int interruptMode = 0;
           //判断节点在不在AQS同步队列中
            while (!isOnSyncQueue(node)) {
               //如果不在同步队列中就可以挂起了
                LockSupport.park(this);
                if ((interruptMode = checkInterruptWhileWaiting(node)) != 0)
                    break;
            }
            if (acquireQueued(node, savedState) && interruptMode != THROW_IE)
                interruptMode = REINTERRUPT;
            if (node.nextWaiter != null) // clean up if cancelled
                unlinkCancelledWaiters();
            if (interruptMode != 0)
                reportInterruptAfterWait(interruptMode);
        }
上面的阻塞过程讲解完了下面说下唤醒机制是怎么做的,我们进入condition.signal();
 public final void signal() {
            if (!isHeldExclusively())
                throw new IllegalMonitorStateException();
            //获取头部节点,此时头部节点是在Condition队列中等待被唤醒的头部节点,唤醒后会移到AQS队列中去抢占锁(因为condition队列是等待队列,AQS队列是抢占锁队列)
            Node first = firstWaiter;
            if (first != null)
                //头节点不会为空所以进入下面方法
                doSignal(first);
        }
 private void doSignal(Node first) {
            do {
                //条件成立说明当前的Condition队列中没有阻塞的线程了
                if ( (firstWaiter = first.nextWaiter) == null)
                     //节点清空
                    lastWaiter = null;
                //断掉唤醒的节点和等待唤醒的节点间的指向引用
                first.nextWaiter = null;
            } while (!transferForSignal(first) &&
                     (first = firstWaiter) != null);
        }
  final boolean transferForSignal(Node node) {
        /*
         * If cannot change waitStatus, the node has been cancelled.
         */
        //如果是偏锁状态说明这个节点是有问题的,没必要进行抢占锁,直接断掉引用进行回收
        if (!compareAndSetWaitStatus(node, Node.CONDITION, 0))
            return false;

        /*
         * Splice onto queue and try to set waitStatus of predecessor to
         * indicate that thread is (probably) waiting. If cancelled or
         * attempt to set waitStatus fails, wake up to resync (in which
         * case the waitStatus can be transiently and harmlessly wrong).
         */
         //将当前节点移到AQS队列中去,从condition等待队列中移除
        Node p = enq(node);
        int ws = p.waitStatus;
        //如果ws>0表示是偏锁状态,如果是偏锁状态就唤醒
        if (ws > 0 || !compareAndSetWaitStatus(p, ws, Node.SIGNAL))
            LockSupport.unpark(node.thread);
        return true;
    }
二.阻塞队列的成员
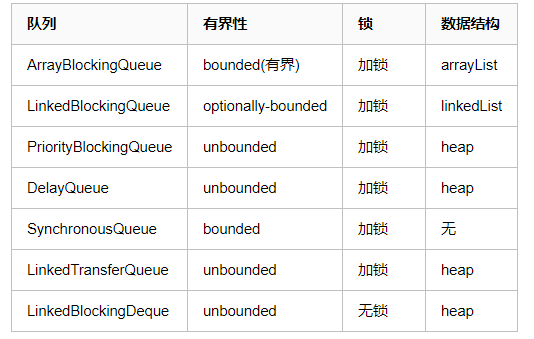
下面分别简单介绍一下:
-
ArrayBlockingQueue:是一个用数组实现的有界阻塞队列,此队列按照先进先出(FIFO)的原则对元素进行排序。支持公平锁和非公平锁。【注:每一个线程在获取锁的时候可能都会排队等待,如果在等待时间上,先获取锁的线程的请求一定先被满足,那么这个锁就是公平的。反之,这个锁就是不公平的。公平的获取锁,也就是当前等待时间最长的线程先获取锁】
-
LinkedBlockingQueue:一个由链表结构组成的有界队列,此队列的长度为Integer.MAX_VALUE。此队列按照先进先出的顺序进行排序。
-
PriorityBlockingQueue: 一个支持线程优先级排序的无界队列,默认自然序进行排序,也可以自定义实现compareTo()方法来指定元素排序规则,不能保证同优先级元素的顺序。
-
DelayQueue: 一个实现PriorityBlockingQueue实现延迟获取的无界队列,在创建元素时,可以指定多久才能从队列中获取当前元素。只有延时期满后才能从队列中获取元素。(DelayQueue可以运用在以下应用场景:1.缓存系统的设计:可以用DelayQueue保存缓存元素的有效期,使用一个线程循环查询DelayQueue,一旦能从DelayQueue中获取元素时,表示缓存有效期到了。2.定时任务调度。使用DelayQueue保存当天将会执行的任务和执行时间,一旦从DelayQueue中获取到任务就开始执行,从比如TimerQueue就是使用DelayQueue实现的。)
-
SynchronousQueue: 一个不存储元素的阻塞队列,每一个put操作必须等待take操作,否则不能添加元素。支持公平锁和非公平锁。SynchronousQueue的一个使用场景是在线程池里。Executors.newCachedThreadPool()就使用了SynchronousQueue,这个线程池根据需要(新任务到来时)创建新的线程,如果有空闲线程则会重复使用,线程空闲了60秒后会被回收。
-
LinkedTransferQueue: 一个由链表结构组成的无界阻塞队列,相当于其它队列,LinkedTransferQueue队列多了transfer和tryTransfer方法。
-
LinkedBlockingDeque: 一个由链表结构组成的双向阻塞队列。队列头部和尾部都可以添加和移除元素,多线程并发时,可以将锁的竞争最多降到一半。