最近因为手抖,在Spark中给自己挖了一个数据倾斜的坑。为了解决这个问题,顺便研究了下Spark分区器的原理,趁着周末加班总结一下~
先说说数据倾斜
数据倾斜是指Spark中的RDD在计算的时候,每个RDD内部的分区包含的数据不平均。比如一共有5个分区,其中一个占有了90%的数据,这就导致本来5个分区可以5个人一起并行干活,结果四个人不怎么干活,工作全都压到一个人身上了。遇到这种问题,网上有很多的解决办法:
比如这篇写的就不错:http://www.cnblogs.com/jasongj/p/6508150.html
但是如果是底层数据的问题,无论怎么优化,还是无法解决数据倾斜的。
比如你想要对某个rdd做groupby,然后做join操作,如果分组的key就是分布不均匀的,那么真样都是无法优化的。因为一旦这个key被切分,就无法完整的做join了,如果不对这个key切分,必然会造成对应的分区数据倾斜。
不过,了解数据为什么会倾斜还是很重要的,继续往下看吧!
分区的作用
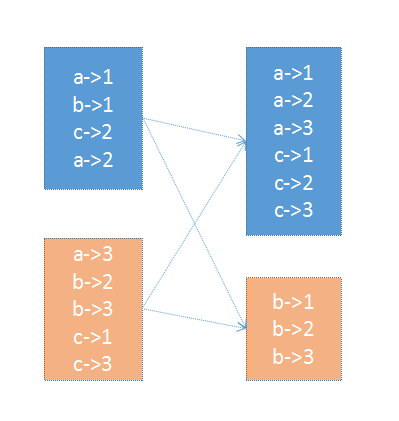
在PairRDD即(key,value)这种格式的rdd中,很多操作都是基于key的,因此为了独立分割任务,会按照key对数据进行重组。比如groupbykey
重组肯定是需要一个规则的,最常见的就是基于Hash,Spark还提供了一种稍微复杂点的基于抽样的Range分区方法。
下面我们先看看分区器在Spark计算流程中是怎么使用的:
Paritioner的使用
就拿groupbykey来说:
def groupByKey(): JavaPairRDD[K, JIterable[V]] =
    fromRDD(groupByResultToJava(rdd.groupByKey()))
它会调用PairRDDFunction的groupByKey()方法
def groupByKey(): RDD[(K, Iterable[V])] = self.withScope {
    groupByKey(defaultPartitioner(self))
  }
在这个方法里面创建了默认的分区器。默认的分区器是这样定义的:
def defaultPartitioner(rdd: RDD[_], others: RDD[_]*): Partitioner = {
    val bySize = (Seq(rdd) ++ others).sortBy(_.partitions.size).reverse
    for (r <- bySize if r.partitioner.isDefined && r.partitioner.get.numPartitions > 0) {
      return r.partitioner.get
    }
    if (rdd.context.conf.contains("spark.default.parallelism")) {
      new HashPartitioner(rdd.context.defaultParallelism)
    } else {
      new HashPartitioner(bySize.head.partitions.size)
    }
  }
首先获取当前分区的分区个数,如果没有设置spark.default.parallelism参数,则创建一个跟之前分区个数一样的Hash分区器。
当然,用户也可以自定义分区器,或者使用其他提供的分区器。API里面也是支持的:
// 传入分区器对象
def groupByKey(partitioner: Partitioner): JavaPairRDD[K, JIterable[V]] =
    fromRDD(groupByResultToJava(rdd.groupByKey(partitioner)))
// 传入分区的个数
def groupByKey(numPartitions: Int): JavaPairRDD[K, JIterable[V]] =
    fromRDD(groupByResultToJava(rdd.groupByKey(numPartitions)))
HashPatitioner
Hash分区器,是最简单也是默认提供的分区器,了解它的分区规则,对我们处理数据倾斜或者设计分组的key时,还是很有帮助的。
class HashPartitioner(partitions: Int) extends Partitioner {
  require(partitions >= 0, s"Number of partitions ($partitions) cannot be negative.")

  def numPartitions: Int = partitions

  // 通过key计算其HashCode,并根据分区数取模。如果结果小于0,直接加上分区数。
  def getPartition(key: Any): Int = key match {
    case null => 0
    case _ => Utils.nonNegativeMod(key.hashCode, numPartitions)
  }

  // 对比两个分区器是否相同,直接对比其分区个数就行
  override def equals(other: Any): Boolean = other match {
    case h: HashPartitioner =>
      h.numPartitions == numPartitions
    case _ =>
      false
  }

  override def hashCode: Int = numPartitions
}
这里最重要的是这个Utils.nonNegativeMod(key.hashCode, numPartitions),它决定了数据进入到哪个分区。
def nonNegativeMod(x: Int, mod: Int): Int = {
    val rawMod = x % mod
    rawMod + (if (rawMod < 0) mod else 0)
  }
说白了,就是基于这个key获取它的hashCode,然后对分区个数取模。由于HashCode可能为负,这里直接判断下,如果小于0,再加上分区个数即可。
因此,基于hash的分区,只要保证你的key是分散的,那么最终数据就不会出现数据倾斜的情况。
RangePartitioner
这个分区器,适合想要把数据打散的场景,但是如果相同的key重复量很大,依然会出现数据倾斜的情况。
每个分区器,最核心的方法,就是getPartition
def getPartition(key: Any): Int = {
    val k = key.asInstanceOf[K]
    var partition = 0
    if (rangeBounds.length <= 128) {
      // If we have less than 128 partitions naive search
      while (partition < rangeBounds.length && ordering.gt(k, rangeBounds(partition))) {
        partition += 1
      }
    } else {
      // Determine which binary search method to use only once.
      partition = binarySearch(rangeBounds, k)
      // binarySearch either returns the match location or -[insertion point]-1
      if (partition < 0) {
        partition = -partition-1
      }
      if (partition > rangeBounds.length) {
        partition = rangeBounds.length
      }
    }
    if (ascending) {
      partition
    } else {
      rangeBounds.length - partition
    }
  }
在range分区中,会存储一个边界的数组,比如[1,100,200,300,400],然后对比传进来的key,返回对应的分区id。
那么这个边界是怎么确定的呢?
这就是Range分区最核心的算法了,大概描述下,就是遍历每个paritiion,对里面的数据进行抽样,把抽样的数据进行排序,并按照对应的权重确定边界。
有几个比较重要的地方:
- 1 抽样
- 2 确定边界
关于抽样,有一个很常见的算法题,即在不知道数据规模的情况下,如何以等概率的方式,随机选择一个值。
最笨的办法,就是遍历一次数据,知道数据的规模,然后随机一个数,取其对应的值。其实这样相当于遍历了两次(第二次的取值根据不同的存储介质,可能不同)。
在Spark中,是使用水塘抽样这种算法。即首先取第一个值,然后依次往后遍历;第二个值有二分之一的几率替换选出来的值;第三个值有三分之一的几率替换选出来的值;...;直到遍历到最后一个值。这样,通过依次遍历就取出来随机的数值了。
算法参考源码:
private var rangeBounds: Array[K] = {
    if (partitions <= 1) {
      Array.empty
    } else {
      // This is the sample size we need to have roughly balanced output partitions, capped at 1M.
      // 最大采样数量不能超过1M。比如,如果分区是5,采样数为100
      val sampleSize = math.min(20.0 * partitions, 1e6)
      // Assume the input partitions are roughly balanced and over-sample a little bit.
      // 每个分区的采样数为平均值的三倍,避免数据倾斜造成的数据量过少
      val sampleSizePerPartition = math.ceil(3.0 * sampleSize / rdd.partitions.size).toInt

      // 真正的采样算法(参数1:rdd的key数组, 采样个数)
      val (numItems, sketched) = RangePartitioner.sketch(rdd.map(_._1), sampleSizePerPartition)
      if (numItems == 0L) {
        Array.empty
      } else {
        // If a partition contains much more than the average number of items, we re-sample from it
        // to ensure that enough items are collected from that partition.
        // 如果有的分区包含的数量远超过平均值,那么需要对它重新采样。每个分区的采样数/采样返回的总的记录数
        val fraction = math.min(sampleSize / math.max(numItems, 1L), 1.0)
        //保存有效的采样数
        val candidates = ArrayBuffer.empty[(K, Float)]
        //保存数据倾斜导致的采样数过多的信息
        val imbalancedPartitions = mutable.Set.empty[Int]

        sketched.foreach { case (idx, n, sample) =>
          if (fraction * n > sampleSizePerPartition) {
            imbalancedPartitions += idx
          } else {
            // The weight is 1 over the sampling probability.
            val weight = (n.toDouble / sample.size).toFloat
            for (key <- sample) {
              candidates += ((key, weight))
            }
          }
        }
        if (imbalancedPartitions.nonEmpty) {
          // Re-sample imbalanced partitions with the desired sampling probability.
          val imbalanced = new PartitionPruningRDD(rdd.map(_._1), imbalancedPartitions.contains)
          val seed = byteswap32(-rdd.id - 1)
          //基于RDD获取采样数据
          val reSampled = imbalanced.sample(withReplacement = false, fraction, seed).collect()
          val weight = (1.0 / fraction).toFloat
          candidates ++= reSampled.map(x => (x, weight))
        }
        RangePartitioner.determineBounds(candidates, partitions)
      }
    }
  }

  def sketch[K : ClassTag](
      rdd: RDD[K],
      sampleSizePerPartition: Int): (Long, Array[(Int, Long, Array[K])]) = {
    val shift = rdd.id
    // val classTagK = classTag[K] // to avoid serializing the entire partitioner object
    val sketched = rdd.mapPartitionsWithIndex { (idx, iter) =>
      val seed = byteswap32(idx ^ (shift << 16))
      val (sample, n) = SamplingUtils.reservoirSampleAndCount(
        iter, sampleSizePerPartition, seed)
      //包装成三元组,(索引号,分区的内容个数,抽样的内容)
      Iterator((idx, n, sample))
    }.collect()
    val numItems = sketched.map(_._2).sum
    //返回(数据条数,(索引号,分区的内容个数,抽样的内容))
    (numItems, sketched)
  }
真正的抽样算法在SamplingUtils中,由于在Spark中是需要一次性取多个值的,因此直接去前n个数值,然后依次概率替换即可:
def reservoirSampleAndCount[T: ClassTag](
      input: Iterator[T],
      k: Int,
      seed: Long = Random.nextLong())
    : (Array[T], Long) = {
    //创建临时数组
    val reservoir = new Array[T](k)
    // Put the first k elements in the reservoir.
    // 取出前k个数,并把对应的rdd中的数据放入对应的序号的数组中
    var i = 0
    while (i < k && input.hasNext) {
      val item = input.next()
      reservoir(i) = item
      i += 1
    }

    // If we have consumed all the elements, return them. Otherwise do the replacement.
    // 如果全部的元素,比要抽取的采样数少,那么直接返回
    if (i < k) {
      // If input size < k, trim the array to return only an array of input size.
      val trimReservoir = new Array[T](i)
      System.arraycopy(reservoir, 0, trimReservoir, 0, i)
      (trimReservoir, i)

    // 否则开始抽样替换
    } else {
      // If input size > k, continue the sampling process.
      // 从刚才的序号开始,继续遍历
      var l = i.toLong
      // 随机数
      val rand = new XORShiftRandom(seed)
      while (input.hasNext) {
        val item = input.next()
        // 随机一个数与当前的l相乘,如果小于采样数k,就替换。(越到后面,替换的概率越小...)
        val replacementIndex = (rand.nextDouble() * l).toLong
        if (replacementIndex < k) {
          reservoir(replacementIndex.toInt) = item
        }
        l += 1
      }
      (reservoir, l)
    }
  }
确定边界
最后就可以通过获取的样本数据,确定边界了。
def determineBounds[K : Ordering : ClassTag](
      candidates: ArrayBuffer[(K, Float)],
      partitions: Int): Array[K] = {
    val ordering = implicitly[Ordering[K]]
    // 数据格式为(key,权重)
    val ordered = candidates.sortBy(_._1)
    val numCandidates = ordered.size
    val sumWeights = ordered.map(_._2.toDouble).sum
    val step = sumWeights / partitions
    var cumWeight = 0.0
    var target = step
    val bounds = ArrayBuffer.empty[K]
    var i = 0
    var j = 0
    var previousBound = Option.empty[K]
    while ((i < numCandidates) && (j < partitions - 1)) {
      val (key, weight) = ordered(i)
      cumWeight += weight
      if (cumWeight >= target) {
        // Skip duplicate values.
        if (previousBound.isEmpty || ordering.gt(key, previousBound.get)) {
          bounds += key
          target += step
          j += 1
          previousBound = Some(key)
        }
      }
      i += 1
    }
    bounds.toArray
  }
直接看代码,还是有些晦涩难懂,我们举个例子,一步一步解释下:
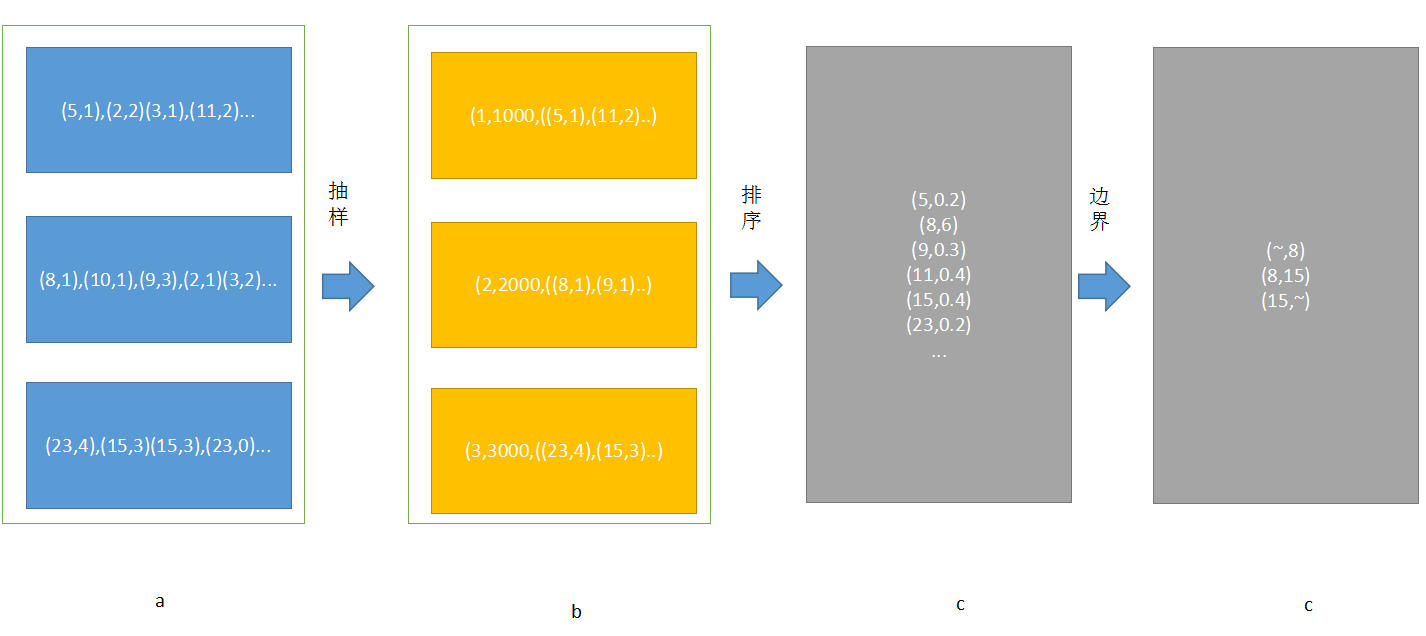
按照上面的算法流程,大致可以理解:
抽样-->确定边界(排序)
首先对spark有一定了解的都应该知道,在spark中每个RDD可以理解为一组分区,这些分区对应了内存块block,他们才是数据最终的载体。那么一个RDD由不同的分区组成,这样在处理一些map,filter等算子的时候,就可以直接以分区为单位并行计算了。直到遇到shuffle的时候才需要和其他的RDD配合。
在上面的图中,如果我们不特殊设置的话,一个RDD由3个分区组成,那么在对它进行groupbykey的时候,就会按照3进行分区。
按照上面的算法流程,如果分区数为3,那么采样的大小为:
val sampleSize = math.min(20.0 * partitions, 1e6)
即采样数为60,每个分区取60个数。但是考虑到数据倾斜的情况,有的分区可能数据很多,因此在实际的采样时,会按照3倍大小采样:
val sampleSizePerPartition = math.ceil(3.0 * sampleSize / rdd.partitions.size).toInt
也就是说,最多会取60个样本数据。
然后就是遍历每个分区,取对应的样本数。
val sketched = rdd.mapPartitionsWithIndex { (idx, iter) =>
      val seed = byteswap32(idx ^ (shift << 16))
      val (sample, n) = SamplingUtils.reservoirSampleAndCount(
        iter, sampleSizePerPartition, seed)
      //包装成三元组,(索引号,分区的内容个数,抽样的内容)
      Iterator((idx, n, sample))
    }.collect()
然后检查,是否有分区的样本数过多,如果多于平均值,则继续采样,这时直接用sample 就可以了
sketched.foreach { case (idx, n, sample) =>
          if (fraction * n > sampleSizePerPartition) {
            imbalancedPartitions += idx
          } else {
            // The weight is 1 over the sampling probability.
            val weight = (n.toDouble / sample.size).toFloat
            for (key <- sample) {
              candidates += ((key, weight))
            }
          }
        }
        if (imbalancedPartitions.nonEmpty) {
          // Re-sample imbalanced partitions with the desired sampling probability.
          val imbalanced = new PartitionPruningRDD(rdd.map(_._1), imbalancedPartitions.contains)
          val seed = byteswap32(-rdd.id - 1)
          //基于RDD获取采样数据
          val reSampled = imbalanced.sample(withReplacement = false, fraction, seed).collect()
          val weight = (1.0 / fraction).toFloat
          candidates ++= reSampled.map(x => (x, weight))
        }
取出样本后,就到了确定边界的时候了。
注意每个key都会有一个权重,这个权重是 【分区的数据总数/样本数】
RangePartitioner.determineBounds(candidates, partitions)
首先排序val ordered = candidates.sortBy(_._1),然后确定一个权重的步长
val sumWeights = ordered.map(_._2.toDouble).sum
val step = sumWeights / partitions
基于该步长,确定边界,最后就形成了几个范围数据。
然后分区器形成二叉树,遍历该数确定每个key对应的分区id
partition = binarySearch(rangeBounds, k)
实践 —— 自定义分区器
自定义分区器,也是很简单的,只需要实现对应的两个方法就行:
public class MyPartioner extends Partitioner {
    @Override
    public int numPartitions() {
        return 1000;
    }

    @Override
    public int getPartition(Object key) {
        String k = (String) key;
        int code = k.hashCode() % 1000;
        System.out.println(k+":"+code);
        return  code < 0?code+1000:code;
    }

    @Override
    public boolean equals(Object obj) {
        if(obj instanceof MyPartioner){
            if(this.numPartitions()==((MyPartioner) obj).numPartitions()){
                return true;
            }
            return false;
        }
        return super.equals(obj);
    }
}
使用的时候,可以直接new一个对象即可。
pairRdd.groupbykey(new MyPartitioner())
这样自定义分区器就完成了。