一、模块
1、什么是模块
    最常常见的场景,一个模块就是包含了一组功能的python文件,例如module.py,模块名是module
    可以使用import module,四个通用类别:
  1 使用python编写的.py文件

  2 已被编译为共享库或DLL的C或C++扩展

  3 把一系列模块组织到一起的文件夹(注:文件夹下有一个__init__.py文件,该文件夹称之为包)

  4 使用C编写并链接到python解释器的内置模块
2、为什么要用模块
    1、从文件级别组织程序,更方便管理
    2、拿来主义,提升开发效率
#!/usr/bin/env python3
# -*- coding:utf-8 -*-
money = 10000
def read1():
    print("spam  money",money,id(money))

def read2():
    print("read2")
    read1()

def change():
    global  money
    money = 0


# if __name__ == "spam":
#     money = 0

if __name__ == "__main__":
    print(money)
    read1()
    read2()
4、如何使用模块-》from 模块名 import 名字
    优点:引用时不用加前缀,简单
    缺点:容易与当前名称空间的名字冲突

    from spam import money as m

    from spam import money,read1,read2,change

    注:在执行change是更改的money依然是spam中的money
from spam import change,read1
money = 1
read1()
change()
read1()
print(money)

# spam  money 10000 4330626768
# spam  money 0 4297636864
# 1
from spam import * #*包含除了下划线开头以外所有的名字(若模块文件中指定了__all__ = ["moey","read1"]列表中存字符串格式的名字,则只能导入__all__里的内容)
5、一个python文件的两种用途
    1、当做脚本执行:__name__ == '__main__'(__name__为python的内置变量,当文件已脚本运行是__name__ 等于 __main__ 当文件以模块导入时__name__等于文件名(模块名))
    2、当做模块被导入使用:__name__ == '模块名'
#所以当文件需要被直接使用是(当做脚本执行)可以添加一下代码来实现
if __name__ == '__main__':
            pass
6、模块的搜索路径
    内存---->>>>> 内置模块---->>>>> sys.path
import  sys
print(sys.path)
#['/Users/lvxingguo/PycharmProjects/oldboy/day5/代码/01_模块', '/Users/lvxingguo/PycharmProjects/oldboy', '/Library/Frameworks/Python.framework/Versions/3.6/lib/python36.zip', '/Library/Frameworks/Python.framework/Versions/3.6/lib/python3.6', '/Library/Frameworks/Python.framework/Versions/3.6/lib/python3.6/lib-dynload', '/Library/Frameworks/Python.framework/Versions/3.6/lib/python3.6/site-packages']
#其中的zip包可以看做是文件夹
print(sys)
#<module 'sys' (built-in)>类似这种的就是内置模块
sys.modules ####内存中已经加载到的模块
二、包
1、什么是包
    包就是一个包含了__init__.py文件的文件夹(可以往该文件夹下放一堆子模块)
# package1 的目录结构
# package1
#     __init__.py
#     m1.py (f1 func  test func)
#     package2
#         __init__.py
#         m2.py (f2 func)
###########
#package1 的__init__.py 文件
# from package1.m1 import f1
# from package1.package2.m2 import f2
#package2 的__init__.py 文件
#from package1.package2 import m2

import package1 #导入包是运行包目录下的__init__.py文件 并且导入时所有的查找路径都已执行文件为准 若要访问package1里的模块就得在__init__.py 里能找的,即得在__init__.py里导入。(也可以通过from package1 import m1来导入但是这样使用者得知道目录结构)
print(package1)
#<module 'package1' from '/Users/lvxingguo/PycharmProjects/oldboy/day5/代码/02_包/测试二(绝对导入)/package1/__init__.py'> 是一个__init__.py文件
package1.f1()
#from f1 func
package1.f2()
#f2
package1.m1.f1()
#from f1 func
#在package1 的__init__.py 文件中使用from package1.m1 import f1 这种方式导入时m1也会执行并包m1加载进入package1的名称空间中所有可以调到m1中的函数
#此为package1 名称空间中的变量名['__builtins__', '__cached__', '__doc__', '__file__', '__loader__', '__name__', '__package__', '__path__', '__spec__', 'f1', 'm1']
package1.m1.test()
#i am test

#相对路径导入
#package1 的__init__.py 文件 (相对路径路径是性对于当前文件的路径及该__init__.py)
# from .m1 import f1
# from .package2.m2 import f2
#from ..m1 import f1
#注意这种语法只使用于导入模块是,即__init__.py 为导入执行, 当文件为执行文件是这种语法不适用

#python2 和 python3 的区别 在python2中若package1是一个包那么它的目录下必须要有一个__init__.py文件,否则在导入时报 ImportError: No module named package1 错误(无论是import package1 或 from package1 import m1)
#而此时print时
import package1
from package1 import m1
print package1
#<module 'package1' from '/Users/lvxingguo/PycharmProjects/untitled/package1/__init__.py'>
print m1
#<module 'package1.m1' from '/Users/lvxingguo/PycharmProjects/untitled/package1/m1.pyc'>

#而在python3中则不用添加__init__.py文件但是在没有__init__.py时:
import package1
print(package1)
#<module 'package1' (namespace)> 此时的package1只是指向一个名称空间
from package1 import m1
print(m1)
#<module 'package1.m1' from '/Users/lvxingguo/PycharmProjects/oldboy/day5  (模块和包的导入和部分常用模块)/代码/02_包/测试二(绝对导入)/package1/m1.py'>
print(dir())
#['__annotations__', '__builtins__', '__cached__', '__doc__', '__file__', '__loader__', '__name__', '__package__', '__spec__', 'm1', 'package1']

#python3若有__init__.py则和python2一样
2、包的使用
    注意:但凡是在导入时,出现.,这是导入包才有的语法,.的左边必须是一个包,使用的时候没有这种限制

3、软件开发规范
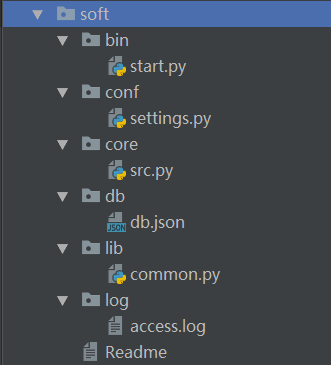
#os模块的使用
os.path.dirname(os.path.dirname(os.path.abspath(__file__)))
os.path.dirname() #获取当前文件的父目录
os.path.abspath(__file__) #获取当前文件的绝对路径
os.path.join(BASE_DIR,'log','access.log') #跨平台拼接路径会从最后一个是绝对路径的参数开始向后匹配,而忽略前面的参数
三、日志模块logging
#介绍
import logging
logging.basicConfig(
    # filename='access.log', #知道日志的输出路径
    format='%(asctime)s - %(name)s - %(levelname)s -%(module)s:  %(message)s', #知道日志的格式
    datefmt='%Y-%m-%d %H:%M:%S %p', #知道日志时间的格式
    level=10  #知道日志级别
    #日志的字符编码默认为操作系统的字符编码
)
#
logging.debug('debug') # 10
logging.info('info') # 20
logging.warning('warn') #30
logging.error('error') #40
logging.critical('critial') #50
#默认的日志级别是30 debug

#日志模块的详细用法:
import logging
#1、Logger:产生日志
logger1=logging.getLogger('访问日志')
# logger2=logging.getLogger('错吴日志')
#2、Filter:几乎不用

#3、Handler:接收Logger传过来的日志,进行日志格式化,可以打印到终端,也可以打印到文件
sh=logging.StreamHandler() #打印到终端
fh1=logging.FileHandler('s1.log',encoding='utf-8')
fh2=logging.FileHandler('s2.log',encoding='utf-8')

#4、Formatter:日志格式
formatter1=logging.Formatter(
    fmt='%(asctime)s - %(name)s - %(levelname)s -%(module)s:  %(message)s', #日志信息的格式
    datefmt='%Y-%m-%d %H:%M:%S %p', #日期格式
)
formatter2=logging.Formatter(
    fmt='%(asctime)s : %(message)s',
    datefmt='%Y-%m-%d %H:%M:%S %p',
)
formatter3=logging.Formatter(
    fmt='%(asctime)s : %(module)s : %(message)s',
    datefmt='%Y-%m-%d %H:%M:%S %p',
)

#5、为handler绑定日志格式
sh.setFormatter(formatter1)
fh1.setFormatter(formatter2)
fh2.setFormatter(formatter3)

#6、为logger绑定handler
logger1.addHandler(sh)
logger1.addHandler(fh1)
logger1.addHandler(fh2)

#7、设置日志级别:logger对象的日志级别应该<=handler的日志界别
# logger1.setLevel(50)
logger1.setLevel(10) #
sh.setLevel(10)
fh1.setLevel(10)
fh2.setLevel(10)

#8、测试
logger1.debug('测试着玩')
logger1.info('运行还算正常')
logger1.warning('可能要有bug了')
logger1.error('不好了,真tm出bug了')
logger1.critical('完犊子,推倒重写')
日志的继承
import logging
#1、Logger:产生日志
logger1=logging.getLogger('root')
logger2=logging.getLogger('root.child1')
logger3=logging.getLogger('root.child1.child2') #加点添加继承关系

#2、Filter:几乎不用

#3、Handler:接收Logger传过来的日志,进行日志格式化,可以打印到终端,也可以打印到文件
sh=logging.StreamHandler() #打印到终端

#4、Formatter:日志格式
formatter1=logging.Formatter(
    fmt='%(asctime)s - %(name)s - %(levelname)s -%(module)s:  %(message)s',
    datefmt='%Y-%m-%d %H:%M:%S %p',
)

#5、为handler绑定日志格式
sh.setFormatter(formatter1)


#6、为logger绑定handler
logger1.addHandler(sh)
logger2.addHandler(sh)
logger3.addHandler(sh)


#7、设置日志级别:logger对象的日志级别应该<=handler的日志界别
# logger1.setLevel(50)
logger1.setLevel(10) #
logger2.setLevel(10) #
logger3.setLevel(10) #
sh.setLevel(10)


#8、测试
logger1.debug('爷爷')
logger2.debug('爸爸')
logger3.debug('孙子')

# 2018-01-11 23:06:45 PM - root - DEBUG -日志的继承:  爷爷
# 2018-01-11 23:06:45 PM - root.child1 - DEBUG -日志的继承:  爸爸
# 2018-01-11 23:06:45 PM - root.child1 - DEBUG -日志的继承:  爸爸
# 2018-01-11 23:06:45 PM - root.child1.child2 - DEBUG -日志的继承:  孙子
# 2018-01-11 23:06:45 PM - root.child1.child2 - DEBUG -日志的继承:  孙子
# 2018-01-11 23:06:45 PM - root.child1.child2 - DEBUG -日志的继承:  孙子
日志模块在项目中的应用
import os
import logging.config

BASE_DIR=os.path.dirname(os.path.dirname(os.path.abspath(__file__)))
LOG_PATH=os.path.join(BASE_DIR,'log','access.log')
COLLECT_PATH=os.path.join(BASE_DIR,'log','collect.log')
DB_PATH=os.path.join(BASE_DIR,'db','user')


# 定义三种日志输出格式 开始
standard_format = '[%(asctime)s][%(threadName)s:%(thread)d][task_id:%(name)s][%(filename)s:%(lineno)d]'
                  '[%(levelname)s][%(message)s]'

simple_format = '[%(levelname)s][%(asctime)s][%(filename)s:%(lineno)d]%(message)s'

id_simple_format = '[%(levelname)s][%(asctime)s] %(message)s'

# log配置字典
LOGGING_DIC = {
    'version': 1,
    'disable_existing_loggers': False,
    'formatters': {
        'standard': {
            'format': standard_format   #日志格式
        },
        'simple': {
            'format': simple_format
        },
        'id_simple' : {
            'format' : id_simple_format
        },
    },
    'filters': {},
    'handlers': {
        #打印到终端的日志
        'console': {
            'level': 'DEBUG',
            'class': 'logging.StreamHandler',  # 打印到屏幕
            'formatter': 'simple'
        },
        #打印到文件的日志,收集info及以上的日志
        'default': {
            'level': 'DEBUG',
            'class': 'logging.handlers.RotatingFileHandler',  # 保存到文件
            'formatter': 'standard',
            'filename': LOG_PATH,  # 日志文件
            'maxBytes': 1024*1024*5,  # 日志大小 5M   单位:字节 Byte
            'backupCount': 5,
            'encoding': 'utf-8',  # 日志文件的编码,再也不用担心中文log乱码了
        },
        'collect': {
            'level': 'DEBUG',
            'class': 'logging.handlers.RotatingFileHandler',  # 保存到文件
            'formatter': 'simple',
            'filename': COLLECT_PATH,  # 日志文件
            'maxBytes': 1024*1024*5,  # 日志大小 5M
            'backupCount': 5,
            'encoding': 'utf-8',  # 日志文件的编码,再也不用担心中文log乱码了
        },
    },
    'loggers': {
        '': {
            'handlers': ['default', 'console','collect'],  # 这里把上面定义的两个handler都加上,即log数据既写入文件又打印到屏幕
            'level': 'DEBUG',
            'propagate': False,  # 向上(更高level的logger)传递
        },
        'error':{ #次名字为 logger = logging.getLogger(名字) 用这个名字来匹配用哪一个logger 若找不到则默认是空('') 的配置日志名就为输入的
            'handlers': ['default', 'console','collect'],  # 这里把上面定义的两个handler都加上,即log数据既写入文件又打印到屏幕
            'level': 'DEBUG',
            'propagate': False,  # 向上(更高level的logger)传递
        },

    },
}

def logger_handle(log_name):
    logging.config.dictConfig(settings.LOGGING_DIC)  # 导入上面定义的logging配置
    logger = logging.getLogger(log_name)  # 生成一个log实例
    return logger
正则模块
1、常用匹配模式(元字符)
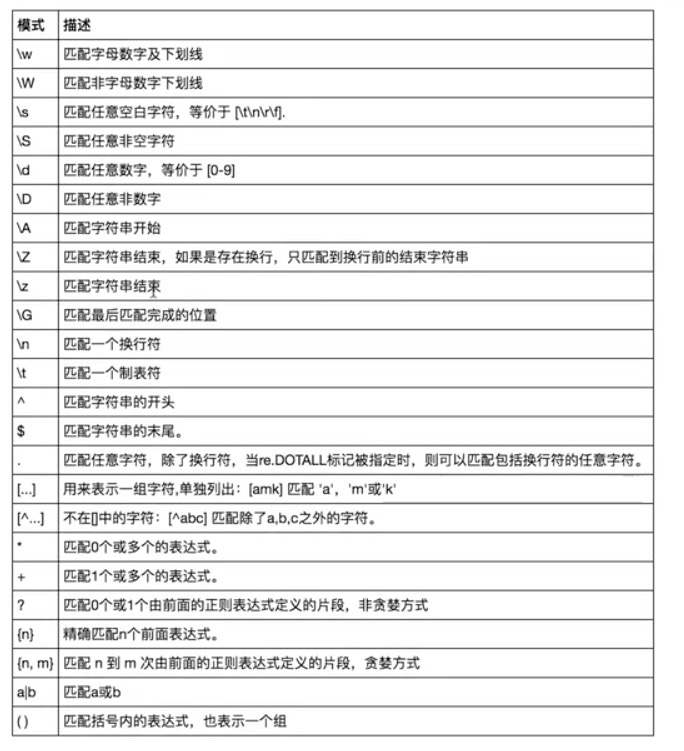
import re

print(re.findall('w','egon 123 + _ - *'))
#['e', 'g', 'o', 'n', '1', '2', '3', '_']

print(re.findall('W','egon 123 + _ - *'))
#[' ', ' ', '+', ' ', ' ', '-', ' ', '*']

print(re.findall('s','ego	n 12
3 + _ - *')) #匹配空格
#['	', ' ', '
', ' ', ' ', ' ', ' ']

print(re.findall('S','ego	n 12
3 + _ - *')) #匹配非空格
#['e', 'g', 'o', 'n', '1', '2', '3', '+', '_', '-', '*']

print(re.findall('d','ego	n 12
3 + _ - *')) #匹配数字
#['1', '2', '3']

print(re.findall('D','ego	n 12
3 + _ - *')) #匹配非数字
#['e', 'g', 'o', '	', 'n', ' ', '
', ' ', '+', ' ', '_', ' ', '-', ' ', '*']

print(re.findall('
','ego	n 12
3 + _ - *')) #配置换行符
#['
']

print(re.findall('	','ego	n 12
3 + _ - *')) #配置tab
#['	']

print(re.findall('e','ego	n 12
3 +hello _ - *'))
#['e', 'e']

print(re.findall('^e','ego	n 12
3 +hello _ - *')) #已什么开头
#['e']

print(re.findall('o$','ego	n 12
3 +hello')) #已什么结尾
#['o']

print("*"*100)
#重复:.|?|*|+|{m,n}|.*|.*?
#.代表任意一个字符  除了

print(re.findall('a.b','a1b a b a-b aaaaaab'))
#['a1b', 'a b', 'a-b', 'aab']

print(re.findall('a.b','a1b a b a
b a-b aaaaaab',re.DOTALL))  #加参数可以实现让 . 来配

#['a1b', 'a b', 'a
b', 'a-b', 'aab']

#?:代表?号左边的字符出现0次或者1
print(re.findall('ab?','a ab abb abbbb a1b')) #['a','ab','ab','ab','a']
#'a', 'ab', 'ab', 'ab', 'a']

#*:代表*号左边的字符出现0次或者无穷次
print(re.findall('ab*','a ab abb abbbb a1b')) #['a','ab','abb','abbbb','a']
#['a', 'ab', 'abb', 'abbbb', 'a']

#+:代表+号左边的字符出现1次或者无穷次
print(re.findall('ab+','a ab abb abbbb a1b')) #['ab','abb','abbbb']
#['ab', 'abb', 'abbbb']

# {m,n}:代表左边的字符出现m次到n次
print(re.findall('ab{0,1}','a ab abb abbbb a1b')) #['ab','abb','abbbb']
#['a', 'ab', 'ab', 'ab', 'a']
print(re.findall('ab?','a ab abb abbbb a1b')) #['ab','abb','abbbb']
#['a', 'ab', 'ab', 'ab', 'a']


print(re.findall('ab{0,}','a ab abb abbbb a1b')) #['ab','abb','abbbb']
#['a', 'ab', 'abb', 'abbbb', 'a']
print(re.findall('ab*','a ab abb abbbb a1b')) #['ab','abb','abbbb']
#['a', 'ab', 'abb', 'abbbb', 'a']

print(re.findall('ab{1,}','a ab abb abbbb a1b')) #['ab','abb','abbbb']
#['ab', 'abb', 'abbbb']
print(re.findall('ab+','a ab abb abbbb a1b')) #['ab','abb','abbbb']
#['ab', 'abb', 'abbbb']

print(re.findall('ab{2,4}','a ab abb abbbb a1b')) #['abb', 'abbbb']
#['abb', 'abbbb']

#.*:贪婪匹配
print(re.findall('a.*b','xxxy123a123b456b'))
#'a123b456b']

#.*?:非贪婪匹配
print(re.findall('a.*?b','xxxy123a123b456b'))
#['a12b']

#|:或者
print(re.findall('compan(y|iess)','too many companiess have gone bankrupt, and the next one is my company')) #在()中时只显示()中匹配到的字符 ()还有分组的意思
#['iess', 'y']

print(re.findall('compan(?:y|iess)','too many companiess have gone bankrupt, and the next one is my company')) #在()中加 ?: 来显示全部的字符
#['companiess', 'company']

print(re.findall('href="(.*?)"','<a href="http://www.baidu.com">点击我</a>'))
#['http://www.baidu.com']

#rawstring:
print(re.findall(r'a\c','ac a1c aBc')) #a\c->ac  #因为正则在python处理完后要交给c处理所以要处理两次,r的意思是把正在表达式直接交个处理c处理
#['a\c']

#[]:取中括号内任意的一个
print(re.findall('a[a-z]b','axb azb aAb a1b a-b a+b'))
#['axb', 'azb']

print(re.findall('a[A-Z]b','axb azb aAb a1b a-b a+b'))
#['aAb']

print(re.findall('a[a-zA-Z]b','axb azb aAb a1b a-b a+b'))
#['axb', 'azb', 'aAb']

print(re.findall('a[0-9]b','axb azb aAb a1b a-b a+b'))
#['a1b']

print(re.findall('a[-+*/]b','axb azb aAb a1b a-b a+b'))  #在[]中 - 有特殊含义所以应该把 - 写到两边
#['a-b', 'a+b']

print(re.findall('a[^-+*/]b','axb azb aAb a1b a-b a+b')) #[^] 中括号中的 ^ 是取反的意思
#['axb', 'azb', 'aAb', 'a1b'


#re模块的其他方法
#re.search :只匹配成功一次就返回
print(re.search('a[*]b','axb azb aAb a1b a-b a+b')) #若没有匹配到返回None
#None
print(re.search('a[0-9]b','axb azb aAb a1b a-b a2b a+b').group()) #若匹配到则用 group()返回匹配到的字符,并且只匹配成功一次就返回
#a1b

# re.match:从开头取
print(re.match('a[0-9]b','axb azb aAb a1b a-b a2b a+b'))
#None
print(re.match('a[0-9]b','a1b axb azb aAb a1b a-b a2b a+b').group())   #re.match 和 re.search加^ 匹配的结果相同 并且也是只匹配成功一次就返回
#a1b
print(re.search('^a[0-9]b','a1b axb azb aAb a1b a-b a2b a+b').group())
#a1b

# re.split
print(re.split(':','root:x:0:0::/root:/bin/bash',maxsplit=1))  #按正则匹配到的字符作为分隔符进行分割
#['root', 'x:0:0::/root:/bin/bash']

# 'root:x:0:0::/root:/bin/bash'.split(':')

# re.sub
print(re.sub('root','admin','root:x:0:0::/root:/bin/bash',1))  #替换
#admin:x:0:0::/root:/bin/bash

#了解
print(re.sub('^([a-z]+)([^a-z]+)(.*?)([^a-z]+)([a-z]+)$',r'52341','root:x:0:0::/root:/bin/bash')) #相当于sed
 代表第几个() 中的字符
#bash:x:0:0::/root:/bin/root

# re.compile
obj=re.compile('ad{2}b')  #写一个可以重复使用的正则
print(obj.findall('a12b a123b a12345b abbb'))
#['a12b']
print(obj.search('a12b a123b a12345b abbb').group())
#a12b
时间模块
import time
#掌握
print(time.time()) #时间戳格式
#1515770176.4042299

print(time.localtime()) #结构化的时间  本时区的时间
#time.struct_time(tm_year=2018, tm_mon=1, tm_mday=12, tm_hour=23, tm_min=16, tm_sec=36, tm_wday=4, tm_yday=12, tm_isdst=0)

print(time.localtime().tm_mday)
#12
print(time.gmtime()) #标准时区的时间
#time.struct_time(tm_year=2018, tm_mon=1, tm_mday=12, tm_hour=15, tm_min=17, tm_sec=37, tm_wday=4, tm_yday=12, tm_isdst=0)

print(time.strftime('%Y-%m-%d %H:%M:%S')) #格式化的字符串
#2018-01-12 23:19:22
print(time.strftime('%Y-%m-%d %X'))
#2018-01-12 23:19:22

#了解
print(time.localtime(11111111)) #时间戳转换结构化时间
#time.struct_time(tm_year=1970, tm_mon=5, tm_mday=9, tm_hour=22, tm_min=25, tm_sec=11, tm_wday=5, tm_yday=129, tm_isdst=0)

print(time.localtime(time.time()))
#time.struct_time(tm_year=2018, tm_mon=1, tm_mday=12, tm_hour=23, tm_min=20, tm_sec=58, tm_wday=4, tm_yday=12, tm_isdst=0)

print(time.gmtime(time.time()))
#time.struct_time(tm_year=2018, tm_mon=1, tm_mday=12, tm_hour=15, tm_min=20, tm_sec=58, tm_wday=4, tm_yday=12, tm_isdst=0)


print(time.mktime(time.localtime())) #结构化时间转换成时间戳
#1515770524.0

print(time.strftime('%Y-%m-%d',time.localtime())) #结构化时间转换成格式化时间
#2018-01-12

print(time.strptime('2017-03-01','%Y-%m-%d')) #格式化时间转换成结构化时间
#time.struct_time(tm_year=2017, tm_mon=3, tm_mday=1, tm_hour=0, tm_min=0, tm_sec=0, tm_wday=2, tm_yday=60, tm_isdst=-1)

print(time.asctime(time.localtime()))
#Fri Jan 12 23:23:45 2018

print(time.ctime(111111))
#Fri Jan  2 14:51:51 1970


#datetime
import datetime
print(datetime.datetime.now())
#2018-01-12 23:26:26.290365
print(datetime.datetime.fromtimestamp(111111111)) #时间戳转换成格式化时间
#1973-07-10 08:11:51

print(datetime.datetime.now()+datetime.timedelta(days=3)) #三天后的时间
#2018-01-15 23:27:27.742059

print(datetime.datetime.now()+datetime.timedelta(days=-3))#三天前的时间
#2018-01-09 23:28:12.736248

print(datetime.datetime.now()+datetime.timedelta(hours=3)) #三个小时后的时间
#2018-01-13 02:29:20.394383
print(datetime.datetime.now()+datetime.timedelta(minutes=3))#三分钟后的时间
#2018-01-12 23:32:20.394392
print(datetime.datetime.now()+datetime.timedelta(seconds=3)) #三秒后的时间
#2018-01-12 23:29:23.394400

print(datetime.datetime.now().replace(year=1999,hour=12)) #用指定的年、月等来替换现在的时间
#1999-01-12 12:30:23.543672