一、面向对象基础补充
# school='xxxxx'
class Student:
    school='Oldboy'

    def __init__(self,name,age,sex):
        if type(name) is not str:
            raise TypeError('名字必须是str')   #raise 主动排除异常
        self.name=name
        self.age=age
        self.sex=sex
        # return None #不允许   __init__ 方法只能return None 不能return别的类型因为在实例化对象的时候会自动return一个空对象所以不能再有返回值了
        #stu1.name='egon'
        #stu1.age=18
        #stu1.sex='sex'

    def learn(self):
        print('%s is learning' %self.name)
面向对象的三大特性
一、继承
1、继承与派生
'''
1 什么是继承
    是一种新建类的方式,新建的类称为子类,子类会遗传父类的属性,可以减少代码冗余
    在python中,子类(派生类)可以继承一个或者多个父类(基类,超类)

'''
class Parent1:
    pass

class Parent2(object):
    pass

class Sub1(Parent1):
    pass

class Sub2(Parent1,Parent2):
    pass


print(Sub1.__bases__)   #查看Sub1继承的父类
#(<class '__main__.Parent1'>,)
print(Sub2.__bases__)
#(<class '__main__.Parent1'>, <class '__main__.Parent2'>)
print(Parent1.__bases__)
#(<class 'object'>,)
print(Parent2.__bases__)
#(<class 'object'>,)


#在Python2中类分为两种:
#1、经典类:指的就是没有继承object类的类,以及该类的子类
#2、新式类:指的就是继承object类的类,以及该类的子类

#在Python3中统一都为新式类

class OldboyPeople:
    school = 'Oldboy'

    def __init__(self, name, age, sex):
        self.name = name
        self.age = age
        self.sex = sex

    def tell_info(self):
        print('<名字:%s 年龄:%s 性别:%s>' %(self.name,self.age,self.sex))

class OldboyStudent(OldboyPeople):
    def learn(self):
        print('%s is learning' %self.name)

    def tell_info(self):
        print('我是学生:',end='')
        print('<名字:%s 年龄:%s 性别:%s>' % (self.name, self.age, self.sex))

class OldboyTeacher(OldboyPeople):
    def teach(self):
        print('%s is teaching' %self.name)

    def tell_info(self):
        print('我是老师:',end='')
        print('<名字:%s 年龄:%s 性别:%s>' % (self.name, self.age, self.sex))

stu1=OldboyStudent('牛榴弹',18,'male')
teacher1=OldboyTeacher('egon',18,'male')

print(stu1.__dict__)
#{'name': '牛榴弹', 'age': 18, 'sex': 'male'}
print(stu1.school)
#Oldboy
#print(stu1.x)

stu1.tell_info()
#我是学生:<名字:牛榴弹 年龄:18 性别:male>
teacher1.tell_info()
#我是老师:<名字:egon 年龄:18 性别:male>

#属性查找
#对象----》类 ------》父类
class Foo:
    def f1(self):
        print('Foo.f1')

    def f2(self): #self=obj
        print('Foo.f2')
        self.f1() #obj.f1()   属性查找 对象----》类 ------》父类 所以输出会调用 Bar的f1

class Bar(Foo):
    def f1(self):
        print('Bar.f1')

obj=Bar()
print(obj.__dict__)
#{}
obj.f2()
# Foo.f2
# Bar.f1
2、子类重用父类的方法
class OldboyPeople:
    school = 'Oldboy'

    def __init__(self, name, age, sex):
        self.name = name
        self.age = age
        self.sex = sex

    def tell_info(self):
        print('<名字:%s 年龄:%s 性别:%s>' %(self.name,self.age,self.sex))

class OldboyStudent(OldboyPeople):
    def __init__(self,name,age,sex,course,stu_id):
        # self.name=name
        # self.age=age
        # self.sex=sex
        OldboyPeople.__init__(self,name,age,sex) #重用父类的功能
        self.course=course
        self.stu_id=stu_id

    def learn(self):
        print('%s is learning' %self.name)

    def tell_info(self):
        print('我是学生:',end='')
        # self.tell_info() #stu1.tell_info()
        OldboyPeople.tell_info(self)

stu1=OldboyStudent('牛榴弹',18,'male','Python',1)
stu1.tell_info()
#我是学生:<名字:牛榴弹 年龄:18 性别:male>
3、组合
class OldboyPeople:
    school = 'Oldboy'

    def __init__(self, name, age, sex,date_obj):
        self.name = name
        self.age = age
        self.sex = sex
        self.birth = date_obj

    def tell_info(self):
        print('<名字:%s 年龄:%s 性别:%s>' % (self.name, self.age, self.sex))

class OldboyStudent(OldboyPeople):
    def __init__(self, name, age, sex, stu_id,date_obj):
        OldboyPeople.__init__(self, name, age, sex,date_obj)
        self.courses=[]
        self.stu_id = stu_id


    def learn(self):
        print('%s is learning' % self.name)

    def tell_info(self):
        print('我是学生:', end='')
        # self.tell_info() #stu1.tell_info()
        OldboyPeople.tell_info(self)

class OldboyTeacher(OldboyPeople):
    def __init__(self, name, age, sex, level, salary,date_obj):
        OldboyPeople.__init__(self, name, age, sex,date_obj)
        self.level = level
        self.salary = salary
        self.courses=[]

    def teach(self):
        print('%s is teaching' % self.name)

    def tell_info(self):
        print('我是老师:', end='')
        OldboyPeople.tell_info(self)

class OldboySale(OldboyPeople):
    def __init__(self,name,age,sex,kpi,date_obj):
        OldboyPeople.__init__(self,name,age,sex,date_obj)
        self.kpi=kpi

    def tell_info(self):
        print('我是销售: ',end='')
        OldboyPeople.tell_info(self)

class Date:
    def __init__(self,year,mon,day):
        self.year = year
        self.mon = mon
        self.day = day

    def tell_birth(self):
        print('出生日期是:<%s-%s-%s>' % (self.year, self.mon, self.day))

class Course:
    def __init__(self,name,price,period):
        self.name=name
        self.price=price
        self.period=period

    def tell_info(self):
        print('课程详细信息:<%s,%s,%s>' %(self.name,self.price,self.period))

Python=Course('python自动化养猪',3000,'3mon')
Linux=Course('大数据分析-linux',3000,'3mon')
date_obj=Date(1993,3,13)

teacher1=OldboyTeacher('egon',18,'male',100,3000,date_obj)
teacher1.courses.append(Python)
teacher1.courses.append(Linux)

# print(teacher1.courses)
for course in teacher1.courses:
    course.tell_info()

# 课程详细信息:<python自动化养猪,3000,3mon>
# 课程详细信息:<大数据分析-linux,3000,3mon>

stu1=OldboyStudent('xxxx',28,'female',1,date_obj)
print(stu1.courses)
#[]

stu1.courses.append(Python)
stu1.courses.append(Linux)

for course in stu1.courses:
    course.tell_info()

# 课程详细信息:<python自动化养猪,3000,3mon>
# 课程详细信息:<大数据分析-linux,3000,3mon>
4、抽象类
import abc

class File(metaclass=abc.ABCMeta):
    @abc.abstractmethod   #此装饰器的作用是继承它的子类必须要有它装饰的方法   (作用是为了规范和方便调用的方法,减少使用成本,若子类没有此方法在实例话是报错   TypeError: Can't instantiate abstract class Process with abstract methods read)
    def read(self):
        pass

    @abc.abstractmethod
    def write(self):
        pass

class Disk(File):
    def read(self):
        print('disk read')

    def write(self):
        print('disk write')


class Process(File):
    def read(self):
        print('Process read')

    def write(self):
        print('Process write')

d=Disk()
p=Process()

d.read()
d.write()

p.read()
p.write()
5、继承的实现原理
1 继承顺序
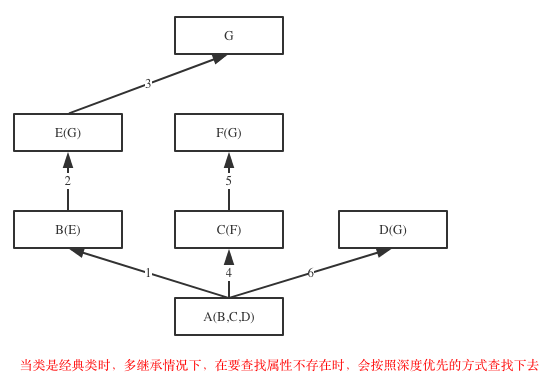
在Java和C#中子类只能继承一个父类,而Python中子类可以同时继承多个父类,如A(B,C,D)
如果继承关系为非菱形结构,则会按照先找B这一条分支,然后再找C这一条分支,最后找D这一条分支的顺序直到找到我们想要的属性
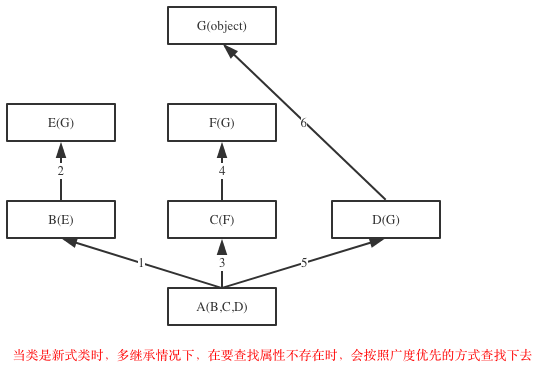
如果继承关系为菱形结构,那么属性的查找方式有两种,分别是:深度优先和广度优先
2 继承原理(python如何实现的继承)
python到底是如何实现继承的,对于你定义的每一个类,python会计算出一个方法解析顺序(MRO)列表,这个MRO列表就是一个简单的所有基类的线性顺序列表,例如
class A(object):
    # def test(self):
    #     print('from A')
    pass

class B(A):
    # def test(self):
    #     print('from B')
    pass

class C(A):
    # def test(self):
    #     print('from C')
    pass
class D(B):
    # def test(self):
    #     print('from D')
    pass

class E(C):
    # def test(self):
    #     print('from E')
    pass

class K:
    # def test(self):
    #     print('from k')
    pass
class F(D,K,E):
    def test(self):
        print('from F')
    pass

f1=F()
print(F.mro())
#[<class '__main__.F'>, <class '__main__.D'>, <class '__main__.B'>, <class '__main__.K'>, <class '__main__.E'>, <class '__main__.C'>, <class '__main__.A'>, <class 'object'>]

f1.test()
#from F
为了实现继承,python会在MRO列表上从左到右开始查找基类,直到找到第一个匹配这个属性的类为止。
而这个MRO列表的构造是通过一个C3线性化算法来实现的。我们不去深究这个算法的数学原理,它实际上就是合并所有父类的MRO列表并遵循如下三条准则:
1.子类会先于父类被检查
2.多个父类会根据它们在列表中的顺序被检查
3.如果对下一个类存在两个合法的选择,选择第一个父类
6、子类重用父类方法2
1、super初试
class OldboyPeople:
    school = 'Oldboy'

    def __init__(self, name, age, sex):
        self.name = name
        self.age = age
        self.sex = sex

    def tell_info(self):
        print('<名字:%s 年龄:%s 性别:%s>' %(self.name,self.age,self.sex))

class OldboyStudent(OldboyPeople):
    def __init__(self,name,age,sex,course):
        # OldboyPeople.__init__(self,name,age,sex)
        super().__init__(name,age,sex)   #super()引用父类方法  依赖继承
        #super(OldboyStudent,self).__init__(name,age,sex) #python2 的写法 super中第一个参数是本类的名称,第二个参数是对象self
        self.course=course

    def tell_info(self):
        print('我是学生: ',end='')
        # OldboyPeople.tell_info(self)
        super(OldboyStudent,self).tell_info()


stu1=OldboyStudent('egon',18,'male','python')

# print(stu1.name,stu1.age,stu1.sex,stu1.course)
stu1.tell_info()
2、super
class Foo:
    def f2(self):
        print('====?>')

    def f1(self):
        print('Foo.f1')
        super().f2()   #super会按照 Sub.mro()(对象的mro方法) 所个出的列表按照顺序从当前类继续往下找 所以他会调用 super().f2() (super(Foo,self).f2()) Bar 的 f2()
                        #Sub.mro()   [<class '__main__.Sub'>, <class '__main__.Foo'>, <class '__main__.Bar'>, <class 'object'>]  所以super() 受对象继承关系的影响
        self.f2()       #而self会按照  Sub.mro() 给出的顺序查找,所以会先找到 Foo 的f2()
class Bar:
    def f2(self):
        print('Bar f2')

class Sub(Foo,Bar):
    pass

s=Sub()
print(Sub.mro())
#[<class '__main__.Sub'>, <class '__main__.Foo'>, <class '__main__.Bar'>, <class 'object'>]
s.f1()
# Foo.f1
# Bar f2
# ====?>
7、多态与多态性
# #1 多态:同一种事物的多种形态
import abc

class Animal(metaclass=abc.ABCMeta):
    @abc.abstractmethod
    def speak(self):
        pass

class Pig(Animal):
    def speak(self):
        print('哼哼')

class Dog(Animal):
    def speak(self):
        print('汪汪')

class People(Animal):
    def speak(self):
        print('say hello')


people1=People()
dog1=Dog()
pig1=Pig()

#多态性:指的是在不考虑对象具体类型的情况下,直接使用对象(对象的方法)
people1.speak()
dog1.speak()
pig1.speak()

def talk(obj):
    obj.speak()

talk(people1) #people1.speak()
talk(dog1)
talk(pig1)


#list,str,tuple
l=list([1,2,3])
s=str('hello')
t=tuple((1,'a',4,'b','c'))

l.__len__()
s.__len__()
t.__len__()

# def len(obj):
#     return obj.__len__()
print(len(l))
print(len(s))
print(len(t))


#python没有强制要求必须来继承父类切是实现父类的方法来表现多态,而是在定义类的是有这些类有相同的方法就可以看成是它的多态性,例如list,str,tuple 都有__len__()
import abc

class Pig:
    def speak(self):
        print('哼哼')

class Dog:
    def speak(self):
        print('汪汪')

class People:
    def speak(self):
        print('say hello')

class Radio:
    def speak(self):
        print('radio speak')


people1=People()
dog1=Dog()
pig1=Pig()


import abc

class Disk:
    def read(self):
        print('disk read')

    def write(self):
        print('disk write')


class Process:
    def read(self):
        print('Process read')

    def write(self):
        print('Process write')
8、封装
1、封装之如何隐藏
#封装:
#以__开头的是隐藏属性或方法
#1、__开头的属性只是一种语法意义上的变形,并不会真的限制外部的访问
#2、这种变形只在类定义阶段发送一次,类定义之后再新增的__开头的属性不会变形
#3、这种隐藏只对外不对内,因为类内部定义的属性在类定义阶段统一发生变形
class Foo:
    __N=1 #_Foo__N=1
    def __init__(self,x,y):
        self.x=x
        self.__y=y #self._Foo__y=y

    def __f1(self): #_Foo__f1
        print('f1')

    def f2(self):
        print(self.__N,self.__y) #print(self._Foo__N,self._Foo__y)

#print(Foo.__N)
#AttributeError: type object 'Foo' has no attribute '__N'
#print(Foo.__f1)
#AttributeError: type object 'Foo' has no attribute '__f1'
print(Foo.__dict__)
#{'__module__': '__main__', '_Foo__N': 1, '__init__': <function Foo.__init__ at 0x102247510>, '_Foo__f1': <function Foo.__f1 at 0x102247620>, 'f2': <function Foo.f2 at 0x1022476a8>, '__dict__': <attribute '__dict__' of 'Foo' objects>, '__weakref__': <attribute '__weakref__' of 'Foo' objects>, '__doc__': None}
#隐藏属性会类在定义的时候就给改名  为以_Foo 即_类名 开头的属性
print(Foo._Foo__N)
#1
print(Foo._Foo__f1)
#<function Foo.__f1 at 0x102247620>

obj=Foo(1,2)
print(obj.__dict__)
#{'x': 1, '_Foo__y': 2}
print(obj._Foo__y)
#2

Foo.__M=2
print(Foo.__dict__)
#{'__module__': '__main__', '_Foo__N': 1, '__init__': <function Foo.__init__ at 0x102247620>, '_Foo__f1': <function Foo.__f1 at 0x1022476a8>, 'f2': <function Foo.f2 at 0x102247730>, '__dict__': <attribute '__dict__' of 'Foo' objects>, '__weakref__': <attribute '__weakref__' of 'Foo' objects>, '__doc__': None, '__M': 2}
print(Foo.__M)
#2
#类定义之后再新增的__开头的属性不会变形

obj=Foo(1,2)
print(obj.__dict__)
#{'x': 1, '_Foo__y': 2}
obj.__z=3
print(obj.__dict__)
#{'x': 1, '_Foo__y': 2, '__z': 3}
print(obj.__z)
#3


obj=Foo(1,2)
obj.f2()
#1 2
#这种隐藏只对外不对内,因为类内部定义的属性在类定义阶段统一发生变形

#print(obj.__N)


class Foo:
    def __f1(self): #_Foo__f1
        print('Foo.f1')

    def f2(self):
        print('Foo.f2')
        self.__f1() #b._Foo__f1()  #此处使用隐藏属性就避免了因为继承而覆盖的问题 就实现了在对象调用方法是只会调到该类的

class Bar(Foo):
    def __f1(self): #_Bar__f1
        print('Bar.f1')


b=Bar()
b.f2()
#Foo.f2
#Foo.f1
2、封装的真正意义
#封装数据属性的目的:外部无法直接访问数据属性,类内部开放接口,然后可以在接口内严格控制对属性的增删改查操作

#封装数据属性
class People:
    def __init__(self,name,age):
        # self.__name=name
        # self.__age=age
        self.set_info(name,age)

    def tell_info(self):
        print("姓名:<%s> 年龄:<%s>" %(self.__name,self.__age))

    def set_info(self,name,age):
        if type(name) is not str:
            raise TypeError('name must be str')
        if type(age) is not int:
            raise TypeError('age must be int')

        self.__name=name
        self.__age=age

p=People('egon',18)

# print(p.__name,p.__age)
# p.tell_info()

# p.set_info('EGON',20)
#p.set_info(3537,20)
#TypeError: name must be str
p.tell_info()
#姓名:<egon> 年龄:<18>

#封装方法的目的是:隔离复杂度
#封装函数属性
class ATM:
    def __card(self):
        print('插卡')
    def __auth(self):
        print('用户认证')
    def __input(self):
        print('输入取款金额')
    def __print_bill(self):
        print('打印账单')
    def __take_money(self):
        print('取款')

    def withdraw(self):
        self.__card()
        self.__auth()
        self.__input()
        self.__print_bill()
        self.__take_money()
9、property
class People:
    def __init__(self,name,age,height,weight):
        self.name=name
        self.age=age
        self.height=height
        self.weight=weight

    @property  #把一个函数属性装饰的像数据属性一样的访问
    def bmi(self):
        return self.weight / (self.height ** 2)

egon=People('egon',18,1.80,75)
egon.height=1.82
# print(egon.bmi())

print(egon.bmi)
#22.6421929718633


class People:
    def __init__(self,name,):
        self.__name=name

    @property
    def name(self):
        return self.__name

    @name.setter   #和propery一起使用 修改被propery装饰的方法 通过赋值的方式传递参数(此方法可以通过赋值来传递参数,来做一些操作 但是name必须是倍property装饰过得)
    def name(self,obj):
        if type(obj) is not str:
            raise TypeError('name must be str')
        self.__name=obj

    @name.deleter #propery一起使用 删除被propery装饰的方法
    def name(self):
        del self.__name
        #raise PermissionError('不让删')

egon=People('egon')

print(egon.name)
#egon
egon.name='EGON'
print(egon.name)
#EGON
#egon.name=35357
#TypeError: name must be str

print(egon.name)

del egon.name

#print(egon.name)
#AttributeError: 'People' object has no attribute '_People__name'
10、绑定方法与非绑定方法(classmethod 和 staticmethod)
import settings
import hashlib
import time

class MySQL:
    def __init__(self,host,port):
        self.host=host
        self.port=port

    def func(self):
        print('%s 说:你好啊我的天' %self.name)

    @classmethod
    def from_conf(cls): #此时函数会自动传类
        print(cls)
        return cls(settings.HOST,settings.PORT)

    @staticmethod
    def create_id(n): #此时不是绑定的方法,所以不会自动传值(默认在类里定义的还是都是绑定给对象的会自动传把对象本身传递给函数的第一个参数,所以在类定义的函数都一个定义至少一个参数,当用staticmethod 装饰函数时,此时函数就不是一个绑定的方法了不会默认传值)
        m=hashlib.md5()
        m.update(str(time.clock()+n).encode('utf-8'))
        return m.hexdigest()

# conn=MySQL('127.0.0.1',3306)

#绑定方法:绑定给谁就应该由谁来调用,谁来调用就会把谁当做第一个参数自动传入

conn=MySQL.from_conf()
print(conn)
#<__main__.MySQL object at 0x101a54160>
# print(conn.host,conn.port)
cooon = conn.from_conf() #此时方法调用也是会传方法属于的类
#<class '__main__.MySQL'>

print(cooon)
#<__main__.MySQL object at 0x101a54198>
print(cooon.host)
#10.10.10.9


print(MySQL.create_id)
#<function MySQL.create_id at 0x102a47950>    是一个函数
print(conn.create_id)
#<function MySQL.create_id at 0x102a47950>    是一个函数

print(MySQL.create_id(1))
#c8a2a7559205f03438213f149c4b137f
print(conn.create_id(2))
#237164986b2cf17cd18f32bf987c63c7
11、内置函数补充
l=list([])

print(type(l) is list)
#True
print(isinstance(l,list))  #判断类型  判断l 是不是list的实例
#True
class Foo:
    pass

class Bar(Foo):
    pass

print(issubclass(Bar,Foo))  #判断Bar 是不是 Foo 的子类
#True


class Foo:
    def __init__(self,name):
        self.name=name

    def f1(self):
        print('===>f1')

obj=Foo('egon')
# obj.name #obj.__dict__['name']


# hasattr  #通过hasattr把字符串类型来映射到属性(都是真的对象的)  判断该属性是否存在
print(hasattr(obj,'name')) #obj.name
#True
print(hasattr(obj,'f1'))#obj.f1
#True

# getattr  #通过字符串得到属性
if hasattr(obj,'f1'):
    f=getattr(obj,'f1') #f=obj.f1
    f()
#===>f1
print(getattr(obj,'xxx',None))  #第三个参数为当属性不存是的返回值
#None

# setattr  #修改和添加属性的值
obj.x=1
setattr(obj,'x',1)
setattr(obj,'b',1)
print(obj.__dict__)
#{'name': 'egon', 'x': 1, 'b': 1}

# delattr
#del obj.name
delattr(obj,'name')
#delattr(obj,"xxx")
#没有该属性时报错  AttributeError: xxx
print(obj.__dict__)
#{'x': 1, 'b': 1}


class FtpClient:
    def __init__(self,host,port):
        self.host=host
        self.port=port
        self.conn='xxx'

    def interactie(self):
        while True:
            cmd=input('>>: ').strip()
            if not cmd:continue
            cmd_l=cmd.split()
            print(cmd_l)
            if hasattr(self,cmd_l[0]):
                func=getattr(self,cmd_l[0])
                func(cmd_l)

    def get(self,cmd_l):
        print('geting...',cmd_l)

    def put(self,cmd_l):
        print('putting....',cmd_l)

client=FtpClient('1.1.1.1',23)
client.interactie()
# >>: get test.txt
# ['get', 'test.txt']
# geting... ['get', 'test.txt']
# >>:
12、类的内置方法
#__str__   当用print打印对象时 对象调用 __str__ 方法 print(obj) =  print(obj__str__())
l=list([1,2,3,4])
print(l)

class People:
    def __init__(self,name,age):
        self.name=name
        self.age=age

    def __str__(self):
        return '<name:%s age:%s>' %(self.name,self.age)

egon=People('egon',18)
print(egon) #print(egon.__str__())
#<name:egon age:18>


#__del__  #此方法的作用为: 当对象没有被引用python解释器回收对象时会先自动调用 __del__() 再回收对象
# f=open('a.txt','w',encoding='utf-8')
# f.read()
# f.close()


class Foo:
    def __del__(self):
        print('del---->')

obj=Foo()
del obj
# del---->
print('主')
# 主


obj = Foo()
print('主')
# 主
# del---->


class Mysql:
    def __init__(self,host,port):
        self.host=host
        self.port=port
        self.conn=Connect(host,port)

    def __del__(self):
        self.conn.close()

# m=Mysql('1.1.1.1',3306)
# m.conn.execute('select * from db.user;')