转载: https://www.cnblogs.com/laoqing
首先来看一下一个爬虫平台的设计,作为一个爬虫平台,需要支撑多种不同的爬虫方式,所以一般爬虫平台需要包括
1、 爬虫规则的维护,平台在接收到爬虫请求时,需要能按照匹配一定的规则去进行自动爬虫
2、 爬虫的job调度器,平台需要能负责爬虫任务的调度,比如定时调度,轮询调度等。
3、 爬虫可以包括异步的海量爬虫,也可以包括实时爬虫,异步爬虫指的是爬虫的数据不会实时返回,可能一个爬虫任务会执行很久。 实时爬虫指爬的数据要实时返回,这个就要求时间很短,一般适合少量数据的爬虫。
4、 爬虫好的数据可以生成指定的文件,比如csv文件,json文件等,然后通过数据处理引擎做统一处理,比如csv文件可以通过数据交换落入大数据平台,或者爬虫好的数据也可以丢入kafka中,然后再通过流式处理任务(spark或者storm,flink)做爬虫数据的清洗和处理,处理完的数据,可以入到数据库中。
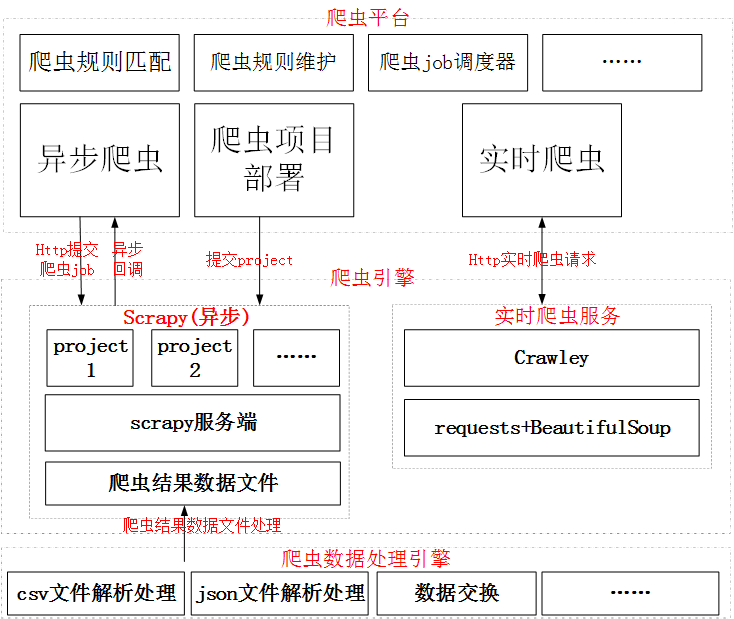
下图就是在平台设计时,爬虫处理的一个流程,这个里面包含了实时爬虫,异步爬虫。
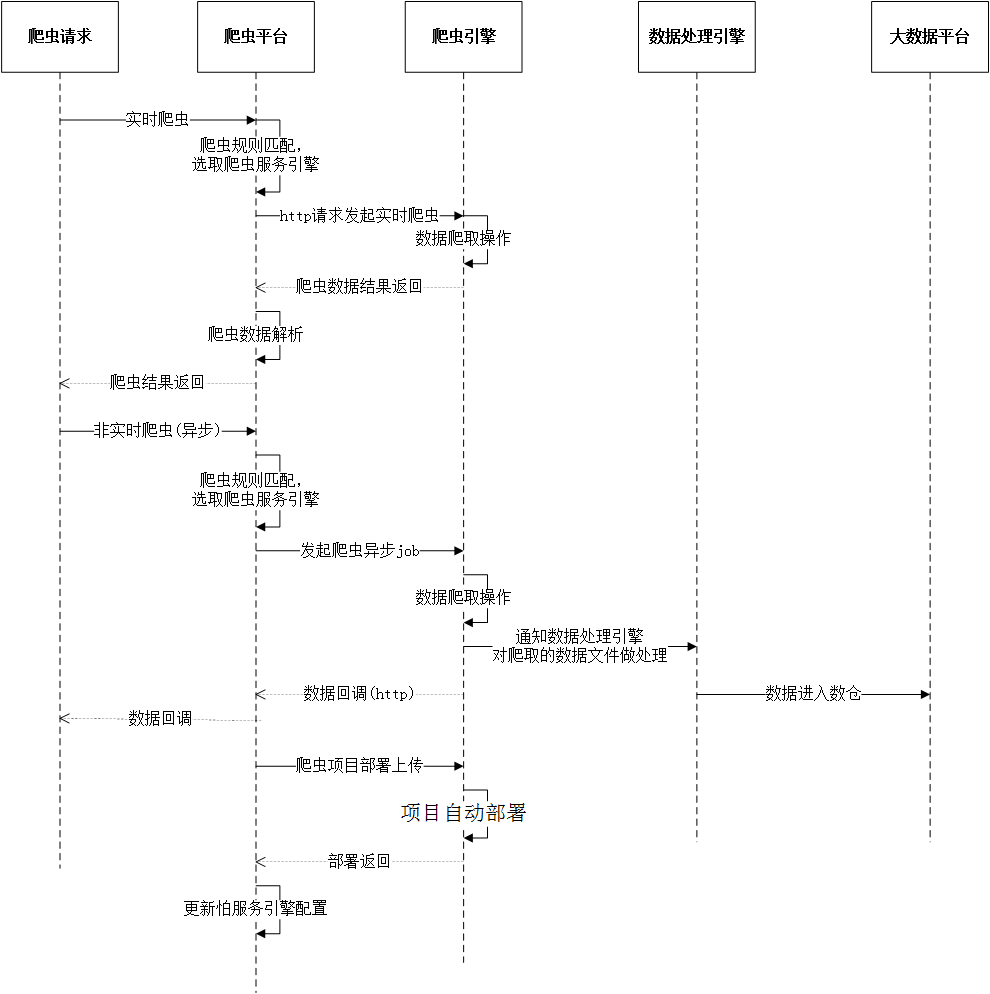
根据上图的处理流程,我们可以把架构图进一步演进下

时序图如下:
我们这里先介绍异步爬虫,爬虫的框架很多,异步爬虫一般用的比较多就是scrapy。
首先安装scrapy
|
1
|
pip install scrapy |
安装完成后,就可以通过命令行创建一个基于scrapy的爬虫项目,我们以爬取应用宝中理财类APP的名称为示例

创建爬虫项目的命令行命令:
|
1
|
scrapy startproject zj_scrapy |
然后在命令行中,进入到创建的zj_scrapy目录下
cd zj_scrapy
执行
|
1
|
scrapy genspider sjqq “sj.qq.com” |
创建一个爬虫
爬虫创建好了后,可以使用IDE打开创建好的python项目,比如用idea(需要安装python插件,默认没有安装)打开我们创建好的项目
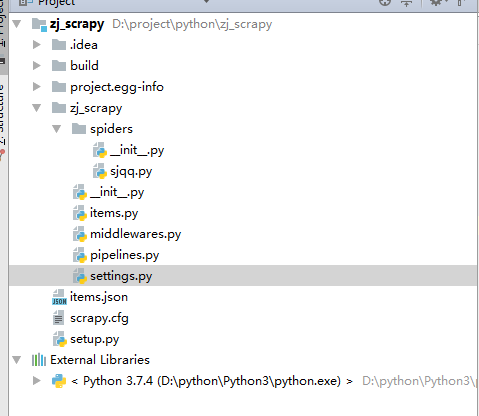
项目创建好了后,会默认生成一些模板代码文件
1、 items.py
items用于存储字段的定义。即爬取的内容存与item类中,在这里我们定义了一个name字段。
|
1
2
3
4
5
6
7
8
9
10
11
12
13
14
15
|
# -*- coding: utf-8 -*-# Define here the models for your scraped items## See documentation in:# https://doc.scrapy.org/en/latest/topics/items.htmlimport scrapyclass ZjScrapyItem(scrapy.Item): # define the fields for your item here like: # name = scrapy.Field() name = scrapy.Field() pass |
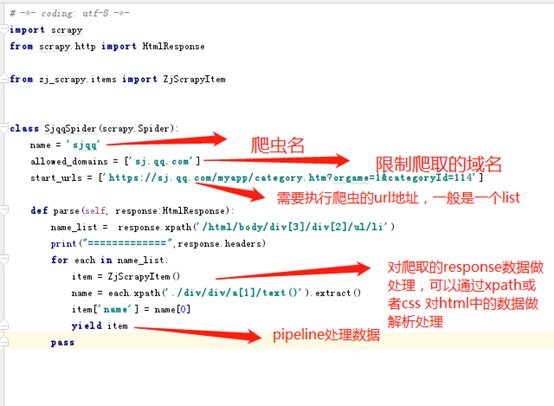
2、 spider文件编写
这个文件一般在spiders 这个package下面,默认会继承scrapy.Spider
|
1
2
3
4
5
6
7
8
9
10
11
12
13
14
15
16
17
18
19
20
21
|
# -*- coding: utf-8 -*-import scrapyfrom scrapy.http import HtmlResponsefrom zj_scrapy.items import ZjScrapyItemclass SjqqSpider(scrapy.Spider): name = 'sjqq' allowed_domains = ['sj.qq.com'] start_urls = ['https://sj.qq.com/myapp/category.htm?orgame=1&categoryId=114'] def parse(self, response:HtmlResponse): name_list = response.xpath('/html/body/div[3]/div[2]/ul/li') print("=============",response.headers) for each in name_list: item = ZjScrapyItem() name = each.xpath('./div/div/a[1]/text()').extract() item['name'] = name[0] yield item pass |
关于这段代码的解释如下:
3、 pipeline文件编写
pipeline文件一般用于对处理好的爬虫结果数据做处理,可以入到数据库中,也可以生成到指定的文件中,process_item 方法就是对数据做处理的。
另外pipeline 还包含了__init__和close_spider 两个方法。__init__ 用于做初始化处理。 close_spider 用于执行结束时的操作处理。比如数据写入数据库或者文件后,对数据库做链接关闭或者文件流做关闭操作等。
|
1
2
3
4
5
6
7
8
9
10
11
12
13
|
# -*- coding: utf-8 -*-# Define your item pipelines here## Don't forget to add your pipeline to the ITEM_PIPELINES setting# See: https://doc.scrapy.org/en/latest/topics/item-pipeline.htmlclass ZjScrapyPipeline(object): def process_item(self, item, spider): print("+++++++++++++++++++",item['name']) print("-------------------",spider.cc) return item |
4、 setting文件修改
setting文件中存放的是爬虫的配置,常用的配置一般可以包括
1)、ITEM_PIPELINES的配置,比如
ITEM_PIPELINES = {

    'zj_scrapy.pipelines.ZjScrapyPipeline': 300,

}
这里的300代表了一个优先级,数值范围一般在0-1000,这个数值确定了运行的顺序,数字越小,优先级越高。
2)、字符集配置,可以通过FEED_EXPORT_ENCODING指定字符集
FEED_EXPORT_ENCODING = 'utf-8'
3)、CONCURRENT_REQUESTS配置Scrapy执行的最大并发请求数
# Configure maximum concurrent requests performed by Scrapy (default: 16)

CONCURRENT_REQUESTS = 32
4)配置请求的header,可以通过DEFAULT_REQUEST_HEADERS来进行配置
DEFAULT_REQUEST_HEADERS = {

  'Accept': 'text/html,application/xhtml+xml,application/xml;q=0.9,*/*;q=0.8',

  'Accept-Language': 'en',

}
5、 本地执行爬虫
在上面的都做完后,可以通过执行命令行scrapy crawl sjqq -o items.csv 来在本地运行爬虫,sjqq 就是前面指定的爬虫名,-o items.csv 表示生成一个csv文件。
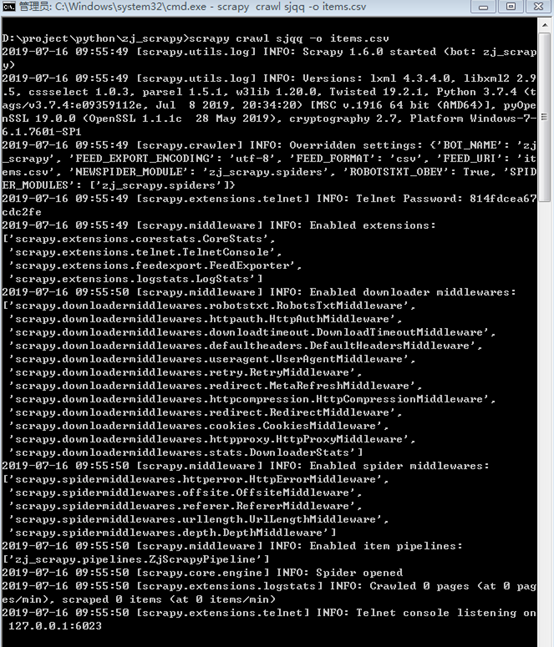
运行完成后,可以看到爬取的内容已经写到了指定的文件中。

在运行时,可以通过-a 指定自定义的参数,比如scrapy crawl sjqq -o items.csv -a cc=scrapttest
在这条执行命令中,我们指定了一个cc参数等于scrapttest,在Pipeline
中,我们可以通过代码获取这个参数
|
1
2
3
4
5
|
class ZjScrapyPipeline(object): def process_item(self, item, spider): print("+++++++++++++++++++",item['name']) print("-------------------",spider.cc) return item |
在代码中,我们通过spider.cc 就可以获取到这个参数的值,然后在运行日志可以看到,我们打印出来了这个参数值。

通过这种方式,我们就解决了爬虫运行时,参数的的动态传递问题。
6、 爬虫部署到服务端
安装scrapyd
pip install scrapyd
安装scrapyd-deploy
pip install scrapyd-client
scrapyd 是scrapy的爬虫服务端,安装完成后,执行scrapyd可以启动服务端。
启动时默认端口为6800

启动后,通过浏览器可以访问http://localhost:6800/
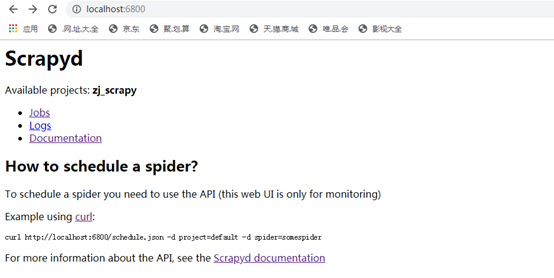
服务端启动后,就可以通过scrapyd-deploy 来提交部署开发好的爬虫了。
scrapyd-deploy <target> -p <project> --version <version>
部署成功后,就可以看到自己的爬虫项目了

7、 创建服务端的爬虫任务
如果是在linux命令下,可以通过
|
1
|
curl http://localhost:6800/schedule.json -d project= zj_scrapy -d spider=sjqq |
来提交一个爬虫任务,提交完成后,会返回提交的任务状态,这个其实就是提交了一个http请求{
"node_name": "ZJPH-0321",
"status": "ok",
"jobid": "dd7f10aca76e11e99b656c4b90156b7e"
}
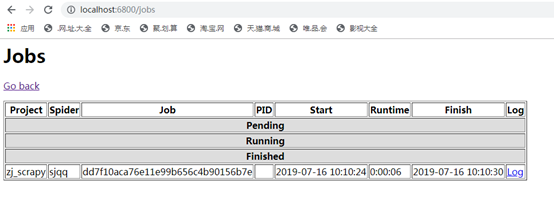
提交成功后,可以在浏览器的job下面看到任务的执行情况
如果需要携带自定义的参数,那么可以通过-d来指定,比如-d cc=scrapttest,和前面在本地执行时,增加自定义参数是一样的。
也可以通过http请求工具(比如soapui)提交一个http请求来触发一个爬虫任务

schedule.json请求中还可以包含如下参数
setting (string, optional) –自定义爬虫settings
jobid (string, optional) –jobid,之前启动过的spider,会有一个id,这个是可选参数
_version (string, optional) –版本号,之前部署的时候的version,只能使用int数据类型,没指定,默认启动最新版本
8、 scrapyd 其他的API
1)、curl http://localhost:6800/daemonstatus.json 检查爬虫服务的状态
2)、addversion.json增加项目到服务端 如果项目已经存在,则增加一个新的版本
POST请求:
project (string, required) –项目名
version (string, required) –项目版本,不填写则是当前时间戳
egg (file, required) –当前项目的egg文件
curl http://localhost:6800/addversion.json -F project=myproject -F version=r23 -F egg=@myproject.egg
3)、 cancel.json
取消一个 spdier的运行
如果 spider是运行状态,则停止其运行
如果 spider是挂起状态,则删除spider
POST请求:
project (string, required) –项目名
job (string, required) -jobid
curl http://localhost:6800/cancel.json -d project=myproject -d job=6487ec79947edab326d6db28a2d86511e8247444
4)、listprojects.json
获取当前已上传的项目的列表
GET请求:
curl http://localhost:6800/listprojects.json
5)、listversions.json
获取指定项目的可用版本
GET请求:
project (string, required) –项目名
curl http://localhost:6800/listversions.json?project=myproject
6)、listspiders.json
获取指定版本的项目中的爬虫列表,如果没有指定版本,则是最新版本
GET请求:
project (string, required) –项目名
_version (string, optional) –版本号
$ curl http://localhost:6800/listspiders.json?project=myproject
7)、 listjobs.json
获取指定项目中所有挂起、运行和运行结束的job
GET请求
project (string, option) - restrict results to project name
curl http://localhost:6800/listjobs.json?project=myproject | python -m json.tool
8)、delversion.json
删除指定项目的指定版本
POST请求
project (string, required) - the project name
version (string, required) - the project version
curl http://localhost:6800/delversion.json -d project=myproject -d version=r99
9)、delproject.json
删除指定项目,并且包括所有的版本
POST请求
project (string, required) - the project name
curl http://localhost:6800/delproject.json -d project=myproject