Netty真面目,只缘未读此真经
Netty官网:https://netty.io/
Netty is an asynchronous event-driven network application framework for rapid development of maintainable high performance protocol servers & clients.
Java技术栈方向的朋友应该或多或少都听说过Netty是对Java中nio ( Non Blocking IO )的封装,让我们能快速开发出性能更高、扩展性更好的网络应用程序。那么Netty究竟对nio做了怎样的封装呢?本文主要从源码角度揭开这层面纱。
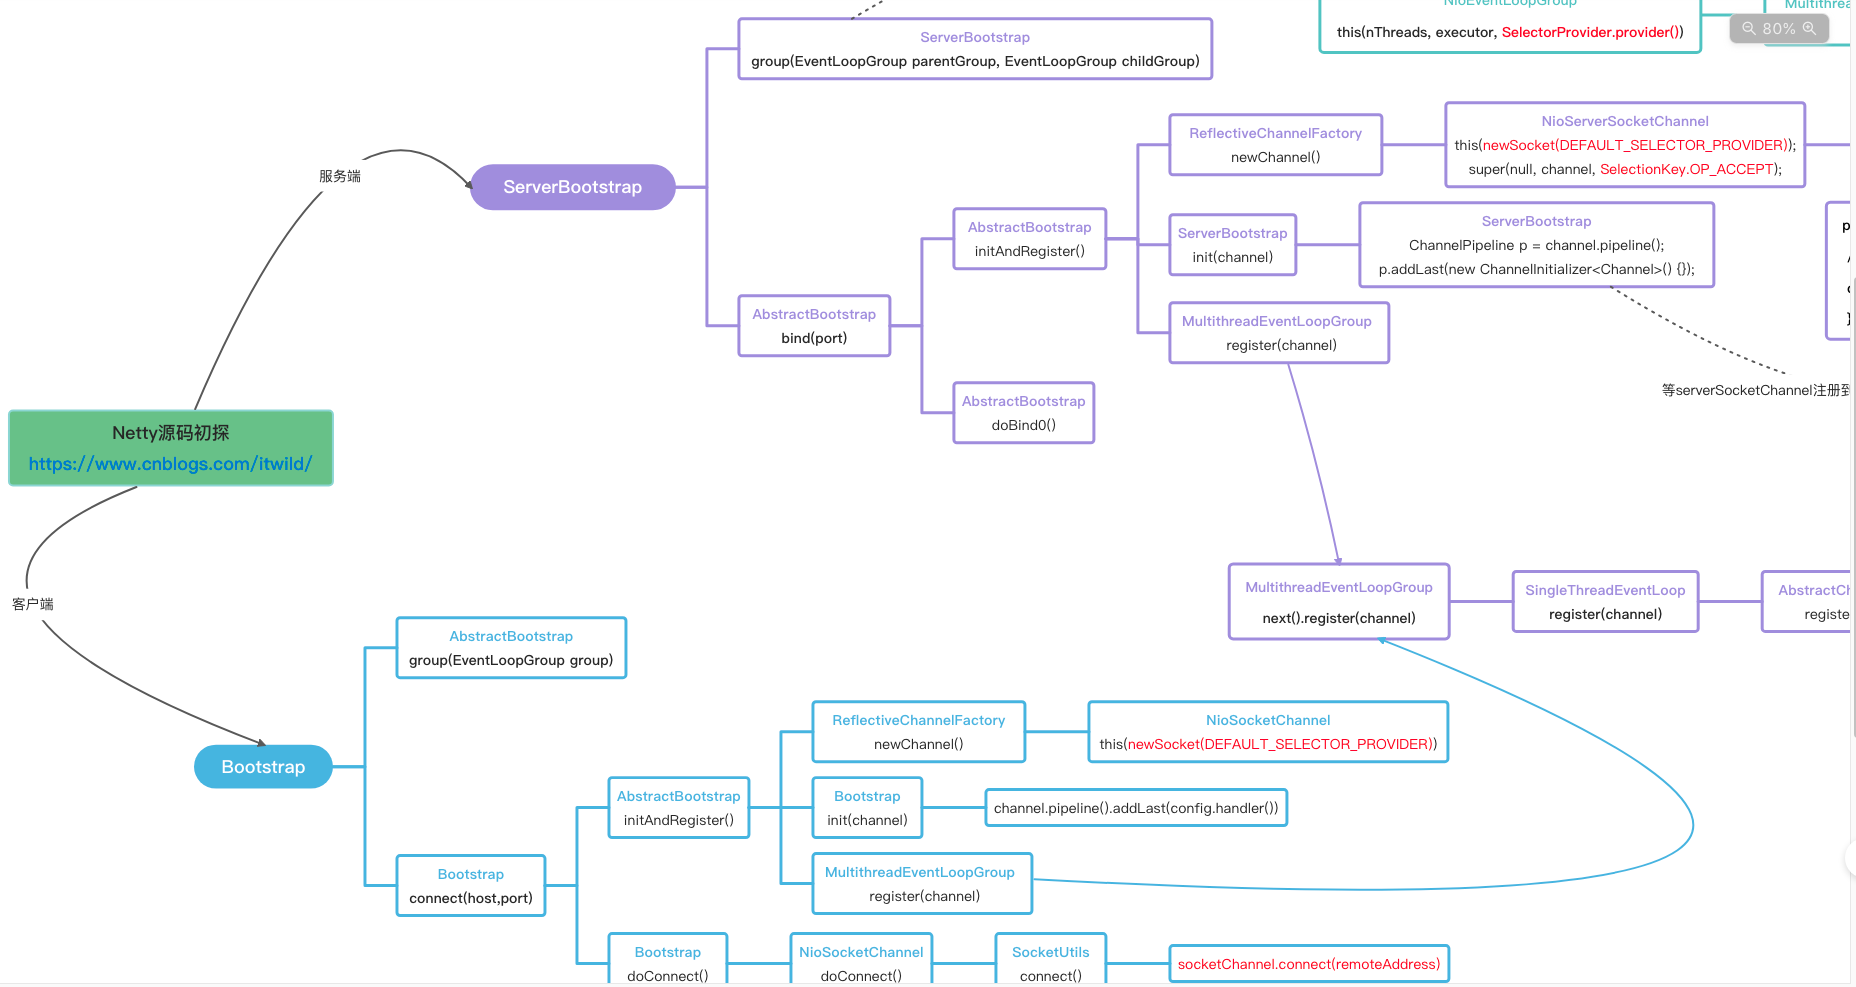
源码追踪中,我使用阿里的语雀产品的思维图记录主要方法调用,上面的图片是部分截图,完整原貌见:
https://www.yuque.com/docs/share/02fa3e3d-d485-48e1-9cfe-6722a3ad8915
预备知识#
在初探Netty源码之前,至少需要理解Reactor Pattern、java.nio基本使用、Netty基本使用,这样后面才能把Netty的源码与java.nio对比着来看。
Reactor Pattern#
不识Netty真面目,只缘未读此真经。Doug Lea (java.util.concurrent包的作者) 在《Scalable IO in Java》中循序渐进地分析了如何构建可伸缩的高性能IO服务以及服务模型的演变与进化。文中描述的Reactor Pattern,也被Netty等大多数高性能IO服务框架所借鉴。因此仔细阅读《Scalable IO in Java》有助于更好地理解Netty框架的架构与设计。详情见:
http://gee.cs.oswego.edu/dl/cpjslides/nio.pdf
传统的服务模式#
Server端为每一个Client端的连接请求都开启一个独立线程,也就是所谓的BIO (Blocking IO),即java.net.ServerSocket包下api的使用。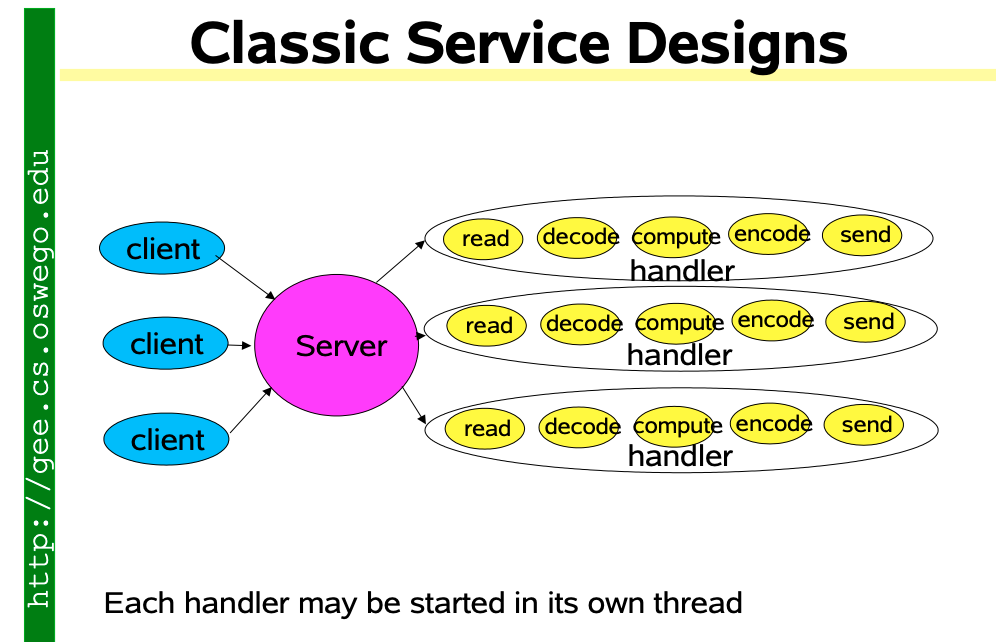
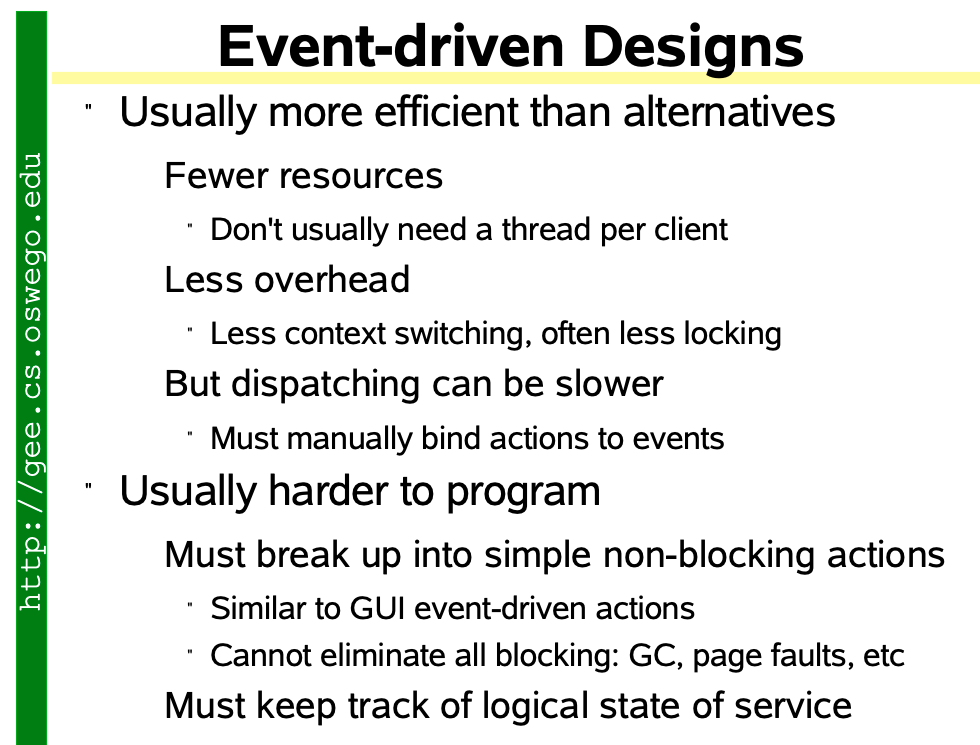
基于事件驱动模式#
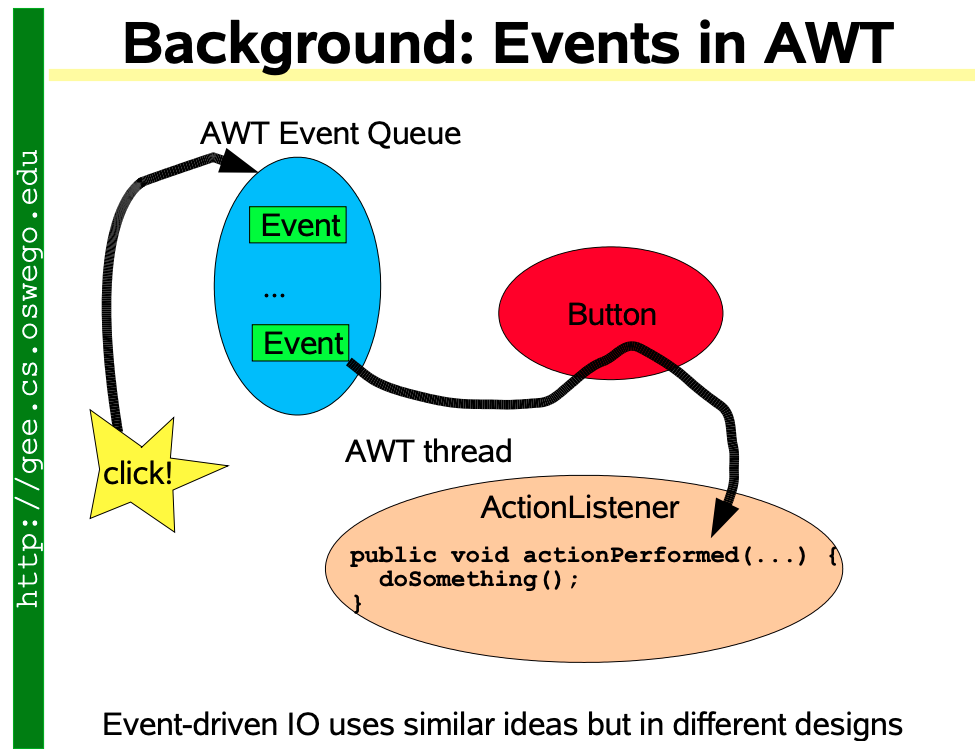
Reactor模式#
Reactor responds to IO events by dispatching the appropriate handler (Similar to AWT thread)
Handlers perform non-blocking actions (Similar to AWT ActionListeners)
Manage by binding handlers to events (Similar to AWT addActionListener)
(1) 单线程版本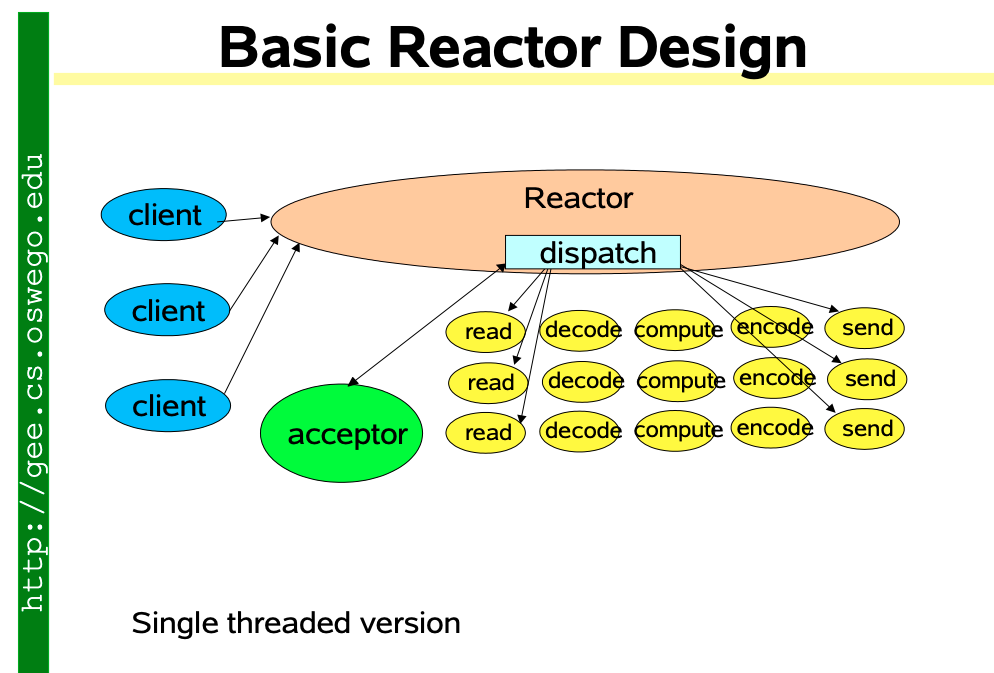
(2) 多线程版本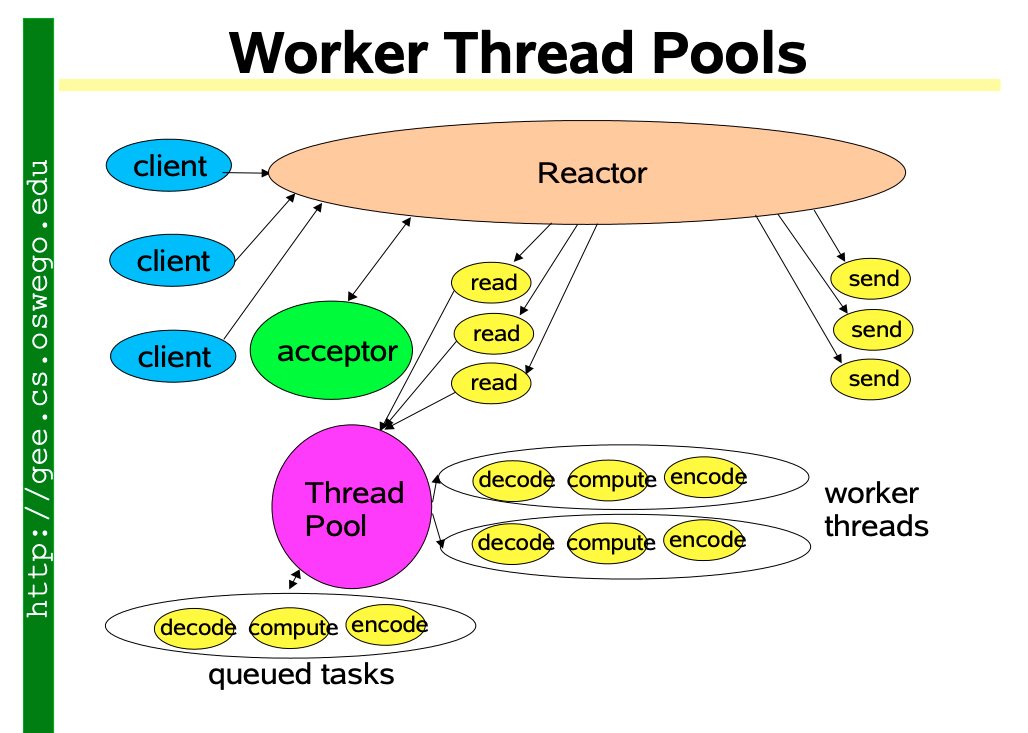
(3) 多Reactor版本 (一主多从、多主多从)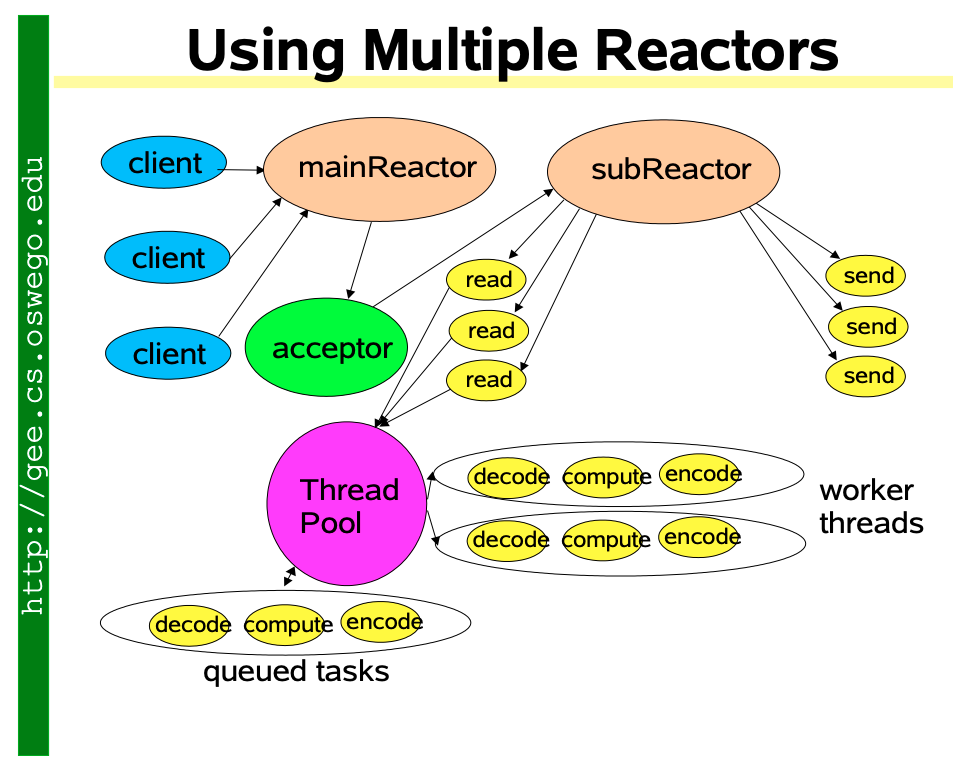
Netty正是借鉴了这种多Reactor版本的设计。
快速上手java.nio#
- Channels:Connections to files, sockets etc that support non-blocking reads
- Buffers:Array-like objects that can be directly read or written by Channels
- Selectors:Tell which of a set of Channels have IO events
- SelectionKeys:Maintain IO event status and bindings
注意:以下Demo仅专注于主逻辑,没有处理异常,也没有关闭资源。
Server端#
import java.io.IOException;
import java.net.InetSocketAddress;
import java.nio.ByteBuffer;
import java.nio.channels.SelectionKey;
import java.nio.channels.Selector;
import java.nio.channels.ServerSocketChannel;
import java.nio.channels.SocketChannel;
import java.nio.channels.spi.SelectorProvider;
import java.util.Iterator;

public class NIOServer {

    private static final SelectorProvider DEFAULT_SELECTOR_PROVIDER = SelectorProvider.provider();

    public static void main(String[] args) throws IOException {
        // ServerSocketChannel.open()
        ServerSocketChannel serverSocketChannel = DEFAULT_SELECTOR_PROVIDER.openServerSocketChannel();
        serverSocketChannel.configureBlocking(false);

        serverSocketChannel.socket().bind(new InetSocketAddress(8080));

        // Selector.open()
        Selector selector = DEFAULT_SELECTOR_PROVIDER.openSelector();

        // register this serverSocketChannel with the selector
        serverSocketChannel.register(selector, SelectionKey.OP_ACCEPT);

        // selector.select()
        while (!Thread.interrupted()) {
            selector.select();

            Iterator<SelectionKey> it = selector.selectedKeys().iterator();
            while (it.hasNext()) {
                SelectionKey key = it.next();
                it.remove();

                // handle IO events
                handle(key);
            }
        }
    }

    private static void handle(SelectionKey key) throws IOException {
        if (key.isAcceptable()) {
            ServerSocketChannel serverSocketChannel = (ServerSocketChannel) key.channel();

            SocketChannel socketChannel = serverSocketChannel.accept();
            socketChannel.configureBlocking(false);
            socketChannel.register(key.selector(), SelectionKey.OP_READ);

        } else if (key.isReadable()) {
            SocketChannel socketChannel = (SocketChannel) key.channel();
            // read client data
            ByteBuffer buffer = ByteBuffer.allocate(1024);
            int len = socketChannel.read(buffer);
            if (len != -1) {
                String msg = String.format("recv client[%s] data:%s", socketChannel.getRemoteAddress(),
                        new String(buffer.array(), 0, len));
                System.out.println(msg);
            }
            // response client
            ByteBuffer data = ByteBuffer.wrap("Hello, NIOClient!".getBytes());
            socketChannel.write(data);
            key.interestOps(SelectionKey.OP_READ | SelectionKey.OP_WRITE);

        } else if (key.isWritable()) {
            // ...
        }
    }
}
Client端#
import java.io.IOException;
import java.net.InetSocketAddress;
import java.nio.ByteBuffer;
import java.nio.channels.SelectionKey;
import java.nio.channels.Selector;
import java.nio.channels.SocketChannel;
import java.nio.channels.spi.SelectorProvider;
import java.util.Iterator;

public class NIOClient {

    private static final SelectorProvider DEFAULT_SELECTOR_PROVIDER = SelectorProvider.provider();

    public static void main(String[] args) throws IOException {
        // SocketChannel.open()
        SocketChannel socketChannel = DEFAULT_SELECTOR_PROVIDER.openSocketChannel();
        socketChannel.configureBlocking(false);
        socketChannel.connect(new InetSocketAddress("127.0.0.1", 8080));

        // Selector.open()
        Selector selector = DEFAULT_SELECTOR_PROVIDER.openSelector();

        // register this socketChannel with the selector
        socketChannel.register(selector, SelectionKey.OP_CONNECT);

        // selector.select()
        while (!Thread.interrupted()) {
            selector.select();

            Iterator<SelectionKey> it = selector.selectedKeys().iterator();
            while (it.hasNext()) {
                SelectionKey key = it.next();
                it.remove();

                // handle IO events
                if (key.isConnectable()) {
                    SocketChannel channel = (SocketChannel) key.channel();
                    if (channel.isConnectionPending()) {
                        channel.finishConnect();
                    }

                    channel.configureBlocking(false);
                    // request server
                    ByteBuffer buffer = ByteBuffer.wrap("Hello, NIOServer!".getBytes());
                    channel.write(buffer);
                    channel.register(selector, SelectionKey.OP_READ);

                } else if (key.isReadable()) {
                    SocketChannel channel = (SocketChannel) key.channel();
                    // read server data
                    ByteBuffer buffer = ByteBuffer.allocate(1024);
                    int len = channel.read(buffer);
                    if (len != -1) {
                        String msg = String.format("recv server[%s] data:%s", channel.getRemoteAddress(),
                                new String(buffer.array(), 0, len));
                        System.out.println(msg);
                    }
                }
            }
        }
    }
}
快速上手Netty#
更多官方example,请参考:
https://github.com/netty/netty/tree/4.1/example/
Server端#
import io.netty.bootstrap.ServerBootstrap;
import io.netty.buffer.ByteBuf;
import io.netty.buffer.Unpooled;
import io.netty.channel.*;
import io.netty.channel.nio.NioEventLoopGroup;
import io.netty.channel.socket.SocketChannel;
import io.netty.channel.socket.nio.NioServerSocketChannel;
import io.netty.util.CharsetUtil;

public class NettyServer {
    public static void main(String[] args) throws Exception {
        EventLoopGroup bossGroup = new NioEventLoopGroup(1);
        EventLoopGroup workerGroup = new NioEventLoopGroup();
        try {
            ServerBootstrap bootstrap = new ServerBootstrap()
                    .group(bossGroup, workerGroup)
                    .channel(NioServerSocketChannel.class)
                    .option(ChannelOption.SO_BACKLOG, 1024)
                    .childHandler(new ChannelInitializer<SocketChannel>() {
                        @Override
                        protected void initChannel(SocketChannel ch) {
                            ch.pipeline().addLast(new NettyServerHandler());
                        }
                    });

            ChannelFuture cf = bootstrap.bind(8080).sync();
            cf.channel().closeFuture().sync();
        } finally {
            bossGroup.shutdownGracefully();
            workerGroup.shutdownGracefully();
        }
    }

    static class NettyServerHandler extends ChannelInboundHandlerAdapter {
        @Override
        public void channelRead(ChannelHandlerContext ctx, Object msg) {
            String message = String.format("recv client[%s] data:%s", ctx.channel().remoteAddress(),
                    ((ByteBuf) msg).toString(CharsetUtil.UTF_8));
            System.out.println(message);
        }

        @Override
        public void channelReadComplete(ChannelHandlerContext ctx) {
            ByteBuf buf = Unpooled.copiedBuffer("Hello, NettyClient!".getBytes(CharsetUtil.UTF_8));
            ctx.writeAndFlush(buf);
        }

        @Override
        public void exceptionCaught(ChannelHandlerContext ctx, Throwable cause) {
            cause.printStackTrace();
            ctx.close();
        }
    }
}
Client端#
import io.netty.bootstrap.Bootstrap;
import io.netty.buffer.ByteBuf;
import io.netty.buffer.Unpooled;
import io.netty.channel.*;
import io.netty.channel.nio.NioEventLoopGroup;
import io.netty.channel.socket.SocketChannel;
import io.netty.channel.socket.nio.NioSocketChannel;
import io.netty.util.CharsetUtil;

public class NettyClient {
    public static void main(String[] args) throws Exception {
        EventLoopGroup group = new NioEventLoopGroup(1);
        try {
            Bootstrap bootstrap = new Bootstrap()
                    .group(group)
                    .channel(NioSocketChannel.class)
                    .handler(new ChannelInitializer<SocketChannel>() {
                        @Override
                        protected void initChannel(SocketChannel ch) {
                            ch.pipeline().addLast(new NettyClientHandler());
                        }
                    });

            ChannelFuture cf = bootstrap.connect("127.0.0.1", 8080).sync();
            cf.channel().closeFuture().sync();
        } finally {
            group.shutdownGracefully();
        }
    }

    static class NettyClientHandler extends ChannelInboundHandlerAdapter {
        @Override
        public void channelActive(ChannelHandlerContext ctx) {
            ByteBuf buf = Unpooled.copiedBuffer("Hello, NettyServer!".getBytes(CharsetUtil.UTF_8));
            ctx.writeAndFlush(buf);
        }

        @Override
        public void channelRead(ChannelHandlerContext ctx, Object msg) {
            String message = String.format("recv server[%s] data:%s", ctx.channel().remoteAddress(),
                    ((ByteBuf) msg).toString(CharsetUtil.UTF_8));
            System.out.println(message);
        }

        @Override
        public void exceptionCaught(ChannelHandlerContext ctx, Throwable cause) {
            cause.printStackTrace();
            ctx.close();
        }
    }
}
源码追踪#
建议跟着我画的源码走向图,跟下面的内容,最好也开着debug模式,不理解的地方调试几遍。这里再次贴一下链接:
https://www.yuque.com/docs/share/02fa3e3d-d485-48e1-9cfe-6722a3ad8915
注意:追踪的是当前最新release的 4.1.58.Final 版本的源码。
<dependency>
  <groupId>io.netty</groupId>
  <artifactId>netty-all</artifactId>
  <version>4.1.58.Final</version>
</dependency>
本文出自 行无际的博客 :
https://www.cnblogs.com/itwild/
关键类#
下面先重点看几个关键类的大致情况,方便我们读代码 。因为面向抽象编程,如果对常见类的继承层次一点不了解,读代码的过程会让人崩溃。你懂的!!!
NioEventLoopGroup#
类定义:
io.netty.channel.nio.NioEventLoopGroup
/**
 * {@link MultithreadEventLoopGroup} implementations which is used for NIO {@link Selector} based {@link Channel}s.
 */
public class NioEventLoopGroup extends MultithreadEventLoopGroup
类图:
NioEventLoop#
类定义:
io.netty.channel.nio.NioEventLoop
/**
 * {@link SingleThreadEventLoop} implementation which register the {@link Channel}'s to a
 * {@link Selector} and so does the multi-plexing of these in the event loop.
 *
 */
public final class NioEventLoop extends SingleThreadEventLoop
类图: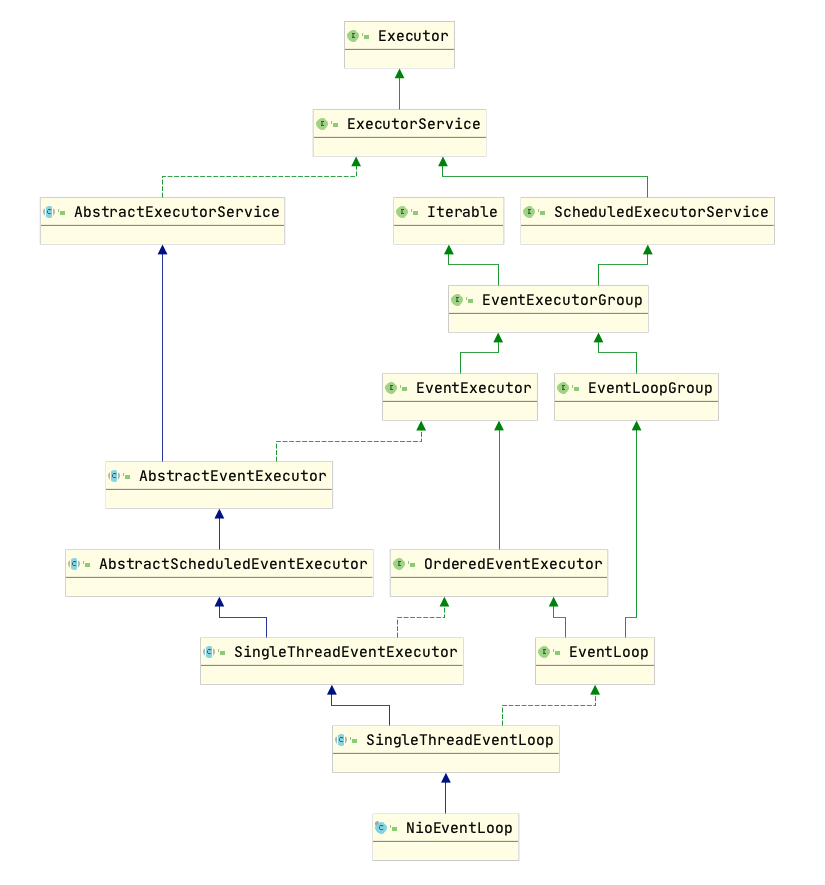
NioServerSocketChannel#
类定义:
io.netty.channel.socket.nio.NioServerSocketChannel
/**
 * A {@link io.netty.channel.socket.ServerSocketChannel} implementation which uses
 * NIO selector based implementation to accept new connections.
 */
public class NioServerSocketChannel extends AbstractNioMessageChannel
                             implements io.netty.channel.socket.ServerSocketChannel
类图: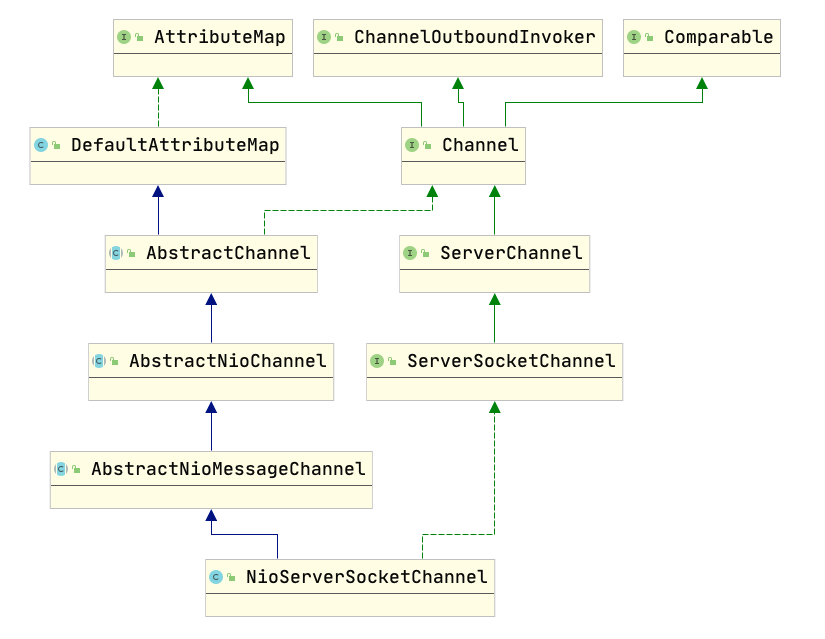
NioSocketChannel#
类定义:
io.netty.channel.socket.nio.NioSocketChannel
/**
 * {@link io.netty.channel.socket.SocketChannel} which uses NIO selector based implementation.
 */
public class NioSocketChannel extends AbstractNioByteChannel
						implements io.netty.channel.socket.SocketChannel
类图: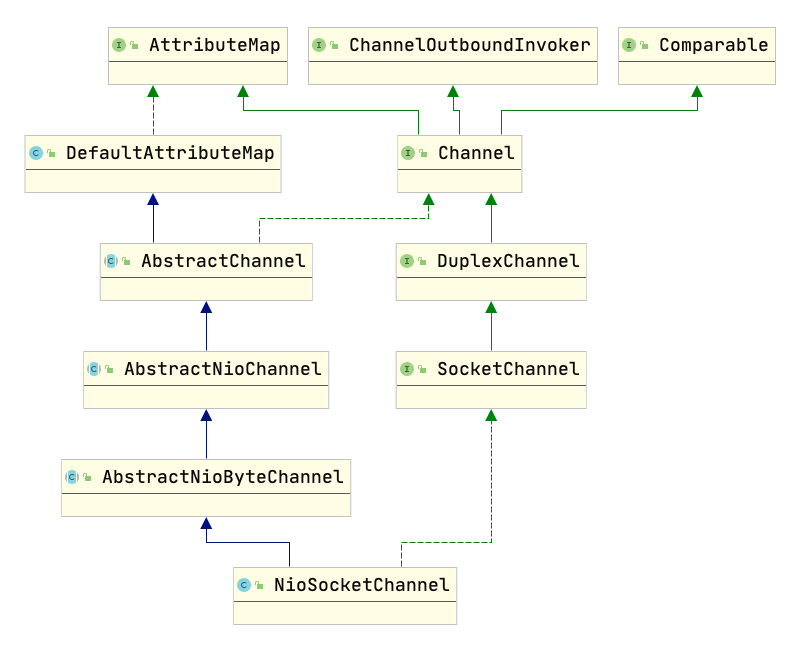
ChannelInitializer#
类定义:
io.netty.channel.ChannelInitializer
/**
 * A special {@link ChannelInboundHandler} which offers an easy way to initialize a {@link Channel} once it was
 * registered to its {@link EventLoop}.
 *
 * Implementations are most often used in the context of {@link Bootstrap#handler(ChannelHandler)} ,
 * {@link ServerBootstrap#handler(ChannelHandler)} and {@link ServerBootstrap#childHandler(ChannelHandler)} to
 * setup the {@link ChannelPipeline} of a {@link Channel}.
 *
 * <pre>
 *
 * public class MyChannelInitializer extends {@link ChannelInitializer} {
 *     public void initChannel({@link Channel} channel) {
 *         channel.pipeline().addLast("myHandler", new MyHandler());
 *     }
 * }
 *
 * {@link ServerBootstrap} bootstrap = ...;
 * ...
 * bootstrap.childHandler(new MyChannelInitializer());
 * ...
 * </pre>
 * Be aware that this class is marked as {@link Sharable} and so the implementation must be safe to be re-used.
 *
 * @param <C>   A sub-type of {@link Channel}
 */
@Sharable
public abstract class ChannelInitializer<C extends Channel> extends ChannelInboundHandlerAdapter
类图: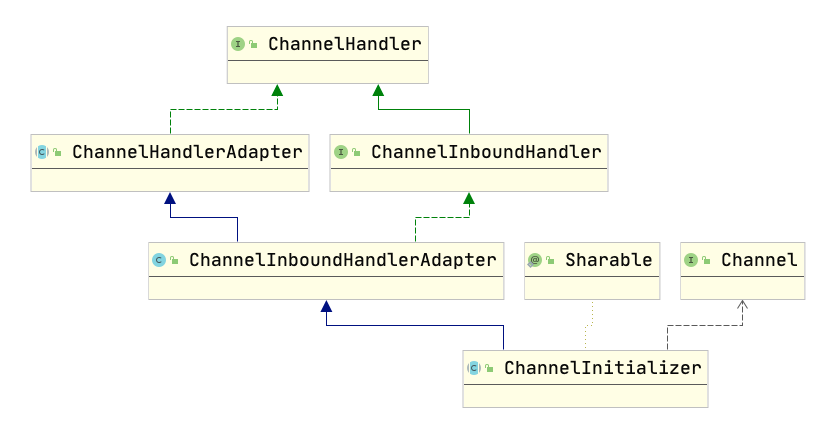
ChannelInboundHandlerAdapter#
类定义:
io.netty.channel.ChannelInboundHandlerAdapter
/**
 * Abstract base class for {@link ChannelInboundHandler} implementations which provide
 * implementations of all of their methods.
 *
 * <p>
 * This implementation just forward the operation to the next {@link ChannelHandler} in the
 * {@link ChannelPipeline}. Sub-classes may override a method implementation to change this.
 * </p>
 * <p>
 * Be aware that messages are not released after the {@link #channelRead(ChannelHandlerContext, Object)}
 * method returns automatically. If you are looking for a {@link ChannelInboundHandler} implementation that
 * releases the received messages automatically, please see {@link SimpleChannelInboundHandler}.
 * </p>
 */
public class ChannelInboundHandlerAdapter extends ChannelHandlerAdapter implements ChannelInboundHandler
类图: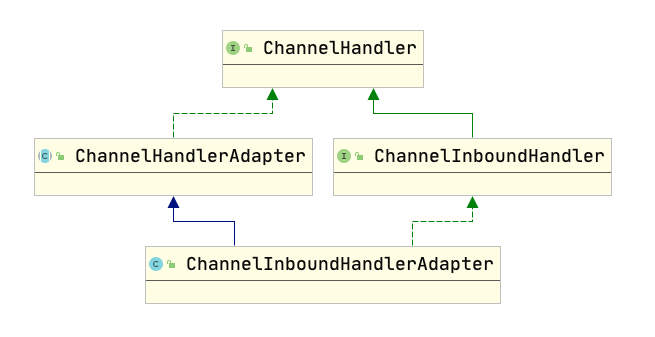
ServerBootstrap#
类定义:
io.netty.bootstrap.ServerBootstrap
/**
 * {@link Bootstrap} sub-class which allows easy bootstrap of {@link ServerChannel}
 *
 */
public class ServerBootstrap extends AbstractBootstrap<ServerBootstrap, ServerChannel>
类图: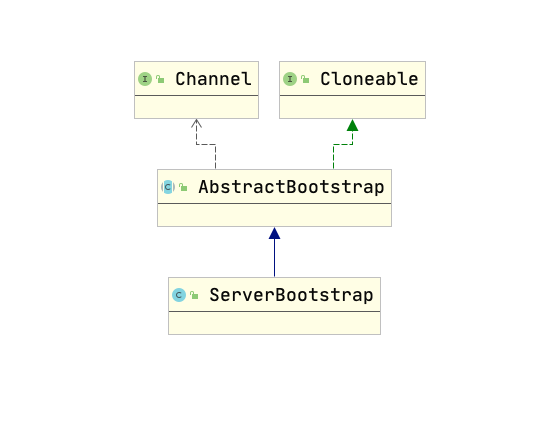
Bootstrap#
类定义:
io.netty.bootstrap.Bootstrap
/**
 * A {@link Bootstrap} that makes it easy to bootstrap a {@link Channel} to use
 * for clients.
 *
 * <p>The {@link #bind()} methods are useful in combination with connectionless transports such as datagram (UDP).
 * For regular TCP connections, please use the provided {@link #connect()} methods.</p>
 */
public class Bootstrap extends AbstractBootstrap<Bootstrap, Channel>
类图: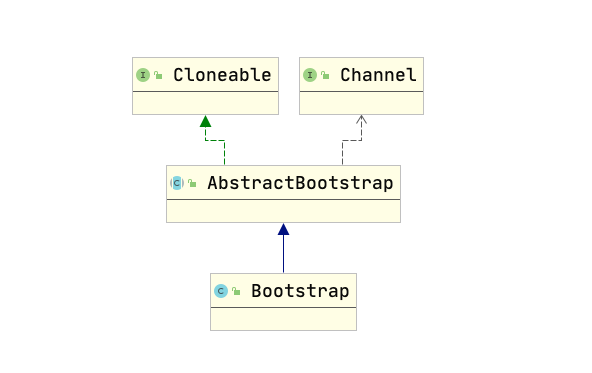
Server端启动过程#
下面就正式开始追源码。
创建Selector#
Selector的创建起于这行代码EventLoopGroup bossGroup = new NioEventLoopGroup(1)
io.netty.channel.nio.NioEventLoopGroup
/**
 * Create a new instance using the specified number of threads, {@link ThreadFactory} and the
 * {@link SelectorProvider} which is returned by {@link SelectorProvider#provider()}.
 */
public NioEventLoopGroup(int nThreads) {
    this(nThreads, (Executor) null);
}

 public NioEventLoopGroup(int nThreads, Executor executor) {
     this(nThreads, executor, SelectorProvider.provider());
 }
这里我们看到了熟悉的SelectorProvider.provider(),如果觉得陌生,建议回到上面快速上手java.nio的代码。
往里面追几层,就到了NioEventLoopGroup的父类 MultithreadEventExecutorGroup 。
io.netty.util.concurrent.MultithreadEventExecutorGroup
protected MultithreadEventExecutorGroup(int nThreads, Executor executor,
                                        EventExecutorChooserFactory chooserFactory, Object... args) {
    if (executor == null) {
        executor = new ThreadPerTaskExecutor(newDefaultThreadFactory());
    }

    children = new EventExecutor[nThreads];

    for (int i = 0; i < nThreads; i ++) {
        children[i] = newChild(executor, args);
    }
}
注意: 创建NioEventLoopGroup(int nThreads)时的参数nThreads就传到了上面代码中的children = new EventExecutor[nThreads]。看newChild(executor, args)做了什么。
io.netty.channel.nio.NioEventLoopGroup
@Override
protected EventLoop newChild(Executor executor, Object... args) throws Exception {
    EventLoopTaskQueueFactory queueFactory = args.length == 4 ? (EventLoopTaskQueueFactory) args[3] : null;
    return new NioEventLoop(this, executor, (SelectorProvider) args[0],
                            ((SelectStrategyFactory) args[1]).newSelectStrategy(), (RejectedExecutionHandler) args[2], queueFactory);
}
io.netty.channel.nio.NioEventLoop
NioEventLoop(NioEventLoopGroup parent, Executor executor, SelectorProvider selectorProvider,
             SelectStrategy strategy, RejectedExecutionHandler rejectedExecutionHandler,
             EventLoopTaskQueueFactory queueFactory) {
    super(parent, executor, false, newTaskQueue(queueFactory), newTaskQueue(queueFactory),
          rejectedExecutionHandler);
    this.provider = ObjectUtil.checkNotNull(selectorProvider, "selectorProvider");
    this.selectStrategy = ObjectUtil.checkNotNull(strategy, "selectStrategy");
    final SelectorTuple selectorTuple = openSelector();
    this.selector = selectorTuple.selector;
    this.unwrappedSelector = selectorTuple.unwrappedSelector;
}
Selector的创建就发生在这行代码final SelectorTuple selectorTuple = openSelector();进去看看。
io.netty.channel.nio.NioEventLoop
private SelectorTuple openSelector() {
    final Selector unwrappedSelector;
    try {
        unwrappedSelector = provider.openSelector();
    } catch (IOException e) {
        throw new ChannelException("failed to open a new selector", e);
    }

    if (DISABLE_KEY_SET_OPTIMIZATION) {
        return new SelectorTuple(unwrappedSelector);
    }
    // 省略其他代码...
    return new SelectorTuple(unwrappedSelector,
                             new SelectedSelectionKeySetSelector(unwrappedSelector, selectedKeySet));
}
这里我们看到了provider.openSelector(),到这里,创建出来的Selector就与 EventLoop 关联在一起了。
同时在创建NioEventLoop时,看看super(parent, executor, false, newTaskQueue(queueFactory), ...)在父类SingleThreadEventLoop干了什么。
io.netty.channel.SingleThreadEventLoop
protected SingleThreadEventLoop(EventLoopGroup parent, Executor executor,
                                boolean addTaskWakesUp, Queue<Runnable> taskQueue, Queue<Runnable> tailTaskQueue,
                                RejectedExecutionHandler rejectedExecutionHandler) {
    super(parent, executor, addTaskWakesUp, taskQueue, rejectedExecutionHandler);
    tailTasks = ObjectUtil.checkNotNull(tailTaskQueue, "tailTaskQueue");
}
再往下;
io.netty.util.concurrent.SingleThreadEventExecutor
private final Queue<Runnable> taskQueue;

protected SingleThreadEventExecutor(EventExecutorGroup parent, Executor executor,
                                    boolean addTaskWakesUp, Queue<Runnable> taskQueue,
                                    RejectedExecutionHandler rejectedHandler) {
    super(parent);
    this.addTaskWakesUp = addTaskWakesUp;
    this.maxPendingTasks = DEFAULT_MAX_PENDING_EXECUTOR_TASKS;
    this.executor = ThreadExecutorMap.apply(executor, this);
    this.taskQueue = ObjectUtil.checkNotNull(taskQueue, "taskQueue");
    this.rejectedExecutionHandler = ObjectUtil.checkNotNull(rejectedHandler, "rejectedHandler");
}
这里我们看到了对Queue<Runnable> taskQueue的赋值。
创建ServerSocketChannel#
AbstractBootstrap中的initAndRegister()方法是ServerSocketChannel的创建入口。
io.netty.bootstrap.AbstractBootstrap
final ChannelFuture initAndRegister() {
        Channel channel = null;
        try {
            // 1.创建ServerSocketChannel
            channel = channelFactory.newChannel();
            // 2.初始化ServerSocketChannel
            init(channel);
        } catch (Throwable t) {
        }
        // 3.将ServerSocketChannel注册到Selector上
        ChannelFuture regFuture = config().group().register(channel);
        return regFuture;
    }
Server端的启动最核心的也就是上面加注释的三步。按照顺序先从ServerSocketChannel的创建讲起。
ServerSocketChannel的创建用了工厂模式+反射机制。具体见ReflectiveChannelFactory
io.netty.channel.ReflectiveChannelFactory
/**
 * A {@link ChannelFactory} that instantiates a new {@link Channel} by invoking its default constructor reflectively.
 */
public class ReflectiveChannelFactory<T extends Channel> implements ChannelFactory<T> {

    private final Constructor<? extends T> constructor;

    public ReflectiveChannelFactory(Class<? extends T> clazz) {
        this.constructor = clazz.getConstructor();
    }

    @Override
    public T newChannel() {
        return constructor.newInstance();
    }
}
还记得在前面的bootstrap.channel(NioServerSocketChannel.class)这行代码吗?传入的Class就是用于反射生成Channel实例的。这里是Server端,显然需要进NioServerSocketChannel看如何创建的。
io.netty.channel.socket.nio.NioServerSocketChannel
private static final SelectorProvider DEFAULT_SELECTOR_PROVIDER = SelectorProvider.provider();

private static ServerSocketChannel newSocket(SelectorProvider provider) {
    try {
        /**
             *  Use the {@link SelectorProvider} to open {@link SocketChannel} and so remove condition in
             *  {@link SelectorProvider#provider()} which is called by each ServerSocketChannel.open() otherwise.
             *
             *  See <a href="https://github.com/netty/netty/issues/2308">#2308</a>.
             */
        return provider.openServerSocketChannel();
    } catch (IOException e) {
        throw new ChannelException(
            "Failed to open a server socket.", e);
    }
}

public NioServerSocketChannel() {
    this(newSocket(DEFAULT_SELECTOR_PROVIDER));
}

 public NioServerSocketChannel(ServerSocketChannel channel) {
     super(null, channel, SelectionKey.OP_ACCEPT);
     config = new NioServerSocketChannelConfig(this, javaChannel().socket());
 }
provider.openServerSocketChannel()这行代码也就创建出来了ServerSocketChannel。再往父类里面追,看做了些什么。super(null, channel, SelectionKey.OP_ACCEPT);
io.netty.channel.nio.AbstractNioChannel
protected AbstractNioChannel(Channel parent, SelectableChannel ch, int readInterestOp) {
    super(parent);
    this.ch = ch;
    this.readInterestOp = readInterestOp;
    ch.configureBlocking(false);
}
this.readInterestOp = readInterestOp把感兴趣的操作赋值给readInterestOp,上面传过来的是SelectionKey.OP_ACCEPT。
ch.configureBlocking(false)把刚才创建出来的channel设置为非阻塞。继续往父类追。
io.netty.channel.AbstractChannel
protected AbstractChannel(Channel parent) {
    this.parent = parent;
    id = newId();
    unsafe = newUnsafe();
    pipeline = newChannelPipeline();
}

protected DefaultChannelPipeline newChannelPipeline() {
    return new DefaultChannelPipeline(this);
}
这里看到创建了ChannelPipeline,并关联到Channel上。再往下走一步。
io.netty.channel.DefaultChannelPipeline
protected DefaultChannelPipeline(Channel channel) {
    this.channel = ObjectUtil.checkNotNull(channel, "channel");
    succeededFuture = new SucceededChannelFuture(channel, null);
    voidPromise =  new VoidChannelPromise(channel, true);

    tail = new TailContext(this);
    head = new HeadContext(this);

    head.next = tail;
    tail.prev = head;
}
此时ChannelPipeline大致如下:
head --> tail
初始化ServerSocketChannel#
回到上面提到的重要的第2步: init(channel); 注意,实现类为ServerBootstrap,因为是Server端嘛。
io.netty.bootstrap.ServerBootstrap
@Override
void init(Channel channel) {
    ChannelPipeline p = channel.pipeline();

    final EventLoopGroup currentChildGroup = childGroup;
    final ChannelHandler currentChildHandler = childHandler;

    p.addLast(new ChannelInitializer<Channel>() {
        @Override
        public void initChannel(final Channel ch) {
            final ChannelPipeline pipeline = ch.pipeline();
            ChannelHandler handler = config.handler();
            if (handler != null) {
                pipeline.addLast(handler);
            }

            ch.eventLoop().execute(new Runnable() {
                @Override
                public void run() {
                    pipeline.addLast(new ServerBootstrapAcceptor(
                        ch, currentChildGroup, currentChildHandler, currentChildOptions, currentChildAttrs));
                }
            });
        }
    });
}
在ChannelPipeline加了一个ChannelHandler。此时ChannelPipeline大致如下:
head --> ChannelInitializer --> tail
一旦serverSocketChannel注册到EventLoop(或者说Selector)上,便会触发这里initChannel的调用。避免绕晕了,这里暂时不去探究具体的调用逻辑。后面调用到这里的时候,再回过头来仔细探究。
ServerSocketChannel注册到Selector上#
回到上面提到的重要的第3步:config().group().register(channel);
通过分析类的继承层次(或者debug也行)可以跟踪调用到SingleThreadEventLoop的register方法。
io.netty.channel.SingleThreadEventLoop
@Override
public ChannelFuture register(Channel channel) {
    return register(new DefaultChannelPromise(channel, this));
}

@Override
public ChannelFuture register(final ChannelPromise promise) {
    ObjectUtil.checkNotNull(promise, "promise");
    promise.channel().unsafe().register(this, promise);
    return promise;
}
再往下跟,最终调用的是AbstractChannel的register方法,如下:
io.netty.channel.AbstractChannel
@Override
public final void register(EventLoop eventLoop, final ChannelPromise promise) {
    AbstractChannel.this.eventLoop = eventLoop;
	eventLoop.execute(new Runnable() {
                @Override
                public void run() {
                    register0(promise);
                }
            });
}
往下跟eventLoop.execute()
io.netty.util.concurrent.SingleThreadEventExecutor
private void execute(Runnable task, boolean immediate) {
    addTask(task);
    startThread();
}
addTask(task)把上面的Runnable放入到上面提到的Queue<Runnable> taskQueue,过程见如下代码:
io.netty.util.concurrent.SingleThreadEventExecutor
 /**
  * Add a task to the task queue, or throws a {@link RejectedExecutionException} if this instance was shutdown
  * before.
  */
protected void addTask(Runnable task) {
    ObjectUtil.checkNotNull(task, "task");
    if (!offerTask(task)) {
        reject(task);
    }
}

final boolean offerTask(Runnable task) {
    if (isShutdown()) {
        reject();
    }
    return taskQueue.offer(task);
}
把task放入taskQueue后,就到startThread()这行代码了,进去瞧瞧。
io.netty.util.concurrent.SingleThreadEventExecutor
private void startThread() {
    doStartThread();
}

private void doStartThread() {
    executor.execute(new Runnable() {
        @Override
        public void run() {
            SingleThreadEventExecutor.this.run();
        }
    });
}
继续追executor.execute,到这里才真正创建新的线程执行SingleThreadEventExecutor.this.run(), thread名称大致为nioEventLoopGroup-2-1,见如下代码:
io.netty.util.concurrent.ThreadPerTaskExecutor
@Override
public void execute(Runnable command) {
    threadFactory.newThread(command).start();
}
SingleThreadEventExecutor.this.run()实际执行的代码如下:
io.netty.channel.nio.NioEventLoop
@Override
protected void run() {
    int selectCnt = 0;
    for (;;) {
        try {
            int strategy;
            try {
                strategy = selectStrategy.calculateStrategy(selectNowSupplier, hasTasks());
                switch (strategy) {
                    case SelectStrategy.CONTINUE:
                        continue;

                    case SelectStrategy.BUSY_WAIT:
                        // fall-through to SELECT since the busy-wait is not supported with NIO

                    case SelectStrategy.SELECT:
                        long curDeadlineNanos = nextScheduledTaskDeadlineNanos();
                        if (curDeadlineNanos == -1L) {
                            curDeadlineNanos = NONE; // nothing on the calendar
                        }
                        nextWakeupNanos.set(curDeadlineNanos);
                        try {
                            if (!hasTasks()) {
                                strategy = select(curDeadlineNanos);
                            }
                        } finally {
                            // This update is just to help block unnecessary selector wakeups
                            // so use of lazySet is ok (no race condition)
                            nextWakeupNanos.lazySet(AWAKE);
                        }
                        // fall through
                    default:
                }
            } catch (IOException e) {
                // If we receive an IOException here its because the Selector is messed up. Let's rebuild
                // the selector and retry. https://github.com/netty/netty/issues/8566
                // ...
                continue;
            }

            selectCnt++;
            cancelledKeys = 0;
            needsToSelectAgain = false;
            final int ioRatio = this.ioRatio;
            boolean ranTasks;
            if (ioRatio == 100) {
                try {
                    if (strategy > 0) {
                        processSelectedKeys();
                    }
                } finally {
                    // Ensure we always run tasks.
                    ranTasks = runAllTasks();
                }
            } else if (strategy > 0) {
                final long ioStartTime = System.nanoTime();
                try {
                    processSelectedKeys();
                } finally {
                    // Ensure we always run tasks.
                    final long ioTime = System.nanoTime() - ioStartTime;
                    ranTasks = runAllTasks(ioTime * (100 - ioRatio) / ioRatio);
                }
            } else {
                ranTasks = runAllTasks(0); // This will run the minimum number of tasks
            }
        } finally {
            // Always handle shutdown even if the loop processing threw an exception.
        }
    }
}
先简单解释一下上面的代码,部分细节后面再扣。run()方法里面是个死循环,大致是这样的,这里的描述并不完全准确,是这么个意思,taskQueue里面如果有task,就不断poll执行队列里的task,具体见runAllTasks();否则,就selector.select(),若有IO事件,则通过processSelectedKeys()来处理。
讲到这里,正好刚才不是往taskQueue里放了个Runnable吗,再贴一下上面那个Runnable的代码
new Runnable() {
    @Override
    public void run() {
        register0(promise);
    }
};
于是就要执行Runnable里面register0(promise)了。
io.netty.channel.AbstractChannel
private void register0(ChannelPromise promise) {
    //(1)把ServerSocketChannel注册到了Selector上
    doRegister();

    // Ensure we call handlerAdded(...) before we actually notify the promise. This is needed as the
    // user may already fire events through the pipeline in the ChannelFutureListener.

    //(2)触发pipeline中的ChannelHandler的handlerAdded()方法调用
    pipeline.invokeHandlerAddedIfNeeded();

    safeSetSuccess(promise);

    //(3)触发pipeline中的ChannelInboundHandler的channelRegistered()方法调用
    pipeline.fireChannelRegistered();

    // Only fire a channelActive if the channel has never been registered. This prevents firing
    // multiple channel actives if the channel is deregistered and re-registered.
    if (isActive()) {
        if (firstRegistration) {
            pipeline.fireChannelActive();
        } else if (config().isAutoRead()) {
            // This channel was registered before and autoRead() is set. This means we need to begin read
            // again so that we process inbound data.
            //
            // See https://github.com/netty/netty/issues/4805
            beginRead();
        }
    }
}
上面我按照自己的理解,在代码中加了少许注释,下面按照我注释的顺序依次解释一下。
(1) doRegister()
io.netty.channel.nio.AbstractNioChannel
@Override
protected void doRegister() throws Exception {
    boolean selected = false;
    for (;;) {
       selectionKey = javaChannel().register(eventLoop().unwrappedSelector(), 0, this);
       return;
    }
}
这里显然是把ServerSocketChannel注册到了Selector上。
(2) pipeline.invokeHandlerAddedIfNeeded()
作用:触发pipeline中的ChannelHandler的handlerAdded()方法调用
io.netty.channel.DefaultChannelPipeline
 final void invokeHandlerAddedIfNeeded() {
     if (firstRegistration) {
         firstRegistration = false;
         // We are now registered to the EventLoop. It's time to call the callbacks for the ChannelHandlers,
         // that were added before the registration was done.
         callHandlerAddedForAllHandlers();
     }
 }
上面的注释清晰地告诉我们,现在ServerSocketChannel已经注册到EventLoop上,是时候该调用Pipeline中的ChannelHandlers。到这里,就能与上面初始化ServerSocketChannel对接起来了,猜测应该会触发上面的ChannelInitializer的调用。
io.netty.channel.DefaultChannelPipeline
private void callHandlerAddedForAllHandlers() {
    final PendingHandlerCallback pendingHandlerCallbackHead;
    synchronized (this) {
        pendingHandlerCallbackHead = this.pendingHandlerCallbackHead;
        // Null out so it can be GC'ed.
        this.pendingHandlerCallbackHead = null;
    }

    // This must happen outside of the synchronized(...) block as otherwise handlerAdded(...) may be called while
    // holding the lock and so produce a deadlock if handlerAdded(...) will try to add another handler from outside
    // the EventLoop.
    PendingHandlerCallback task = pendingHandlerCallbackHead;
    while (task != null) {
        task.execute();
        task = task.next;
    }
}
这里需要先解释一下为什么又突然冒出来PendingHandlerCallback。是这样的,在addLast(ChannelHandler... handlers)时,实际上调了下面的方法。
io.netty.channel.DefaultChannelPipeline
public final ChannelPipeline addLast(EventExecutorGroup group, String name, ChannelHandler handler) {
    final AbstractChannelHandlerContext newCtx;
    synchronized (this) {
        newCtx = newContext(group, filterName(name, handler), handler);

        addLast0(newCtx);

        // If the registered is false it means that the channel was not registered on an eventLoop yet.
        // In this case we add the context to the pipeline and add a task that will call
        // ChannelHandler.handlerAdded(...) once the channel is registered.
        if (!registered) {
            newCtx.setAddPending();
            callHandlerCallbackLater(newCtx, true);
            return this;
        }

        EventExecutor executor = newCtx.executor();
        if (!executor.inEventLoop()) {
            callHandlerAddedInEventLoop(newCtx, executor);
            return this;
        }
    }
    callHandlerAdded0(newCtx);
    return this;
}
看到上面的3行注释没有,就解释了上面的PendingHandlerCallback从哪里来的。翻译一下就是,在往Pipeline中添加ChannelHandler时,如果Channel还没有注册到EventLoop上,就将当前的AbstractChannelHandlerContext封装到PendingHandlerCallback里去,等着后面触发调用。
回到正题,PendingHandlerCallback.execute()几经周折,会调用ChannelHandler的handlerAdded(),如下所示:
io.netty.channel.AbstractChannelHandlerContext
final void callHandlerAdded() throws Exception {
    // We must call setAddComplete before calling handlerAdded. Otherwise if the handlerAdded method generates
    // any pipeline events ctx.handler() will miss them because the state will not allow it.
    if (setAddComplete()) {
        handler().handlerAdded(this);
    }
}
那么再回头看看ChannelInitializer
io.netty.channel.ChannelInitializer
 /**
  * {@inheritDoc} If override this method ensure you call super!
  */
@Override
public void handlerAdded(ChannelHandlerContext ctx) throws Exception {
    if (ctx.channel().isRegistered()) {
        if (initChannel(ctx)) {
            removeState(ctx);
        }
    }
}

private boolean initChannel(ChannelHandlerContext ctx) throws Exception {
    if (initMap.add(ctx)) { // Guard against re-entrance.
        initChannel((C) ctx.channel());
        return true;
    }
    return false;
}

 /**
  * This method will be called once the {@link Channel} was registered. After the method returns this instance
  * will be removed from the {@link ChannelPipeline} of the {@link Channel}.
  *
  * @param ch            the {@link Channel} which was registered.
  * @throws Exception    is thrown if an error occurs. In that case it will be handled by
  *                      {@link #exceptionCaught(ChannelHandlerContext, Throwable)} which will by default close
  *                      the {@link Channel}.
  */
protected abstract void initChannel(C ch) throws Exception;
原来,最终会触发initChannel调用,所以上面初始化ServerSocketChannel时重写的initChannel会在这时执行。
p.addLast(new ChannelInitializer<Channel>() {
    @Override
    public void initChannel(final Channel ch) {
        final ChannelPipeline pipeline = ch.pipeline();
        ChannelHandler handler = config.handler();
        if (handler != null) {
            pipeline.addLast(handler);
        }

        ch.eventLoop().execute(new Runnable() {
            @Override
            public void run() {
                pipeline.addLast(new ServerBootstrapAcceptor(
                    ch, currentChildGroup, currentChildHandler, currentChildOptions, currentChildAttrs));
            }
        });
    }
});
这里的initChannel执行之后,此时ChannelPipeline大致如下:
head --> tail
值得注意的是,此时ServerBootstrapAcceptor暂时并没有被放入ChannelPipeline中,而同样是放到了上面提到的Queue<Runnable> taskQueue队列中,如下:
ch.eventLoop().execute(new Runnable() {
    @Override
    public void run() {
        pipeline.addLast(new ServerBootstrapAcceptor(
            ch, currentChildGroup, currentChildHandler, currentChildOptions, currentChildAttrs));
    }
});
至于ServerBootstrapAcceptor里面干了啥,等到后面再细说。
来,继续。上面讲清楚了doRegister()和pipeline.invokeHandlerAddedIfNeeded(),接下来看pipeline.fireChannelRegistered()。
(3) pipeline.fireChannelRegistered()
作用:触发pipeline中的ChannelInboundHandler的channelRegistered()方法调用
还是往里面简单追一下源码。
io.netty.channel.AbstractChannelHandlerContext
static void invokeChannelRegistered(final AbstractChannelHandlerContext next) {
    EventExecutor executor = next.executor();
    if (executor.inEventLoop()) {
        next.invokeChannelRegistered();
    } else {
        executor.execute(new Runnable() {
            @Override
            public void run() {
                next.invokeChannelRegistered();
            }
        });
    }
}

private void invokeChannelRegistered() {
    if (invokeHandler()) {
        try {
            // 这里触发了channelRegistered()方法调用
            ((ChannelInboundHandler) handler()).channelRegistered(this);
        } catch (Throwable t) {
            invokeExceptionCaught(t);
        }
    } else {
        fireChannelRegistered();
    }
}
到这里,register0()这个task就执行完了。但是还记得这个task执行过程中,又往taskQueue中添加了一个Runnable吗?
new Runnable() {
    @Override
    public void run() {
        pipeline.addLast(new ServerBootstrapAcceptor(
            ch, currentChildGroup, currentChildHandler, currentChildOptions, currentChildAttrs));
    }
}
此时会poll到新加的task,见如下代码:
io.netty.util.concurrent.SingleThreadEventExecutor
protected boolean runAllTasks(long timeoutNanos) {
    for (;;) {
        safeExecute(task);
        task = pollTask();
        if (task == null) {
            lastExecutionTime = ScheduledFutureTask.nanoTime();
            break;
        }
    }

    afterRunningAllTasks();
    this.lastExecutionTime = lastExecutionTime;
    return true;
}
执行完这个新增的Runnable后,此时ChannelPipeline大致如下:
head --> ServerBootstrapAcceptor --> tail
此时,taskQueue中的task都执行完了,EventLoop线程执行selector.select(),等待客户端的连接。
到这里,Server端也就成功启动了。
Client端启动过程#
创建Selector#
与Server端完全一致。
创建SocketChannel#
入口与Server端一样,不一样的地方在于Client端是bootstrap.channel(NioSocketChannel.class),所以需要看NioSocketChannel的实现。这里也不必多说。
初始化SocketChannel#
Client端的就比较简单了,如下:
io.netty.bootstrap.Bootstrap
@Override
void init(Channel channel) {
    ChannelPipeline p = channel.pipeline();
    p.addLast(config.handler());
}
SocketChannel注册到Selector上#
前面的过程与Server端基本一样,执行完doRegister(),执行pipeline.invokeHandlerAddedIfNeeded()时,没有Server端复杂(因为Server端初始化SocketChannel,加了个添加ServerBootstrapAcceptor到ChannelPipeline的task)。
前面分析过,这个过程会触发initChannel调用,所以这时会执行用户编写的ChannelInitializer,也就是会执行ch.pipeline().addLast(new NettyClientHandler()),将用户编写的NettyClientHandler插入到ChannelPipeline中。
连接Server#
注册成功后,会执行连接Server的回调。
io.netty.bootstrap.Bootstrap
private ChannelFuture doResolveAndConnect(final SocketAddress remoteAddress, final SocketAddress localAddress) {
    final ChannelFuture regFuture = initAndRegister();
    final Channel channel = regFuture.channel();

    if (regFuture.isDone()) {
        return doResolveAndConnect0(channel, remoteAddress, localAddress, channel.newPromise());
    } else {
        // Registration future is almost always fulfilled already, but just in case it's not.
        final PendingRegistrationPromise promise = new PendingRegistrationPromise(channel);
        regFuture.addListener(new ChannelFutureListener() {
            @Override
            public void operationComplete(ChannelFuture future) throws Exception {
                // Directly obtain the cause and do a null check so we only need one volatile read in case of a
                // failure.
                Throwable cause = future.cause();
                if (cause != null) {
                    // Registration on the EventLoop failed so fail the ChannelPromise directly to not cause an
                    // IllegalStateException once we try to access the EventLoop of the Channel.
                    promise.setFailure(cause);
                } else {
                    // Registration was successful, so set the correct executor to use.
                    // See https://github.com/netty/netty/issues/2586
                    promise.registered();
                    doResolveAndConnect0(channel, remoteAddress, localAddress, promise);
                }
            }
        });
        return promise;
    }
}
需要看doResolveAndConnect0(), 里面又调用的是doConnect()
io.netty.bootstrap.Bootstrap
private static void doConnect(
    final SocketAddress remoteAddress, final SocketAddress localAddress, final ChannelPromise connectPromise) {

    // This method is invoked before channelRegistered() is triggered.  Give user handlers a chance to set up
    // the pipeline in its channelRegistered() implementation.
    final Channel channel = connectPromise.channel();
    channel.eventLoop().execute(new Runnable() {
        @Override
        public void run() {
            if (localAddress == null) {
                channel.connect(remoteAddress, connectPromise);
            } else {
                channel.connect(remoteAddress, localAddress, connectPromise);
            }
            connectPromise.addListener(ChannelFutureListener.CLOSE_ON_FAILURE);
        }
    });
}
最终调用的是:
io.netty.channel.socket.nio.NioSocketChannel#doConnect()
@Override
protected boolean doConnect(SocketAddress remoteAddress, SocketAddress localAddress) throws Exception {
    boolean success = false;
    try {
        boolean connected = SocketUtils.connect(javaChannel(), remoteAddress);
        if (!connected) {
            selectionKey().interestOps(SelectionKey.OP_CONNECT);
        }
        success = true;
        return connected;
    } finally {
        if (!success) {
            doClose();
        }
    }
}
再看SocketUtils.connect(javaChannel(), remoteAddress)
io.netty.util.internal.SocketUtils
public static boolean connect(final SocketChannel socketChannel, final SocketAddress remoteAddress)
            throws IOException {
    try {
        return AccessController.doPrivileged(new PrivilegedExceptionAction<Boolean>() {
            @Override
            public Boolean run() throws IOException {
                return socketChannel.connect(remoteAddress);
            }
        });
    } catch (PrivilegedActionException e) {
        throw (IOException) e.getCause();
    }
}
这里我们看到了熟悉的socketChannel.connect(remoteAddress)。
Server与Client通信#
上面详细介绍了Server端的启动过程,Client端的启动过程,Client也向Server发出了连接请求。这时再回过头来看Server端。
Server端感知到了IO事件,会在io.netty.channel.nio.NioEventLoop的run()方法里,调用processSelectedKeys(),对于每个IO事件,最终调用的是processSelectedKey()来处理。
io.netty.channel.nio.NioEventLoop
private void processSelectedKey(SelectionKey k, AbstractNioChannel ch) {
    final AbstractNioChannel.NioUnsafe unsafe = ch.unsafe();
    try {
        int readyOps = k.readyOps();
        // We first need to call finishConnect() before try to trigger a read(...) or write(...) as otherwise
        // the NIO JDK channel implementation may throw a NotYetConnectedException.
        if ((readyOps & SelectionKey.OP_CONNECT) != 0) {
            // remove OP_CONNECT as otherwise Selector.select(..) will always return without blocking
            // See https://github.com/netty/netty/issues/924
            int ops = k.interestOps();
            ops &= ~SelectionKey.OP_CONNECT;
            k.interestOps(ops);

            unsafe.finishConnect();
        }

        // Process OP_WRITE first as we may be able to write some queued buffers and so free memory.
        if ((readyOps & SelectionKey.OP_WRITE) != 0) {
            // Call forceFlush which will also take care of clear the OP_WRITE once there is nothing left to write
            ch.unsafe().forceFlush();
        }

        // Also check for readOps of 0 to workaround possible JDK bug which may otherwise lead
        // to a spin loop
        if ((readyOps & (SelectionKey.OP_READ | SelectionKey.OP_ACCEPT)) != 0 || readyOps == 0) {
            unsafe.read();
        }
    } catch (CancelledKeyException ignored) {
        unsafe.close(unsafe.voidPromise());
    }
}
这里是SelectionKey.OP_ACCEPT,当然走的是unsafe.read()
io.netty.channel.nio.AbstractNioMessageChannel
private final class NioMessageUnsafe extends AbstractNioUnsafe {

    private final List<Object> readBuf = new ArrayList<Object>();

    @Override
    public void read() {
        assert eventLoop().inEventLoop();
        final ChannelConfig config = config();
        final ChannelPipeline pipeline = pipeline();
        final RecvByteBufAllocator.Handle allocHandle = unsafe().recvBufAllocHandle();
        allocHandle.reset(config);

        boolean closed = false;
        Throwable exception = null;
        try {
            try {
                do {
                    int localRead = doReadMessages(readBuf);
                    if (localRead == 0) {
                        break;
                    }
                    if (localRead < 0) {
                        closed = true;
                        break;
                    }

                    allocHandle.incMessagesRead(localRead);
                } while (allocHandle.continueReading());
            } catch (Throwable t) {
                exception = t;
            }

            int size = readBuf.size();
            for (int i = 0; i < size; i ++) {
                readPending = false;
                pipeline.fireChannelRead(readBuf.get(i));
            }
            readBuf.clear();
            allocHandle.readComplete();
            pipeline.fireChannelReadComplete();
        } finally {
            // ...
        }
    }
}
这里面有很重要的两个方法,doReadMessages(readBuf)和pipeline.fireChannelRead()
io.netty.channel.socket.nio.NioServerSocketChannel
@Override
protected int doReadMessages(List<Object> buf) throws Exception {
    SocketChannel ch = SocketUtils.accept(javaChannel());
    try {
        if (ch != null) {
            buf.add(new NioSocketChannel(this, ch));
            return 1;
        }
    } catch (Throwable t) {
        // ...
    }
    return 0;
}
io.netty.util.internal.SocketUtils
public static SocketChannel accept(final ServerSocketChannel serverSocketChannel) throws IOException {
    try {
        return AccessController.doPrivileged(new PrivilegedExceptionAction<SocketChannel>() {
            @Override
            public SocketChannel run() throws IOException {
                return serverSocketChannel.accept();
            }
        });
    } catch (PrivilegedActionException e) {
        throw (IOException) e.getCause();
    }
}
serverSocketChannel接受了Client端的连接后,将该socketChannel放到了List中。
而后遍历该List,将每个socketChannel传入pipeline.fireChannelRead()中。
还记得当前serverSocketChannel的ChannelPipeline有哪些ChannelHandler吗?
head --> ServerBootstrapAcceptor --> tail
接下来就需要重点看下ServerBootstrapAcceptor的逻辑
io.netty.bootstrap.ServerBootstrap#ServerBootstrapAcceptor
private static class ServerBootstrapAcceptor extends ChannelInboundHandlerAdapter {

    private final EventLoopGroup childGroup;
    private final ChannelHandler childHandler;
    private final Runnable enableAutoReadTask;

    ServerBootstrapAcceptor(
            final Channel channel, EventLoopGroup childGroup, ChannelHandler childHandler,
            Entry<ChannelOption<?>, Object>[] childOptions, Entry<AttributeKey<?>, Object>[] childAttrs) {
        this.childGroup = childGroup;
        this.childHandler = childHandler;

        enableAutoReadTask = new Runnable() {
            @Override
            public void run() {
                channel.config().setAutoRead(true);
            }
        };
    }

    @Override
    public void channelRead(ChannelHandlerContext ctx, Object msg) {
        final Channel child = (Channel) msg;

        child.pipeline().addLast(childHandler);

        setChannelOptions(child, childOptions, logger);
        setAttributes(child, childAttrs);

        childGroup.register(child).addListener(new ChannelFutureListener() {
                @Override
                public void operationComplete(ChannelFuture future) throws Exception {
                    if (!future.isSuccess()) {
                        forceClose(child, future.cause());
                    }
                }
        });
    }
}
ServerBootstrapAcceptor将建立好连接的socketChannel注册到workerGroup中的某个EventLoop(或者说是Selector)上,而且将用户编写的childHandler加到了每个socketChannel的ChannelPipeline中。ServerBootstrapAcceptor相当于起了转发的作用,建立好连接后Channel实际的读写IO事件是由workerGroup中的EventLoop来处理。
再回过头来,看Reactor模式的多Reactor版本(一主多从),不知道你是否能get到其中的含义?
注意:上面代码里的childGroup就是来自我们在写Server端NettyServer代码时定义的workerGroup
EventLoopGroup workerGroup = new NioEventLoopGroup();
我觉得能坚持看到这个地方的朋友应该能明白,只是这里又啰嗦了一下。
讲到这里,我觉得其实后面Client端的情况都不用讲了,已经很清晰了。不过为了文章的完整性,还是写下去比较好。
Server端accept连接请求后,Client端此时同样也有了IO事件。同样还是走processSelectedKey()那个方法,不过执行的分支不一样。
int readyOps = k.readyOps();
// We first need to call finishConnect() before try to trigger a read(...) or write(...) as otherwise
// the NIO JDK channel implementation may throw a NotYetConnectedException.
if ((readyOps & SelectionKey.OP_CONNECT) != 0) {
    // remove OP_CONNECT as otherwise Selector.select(..) will always return without blocking
    // See https://github.com/netty/netty/issues/924
    int ops = k.interestOps();
    ops &= ~SelectionKey.OP_CONNECT;
    k.interestOps(ops);

    unsafe.finishConnect();
}
最终调用doFinishConnect(),如下:
io.netty.channel.socket.nio.NioSocketChannel
@Override
protected void doFinishConnect() throws Exception {
    if (!javaChannel().finishConnect()) {
        throw new Error();
    }
}
之后,Client端与Server端就可以通过Channel读写数据,通过ChannelPipeline中的ChannelHandler对数据decode、compute、encode。
写在后面#
至此,本篇就大致讲清楚了Netty的Server端和Client端的整个启动并通信的过程以及如何对nio进行封装的。这里再贴一张在网络上流传较广的Netty工作原理图,相信此时再看这张图应该无比亲切吧。
整个过程确实比较绕。但回过头再看,有一个清晰的思路,然后时刻记着与nio的代码做对比,多点耐心也还能坚持下去,另外遇到搞不明白的地方再配合debug,会轻松许多。