一、介绍
Axios 是一个基于 promise 的 HTTP 库,可以用在浏览器和 node.js 中。 官方资料和介绍
- 从浏览器中创建 XMLHttpRequests
- 从 node.js 创建 http 请求
- 支持 Promise API
- 拦截请求和响应
- 转换请求数据和响应数据
- 取消请求
- 自动转换 JSON 数据
- 客户端支持防御 XSRF
二、Axios的基本使用
1、Axios安装方法
使用npm:
$ npm install axios
使用bower:
$ bower install axios
使用cdn:
<script src="https://unpkg.com/axios/dist/axios.min.js"></script>
2、axios项目配置准备
$ npm init --yes
{
  "name": "code",
  "version": "1.0.0",
  "description": "",
  "main": "index.js",
  "scripts": {
    "test": "echo "Error: no test specified" && exit 1"
  },
  "keywords": [],
  "author": "",
  "license": "ISC"
}

$ npm install vue -S;npm install axios -S
code@1.0.0 /Users/hqs/PycharmProjects/vue_study/04-axios的基本使用/code
└── vue@2.6.10

code@1.0.0 /Users/hqs/PycharmProjects/vue_study/04-axios的基本使用/code
└─┬ axios@0.18.0
  ├─┬ follow-redirects@1.7.0
  │ └─┬ debug@3.2.6
  │   └── ms@2.1.1
  └── is-buffer@1.1.6
3、服务端配置准备
# 1.pip3 install Flask
# 2.python3 server.py

import json

from flask import Flask
from flask import request
from flask import Response


app = Flask(__name__)

# 默认是get请求
@app.route("/")
def index():
    resp = Response("<h2>首页</h2>")
    resp.headers["Access-Control-Allow-Origin"] = "*"
    return resp


@app.route("/course")
def courses():
    resp = Response(json.dumps({
        "name": "alex"
    }))
    resp.headers["Access-Control-Allow-Origin"] = "*"
    return resp


@app.route("/create", methods=["post",])
def create():
    print(request.form.get('name'))

    with open("user.json", "r") as f:
        # 将数据反序列化
        data = json.loads(f.read())

    data.append({"name": request.form.get('name')})

    with open("user.json", "w") as f:
        f.write(json.dumps(data))

    resp = Response(json.dumps(data))
    resp.headers["Access-Control-Allow-Origin"] = "*"

    return resp

if __name__ == '__main__':
    app.run(host="localhost", port=8800)
服务端代码如上所示,再编辑user.json文件如下:
[{"name": "alex"}]
4、axios发送请求
<body>
    <div id="app"></div>
    <script type="text/javascript" src="./node_modules/vue/dist/vue.js"></script>
    <script type="text/javascript" src="./node_modules/axios/dist/axios.js"></script>
    <script type="text/javascript">
        var App = {
            data(){
                return {
                    msg: ''
                }
            },
            template:`
                <div>
                    <button @click='sendAjax'>发Get请求</button>
                    <div v-html="msg"></div>
                    <button @click="sendAjaxByPost">发post请求</button>
                </div>
            `,
            methods:{
                sendAjax(){
                    // 发送get请求
                    axios.get("http://127.0.0.1:8800/"
                    ).then(res=>{
                        console.log(res.data);        // <h2>首页</h2>
                        console.log(typeof res.data);    // string
                        this.msg = res.data;
                    }).catch(err=>{   // 有参数括号可以不写
                        console.log(err);
                    })
                },
                sendAjaxByPost(){
                    var params = new URLSearchParams();
                    params.append('name', 'hqs');
                    // 发送post请求
                    axios.post('http://127.0.0.1:8800/create', params
                    ).then(function (res) {
                        console.log(res);
                    }).catch(err=>{
                        console.log(err);
                    })
                }
            }
        };

        new Vue({
            el: "#app",
            data(){
                return {

                }
            },
            components:{
                App
            },
            template: `<App/>`
        })
    </script>
</body>
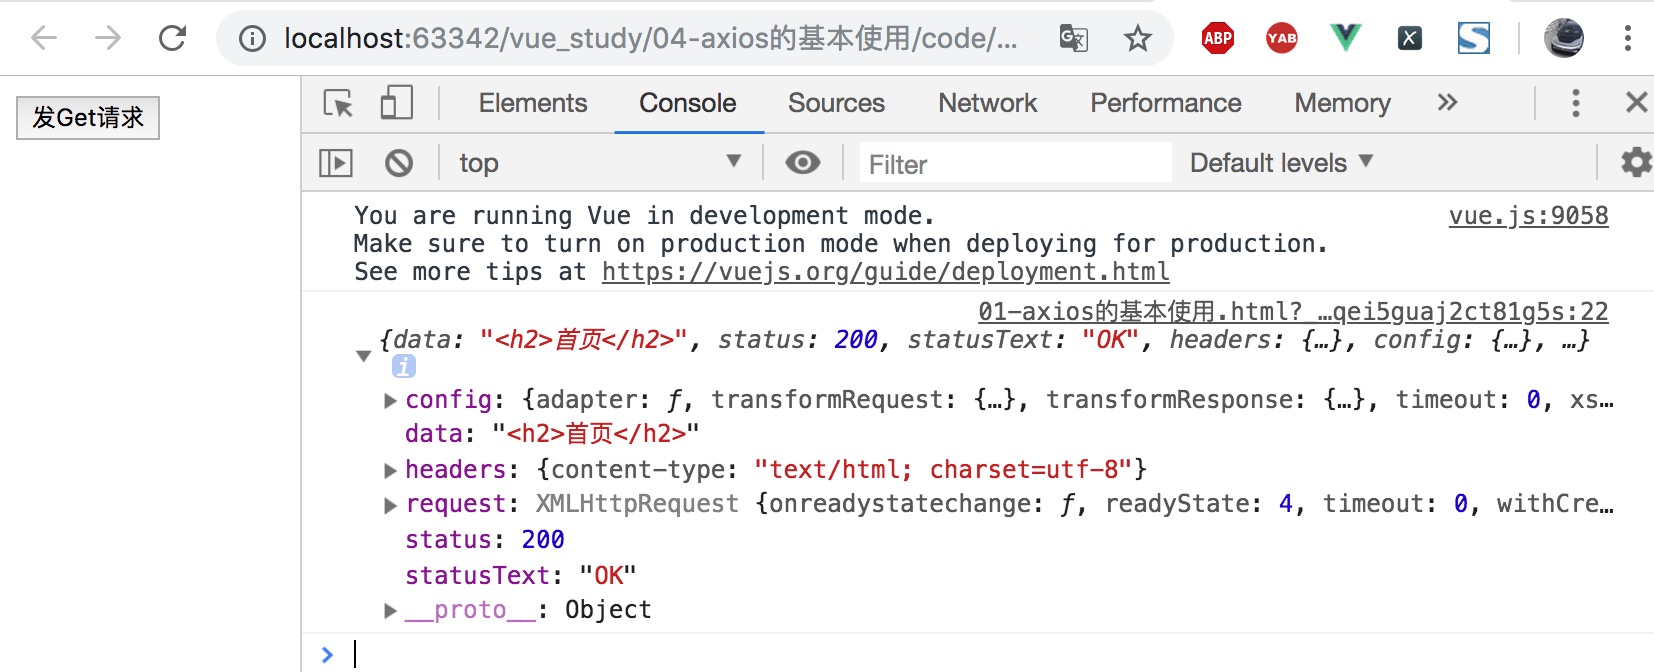
(1) 发起一个GET请求
methods:{
    sendAjax(){
        // 发送get请求
        axios.get("http://127.0.0.1:8800/"
        ).then(res=>{
            console.log(res.data);        // <h2>首页</h2>
            console.log(typeof res.data);    // string
            this.msg = res.data;
        }).catch(err=>{   // 有参数括号可以不写
            console.log(err);
        })
    }
}
点击发送get请求的按钮,console输出的实例化对象如下所示:
(2)发起一个POST请求
methods:{
    sendAjaxByPost(){
        var params = new URLSearchParams();
        params.append('name', 'hqs');
        // 发送post请求
        axios.post('http://127.0.0.1:8800/create', params
        ).then(function (res) {
            console.log(res);
        }).catch(err=>{
            console.log(err);
        })
    }
}
点击发送post请求,console输出的实例化对象如下所示:
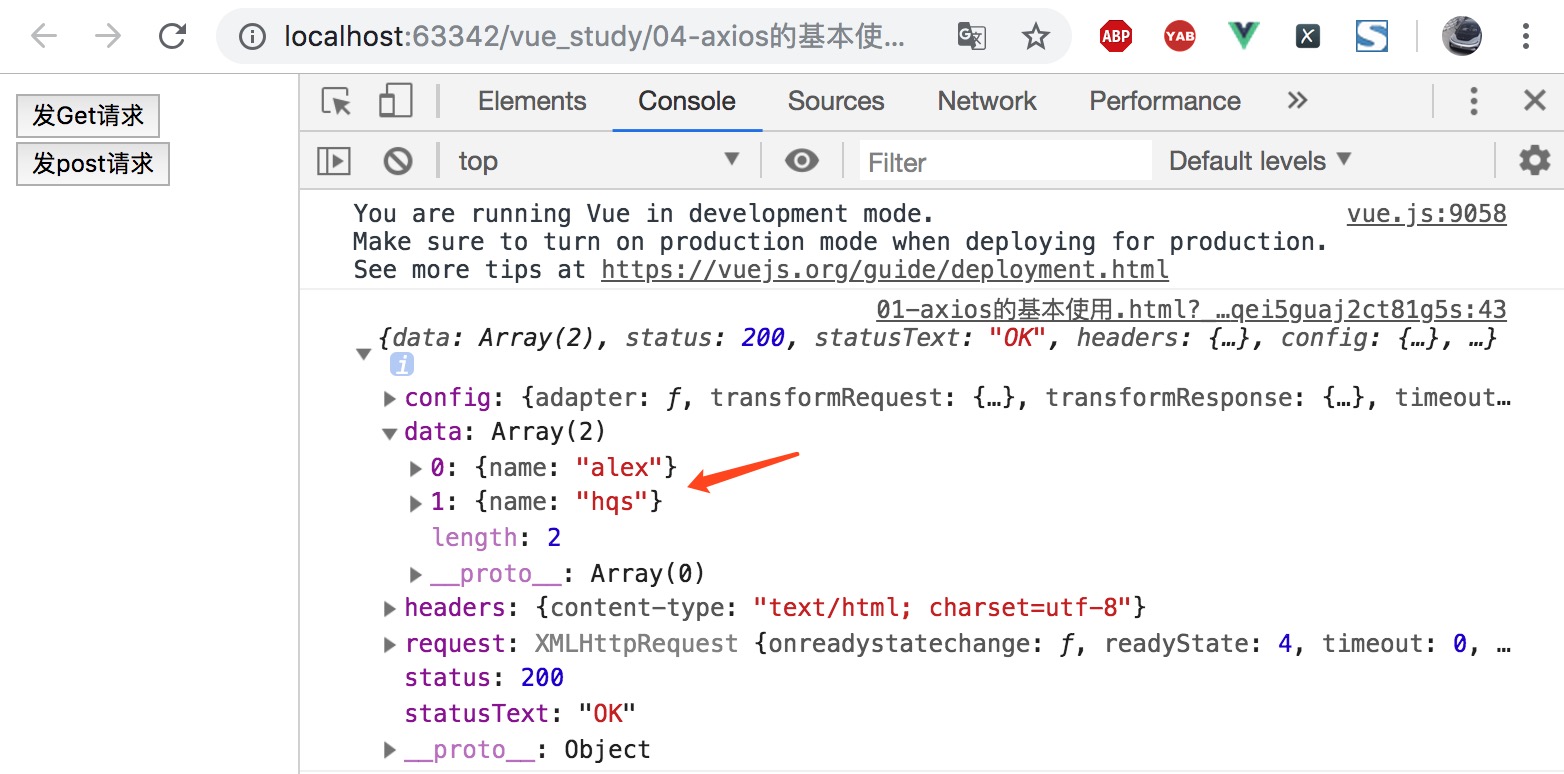
user.json文件内容变化为如下内容:
[{"name": "alex"}, {"name": "hqs"}]
5、axios的默认配置
vue和axios都是全局对象,未来axios会成为局部作用域.可以给Vue的原型挂载一个属性$axios:
Vue.prototype.$axios = axios;
此时我们就可以在任意组件中通过this.$axios获取到当前的axios实例。
<!--vue和axios都是全局对象,未来axios会成为局部作用域-->
<script type="text/javascript">
    // 挂载,给Vue的原型挂载一个属性$axios,使用插件
    Vue.prototype.$axios = axios;
    // 配置公共的url
    axios.defaults.baseURL = 'http://127.0.0.1:8800';

    var App = {
        data(){
            return {
                msg: ''
            }
        },
        template:`
            <div>
                <button @click='sendAjax'>发Get请求</button>
                <div v-html="msg"></div>
                <button @click="sendAjaxByPost">发post请求</button>
            </div>
        `,
        methods:{
            sendAjax(){
                // 发送get请求,直接拼接公共Url
                this.$axios.get("/"
                ).then(res=>{
                    console.log(res.data);        // <h2>首页</h2>
                    console.log(typeof res.data);    // string
                    this.msg = res.data;
                }).catch(err=>{   // 有参数括号可以不写
                    console.log(err);
                })
            },
            sendAjaxByPost(){
                var params = new URLSearchParams();
                params.append('name', 'hqs');
                // 发送post请求
                this.$axios.post('/create', params
                ).then(function (res) {
                    console.log(res);
                }).catch(err=>{
                    console.log(err);
                })
            }
        }
    };
    // 代码省略
</script>
6、使用axios的this指向问题
在前端框架中一定要使用箭头函数,不建议使用es5中的普通函数,因为它会使this的指向发生改变。
(1)this指向问题现象
<body>
    <div id="app"></div>
    <script type="text/javascript" src="./node_modules/vue/dist/vue.js"></script>
    <script type="text/javascript" src="./node_modules/axios/dist/axios.js"></script>

    <!--vue和axios都是全局对象,未来axios会成为局部作用域-->
    <script type="text/javascript">
        // 挂载,给Vue的原型挂载一个属性$axios,使用插件
        Vue.prototype.$axios = axios;
        // 配置公共的url
        axios.defaults.baseURL = 'http://127.0.0.1:8800';

        var App = {
            data(){
                return {
                    msg: '',
                    datas: []

                }
            },
            template:`
                <div>
                    <button @click='sendAjax'>发Get请求</button>
                    <div v-html="msg"></div>
                    <button @click="sendAjaxByPost">发post请求</button>
                    {{datas}}
                </div>
            `,
            methods:{
                sendAjax(){
                    // 发送get请求,直接拼接公共Url
                    this.$axios.get("/"
                    ).then(res=>{
                        console.log(res.data);        // <h2>首页</h2>
                        console.log(typeof res.data);    // string
                        this.msg = res.data;
                    }).catch(err=>{   // 有参数括号可以不写
                        console.log(err);
                    })
                },
                sendAjaxByPost(){
                    var params = new URLSearchParams();
                    params.append('name', 'hqs');
                    // 发送post请求
                    this.$axios.post('/create', params
                    ).then(function (res) {
                        console.log(res);
                        console.log(this);   // 输出window示例对象(自动转化为windows对象)
                        // 初学者易犯的错
                        this.datas = res;
                    }).catch(err=>{
                        console.log(err);
                    })
                }
            }
        };

        new Vue({
            el: "#app",
            data(){
                return {

                }
            },
            components:{
                App
            },
            template: `<App/>`
        })
    </script>
</body>
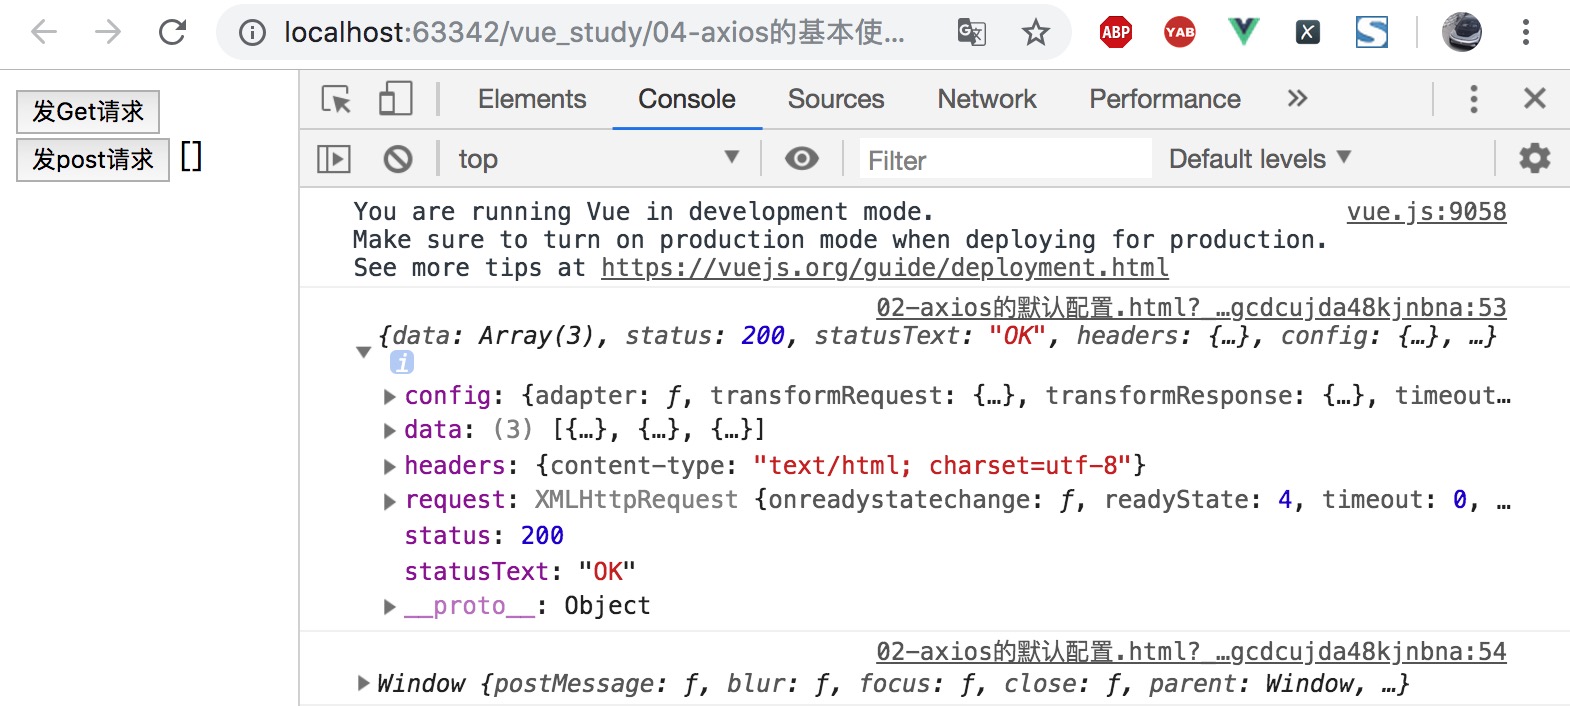
回调函数中的this从axios改为了windows,console输出如下所示:
(2)使用箭头函数解决this指向问题
在vue中使用函数时,推荐使用箭头函数可以解决this的指向问题。
sendAjaxByPost(){
    var params = new URLSearchParams();
    params.append('name', 'hqs');
    // 发送post请求
    this.$axios.post('/create', params
    ).then((res)=> {
        console.log(res);
        console.log(this);
        // 初学者易犯的错
        this.datas = res;
    }).catch(err=>{
        console.log(err);
    })
}
点击发送post请求按钮,显示效果如下所示:

(3)使用局部变量解决this指向问题(不推荐)
sendAjaxByPost(){
    var _this = this;
    var params = new URLSearchParams();
    params.append('name', 'hqs');
    // 发送post请求
    this.$axios.post('/create', params
    ).then(function (res) {
        console.log(res);
        console.log(this);
        // 初学者易犯的错
        this.datas = res;
    }).catch(err=>{
        console.log(err);
    })
}