接整合druid那节。
现在基本目录:


pom.xml
<?xml version="1.0" encoding="UTF-8"?>
<project xmlns="http://maven.apache.org/POM/4.0.0" xmlns:xsi="http://www.w3.org/2001/XMLSchema-instance"
         xsi:schemaLocation="http://maven.apache.org/POM/4.0.0 https://maven.apache.org/xsd/maven-4.0.0.xsd">
    <modelVersion>4.0.0</modelVersion>
    <parent>
        <groupId>org.springframework.boot</groupId>
        <artifactId>spring-boot-starter-parent</artifactId>
        <version>2.2.4.RELEASE</version>
        <relativePath/> <!-- lookup parent from repository -->
    </parent>
    <groupId>com.gong</groupId>
    <artifactId>springboot-curd</artifactId>
    <version>0.0.1-SNAPSHOT</version>
    <name>springboot-curd</name>
    <description>Demo project for Spring Boot</description>

    <properties>
        <java.version>1.8</java.version>
    </properties>

    <dependencies>
        <dependency>
            <groupId>org.springframework.boot</groupId>
            <artifactId>spring-boot-starter-web</artifactId>
        </dependency>
        <dependency>
            <groupId>org.springframework.boot</groupId>
            <artifactId>spring-boot-starter-thymeleaf</artifactId>
        </dependency>
        <dependency>
            <groupId>mysql</groupId>
            <artifactId>mysql-connector-java</artifactId>
            <version>5.1.41</version>
            <scope>runtime</scope>
        </dependency>
        <dependency>
            <groupId>org.springframework.boot</groupId>
            <artifactId>spring-boot-starter-data-jdbc</artifactId>
        </dependency>
        <dependency>
            <groupId>org.mybatis.spring.boot</groupId>
            <artifactId>mybatis-spring-boot-starter</artifactId>
            <version>1.3.2</version>
        </dependency>
        <dependency>
            <groupId>com.alibaba</groupId>
            <artifactId>druid-spring-boot-starter</artifactId>
            <version>1.1.10</version>
        </dependency>
        <dependency>
            <groupId>org.webjars</groupId>
            <artifactId>bootstrap</artifactId>
            <version>4.1.2</version>
        </dependency>
        <dependency>
            <groupId>junit</groupId>
            <artifactId>junit</artifactId>
            <version>4.12</version>
            <scope>test</scope>
        </dependency>
        <dependency>
            <groupId>org.springframework.boot</groupId>
            <artifactId>spring-boot-starter-test</artifactId>
            <scope>test</scope>
            <exclusions>
                <exclusion>
                    <groupId>org.junit.vintage</groupId>
                    <artifactId>junit-vintage-engine</artifactId>
                </exclusion>
            </exclusions>
        </dependency>
    </dependencies>

    <build>
        <plugins>
            <plugin>
                <groupId>org.springframework.boot</groupId>
                <artifactId>spring-boot-maven-plugin</artifactId>
            </plugin>
        </plugins>
    </build>

</project>
导入这个启动器之后,实际上就可以使用基于注解的Mybatis,接下来我们进行测试。
application.yml
spring:
  datasource:
    username: root
    password: 123456
    url: jdbc:mysql://192.168.124.22:3306/mybatis?serverTimezone=UTC
    driver-class-name: com.mysql.jdbc.Driver
    type: com.alibaba.druid.pool.DruidDataSource
    # 数据源其它配置
    initialSize: 5
    minIdle: 5
    maxActive: 20
    maxWait: 60000
    timeBetweenEvictionRunsMillis: 60000
    minEvictableIdleTimeMillis: 300000
    validationQuery: SELECT 1 FROM DUAL
    testWhileIdle: true
    testOnBorrow: false
    testOnReturn: false
    poolPreparedStatements: true
    #配置监控统计拦截的filters,去掉后监控界面sql无法统计,'wall'用于防火墙
    filters: stat,wall
    maxPoolPreparedStatementPerConnectionSize: 20
    useGlobalDataSourceStat: true
    connectionProperties: druid.stat.mergeSql=true;druid.stat.slowSqlMillis=500
#    schema:
#     - classpath:sql/department.sql
#     - classpath:sql/employee.sql
#    initialization-mode: always
后面注释掉的是用于启动服务器之后自动创建sql表。
department.sql
SET FOREIGN_KEY_CHECKS=0;

-- ----------------------------
-- Table structure for department
-- ----------------------------
DROP TABLE IF EXISTS `department`;
CREATE TABLE `department` (
  `id` int(11) NOT NULL AUTO_INCREMENT,
  `departmentName` varchar(255) DEFAULT NULL,
  PRIMARY KEY (`id`)
) ENGINE=InnoDB AUTO_INCREMENT=1 DEFAULT CHARSET=utf8;
employee.sql
SET FOREIGN_KEY_CHECKS=0;

-- ----------------------------
-- Table structure for employee
-- ----------------------------
DROP TABLE IF EXISTS `employee`;
CREATE TABLE `employee` (
  `id` int(11) NOT NULL AUTO_INCREMENT,
  `lastName` varchar(255) DEFAULT NULL,
  `email` varchar(255) DEFAULT NULL,
  `gender` int(2) DEFAULT NULL,
  `d_id` int(11) DEFAULT NULL,
  PRIMARY KEY (`id`)
) ENGINE=InnoDB AUTO_INCREMENT=1 DEFAULT CHARSET=utf8;
生成一次之后记得注释掉,不然会重新建表,数据会丢失。
Deparment.java
package com.gong.springbootjdbc.bean;

import org.springframework.stereotype.Repository;

@Repository
public class Department {
    private Integer id;
    private  String departmentName;

    public Integer getId() {
        return id;
    }

    public void setId(Integer id) {
        this.id = id;
    }

    public String getDepartmentName() {
        return departmentName;
    }

    public void setDepartmentName(String departmentName) {
        this.departmentName = departmentName;
    }
}
Employee.java
package com.gong.springbootjdbc.bean;

import org.springframework.stereotype.Repository;

@Repository
public class Employee {
    private Integer id;
    private String lastName;
    private Integer gender;
    private String email;
    private Integer dId;

    public Integer getId() {
        return id;
    }

    public void setId(Integer id) {
        this.id = id;
    }

    public String getLastName() {
        return lastName;
    }

    public void setLastName(String lastName) {
        this.lastName = lastName;
    }

    public Integer getGender() {
        return gender;
    }

    public void setGender(Integer gender) {
        this.gender = gender;
    }

    public String getEmail() {
        return email;
    }

    public void setEmail(String email) {
        this.email = email;
    }

    public Integer getdId() {
        return dId;
    }

    public void setdId(Integer dId) {
        this.dId = dId;
    }
}
记得标注@Repository
DruidConfig.java
package com.gong.springbootjdbc.config;

import com.alibaba.druid.pool.DruidDataSource;
import com.alibaba.druid.support.http.StatViewServlet;
import com.alibaba.druid.support.http.WebStatFilter;
import org.springframework.boot.context.properties.ConfigurationProperties;
import org.springframework.boot.web.servlet.FilterRegistrationBean;
import org.springframework.boot.web.servlet.ServletRegistrationBean;
import org.springframework.context.annotation.Bean;
import org.springframework.context.annotation.Configuration;

import javax.sql.DataSource;
import java.util.Arrays;
import java.util.HashMap;
import java.util.Map;

@Configuration
public class DruidConfig {

    @ConfigurationProperties(prefix = "spring.datasource")
    @Bean
    public DataSource druid(){
       return  new DruidDataSource();
    }

    //配置Druid的监控
    //1、配置一个管理后台的Servlet
    @Bean
    public ServletRegistrationBean statViewServlet(){
        ServletRegistrationBean bean = new ServletRegistrationBean(new StatViewServlet(), "/druid/*");
        Map<String,String> initParams = new HashMap<>();

        initParams.put("loginUsername","admin");
        initParams.put("loginPassword","123456");
        initParams.put("allow","");//默认就是允许所有访问
        initParams.put("deny","192.168.124.9");

        bean.setInitParameters(initParams);
        return bean;
    }


    //2、配置一个web监控的filter
    @Bean
    public FilterRegistrationBean webStatFilter(){
        FilterRegistrationBean bean = new FilterRegistrationBean();
        bean.setFilter(new WebStatFilter());

        Map<String,String> initParams = new HashMap<>();
        initParams.put("exclusions","*.js,*.css,/druid/*");

        bean.setInitParameters(initParams);

        bean.setUrlPatterns(Arrays.asList("/*"));

        return  bean;
    }
}
DruidConfig相关设置。
MybatisConfig.java
package com.gong.springbootjdbc.config;

import org.mybatis.spring.boot.autoconfigure.ConfigurationCustomizer;
import org.springframework.context.annotation.Bean;
import org.springframework.context.annotation.Configuration;

@Configuration
public class MybatisConfig {

    @Bean
    public ConfigurationCustomizer configurationCustomizer(){
        return new ConfigurationCustomizer(){
            @Override
            public void customize(org.apache.ibatis.session.Configuration configuration) {
                //开启驼峰命名法
                configuration.setMapUnderscoreToCamelCase(true);
            }
        };
    }

}
Mybatis相关设置。
接下来是DepartmentMapper.java
package com.gong.springbootjdbc.mapper;

import com.gong.springbootjdbc.bean.Department;
import org.apache.ibatis.annotations.*;

//@Mapper
public interface DepartmentMapper {

    @Select("select * from department where id=#{id}")
    public Department getDeptById(Integer id);

    @Delete("delete from department where id=#{id}")
    public int deleteDeptById(Integer id);

    @Options(useGeneratedKeys = true,keyProperty = "id")
    @Insert("insert into department(department_name) values(#{departmentName})")
    public int insertDept(Department department);

    @Update("update department set department_name=#{departmentName} where id=#{id}")
    public int updateDept(Department department);
}
这里如果注释掉Mapper,则需要在启动入口或者MybatisConfig中开启自动扫描Mapper,这里我选择在程序入口上加:
package com.gong.springbootjdbc;

import org.mybatis.spring.annotation.MapperScan;
import org.springframework.boot.SpringApplication;
import org.springframework.boot.autoconfigure.SpringBootApplication;

@MapperScan(value = "com.gong.springbootjdbc.mapper")
@SpringBootApplication
public class SpringbootJdbcApplication {

    public static void main(String[] args) {
        SpringApplication.run(SpringbootJdbcApplication.class, args);
    }

}
最后是DeptController.java
package com.gong.springbootjdbc.controller;


import com.gong.springbootjdbc.bean.Department;
import com.gong.springbootjdbc.mapper.DepartmentMapper;
import org.springframework.beans.factory.annotation.Autowired;
import org.springframework.web.bind.annotation.GetMapping;
import org.springframework.web.bind.annotation.PathVariable;
import org.springframework.web.bind.annotation.RestController;

@RestController
public class DeptController {

    @Autowired
    DepartmentMapper departmentMapper;

    @GetMapping("/dept/{id}")
    public Department getDepartment(@PathVariable("id") Integer id){
        return departmentMapper.getDeptById(id);
    }

    @GetMapping("/dept")
    public Department insertDept(Department department){
        departmentMapper.insertDept(department);
        return department;
    }
}
启动服务器,首先我们输入localhost:8080/dept?departmentName=AA,插入一条数据。id为5是因为我之前测试了4条并全部删除了。

再插入一条:

然后查询id为6的:

最后另外打开一个窗口:输入localhost:8080/druid,输入用户名和密码之后进入到druid后台管理界面:
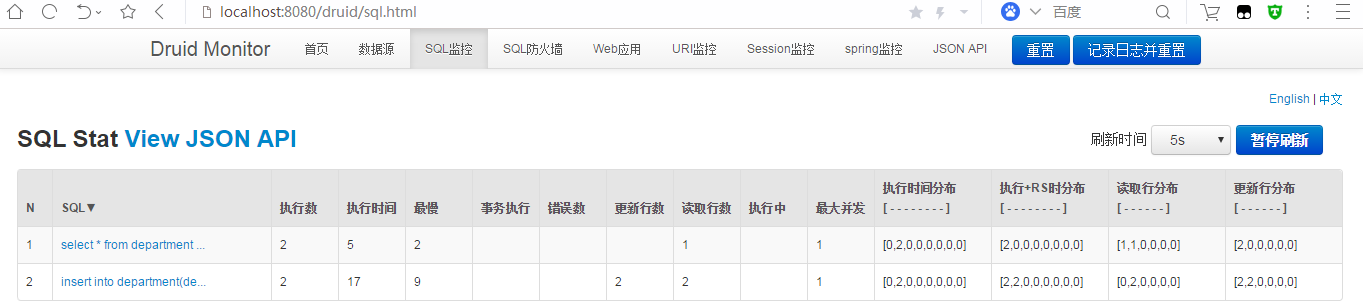
看到druid监控了我们的sql。查询执行数为2,是因为我开始忘了id是从5开始,查询了id为1.
至此,基于注解的Mybatis以及使用druid监控就完成了。