fastfds的安装和使用
一、所需依赖
- 操作系统:centos7.x(注意的是centos使用yum安装相关依赖)
- fastdfs:V6.06.tar.gz
- libfastcommon:V1.0.43.tar.gz
- fastdfs-nginx-module:fastdfs-nginx-module-1.22.tar.gz
- nginx:nginx-1.18.0.tar.gz
切记:版本一定要对应好,不然会遇到很多难以名状的问题。
二、fastdfs基础知识
1、什么是fastdfs
(1)fastdfs是一个轻量级的开源分布式文件系统;
(2)fastdfs主要解决了大容量的文件存储和高并发访问的问题,文件存取时实现了负载均衡;
(3)fastdfs实现了软件方式的RAID,可以使用廉价的IDE硬盘进行存储支持存储服务器在线扩容支持相同内容的文件只保存一份,节约磁盘空间;
(4)fastdfs只能通过Client API访问,不支持POSIX访问方式;
(5)fastdfs特别适合大中型网站使用,用来存储资源文件(如:图片、文档、音频、视频等等)。
2、fastdfs框架图

其中:
*Tracker Server:*跟踪服务器,主要做调度工作,在访问上起负载均衡的作用。记录storage server的状态,是连接Client和Storage server的枢纽。
*Storage Server:*存储服务器,文件和meta data都保存到存储服务器上。
*group:*组,也可称为卷。同组内服务器上的文件是完全相同的文件标识:包括两部分:组名和文件名(包含路径)。
*meta data:*文件相关属性,键值对(Key Value Pair)方式,如:width=1024,heigth=768。
3、上传文件流程

(1)client询问tracker上传到的storage,不需要附加参数;
(2)tracker返回一台可用的storage;
(3)client直接和storage通讯完成文件上传。
4、下载文件流程
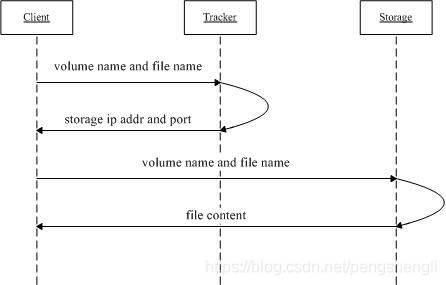
(1)client询问tracker下载文件的storage,参数为文件标识(组名和文件名);
(2)tracker返回一台可用的storage;
(3)client直接和storage通讯完成文件下载。
5、同步机制
(1)同一组内的storage server之间是对等的,文件上传、删除等操作可以在任意一台storage server上进行;
(2)文件同步只在同组内的storage server之间进行,采用push方式,即源服务器同步给目标服务器;
(3)源头数据才需要同步,备份数据不需要再次同步,否则就构成环路了;
(4)上述第二条规则有个例外,就是新增加一台storage server时,由已有的一台storage server将已有的所有数据(包括源头数据和备份数据)同步给该新增服务器。
6、tracker server目录结构
--data
storage_groups.dat:存储分组信息
storage_servers.dat:存储服务器列表
--logs
trackerd.log:tracker server日志文件
7、storage_server目录结构
--data
fdfs_storaged.pid:当前storage server的pid
storage_stat.dat:当前storage server统计信息
--sync:存放数据同步相关文件
binlog_index.dat:当前的binlog文件索引号
binlog.###:存放更新操作记录(日志)
\({ip_addr}_\){port}.mark:存放同步的完成情况
--logs
storaged.log:storage server日志文件
以上理论参考:
ChinaUnix论坛:http://bbs.chinaunix.net/forum-240-1.html
github下载地址:https://github.com/happyfish100
脚本之家:https://www.jb51.net/article/197165.html
三、安装
碰到权限问题,在指令前面加sudo。可以找一个地方建立一个文件夹,专门存放上述的压缩包,然后操作时在同级目录下解压即可。
总体框架:
- 一台服务器作为tracker,同时该服务器下有一个storage,该storage为group1
- 还有一台服务器只作为storage,且有4个组,分别是group1-group4,每个组下面都有一个storage,其中group1的storage和tracker所在的服务器的storage同属于一个组。
1、安装libfastcommon
tar -zxvf V1.0.43.tar.gz
cd libfastcommon-1.0.43
./make.sh
sudo ./make.sh install
2、安装fastfds
tar -zxvf V6.06.tar.gz
cd fastdfs-6.06
./make.sh
sudo ./make.sh install
对于包含tracker的服务器:注意这里可能存在权限问题,可以先切换到root用户。
2.1、配置tracker
cd /etc/fdfs/
cp tracker.conf.sample tracker.conf
vim tracker.conf
修改:base_path=/data02/file_server/tracker(必须手动先创建tracker目录)
启动tracker:/etc/init.d/fdfs_trackerd start
==========================================================
其它指令:
停止tracker:/etc/init.d/fdfs_trackerd stop
重启tracker:/etc/init.d/fdfs_trackerd restart
查看tracker进程:ps aux | grep tracker
2.2、配置storage
cd /etc/fdfs/
cp storage.conf.sample storage.conf
修改:(storage目录需要手动创建)
base_path=/data02/file_server/storage
store_path0=/data02/file_server/storage
tracker_server=192.168.0.101:22122(这里192.168.0.101是本机ip,22122和tracker.conf里面的port保持一致)
启动:/etc/init.d/fdfs_storaged start
==========================================================
其它指令:
停止storage:/etc/init.d/fdfs_storaged stop
重启storage:/etc/init.d/fdfs_storaged restart
查看storage进程:ps aux | grep storage
查看fastfds相应的配置信息:
fdfs_monitor /etc/fdfs/storage.conf
2.3、测试上传
选择192.168.0.101 tracker机器当做fdfs_client。
cd /etc/fdfs/
cp client.conf.sample client.conf
vim client.conf
修改:
base_path = /data02/file_server
tracker_server=192.168.0.101:22122
测试上传文件:
fdfs_upload_file /etc/fdfs/client.conf net.png
3、安装nginx以及fastdfs-nginx-module
3.1、未安装nginx
假设之前我们并没有安装过nginx,我们可以这么操作:
tar -zxvf nginx-1.18.0.tar.gz
tar -zxvf fastdfs-nginx-module-1.22.tar.gz
cd nginx-1.18.0
./configure --add-module=../fastdfs-nginx-module-1.22/src/
说明:以上这句指令是将fastdfs-nginx-module模块加入的nginx配置中。如果提示缺少相关文件,可运行以下指令:
yum -y install gcc zlib zlib-devel pcre-devel openssl openssl-devel。--add-module的值是fastdfs-nginx-module的路径。
sudo make
sudo make install
接下来,我们拷贝相关文件到指定目录:
cd fastdfs-nginx-module-1.22/src
cp mod_fastdfs.conf /etc/fdfs/
cd /etc/fdfs/
vim mod_fastdfs.conf
修改:
tracker_server=192.168.0.101:22122(对应tracker.conf的ip地址以及port)
store_path0=/data02/file_server/storage(对应storage.conf里面的store_path0)
storage_server_port=23000
group_name=group1
group_count=1
[group1]
group_name=group1
storage_server_port=23000
store_path_count=1
store_path0=/data02/file_server/storage

cd fastdfs-6.06/conf/
cp http.conf /etc/fdfs/
cp mime.types /etc/fdfs/
cd /etc/fdfs/
vim http.conf
修改:http.anti_steal.token_check_fail=/data02/file_server/fastdfs-6.06/conf/
接下来我们要修改nginx的相关配置:默认nginx配置在/use/local/nginx/conf/nginx.conf
vim /use/local/nginx/conf/nginx.conf
修改:
user root;
listen 8888;(这里的和storage.conf里面的http.server_port = 8888是一致的)
server_name  192.168.0.101;
并在该块中添加:
location ~/group1/ {
    ngx_fastdfs_module;
}
保存后,接下来我们就可以测试nginx了。
检查配置文件是否可用:sudo /usr/local/nginx/sbin/nginx -t
启动nginx:sudo /usr/local/nginx/sbin/nginx
============================================
其它指令:
sudo /usr/local/nginx/sbin/nginx -s reload # 重启nginx
sudo /usr/local/nginx/sbin/nginx -s stop # 立刻停止nginx
sudo /usr/local/nginx/sbin/nginx -s quit # nginx运行完后停止
补充:如果存在多个nginx的环境,我们可以指定nginx以及其配置文件的方式来启动,比如:
/data02/file_server/nginx-1.18.0/objs/nginx -c /data02/file_server/nginx-1.18.0/conf/nginx.conf
当然你要确保nginx.conf也是修改过的。
3.2、已安装过nginx
如果我们已经安装过nginx,则进行如下操作:
ps aux | grep nginx(查看nginx的进程,并找到nginx的位置以及其配置文件,比如现在找到了nginx以及nginx.conf)
nginx -V(查看之前已经安装的nginx的配置)
下载一个和该nginx相同版本的压缩包并解压,比如:nginx-1.18.0
cd nginx-1.18.0
./configure 刚才用-V得到的参数 --add-module=../fastdfs-nginx-module-1.22/src/
sudo make(这步之后不要用sudo make install指令)
然后会在objs/下生成编译好的nginx文件。

接下来先停止之前运行的nginx:nginx -s stop
备份一下原始的nginx:cp nginx nginx.bak
然后将新编译好的nginx复制进去:cp nginx-1.18.0/objs/nginx /usr/local/nginx/sbin/
接着修改nginx配置文件:vim /use/local/nginx/conf/nginx.conf
增加:
server {
        listen       8888;
        server_name  192.168.0.101;

        #charset koi8-r;

        #access_log  logs/host.access.log  main;

        location / {
            root   html;
            index  index.html index.htm;
        }
        # 拦截包含 /group1/M00 请求,使用 fastdfs 这个 Nginx 模块进行转发
        location ~/group1/ {
            ngx_fastdfs_module;
        }

        #error_page  404              /404.html;

        # redirect server error pages to the static page /50x.html
        error_page   500 502 503 504  /50x.html;
        location = /50x.html {
            root   html;
        }

}
最后启动nginx:sudo /usr/local/nginx/sbin/nginx
3.3、补充
如果不想替换原本的nginx,那么我们可以修改自己下载的nginx文件,在nginx-1.18.0/conf/nginx.conf里面进行相应的修改,然后这样启动:sudo nginx-1.18.0/objs/nginx -c nginx-1.18.0/conf/nginx.conf 。为了不和已有的nginx冲突,可能在./configure添加配置的时候指定相关文件的路径,比如:
./configure --prefix=/usr/share/nginx --sbin-path=/usr/sbin/nginx --modules-path=/usr/lib64/nginx/modules --conf-path=/etc/nginx/nginx.conf --error-log-path=/var/log/nginx/error.log --http-log-path=/var/log/nginx/access.log --http-client-body-temp-path=/var/lib/nginx/tmp/client_body --http-proxy-temp-path=/var/lib/nginx/tmp/proxy --http-fastcgi-temp-path=/var/lib/nginx/tmp/fastcgi --http-uwsgi-temp-path=/var/lib/nginx/tmp/uwsgi --http-scgi-temp-path=/var/lib/nginx/tmp/scgi --pid-path=/run/nginx.pid --lock-path=/run/lock/subsys/nginx --user=nginx --group=nginx --with-file-aio --with-ipv6 --with-http_ssl_module --with-http_v2_module --with-http_realip_module --with-stream_ssl_preread_module --with-http_addition_module --with-http_xslt_module=dynamic --with-http_image_filter_module=dynamic --with-http_sub_module --with-http_dav_module --with-http_flv_module --with-http_mp4_module --with-http_gunzip_module --with-http_gzip_static_module --with-http_random_index_module --with-http_secure_link_module --with-http_degradation_module --with-http_slice_module --with-http_stub_status_module --with-http_perl_module=dynamic --with-http_auth_request_module --with-mail=dynamic --with-mail_ssl_module --with-pcre --with-pcre-jit --with-stream=dynamic --with-stream_ssl_module --with-google_perftools_module --with-debug --with-cc-opt='-O2 -g -pipe -Wall -Wp,-D_FORTIFY_SOURCE=2 -fexceptions -fstack-protector-strong --param=ssp-buffer-size=4 -grecord-gcc-switches -specs=/usr/lib/rpm/redhat/redhat-hardened-cc1 -m64 -mtune=generic' --with-ld-opt='-Wl,-z,relro -specs=/usr/lib/rpm/redhat/redhat-hardened-ld -Wl,-E' --add-module=/data02/fastdfs/fastdfs-nginx-module/src
如果在./configure时出现缺少相关依赖,可对照以下进行安装:
错误./configure: error: the HTTP rewrite module requires the PCRE library.

解决:安装pcre-devel:yum -y install pcre-devel

错误:./configure: error: the HTTP cache module requires md5 functions

from OpenSSL library. You can either disable the module by using
–without-http-cache option, or install the OpenSSL library into the system,
or build the OpenSSL library statically from the source with nginx by using
–with-http_ssl_module –with-openssl= options.

解决:yum -y install openssl openssl-devel

错误:./configure: error: the HTTP XSLT module requires the libxml2/libxslt    缺少libxml2

解决:yum -y install libxml2 libxml2-devel && yum -y install libxslt-devel

错误信息:./configure: error: the HTTP image filter module requires the GD library. You can either do not enable the module or install the libraries.

解决方法:http_image_filter_module是nginx提供的集成图片处理模块,需要gd-devel的支持   yum -y install gd-devel

错误信息:./configure: error: perl module ExtUtils::Embed is required 缺少ExtUtils

解决方法:yum -y install perl-devel perl-ExtUtils-Embed

错误信息:./configure: error: the GeoIP module requires the GeoIP library. You can either do not enable the module or install the library. 缺少GeoIP

解决方法:yum -y install GeoIP GeoIP-devel GeoIP-data

错误信息:./configure: error: the Google perftools module requires the Google perftools
library. You can either do not enable the module or install the library.

解决方法:yum -y install gperftools
最后测试上传文件后在:http:192.168.0.101:8888/group1/M00/00/00/wKgACWHCyqeAR1X_AAAFTB0Vk_Y126.jpg可以访问到了。
4、在另一台服务器上搭建storage
该台服务器对应Ip:192.168.0.9。首先要明确的是除了安装tracker,storage,nginx,fastdfs-nginx-module都是要重新走一遍的,只是配置的时候有所不同。
4.1、相关依赖
将之前的libfastcommon、fastdfs、nginx、fastdfs-nginx-module拷贝到该服务器上。
4.2、配置storage
首先安装好libfastcommon以及fastdfs,参考之前的步骤就行。然后开始配置storage:
cd /etc/fdfs/
cp storage.conf.sample storage.conf
vim storage.conf
修改:(storage目录需要手动创建)
group=group1
port=23000
base_path=/data/data02/file_server/opt/storage
store_path0=/data/data03/storage
tracker_server=192.168.0.101:22122(这里指定tracker)
http.server_port=8688

# 接下来我们同样增加加个storage配置文件
cp storage.conf.sample storage2.conf
vim storage2.conf
修改:(storage目录需要手动创建)
group=group2
port=23002
base_path=/data/data05/storage
store_path0=/data/data05/storage
tracker_server=192.168.0.101:22122(这里指定tracker)
http.server_port=8688

cp storage.conf.sample storage3.conf
vim storage3.conf
修改:(storage目录需要手动创建)
group=group3
port=23003
base_path=/data/data06/storage
store_path0=/data/data06/storage
tracker_server=192.168.0.101:22122(这里指定tracker)
http.server_port=8688

cp storage.conf.sample storage4.conf
vim storage4.conf
修改:(storage目录需要手动创建)
group=group4
port=23004
base_path=/data/data09/storage
store_path0=/data/data09/storage
tracker_server=192.168.0.101:22122(这里指定tracker)
http.server_port=8688

启动时我们要分别启动每一个storage:(配置完后暂时先不启动,等后续其它的一起配置完毕)
fdfs_storaged /etc/fdfs/storage.conf start
fdfs_storaged /etc/fdfs/storage2.conf start
fdfs_storaged /etc/fdfs/storage3.conf start
fdfs_storaged /etc/fdfs/storage4.conf start
==========================================================
其它指令:
停止storage:fdfs_storaged /etc/fdfs/storage.conf stop
重启storage:fdfs_storaged /etc/fdfs/storage.conf restart
查看storage进程:ps aux | grep storage
当我们看到有4个storage进程的时候证明配置成功了。
4.3、配置nginx
./configure --add-module=../fastdfs-nginx-module-1.22/src/
sudo make (这里可继续选择安装,我就不安装了)
不安装时使用该nginx-1.18.0下的配置。
cd fastdfs-nginx-module-1.22/src
cp mod_fastdfs.conf /etc/fdfs/
cd /etc/fdfs/
vim mod_fastdfs.conf
修改:
tracker_server=192.168.0.101:22122
storage_server_port=23000
group_name=group1/group2/group3/group4
store_path0=/data/data02/file_server/opt/storage
[group1]
group_name=group1
storage_server_port=23000
store_path_count=1
store_path0=/data/data03/storage

[group2]
group_name=group2
storage_server_port=23002
store_path_count=1
store_path0=/data/data05/storage

[group3]
group_name=group3
storage_server_port=23003
store_path_count=1
store_path0=/data/data06/storage

[group4]
group_name=group4
storage_server_port=23004
store_path_count=1
store_path0=/data/data09/storage
接下来:
cd fastdfs-6.06/conf/
cp http.conf /etc/fdfs/
cp mime.types /etc/fdfs/
cd /etc/fdfs/
vim http.conf
修改:http.anti_steal.token_check_fail=/data/data02/file_server/soft/fastdfs-6.06/conf/
然后修改nginx配置:
vim nginx-1.18.0/conf/nginx.conf
修改:
user  root;
worker_processes  1;

#error_log  logs/error.log;
#error_log  logs/error.log  notice;
#error_log  logs/error.log  info;

#pid        logs/nginx.pid;


events {
    worker_connections  1024;
}


http {
    include       mime.types;
    default_type  application/octet-stream;

    #log_format  main  '$remote_addr - $remote_user [$time_local] "$request" '
    #                  '$status $body_bytes_sent "$http_referer" '
    #                  '"$http_user_agent" "$http_x_forwarded_for"';

    #access_log  logs/access.log  main;

    sendfile        on;
    #tcp_nopush     on;

    #keepalive_timeout  0;
    keepalive_timeout  65;

    #gzip  on;

    server {
        listen       8688;
        server_name  192.168.0.9;

        #charset koi8-r;

        #access_log  logs/host.access.log  main;

        location / {
            root   html;
            index  index.html index.htm;
        }

        location ~/group2/ {
            ngx_fastdfs_module;
        }
        location ~/group3/ {
            ngx_fastdfs_module;
        }
        location ~/group4/ {
            ngx_fastdfs_module;
        }

        #error_page  404              /404.html;

        # redirect server error pages to the static page /50x.html
        error_page   500 502 503 504  /50x.html;
        location = /50x.html {
            root   html;
        }
    }
}
5、启动所有服务
(1)启动t192.168.0.101服务器:tracker以及storage
sudo /etc/init.d/fdfs_trackerd start
sudo /etc/init.d/fdfs_storaged start
(2)启动192.168.0.9服务器:storage
fdfs_storaged /etc/fdfs/storage.conf start
fdfs_storaged /etc/fdfs/storage2.conf start
fdfs_storaged /etc/fdfs/storage3.conf start
fdfs_storaged /etc/fdfs/storage4.conf start
然后使用fdfs_monitor /etc/fdfs/storage.conf查看,看到有如下结果表示成功:
tracker server is 192.168.0.101:22122

group count: 4

Group 1:
group name = group1
	 Storage 1:
                id = 192.168.0.101
                ip_addr = 192.168.0.101  ACTIVE
	Storage 2:
                id = 192.168.0.9
                ip_addr = 192.168.0.9  ACTIVE
Group 2:
group name = group2
Storage 1:
                id = 192.168.0.9
                ip_addr = 192.168.0.9  ACTIVE
Group 3:
group name = group3
Storage 1:
                id = 192.168.0.9
                ip_addr = 192.168.0.9  ACTIVE
Group 4:
group name = group4
Storage 1:
                id = 192.168.0.9
                ip_addr = 192.168.0.9  ACTIVE
(3)启动192.168.0.9服务器:nginx
sudo /data/data02/file_server/soft/nginx-1.18.0/objs/nginx -c /data/data02/file_server/soft/nginx-1.18.0/conf/nginx.conf
(4)启动192.168.0.101服务器:nginx
sudo /usr/local/nginx/sbin/nginx -c /usr/local/nginx/conf/nginx.conf
用ps aux | grep nginx可查看nginx进程,需要注意的是有两个进程:
root     18429  0.0  0.0  28144   680 ?        Ss   12月22   0:00 nginx: master process /usr/local/nginx/sbin/nginx -c /usr/local/nginx/conf/nginx.conf
rhino    18430  0.0  0.0  28924  2392 ?        S    12月22   0:00 nginx: worker proces
如果只有一个master进程,则说明是有问题的,可以去日志查看原因:/usr/local/nginx/logs/error.log
四、python操作fastfds进行上传和下载
首先需要安装包:pip install py3Fdfs
然后找一个位置,新建配置文件:fastfdfs_client.conf,里面配置:
connect_timeout=30
network_timeout=60
tracker_server = 192.168.0.101:22122
# tracker服务器的端口
http.tracker_server_port = 8888
然后在同级目录下新建一个python文件:test_fastdfs.py
# 在522服务器上可操作:
from fdfs_client.client import get_tracker_conf, Fdfs_client
import base64
from PIL import Image
from io import BytesIO

def main():
    tracker_conf = get_tracker_conf('fastfdfs_client.conf')
    client = Fdfs_client(tracker_conf)

    # 文件上传,结果返回:{'Group name': b'group1', 'Remote file_id': b'group1/M00/00/00/wKgf3F5MAe2AV_23AAAADL_GVeU370.txt', 'Status': 'Upload successed.', 'Local file name': 'test.txt', 'Uploaded size': '12B', 'Storage IP': b'192.168.31.220'}
    # 上传后需要记录该文件在哪,以Remote file_id标识
    # upload_by_filename函数根据文件名上传
    print(dir(client))
    result = client.upload_by_filename('2579937-d92ba54f63a2d63e.png')
    print(result)

    # upload_by_buffer将二进制文件上传,并添加后缀进行保存
    s = 'data:image/png;base64,iVBORw0KGgoAAAANSUhEUgAAAEAAAABACAMAAACdt4HsAAACK1BMVEVHcEwYd/8Wd/8Wd/8Vd/8XeP8Af/8Wdv8Wd/8Wdv8Wd//e6/8bev+NvP+10/8vhf9io/8aef/d6//z+P8whv/v9f85i/9uqv+51f9Ekv9Tmv+61v/O4v9+s/9CkP82iv8kf/9Klf8zh/9xrP8de/+Lu//t9P/I3//Z6P/y9//R5P/2+f+exv/u9f8rg//e7P9sqf+31f9Hk/+MvP95sP8xhv86jP8shP/b6f/c6v+fx/8yh//v9v+UwP9Fkv8gff/q8//k7/81if9Ol/8ifv9QmP+Sv//0+P8ffP/D3P84iv+GuP8YeP8cev/W5/////84i/9Rmf/l7/+Ft/+qzf8ee/+Vwf/a6v/Q4//S5f/P4/9IlP/f7P+axP+uz//X5/+tz/+Pvf82if+Wwv/T5f+Juv9WnP/G3f9Smv+gx//g7P8pgv/U5v9pp//N4f8/j/8thP9mpv+11P9coP8qgv+AtP/r8/8efP9npv8qg/9jpP8uhf8ogf8gfP8Zef9rqf/8/f8bef9Xnf9bn/9wq/9Aj/9mpf9kpP/5+/8ngP+cxf+pzf94sP/1+f9+tP+ozP9HlP97sv/M4f/n8f/w9v/Y6P9zrf+rzv9doP/W5v/A2v++2f83iv/l8P/o8v/o8f+71/9ho/+pzP/U5f/+/v/q8v+Rv/80iP9Mlv9Ckf+Xwv+/2f/j7//4+/88jf+Atf+Huf93r//7/P+y0v+51v9anv9PmP9qqP9lpf9BPI6rAAAACnRSTlMAK9S8j5MGf/L8h4HvUAAAAsZJREFUWMOl1vdbUlEYwPFX07KDQAyhSLFkKBC4KkPBlWluc+fOvdt72N577733rj+vc+6FGHLPvXDuD9wHHj7f+57DwwUAfMQlxCeh2I5FmC9MXIwQi1+AmDwk0t6haxL1cbT5dZM3mkQ8JNB8VnF7R90Jqod4in9i0m5eKV9+jOYhiXJ9i3Ua+3qqB9r82g7s088n07xgQKd+PNrzFHt7f24yxQsFdLeKa23PbJ3p9ryWlHmFIC8QaCu7Rvbv+qXhvNWr3r3EhYyiyF5ogtOaBrJ+NfZrMt++yq1R74zsIwbIxGeIt3N+rdz7wrFEwEcKFGTp8SP27m7O51sy1II+QqBg3Q6NHpkr67XZmeIeIvhCtEFDZkDa7FZRPy/gwh4FCn1yER8eUF6+yJ29Vbv4gv0N3YcFlLJe7pyj2cS/oO2x0T2EeTsq+ez3uysREpk/LKCUFXa9H3MaB79/IU9rrPuONIh5CPHNz4s+Vc+UGk229eSFA3v2HhLzwYELvW0frIrZ8b/+wnFHhagPDphRydjwgGvWNMkXrnrmxH1QoA6hbsfoyNDUxK8/TqNJ89pzUoIPBJKX5iBksBp+/kYqxXSpccadI8VDwKeuQKTw9YdKUb0xzWlEkjwXqMhX8X7ZBDI4v2FfXqa4Is1zgYMyBe9T0vAMjlTst0i8vm8J5Wc1Uz5PVqH/KN0Dv/4umULl82SGO9I9+PZPKbvveUDum+ZT+hJDq3QP/v2/2/jI23nTWdV4tHkwiuuTgInfv3t4Feica78KReXJEg5z+9f/kBQEfz/onwLZv75xZVhBkucCRrL/7bdRaEGa5wIucgcdkZM7Qm20PvBlGrLgh23maH0gMNAS/fpDAu7tMfn/AXPW1pg8UP//xBiIygOrB1YPrB5YPbB6YPXA6oHVA6sHVg+sHlg9sHpg9cDqgdUDqwdWD6z+H8aOr+GHK13YAAAAAElFTkSuQmCC'
    data = s.split(',')[1]
    image_data = base64.b64decode(data)
    result = client.upload_by_buffer(image_data, 'jpg')
    print(result)


    # 文件下载,结果返回:{'Remote file_id': b'group1/M00/00/00/wKgf3F5MAe2AV_23AAAADL_GVeU370.txt', 'Content': 't.txt', 'Download size': '12B', 'Storage IP': b'192.168.31.220'}
    # 第一个参数是保存的文件名,第二个参数是之前上传得到的标识
    result = client.download_to_file('t.png', b'group1/M00/00/00/wKgAZWHAQjiAAm4PAAFEJ0JhBgk569.png')
    print(result)


    #文件删除,结果返回:('Delete file successed.', b'group1/M00/00/00/wKgf3F5MAe2AV_23AAAADL_GVeU370.txt', b'192.168.31.220')
    result = client.delete_file(b'group1/M00/00/00/wKgf3F5MAe2AV_23AAAADL_GVeU370.txt')


if __name__ == '__main__':
    main()
具体函数可参考:https://pypi.org/project/py3Fdfs/2.1.0/
五、其它问题
1、图片显示不完整问题
解决方法:在每一个用到的nginx的配置文件nginx.conf相应的server下添加:
proxy_buffer_size 10M;
proxy_buffers 32 10M;
proxy_busy_buffers_size 10M;
参考
https://www.cnblogs.com/zhangmingda/p/12622590.html