一、TFRecord数据格式
对于深度学习的物体检测等任务,比较常用的数据集是PASCAL VOC数据集。对于PASCAL VOC数据集,主要有两个文件夹,分别为:Annotations和JPEGImages。其中,Annotations文件夹存储了图片物体的label,格式为XML格式,而JPEGImages文件夹下存放的是图片。这种数据集需要将图像数据和标签分开放置,比较不友好。
对于使用tensorflow框架进行训练深度神经网络时,tensorflow提供了对图像数据进行处理的工具——TFRecord。其将数据标签和图像数据存储在一起,方便管理。
TFRecord通过tf.train.Example Protocol Buffer协议进行数据存储的。tf.train.Example的定义如下:
message Example {
    Features features = 1;
};

message Features {
    map<string, Feature> feature = 1;
};

message Feature {
    oneof kind {
        BytesList bytes_list = 1;
        FloatList float_list =2;
        Int64List int64_list = 3;
    }
};
tf.train.Example包含了一个从属性到取值的字典。属性的取值可以为字符串、实数列表和整数列表。
二、图像预处理
对于图像预处理,tensorflow提供了几种方法,主要包括:
1、调整图像大小
tf.image.resize_images
例如:resized = tf.image.resize_images(img_data, [300, 300], method=0)
tf.image.resize_images函数的method参数对应不同的图像调整算法,如下图所示;
| method取值 | 图像大小调整算法 |
| 0 | 双线性插值法 |
| 1 | 最近邻居法 |
| 2 | 双三次插值法 |
| 3 | 面积插值法 |
不同算法调整图像大小的结果差不多。除了将整张图像信息完整保存,tensorflow还支持对图像进行裁剪或者填充(tf.image.crop_to_bounding_box函数、tf.image.pad_to_bounding_box和tf.image.resize_image_with_crop_or_pad函数)。
2、图像色彩调整
tf.image.adjust_brightness、tf.image.adjust_contrast、tf.image.adjust_hue、tf.image.adjust_saturation
3、处理标注框
tf.image.draw_bounding_box
4、随机截取图像
tf.image.sample_distorted_bounding_box
三、多线程输入数据处理框架
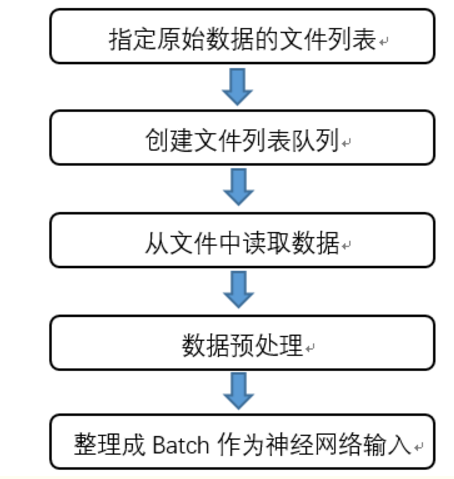
对于第二节中tensorflow提供的数据预处理方法,虽然可以减小无关因素对图像识别模型的效果的影响,但是这些预处理方式比较复杂,会减慢整个训练的过程。因此,为了避免图像预处理称为神经网络模型训练效率的瓶颈,tensorflow提供了一套多线程处理输入数据的框架。其主要的流程图如下:
3.1队列和多线程
在tensorflow中,队列和变量类似,都是计算图上有状态的节点。其他的计算节点可以修改他们的状态。对于变量,可以通过赋值操作修改变量的值,而对于队列而言,修改队列的状态的操作有:Enqueue、EnqueueMany和Dequeue。
tensorflow提供了tf.Coordinator和tf.QueueRunner两个类完成多线程协同的功能。tf.Coordinator主要用于协同多个线程一起停止,并提供了should_stop、request_stop和join三个函数。在启动线程之前需要先声明一个tf.Coordinator类,并将这个类传入每一个创建的线程中。启动的线程需要一直查询tf.Coordinator类中提供的should_stop函数,当这个函数的返回值是True时,则当前的线程需要退出。当某一个线程调用request_stop函数之后,should_stop函数的返回值将被设置为True,这样所有的线程就可以同时终止了。
实例:
import tensorflow as tf
import numpy as np
import threading

# 线程中运行的程序,这个程序每隔1秒判断是否需要停止并打印自己的ID
def MyLoop(coord, worker_id):
    # 使用tf.Coordinator类提供的协同工具判断当前进程是否需要停止
    while not coord.should_stop():
        # 随机停止所有线程
        if np.random.rand() < 0.1:
            print("Stoping from id: %d
" % worker_id)
            coord.request_stop()
        else:
            print("working on id: %d
" %worker_id)

# 声明一个tf.train.Coordinator类来协同多个线程
coord = tf.train.Coordinator()
# 创建5个线程
threads = [threading.Thread(target=MyLoop, args=(coord, i)) for i in range(5)]

# 启动所有线程
for t in threads:
    t.start()

# 等待所有线程退出
coord.join()
3.2输入文件队列
本节介绍使用tensorflow中的队列管理输入文件列表。
为了提高处理效率,当训练的数据量较大时,通常将数据分成多个TFRecord文件保存。tensorflow提供了获取符合正则表达式获取文件的函数:tf.train.match_filenames_once。对于得到的文件列表,可以通过tf.train.string_input_producer函数进行管理。
tf.train.string_input_producer函数会使用初始化时提供的文件列表创建一个输入队列,输入队列中原始元素为文件列中的所有文件。
实例:
1、将数据转换成TFRecord格式,写入文件
import tensorflow as tf

# 创建TFRecord文件的帮助函数
def _int64_feature(value):
    return tf.train.Feature(int64_list=tf.train.Int64List(value=value))

# 写入数据
num_shards = 2
instances_per_shard = 2

# 写入数据,文件后缀为:000n-of-000m,m为训练数据总的被存放在了多少个文件,n为当前的文件编号
# 这种命名方式,方便了使用正则表达式获取文件列表
for i in range(num_shards):
    filename = ('/path/to/data.tfrecords-%.5d-of-%.5d' % (i, num_shards))

    writer = tf.python_io.TFRecordWriter(filename)

    # 将数据封装成Example结构并写入TFRecord文件
    for j in range(instances_per_shard):
        example = tf.train.Example(features=tf.train.Features(feature={
            'i': _int64_feature(i),
            'j': _int64_feature(j)}))

        writer.write(example.SerializeToString())
    writer.close()
2、读取TFRecord数据实例
import tensorflow as tf

# 使用tf.train.match_filenames_once函数获取文件列表
files = tf.train.match_filenames_once("/path/to/data.tfrecords-*")

# 通过tf.train.string_input_producer函数创建输入队列,输入队列的文件列表为tf.train.match_filenames_once函数获取文件列表
filename_queue = tf.train.string_input_producer(files, shuffle=True)

# 解析一个样本
reader = tf.TFRecordReader()
_, serialized_example = reader.read(filename_queue)
features = tf.parse_single_example(serialized_example,
                                   features={
                                       'i': tf.FixedLenFeature((), tf.int64),
                                       'j': tf.FixedLenFeature((), tf.int64)
                                   })

with tf.Session() as sess:
    tf.local_variables_initializer().run()
    print(sess.run(files))

    # 声明tf.train.Coordinator类来协同不同的现场,并且启动线程
    coord = tf.train.Coordinator()
    threads = tf.train.start_queue_runners(sess=sess, coord=coord)

    for i in range(6):
        print(sess.run([features['i'], features['j']]))
    coord.request_stop()
    coord.join(threads)
3.3组合训练数据
通常在训练神经网络时,我们一次输入一个batch的数据量,这样可以提高训练效率。所以得到单个样例的预处理结果之后,还需要将它们组织成batch,然后输入网络的输入层。tensorflow提供了这样的函数:tf.train.batch以及tf.train.shuffle_batch。
实例:
import tensorflow as tf

files = tf.train.match_filenames_once("/path/to/data.tfrecords-*")

file_queue = tf.train.string_input_producer(files)

# 解析一个样本
reader = tf.TFRecordReader()
_, serialized_example = reader.read(filename_queue)
features = tf.parse_single_example(serialized_example,
                                   features={
                                       'i': tf.FixedLenFeature((), tf.int64),
                                       'j': tf.FixedLenFeature((), tf.int64)
                                   })

example, label = features['i'], features['j']

batch_size = 3

capacity = 1000 + 3 *batch_size

example_batch, label_batch = tf.train.batch([example, label], batch_size=batch_size capacity=capacity)


with tf.Session() as sess:
    tf.global_variables_initializer().run()
    coord = tf.train.Coordinator()
    threads = tf.train.start_queue_runners(sess=sess, coord=coord)

    for i in range(2):
        cur_example_batch, cur_label_batch = sess.run(
            [example_batch, label_batch])

        print(cur_example_batch, cur_label_batch)

    coord.request_stop()
    coord.join(threads)
其中,调用tf.train.start_queue_runners, 启动入队线程,由多个或单个线程,按照设定规则,把文件读入Filename Queue中。函数返回线程ID的列表,一般情况下,系统有多少个核,就会启动多少个入队线程(入队具体使用多少个线程在tf.train.batch中定义);
(参考:https://blog.csdn.net/dcrmg/article/details/79780331)
3.4高层处理框架slim
除了使用tf.train提供的方法进行获取批量的训练TFRecord数据,对于tensorflow的高层封装tf.slim处理。
通过slim读取TFRecord数据,主要分为以下几个步骤:
1、定义解码器decoder
decoder = tf.slim.tfexample_decoder.TFExampleDecoder()
其中,定义解码器时,需要制定两个参数:keys_to_features,和items_to_handlers两个字典参数。key_to_features这个字典需要和TFrecord文件中定义的字典项匹配。items_to_handlers中的关键字可以是任意值,但是它的handler的初始化参数必须要来自于keys_to_features中的关键字。
2、定义dataset
dataset= tf.slim.dataset.Dataset()
其中,定义dataset时需要将datasetsource、reader、decoder、num_samples等参数
3、定义provider
provider = slim.dataset_data_provider.DatasetDataProvider
其中,需要的参数为:dataset, num_readers, reader_kwargs, shuffle, num_epochs,common_queue_capacity,common_queue_min, record_key=',seed, scope等。
4、调用provider的get方法
获取items_to_handlers中定义的关键字
5、利用分好的batch建立一个prefetch_queue
6、prefetch_queue中有一个dequeue的op,每执行一次dequeue则返回一个batch的数据。
(参考:
https://www.jianshu.com/p/63eb53cb5b73
https://blog.csdn.net/MOU_IT/article/details/82773839)
实例:
# 构造第一个参数:数据目录+文件名
file_pattern = os.path.join(dataset_dir, self.param.FILE_PATTERN % train_or_test)
# 准备第二个参数:
reader = tf.TFRecordReader
# 准备第三个参数:decoder
# 反序列化的格式
keys_to_features = {
'image/encoded': tf.FixedLenFeature((), tf.string, default_value=''),
'image/format': tf.FixedLenFeature((), tf.string, default_value='jpeg'),
'image/height': tf.FixedLenFeature([1], tf.int64),
'image/width': tf.FixedLenFeature([1], tf.int64),
'image/channels': tf.FixedLenFeature([1], tf.int64),
'image/shape': tf.FixedLenFeature([3], tf.int64),
'image/object/bbox/xmin': tf.VarLenFeature(dtype=tf.float32),
'image/object/bbox/ymin': tf.VarLenFeature(dtype=tf.float32),
'image/object/bbox/xmax': tf.VarLenFeature(dtype=tf.float32),
'image/object/bbox/ymax': tf.VarLenFeature(dtype=tf.float32),
'image/object/bbox/label': tf.VarLenFeature(dtype=tf.int64),
'image/object/bbox/difficult': tf.VarLenFeature(dtype=tf.int64),
'image/object/bbox/truncated': tf.VarLenFeature(dtype=tf.int64),
}
# 2、反序列化成高级的格式
# 其中bbox框ymin [23] xmin [46],ymax [234] xmax[12]--->[23,46,234,13]
items_to_handlers = {
'image': slim.tfexample_decoder.Image('image/encoded', 'image/format'),
'shape': slim.tfexample_decoder.Tensor('image/shape'),
'object/bbox': slim.tfexample_decoder.BoundingBox(
['ymin', 'xmin', 'ymax', 'xmax'], 'image/object/bbox/'),
'object/label': slim.tfexample_decoder.Tensor('image/object/bbox/label'),
'object/difficult': slim.tfexample_decoder.Tensor('image/object/bbox/difficult'),
'object/truncated': slim.tfexample_decoder.Tensor('image/object/bbox/truncated'),
}
# 构造decoder
decoder = slim.tfexample_decoder.TFExampleDecoder(keys_to_features, items_to_handlers)
dataset = slim.dataset.Dataset(
data_sources=file_pattern,
reader=reader,
decoder=decoder,
num_samples=self.param.SPLITS_TO_SIZES[train_or_test],
items_to_descriptions=self.param.ITEMS_TO_DESCRIPTIONS,
num_classes=self.param.NUM_CLASSES)
provider = slim.dataset_data_provider.DatasetDataProvider(
dataset,
num_readers=4,
common_queue_capacity=20 * FLAGS.batch_size,
common_queue_min=10 * FLAGS.batch_size,
shuffle=True
)
# 通过get获取数据,获取到的数据是单个数据,还需要对数据进行预处理,组合数据
# 真正获取参数
[image, shape, glabels, gbboxes] = provider.get(['image', 'shape', 'object/label', 'object/bbox'])
# 直接进行数据预处理
# image [?, ?, 3]---->[300, 300, 3]
image, glabels, gbboxes = image_preprocessing_fn(image, glabels, gbboxes,
out_shape=ssd_shape,
data_format=DATA_FORMAT)
# 特征值、目标
# 批处理以及队列处理
# tensor_list:tensor列表 [tensor, tensor, ]
# tf.train.batch(tensor_list, batch_size, num_threads, capacity)
# [Tensor, [6], [6], [6]] 嵌套的列表要转换成单列表形式
r = tf.train.batch(train_tools.reshape_list([image, gclasses, glocalisations, gscores]),
batch_size=FLAGS.batch_size,
num_threads=4,
capacity=5 * FLAGS.batch_size)
# 批处理数据放入队列
# 1个r:批处理的样本, 5个设备,5个r, 5组32张图片
# 队列的目的是为了不同设备需求
#最后组装好的数据出队列dequeue
batch_queue = slim.prefetch_queue.prefetch_queue(r, capacity=deploy_config.num_clones)