pom.xml文件
<?xml version="1.0" encoding="UTF-8"?>
<project xmlns="http://maven.apache.org/POM/4.0.0" xmlns:xsi="http://www.w3.org/2001/XMLSchema-instance"
    xsi:schemaLocation="http://maven.apache.org/POM/4.0.0 http://maven.apache.org/xsd/maven-4.0.0.xsd">
    <modelVersion>4.0.0</modelVersion>

    <groupId>com.example</groupId>
    <artifactId>springboot_ssm</artifactId>
    <version>0.0.1-SNAPSHOT</version>
    <packaging>jar</packaging>

    <name>springboot_ssm</name>
    <description>Demo project for Spring Boot</description>

    <parent>
        <groupId>org.springframework.boot</groupId>
        <artifactId>spring-boot-starter-parent</artifactId>
        <version>1.5.8.RELEASE</version>
        <relativePath /> <!-- lookup parent from repository -->
    </parent>

    <properties>
        <project.build.sourceEncoding>UTF-8</project.build.sourceEncoding>
        <project.reporting.outputEncoding>UTF-8</project.reporting.outputEncoding>
        <java.version>1.8</java.version>
    </properties>

    <dependencies>
        <dependency>
            <groupId>org.springframework.boot</groupId>
            <artifactId>spring-boot-starter-cache</artifactId>
        </dependency>
        <!--整合mybatis所需的jar -->
        <dependency>
            <groupId>org.mybatis.spring.boot</groupId>
            <artifactId>mybatis-spring-boot-starter</artifactId>
            <version>1.3.1</version>
        </dependency>
        <dependency>
            <groupId>org.springframework.boot</groupId>
            <artifactId>spring-boot-starter-web</artifactId>
        </dependency>
        <!--热启动:每自修改后, 程序自动启动spring Application上下文。 -->
        <dependency>
            <groupId>org.springframework.boot</groupId>
            <artifactId>spring-boot-devtools</artifactId>
            <optional>true</optional>
        </dependency>
        <!-- 阿里jeon -->
         <dependency>
            <groupId>com.alibaba</groupId>
            <artifactId>fastjson</artifactId>
            <version>1.2.9</version>
        </dependency>
        <dependency>
            <groupId>mysql</groupId>
            <artifactId>mysql-connector-java</artifactId>
            <scope>runtime</scope>
        </dependency>
        <dependency>
            <groupId>org.springframework.boot</groupId>
            <artifactId>spring-boot-starter-test</artifactId>
            <scope>test</scope>
        </dependency>


    </dependencies>

    <build>
        <plugins>
            <plugin>
                <groupId>org.springframework.boot</groupId>
                <artifactId>spring-boot-maven-plugin</artifactId>
                <configuration>
                    <fork>true</fork>
                </configuration>
            </plugin>
        </plugins>
    </build>


</project>
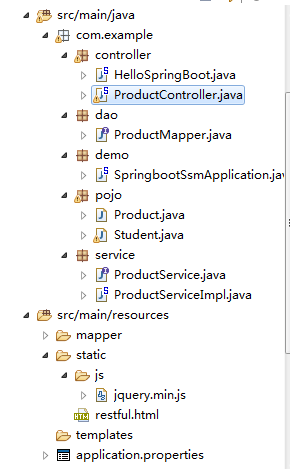
项目目录

ProductController控制层代码
package com.example.controller;

import java.io.IOException;
import java.util.List;

import javax.servlet.http.HttpServletResponse;

import org.springframework.beans.factory.annotation.Autowired;
import org.springframework.boot.autoconfigure.EnableAutoConfiguration;
import org.springframework.context.annotation.ComponentScan;
import org.springframework.web.bind.annotation.PathVariable;
import org.springframework.web.bind.annotation.RequestMapping;
import org.springframework.web.bind.annotation.RequestMethod;
import org.springframework.web.bind.annotation.RestController;

import com.alibaba.fastjson.JSON;
import com.example.pojo.Product;
import com.example.service.ProductService;

/**
 * 产品控制层
 * @author pengfei.xiong
 * @date 2017年11月16日
 */
@RestController //证明是controller层并且返回json
@EnableAutoConfiguration
@ComponentScan(basePackages={"com.example.service"})//添加的注解
public class ProductController {
    //依赖注入
    @Autowired
    ProductService productService;


    /**
     * @RestController代表这个类是用Restful风格来访问的,如果是普通的WEB页面访问跳转时,我们通常会使用@Controller
        value = "/users/{username}" 代表访问的URL是"http://host:PORT/users/实际的用户名"
            method = RequestMethod.GET 代表这个HTTP请求必须是以GET方式访问
        consumes="application/json" 代表数据传输格式是json
        @PathVariable将某个动态参数放到URL请求路径中
        @RequestParam指定了请求参数名称
     */
    @RequestMapping(value = "qp/{name}",method = RequestMethod.GET)
    public  List<Product> queryProduct(@PathVariable String name,HttpServletResponse httpServletResponse) {
        System.out.println(name);
        List<Product> p = productService.queryProductByName(name);

        return p;
    }
}
service接口
package com.example.service;

import java.util.List;

import com.example.pojo.Product;

/**
 * 产品业务层接口
 * @author pengfei.xiong
 * @date 2017年11月16日
 */
public interface ProductService {
    public List<Product> queryProductByName(String name);
}
service实现类
package com.example.service;

import java.util.List;

import org.mybatis.spring.annotation.MapperScan;
import org.springframework.beans.factory.annotation.Autowired;
import org.springframework.stereotype.Service;

import com.example.dao.ProductMapper;
import com.example.pojo.Product;
/**
 * 产品业务层实现类
 * @author XSWL pengfei.xiong
 * @date 2017年11月16日
 */
@Service
@MapperScan("com.example.dao") //与dao层的@Mapper二选一写上即可(主要作用是扫包)
public class ProductServiceImpl implements ProductService {
    //依赖注入
    @Autowired
    ProductMapper mapper;

    @Override
    public List<Product> queryProductByName(String name) {
        List<Product> pro = mapper.selectProductByName(name);
        return pro;
    }
}
mapper接口
package com.example.dao;

import java.util.List;

import org.apache.ibatis.annotations.Mapper;
import org.apache.ibatis.annotations.Param;
import org.apache.ibatis.annotations.ResultType;
import org.apache.ibatis.annotations.Select;
import org.springframework.stereotype.Repository;

import com.example.pojo.Product;

/**
 * 产品数据层接口
 * @author pengfei.xiong
 * @date 2017年11月16日
 */
@Mapper
@Repository
public interface ProductMapper {
    /**
     * 根据名称查询产品
     * @param name 名称
     * @return 返回产品实体对象
     */
    @Select(" SELECT * FROM product WHERE name = #{name}")
    @ResultType(Product.class)
    List<Product> selectProductByName(@Param("name") String name);
}
实体类
package com.example.pojo;
/**
 * 产品实体类
 * @author pengfei.xiong
 * @date 2017年11月16日
 */
public class Product {
    private int id;
    private String name;
    private int count;
    private double price;
    public int getId() {
        return id;
    }
    public void setId(int id) {
        this.id = id;
    }
    public String getName() {
        return name;
    }
    public void setName(String name) {
        this.name = name;
    }
    public int getCount() {
        return count;
    }
    public void setCount(int count) {
        this.count = count;
    }
    public double getPrice() {
        return price;
    }
    public void setPrice(double price) {
        this.price = price;
    }

    public Product() {
        super();
    }
    public Product(int id, String name, int count, double price) {
        super();
        this.id = id;
        this.name = name;
        this.count = count;
        this.price = price;
    }

}
程序的入口
package com.example.demo;

import org.springframework.boot.SpringApplication;
import org.springframework.boot.autoconfigure.SpringBootApplication;

import com.example.controller.ProductController;

/**
 * 项目入口
 * @author XSWL pengfei.xiong
 * @date 2017年11月16日
 */
@SpringBootApplication
public class SpringbootSsmApplication {

     //项目子入口
    public static void main(String[] args) {
        SpringApplication.run(ProductController.class, args);
    }
}
最后还有一个配置文件要配置
#mysql
spring.datasource.url=jdbc:mysql://localhost:3306/test
spring.datasource.username=root
spring.datasource.password=root
spring.datasource.driverClassName=com.mysql.jdbc.Driver
spring.jpa.database = mysql
#tomcat 端口
 server.port=4560
#Mybatis扫描(配置xml模式使用)     mybatis.mapper-locations=classpath*:mapper/*.xml

#起别名。可省略写mybatis的xml中的resultType的全路径
mybatis.type-aliases-package=com.example.pojo
这样就已经可以访问了,但是大家要自己根据实体类建数据库表,或者替换实体类,还有配置文件中数据的密码和数据库名称
访问路径:http://localhost:4560/qp/name 这里name是参数的值 这是rustful风格 测试话先可以查询所有 不带条件自己修改下代码
下面是前台界面 我把它写在static目录下的 采用的ajax提交
前台代码
<!DOCTYPE html>
<html>
<head>
<meta charset="UTF-8">
<title>Spring boot</title>
<script type="text/javascript" src="js/jquery.min.js"></script>
<script type="text/javascript">
//查询的内容
function quary(){
    var str = $("#name").val();
    alert(str)
     $.ajax({
        url:"qp/"+str,
        type:"get",
        success : function(data) {
            alert(data);
            //i循环的次数  value对象 id,name等是属性 <接收list>
            $.each(data, function(i, value) {
                        $("#remark").append(
                         " <tr><td>" + value.id + "</td><td>"
                                + value.name + "</td><td>" + value.count
                                + "</td><td>" + value.count + "</td></tr>");
            });
        },
        error:function(){
            alert("没有查询到该商品");
        }
    });
}

</script>
</head>
<body>
    <form action="">
        查询:<input type="text" id="name" onchange="quary()"/>
        <table class="table table-striped" id="remark">
        <tr>
            <td>编号</td>
            <td>名称</td>
            <td>总数</td>
            <td>价格</td>
        </tr>
    </table>
    </form>
</body>
</html>
这样就大功完成,当然还少了些什么日志等等 不会的可以留言