今天我弄了一下文件夹上传(很简单的
首先,我们的html需要这样写
<form action="/file/upload" enctype="multipart/form-data" method="post">
<input type="hidden" name="type" value="1"/>
<input id="dir" type="file" name="file" webkitdirectory mozdirectory/>
<input id="uploadDir" type="submit" value="提交文件夹">
</form>
这个一定要加上去
enctype="multipart/form-data" method="post"
还有
webkitdirectory mozdirectory
如果没有在Spring 里配置multipartResolver会报错,配置一下就好了
<bean id="multipartResolver"
class="org.springframework.web.multipart.commons.CommonsMultipartResolver">
<!-- 上传文件大小上限,单位为字节(10MB) -->
<property name="maxUploadSize">
<value>999999999999999999</value>
</property>
<!-- 请求的编码格式,必须和jSP的pageEncoding属性一致,以便正确读取表单的内容,默认为ISO-8859-1 -->
<property name="defaultEncoding">
<value>UTF-8</value>
</property>
</bean>
然后就是我们的后台
@RequestMapping("/upload")
public Message upload(@RequestParam("type")int type, @RequestParam("file") MultipartFile[] file){
for(MultipartFile f:file){
File file1 ;
String name="";
try {
if (f instanceof CommonsMultipartFile) {
//转换成这个对象,然后我们需要通过里面的FileItem来获得相对路径
CommonsMultipartFile f2 = (CommonsMultipartFile) f;
name = f2.getFileItem().getName();
System.out.println(name + " ---------相对路径");
file1 = new File(getProjectPath() + "/" + name);
file1.mkdirs();
file1.createNewFile();
f.transferTo(file1);
}
System.out.println(f.getOriginalFilename() + " iii --------");
System.out.println("sssss ");
}catch (Exception e){
e.printStackTrace();
}
}
return new Message(true,"成功");
}
我们需要将MultipartFile转换成这个对象
CommonsMultipartFile f2 = (CommonsMultipartFile) f;
因为我们需要里面的FileItem来获得相对路径
获得了相对路径,然后我们就用项目路径和这个相对路径加上去
然后创建文件夹,并写入到服务器的绝对路径就行了
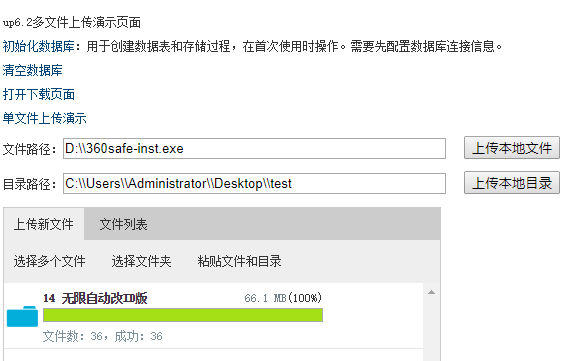
前端效果:

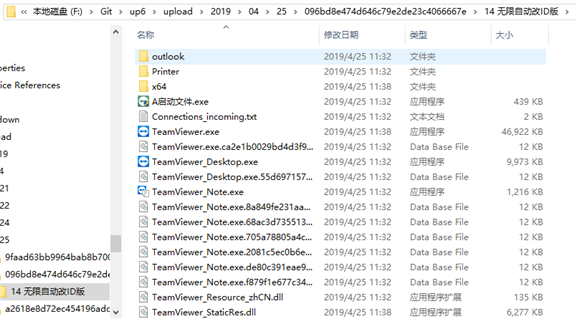
后台服务端目录:F:Gitup6upload2019�425�96bd8e474d646c79e2de23c4066667e


由上图可以看出,上传后保留了目录结构,保证了文件夹的不变性,完整的将文件夹上传了。
后端代码逻辑大部分是相同的,目前能够支持MySQL,Oracle,SQL。在使用前需要配置一下数据库,可以参考我写的这篇文章:http://blog.ncmem.com/wordpress/2019/08/12/java-http%E5%A4%A7%E6%96%87%E4%BB%B6%E6%96%AD%E7%82%B9%E7%BB%AD%E4%BC%A0%E4%B8%8A%E4%BC%A0/