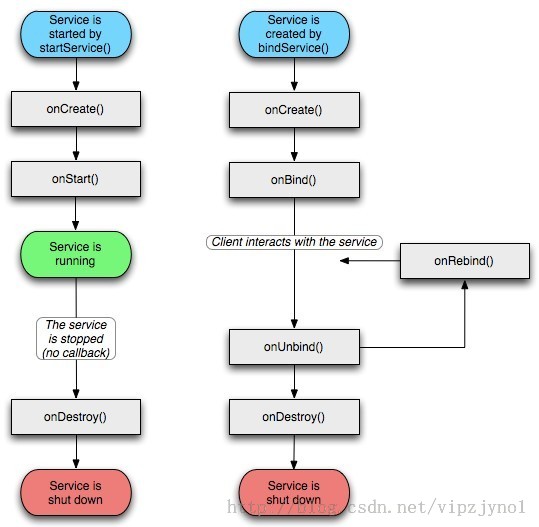
一、Service(服务)
Service是Android程序中四大基础组件之一,它和Activity一样都是Context的子类,区别在于它没有UI界面,是在后台运行的组件。
public abstract class
Service
extends ContextWrapper
implements ComponentCallbacks

java.lang.Object
   ↳ android.content.Context
     ↳ android.content.ContextWrapper
       ↳ android.app.Service
二、Service启动方法+相应的生命周期
Service的生命周期并不是固定的,而是要看启动Service的方式。
而启动Service的方式又分为两种startService和bindService

1、 StartService(启动运行在后台的服务,所谓后台即没有界页;作为四大组件之一,其是运行在主线程中的)
启动时:
Context.startService(intent)-->onCreate()àonStartCommand ()
停止时:
Context_stopService(intent)-->onDestroy()
使用方法:
(1)、创建一个自定义服务类继承Service,实现抽象方法
(2)、清单文件中注册自定义的服务类
(3)、在activity中通过startService和 stopService()
看一个Demo

 1 package com.example.demo01;
 2
 3 import android.app.Activity;
 4 import android.content.Intent;
 5 import android.os.Bundle;
 6 import android.util.Log;
 7 import android.view.View;
 8
 9 public class MainActivity extends Activity {
10     @Override
11     protected void onCreate(Bundle savedInstanceState) {
12         // TODO Auto-generated method stub
13         super.onCreate(savedInstanceState);
14         setContentView(R.layout.activity_main);
15
16     }
17
18     public void btn_startService(View view)
19     {
20         Intent intent = new Intent(this,MyService.class);
21         intent.putExtra("info", "这里是传送的数据");
22         startService(intent);
23         Log.i("activity", "开启服务");
24
25     }
26     public void btn_closeService(View view)
27     {
28         Intent intent = new Intent(this,MyService.class);
29         Log.i("activity", "关闭服务");
30         stopService(intent);
31     }
32 }

 1 package com.example.demo01;
 2
 3 import android.app.Service;
 4 import android.content.Intent;
 5 import android.os.IBinder;
 6 import android.util.Log;
 7
 8 public class MyService extends Service{
 9
10     @Override
11     public void onCreate() {
12         // TODO Auto-generated method stub
13         super.onCreate();
14         Log.i("MyService", "--->onCreate");
15
16     }
17
18     @Override
19     public IBinder onBind(Intent intent) {
20         // TODO Auto-generated method stub
21         Log.i("MyService", "--->onBind");
22
23         return null;
24     }
25
26     @Override
27     public int onStartCommand(Intent intent, int flags, int startId) {
28         // TODO Auto-generated method stub
29         Log.i("MyService", "--->onStartCommand");
30
31         String str = intent.getStringExtra("info");
32         Log.i("MyService", "自定义服务MyService被activity启动并收到了activity发送过来信息:"+str);
33
34         return super.onStartCommand(intent, flags, startId);
35     }
36
37     @Override
38     public void onDestroy() {
39         // TODO Auto-generated method stub
40         super.onDestroy();
41         Log.i("MyService", "--->onDestroy");
42     }
43
44
45 }

 1 <LinearLayout xmlns:android="http://schemas.android.com/apk/res/android"
 2     xmlns:tools="http://schemas.android.com/tools"
 3     android:layout_width="match_parent"
 4     android:layout_height="match_parent"
 5     android:orientation="vertical"
 6      >
 7
 8     <Button
 9         android:onClick="btn_startService"
10         android:text="开启服务并发送消息"
11         android:layout_width="wrap_content"
12         android:layout_height="wrap_content">
13
14
15     </Button>
16     <Button
17         android:onClick="btn_closeService"
18         android:text="关闭服务"
19         android:layout_width="wrap_content"
20         android:layout_height="wrap_content">
21
22
23     </Button>
24 </LinearLayout>
清单文件注册自定义的服务类
1 <service android:name="com.example.demo01.MyService"></service>
点击两次开启服务按钮,然后点击一次关闭服务按钮,
可见第一次开启服务的时候执行onCreate()服务, 再执行onStartCommand()方法,
当第二次开启服务的时候,则不再执行onCreate()方法,直接执行onStartCommand
当关闭服务的时候,执行onDestroy()方法

2、BindService(基于IBinder方式将两个组件进行绑定,然后相互传值,如果以绑定的方式启动的服务,在解除绑定时也会自动停止服务)
绑定时:
bindService-->onCreate()-->onBind()
解绑时:
unbindService-->onUnbind()-->onDestory()
使用方法:
(1)、创建一个自定义服务类继承Service,实现onBind()方法
(2)、创建Bindler的子类
(3)、在onBind()方法中返回自定义Bindler子类的对象
(4)、清单文件中组册自定义服务
(5)、创建ServiceConnection接口对象,实现 onServiceConnected()方法和 onServiceDisconnected方法
(6)、在activity中绑定bindService和解绑服务unbindService
Demo

 1 package com.example.demo02;
 2
 3 import android.app.Service;
 4 import android.content.Intent;
 5 import android.os.Binder;
 6 import android.os.IBinder;
 7 import android.util.Log;
 8
 9 public class MyService extends Service{
10
11     private MyBinder binder ;
12
13
14     @Override
15     public IBinder onBind(Intent intent) {
16         // TODO Auto-generated method stub
17         Log.i("service", "-->onBind");
18         return new MyBinder();
19     }
20
21     @Override
22     public void onCreate() {
23         // TODO Auto-generated method stub
24         Log.i("service", "-->onCreate");
25         super.onCreate();
26     }
27
28     @Override
29     public int onStartCommand(Intent intent, int flags, int startId) {
30         // TODO Auto-generated method stub
31         Log.i("service", "-->onStartCommand");
32         return super.onStartCommand(intent, flags, startId);
33     }
34
35     @Override
36     public void onDestroy() {
37         // TODO Auto-generated method stub
38         Log.i("service", "-->onDestroy");
39         super.onDestroy();
40     }
41
42     class MyBinder extends Binder{
43         public void function(){
44             Log.i("service", "Binder-->function");
45
46         }
47
48     }
49
50 }

 1 <LinearLayout xmlns:android="http://schemas.android.com/apk/res/android"
 2     xmlns:tools="http://schemas.android.com/tools"
 3     android:layout_width="match_parent"
 4     android:layout_height="match_parent"
 5     android:orientation="vertical"
 6       >
 7
 8     <Button
 9         android:layout_width="wrap_content"
10         android:layout_height="wrap_content"
11         android:text="绑定服务"
12         android:onClick="btn_bindService"
13         />
14     <Button
15         android:layout_width="wrap_content"
16         android:layout_height="wrap_content"
17         android:text="解绑服务"
18         android:onClick="btn_unbindService"
19         />
20     <Button
21         android:layout_width="wrap_content"
22         android:layout_height="wrap_content"
23         android:text="执行自定义Binder子类的function方法"
24         android:onClick="btn_Binder"
25         />
26
27
28 </LinearLayout>
清单文件注册:
<service android:name="com.example.demo02.MyService"></service>
一共三个按钮
当点击“绑定服务”按钮时 执行

当点击“执行自定义Binder子类的function方法”按钮时 执行

当点击“解绑服务”按钮时 执行

BIND_AUTO_CREATE标识表示:绑定的服务组件如果不存,则会自动创建,
由bindService方式启动的Service,其生命周期会受到绑定组件的影响,即当绑定组件Activity销毁时,Service也会停止
