先删除这些
rm -rf ~/.npm
rm -rf ~/.npm-global
rm -rf ~/.npmrc
rm -rf ~/.node-gyp
按https://github.com/nodesource/distributions/blob/master/README.md#debinstall
安装
curl -sL https://deb.nodesource.com/setup_14.x | sudo -E bash -
sudo apt-get install -y nodejs
npm uninstall -g @angular/cli
npm cache clean --force
sudo apt remove nodejs
如果新安装的mint新版本,比如19.2 19.3... node会提示操作系统不支持
形如:

,那么参考https://github.com/nodesource/distributions/issues/881
1 下载nodejs_install.sh
wget -O nodejs_install.sh https://deb.nodesource.com/setup_14.x
2
xed ./nodejs_install.sh
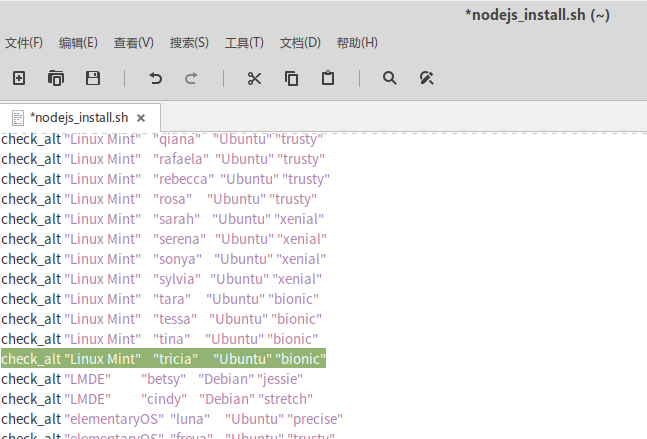
在文件靠后的地方,找到mint
check_alt "Linux Mint"    "tara"     "Ubuntu" "bionic"
check_alt "Linux Mint"    "tessa"    "Ubuntu" "bionic"
加一行
mint19:
check_alt "Linux Mint" "tricia" "Ubuntu" "bionic"
mint20:
check_alt "Linux Mint" "ulyana" "Ubuntu" "focal"
形如
然后 保存退出
sudo bash ./nodejs_install.sh
就可以 安装了
sudo apt-get install -y nodejs
参考这个修改npm路径,以便用-g安装包的时候不报错
Make a directory for global installations:
mkdir ~/.npm-global
Configure npm to use the new directory path:
npm config set prefix '~/.npm-global'
Open or create a ~/.profile file
xed ~/.profile
and add this line:
export PATH=~/.npm-global/bin:$PATH
Back on the command line, update your system variables:
source ~/.profile
添加 PATH="$HOME/.npm-global/bin:$PATH"
再安装angular就不用sudo了
先确认安装了
sudo apt install build-essential
如果不行,就
sudo -i
aptitude install g++
否则sass编译不过,提示没有g++
npm install -g -f @angular/cli
应对被墙, 装nrm
npm i nrm -g
然后用
nrm ls 列出代理
nrm use XXX 切换代理
安装phantomjs
sudo apt-get install phantomjs
安装typescript
npm i -g typescript
查看版本
ng --version
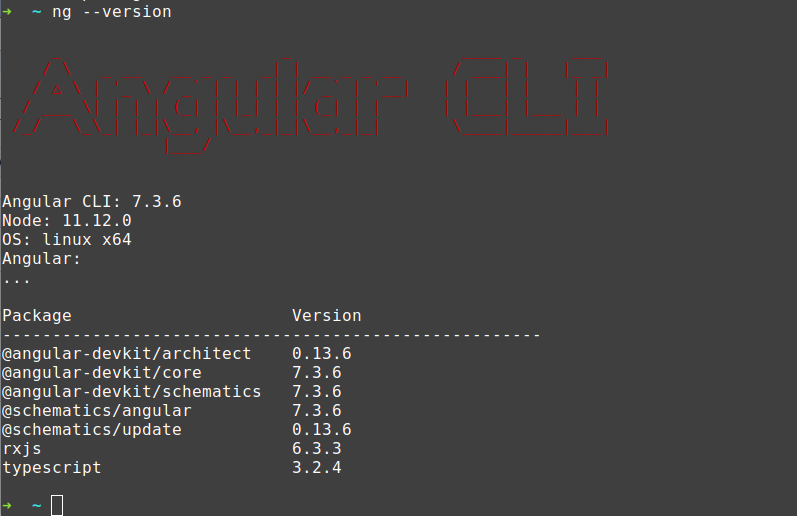
看见Angular: ...应该是安装正确的.
否则会看见error (8.x的node如果没卸载干净安装9 会提示 ts错误)