1.图书列表页获取数据
1.在server/routes/index.js中新增路由
router.get('/booklist',controllers.booklist)
2.在server/controllers下新增booklist.js
const {mysql}=require('../qcloud')

module.exports=async(ctx)=>{
    const books=await mysql('books').select('*').orderBy('id','desc')
    ctx.state.data={
        list:books
    }
}
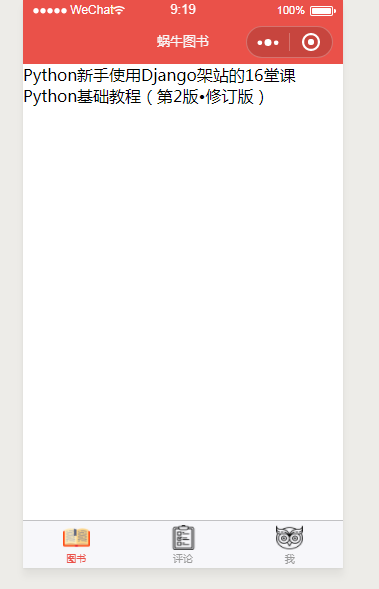
3.在mydemo/src/pages/books/index.vue中
<template>
    <div>
        <div :key="book.id" v-for="book in books">{{book.title}}</div>
    </div>
</template>
<script>
import {get} from '@/until'

export default {
    data(){
        return {
            books:[]
        }
    },

    methods:{
        async getList(){
            const books=await get('/weapp/booklist')

            this.books=books.data.list
        }
    },

    mounted(){
        this.getList()
    }

}
</script>
<style>

</style>
效果图
2.图书卡片显示数据
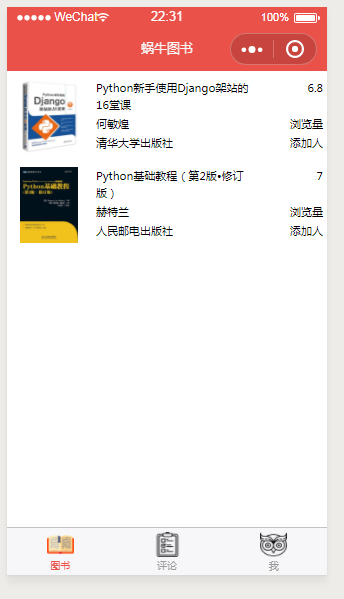
1.在src/components目录下新建组件BookList.vue
<template>
    <div class='book-card'>
        <div class="thumb">
            <img :src="book.image" class="img" mode="aspectFit">
        </div>
        <div class="detail">
            <div class="row">
                <div class="right">
                    {{book.rate}}
                </div>
                <div class="left">
                    {{book.title}}
                </div>
            </div>

            <div class="row">
                <div class="right">
                    浏览量
                </div>
                <div class="left">
                    {{book.author}}
                </div>
            </div>

            <div class="row">
                <div class="right">
                    添加人
                </div>
                <div class="left">
                    {{book.publisher}}
                </div>
            </div>
        </div>
    </div>
</template>

<script>
export default {
    props:['book']

}
</script>

<style lang='scss' scoped>
    .book-card{
        padding: 5px;
        overflow: hidden;
        margin-top: 5px;
        margin-bottom: 5px;
        font-size: 14px;
        .thumb{
            width: 90px;
            height: 90px;
            float: left;
            margin: 0 auto;
            overflow: hidden;
            .img{
                max-width: 100%;
                max-height: 100%;
            }
        }
        .detail{
            margin-left: 100px;
            .row{
                line-height: 20px;
                margin-bottom: 3px;
            }
            .right{
                float: right;
            }
            .left{
                margin-right: 80px;
            }
        }
    }

</style>
2.在src/pages/books/index.vue中
<template>
    <div>
        <BookList :key='book.id' v-for='book in books' :book='book'></BookList>

    </div>
</template>
<script>
import {get} from '@/until';

import BookList from'@/components/BookList'

export default {
    components:{
        BookList
    },

    data(){
        return {
            books:[]
        }
    },

    methods:{
        async getList(){
            const books=await get('/weapp/booklist')

            this.books=books.data.list
        }
    },

    mounted(){
        this.getList()
    }

}
</script>
<style>

</style>
效果图
3.星级显示组件的实现
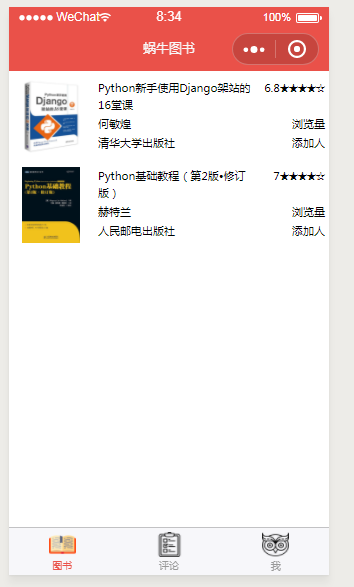
1.在src/components目录下新建组件Rate.vue
<template>
    <div class="rate">
        <span>☆☆☆☆☆</span>
        <div class="hollow" :style='style'>★★★★★</div>
    </div>
</template>
<script>
export default {
    props:{
        value:{type:[Number,String],default:'0'}
    },
    computed:{
        style(){
            return `${this.value/2}em`
        }
    },

}
</script>
<style lang='scss'>
    .rate{
        position: relative;
        display: inline-block;
        .hollow{
            position: absolute;
            display: inline-block;
            top:0;
            left: 0;
            width: 0;
            overflow: hidden;
        }
    }
</style>
2.在src/components目录下修改BookList.vue
<template>
    <div class='book-card'>
        <div class="thumb">
            <img :src="book.image" class="img" mode="aspectFit">
        </div>
        <div class="detail">
            <div class="row">
                <div class="right">
                    {{book.rate}}<Rate :value='book.rate'></Rate>
                </div>
                <div class="left">
                    {{book.title}}
                </div>
            </div>

            <div class="row">
                <div class="right">
                    浏览量
                </div>
                <div class="left">
                    {{book.author}}
                </div>
            </div>

            <div class="row">
                <div class="right">
                    添加人
                </div>
                <div class="left">
                    {{book.publisher}}
                </div>
            </div>
        </div>
    </div>
</template>

<script>
import Rate from '@/components/Rate'
export default {
    components:{
        Rate
    },
    props:['book']

}
</script>

<style lang='scss' scoped>
    .book-card{
        padding: 5px;
        overflow: hidden;
        margin-top: 5px;
        margin-bottom: 5px;
        font-size: 14px;
        .thumb{
            width: 90px;
            height: 90px;
            float: left;
            margin: 0 auto;
            overflow: hidden;
            .img{
                max-width: 100%;
                max-height: 100%;
            }
        }
        .detail{
            margin-left: 100px;
            .row{
                line-height: 20px;
                margin-bottom: 3px;
            }
            .right{
                float: right;
            }
            .left{
                margin-right: 80px;
            }
        }
    }

</style>
效果图
3.优化UI页面
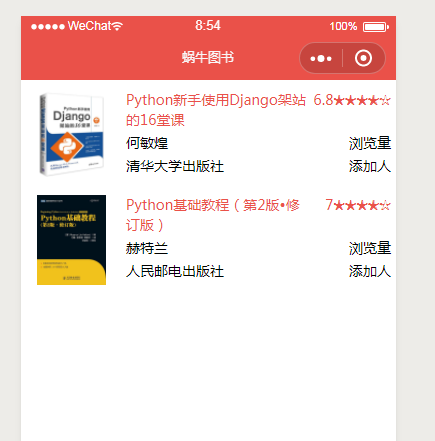
在src/App.vue中的<style>标签内,加全局样式
.text-primary{
  color: #EA5149;
}
在src/components/BookList.vue中给row加上text-primary类
<div class="row text-primary">
                <div class="right">
                    {{book.rate}}<Rate :value='book.rate'></Rate>
                </div>
                <div class="left">
                    {{book.title}}
                </div>
            </div>
效果图
4.获取添加人(连表查询)
1.在server/controllers/booklist.js中
const {mysql}=require('../qcloud')

module.exports=async(ctx)=>{
    const books=await mysql('books')
    .select('books.*','csessioninfo.user_info')
    .join('csessioninfo','books.openid','csessioninfo.open_id')
    .orderBy('books.id','desc')
    ctx.state.data={
        list:books.map(v=>{
            const info=JSON.parse(v.user_info)
            return Object.assign({},v,{
                user_info:{
                    nickName:info.nickName
                }
            })
        })
    }
}
2.在src/components/BookList.vue中将原来添加人的位置,替换为
<div class="row">
                <div class="right">
                    {{book.user_info.nickName}}
                </div>
                <div class="left">
                    {{book.publisher}}
                </div>
            </div>
效果图
5.下拉刷新
1.多添加几本图书入库
2.在src/pages/books目录下,新建main.json
{
    "enablePullDownRefresh":true
  }
3.在src/pages/books/index.vue中
<template>
    <div>
        <BookList :key='book.id' v-for='book in books' :book='book'></BookList>

    </div>
</template>
<script>
import {get} from '@/until';

import BookList from'@/components/BookList'

export default {
    components:{
        BookList
    },

    data(){
        return {
            books:[]
        }
    },

    methods:{
        async getList(){
            wx.showNavigationBarLoading()
            const books=await get('/weapp/booklist')
            this.books=books.data.list
            wx.stopPullDownRefresh()
            wx.hideNavigationBarLoading()
        }
    },

    onPullDownRefresh(){
        // console.log('下拉')
        this.getList()
    },

    mounted(){
        this.getList()
    }

}
</script>
<style>

</style>
6.图书滚动加载功能实现(包含了下拉加载和上拉加载)
1.在server/controllers/booklist.js中修改代码为
const {mysql}=require('../qcloud')

module.exports=async(ctx)=>{
    const {page}=ctx.request.query
    const size=10
    const books=await mysql('books')
    .select('books.*','csessioninfo.user_info')
    .join('csessioninfo','books.openid','csessioninfo.open_id')
    .limit(size)
    .offset(Number(page)*size)
    .orderBy('books.id','desc')
    ctx.state.data={
        list:books.map(v=>{
            const info=JSON.parse(v.user_info)
            return Object.assign({},v,{
                user_info:{
                    nickName:info.nickName
                }
            })
        })
    }
}
2.在src/pages/books/index.vue中修改为
<template>
    <div>
        <BookList :key='book.id' v-for='book in books' :book='book'></BookList>
        <p class="text-footer" v-if='!more'>没有更多数据</p>
    </div>
</template>
<script>
import {get} from '@/until';

import BookList from'@/components/BookList'

export default {
    components:{
        BookList
    },

    data(){
        return {
            books:[],
            page:0,
            more:true
        }
    },

    methods:{
        async getList(){

            wx.showNavigationBarLoading()//显示加载中菊花动画
            const books=await get('/weapp/booklist',{page:this.page})
            if(books.data.list.length<10&&this.page>0){
                this.more=false
            }
            this.books=this.books.concat(books.data.list)//下拉刷新,不能直接覆盖books,而是累加
            wx.hideNavigationBarLoading()//隐藏加载中菊花动画
            wx.stopPullDownRefresh()//停止下拉状态
        }
    },

    onPullDownRefresh(){
        // console.log('下拉')
        this.page+=1
        this.getList(true)
    },
    onReachBottom(){
        //上拉(向下到底)
        if(!this.more){
            // 没有更多了
            return false
        }
        this.page+=1
        this.getList()
    },

    mounted(){
        this.getList()
    }

}
</script>
<style>

</style>
3.在App.vue中增加样式
.text-footer{
  text-align: center;
  font-size: 15px;
  margin-bottom: 15px;
}
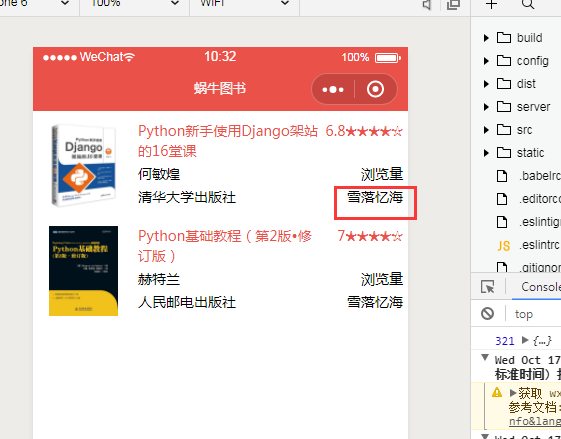
7.图书访问次数统计
1.在src/components/BookList.vue中,修改代码,加上a标签,以及配置
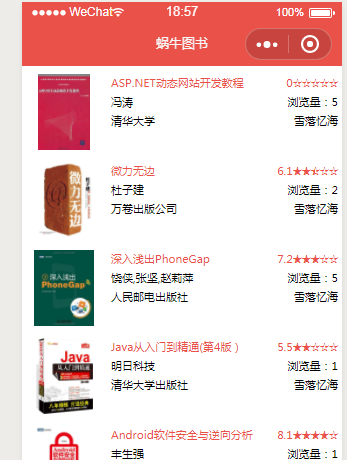
<template>
<a :href="detailUrl">
    <div class='book-card'>
        <div class="thumb">
            <img :src="book.image" class="img" mode="aspectFit">
        </div>
        <div class="detail">
            <div class="row text-primary">
                <div class="right">
                    {{book.rate}}<Rate :value='book.rate'></Rate>
                </div>
                <div class="left">
                    {{book.title}}
                </div>
            </div>

            <div class="row">
                <div class="right">
                    浏览量:{{book.count}}
                </div>
                <div class="left">
                    {{book.author}}
                </div>
            </div>

            <div class="row">
                <div class="right">
                    {{book.user_info.nickName}}
                </div>
                <div class="left">
                    {{book.publisher}}
                </div>
            </div>
        </div>
    </div>
</a>
</template>

<script>
import Rate from '@/components/Rate'
export default {
    components:{
        Rate
    },
    props:['book'],

    computed:{
        detailUrl(){
            return '/pages/detail/main?id='+this.book.id
        }
    }

}
</script>

<style lang='scss' scoped>
    .book-card{
        padding: 5px;
        overflow: hidden;
        margin-top: 5px;
        margin-bottom: 5px;
        font-size: 14px;
        .thumb{
            width: 90px;
            height: 90px;
            float: left;
            margin: 0 auto;
            overflow: hidden;
            .img{
                max-width: 100%;
                max-height: 100%;
            }
        }
        .detail{
            margin-left: 100px;
            .row{
                line-height: 20px;
                margin-bottom: 3px;
            }
            .right{
                float: right;
            }
            .left{
                margin-right: 80px;
            }
        }
    }

</style>
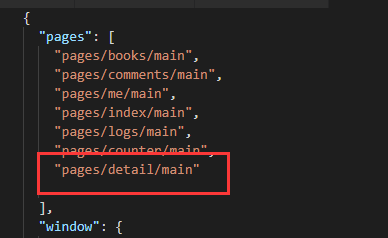
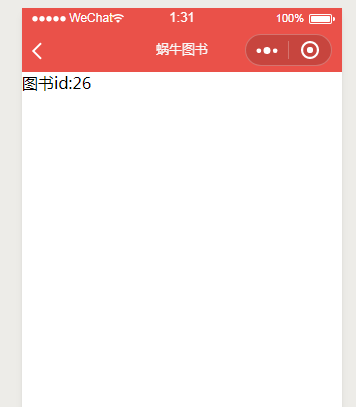
2.在src/pages目录下新建detail目录,新建index.vue和main.js
1.main.js
import Vue from 'vue'
import App from './index'

const app = new Vue(App)
app.$mount()
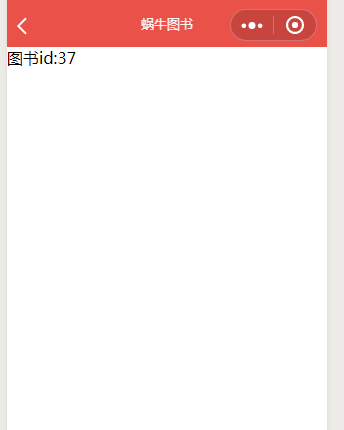
2.index.vue
<template>
    <div>图书id:{{bookid}}</div>
</template>
<script>

import {get} from '@/until'

export default {
    data(){
        return{
            bookid:''
        }
    },

    methods:{
        async getDetail(){
            const info=await get('/weapp/bookdetail',{id:this.bookid})
        }
    },

    mounted(){
        this.bookid=this.$root.$mp.query.id //this.$root.$mp.query获取跳转链接传过来的对象集合
        this.getDetail()
    }
}
</script>
<style>

</style>
3.在src/app.json中加入
"pages/detail/main"
4.在server/routes/index.js中加入路由
router.get('/bookdetail',controllers.bookdetail)
5.在server/controllers目录下新建bookdetail.js
const {mysql}=require('../qcloud')

module.exports=async(ctx)=>{
    const {id}=ctx.request.query
    await mysql('books')
        .where('id',id)
        .increment('count',1)
}
6.因为新增了page,所以要重新启动项目
npm run dev
8.排行榜轮播图
1.点击排行榜的获取
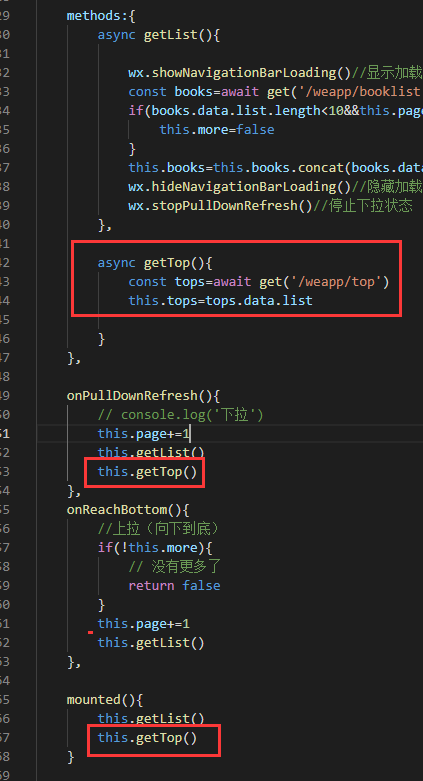
1.在src/pages/books/index.vue中增加getTop方法,并在相关位置调用
async getTop(){
            const tops=await get('/weapp/top')
            this.tops=tops.data.list

        }
2.在server/router/index.js中增加路由
router.get('/top',controllers.top)
3.在server/controllers目录下新建top.js
const {mysql} =require('../qcloud')

module.exports=async (ctx)=>{
    const top=await mysql('books')
                .select('id','title','image','count')
                .orderBy('count','desc')
                .limit(9)
    ctx.state.data={
        list:top
    }
}
2.排行榜轮播图的基本实现
1.在src/components目录下新建组件TopSwiper.vue
<template>
  <div class='swiper'>
      <swiper
      :indicator-dots='true'
      indicator-color='#EA5A49'
      :autoplay='true'
      :interval='6000'
      :duration='1000'
      :circular='true'
    >

        <div :key='imgindex' v-for='(top,imgindex) in tops'>

            <swiper-item>
                <img  class='slide-image' mode='aspectFit' :src='top.image'>
            </swiper-item>

        </div>


    </swiper>
  </div>
</template>
<script>
export default {
  props:['tops']

}
</script>
<style>

</style>
2.在src/pages/books/index.vue中导入TopSwiper组件
<template>
    <div>
        <TopSwiper :tops='tops'></TopSwiper>
        <BookList :key='book.id' v-for='book in books' :book='book'></BookList>
        <p class="text-footer" v-if='!more'>没有更多数据</p>
    </div>
</template>
<script>
import {get} from '@/until';

import BookList from'@/components/BookList'
import TopSwiper from '@/components/TopSwiper'

//...
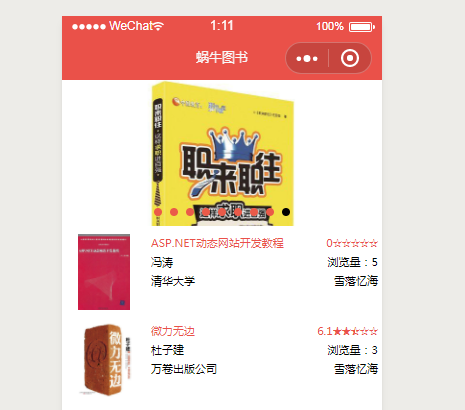
效果图
3.排行榜轮播图完善实现
1.修改在src/components目录下的组件TopSwiper.vue
<template>
  <div class='swiper'>
      <swiper
      :indicator-dots='true'
      indicator-color='#EA5A49'
      :autoplay='true'
      :interval='6000'
      :duration='1000'
      :circular='true'
    >

        <div :key='imgindex' v-for='(top,imgindex) in imgUrls'>

            <swiper-item>
                <img
                @click="bookDetail(img)"
                class='slide-image'
                mode='aspectFit'
                v-for="img in top"
                :key="img.id"
                :src='img.image'>
            </swiper-item>

        </div>


    </swiper>
  </div>
</template>
<script>
export default {
  props:['tops'],
  computed:{
      imgUrls(){
        //   如果通用 请用chunk函数 比如lodash的chunk方法
        let res=this.tops
        return [res.slice(0,3),res.slice(3,6),res.slice(6)]
      }
  },
  methods:{
      bookDetail(item){
          wx.navigateTo({
              url:'/pages/detail/main?id='+item.id
          })
      }
  }

}
</script>
<style lang='scss'>
.swiper{
    margin-top: 5px;
    .slide-image{
        width: 33%;
        height: 250rpx;
    }
}
</style>
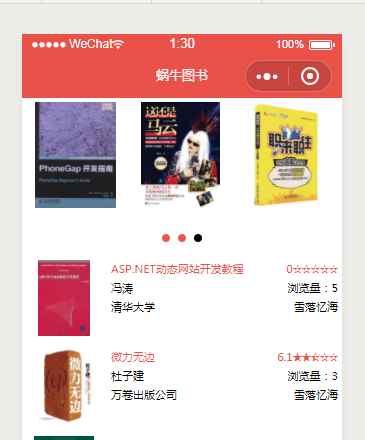
效果图
2.点击图片预览功能,点击缩略图不会跳转,而是图片预览效果
1.修改在src/components目录下的组件BookList.vue
<template>
<a :href="detailUrl">
    <div class='book-card'>
        <div class="thumb" @click.stop="preview">
            <img :src="book.image" class="img" mode="aspectFit">
        </div>
        <div class="detail">
            <div class="row text-primary">
                <div class="right">
                    {{book.rate}}<Rate :value='book.rate'></Rate>
                </div>
                <div class="left">
                    {{book.title}}
                </div>
            </div>

            <div class="row">
                <div class="right">
                    浏览量:{{book.count}}
                </div>
                <div class="left">
                    {{book.author}}
                </div>
            </div>

            <div class="row">
                <div class="right">
                    {{book.user_info.nickName}}
                </div>
                <div class="left">
                    {{book.publisher}}
                </div>
            </div>
        </div>
    </div>
</a>
</template>

<script>
import Rate from '@/components/Rate'
export default {
    components:{
        Rate
    },
    props:['book'],

    computed:{
        detailUrl(){
            return '/pages/detail/main?id='+this.book.id
        }
    },
    methods:{
        preview(){
            wx.previewImage({
                current:this.book.image,
                urls:[this.book.image]//轮播图列表
            })
        }
    }

}
</script>

<style lang='scss' scoped>
    .book-card{
        padding: 5px;
        overflow: hidden;
        margin-top: 5px;
        margin-bottom: 5px;
        font-size: 14px;
        .thumb{
            width: 90px;
            height: 90px;
            float: left;
            margin: 0 auto;
            overflow: hidden;
            .img{
                max-width: 100%;
                max-height: 100%;
            }
        }
        .detail{
            margin-left: 100px;
            .row{
                line-height: 20px;
                margin-bottom: 3px;
            }
            .right{
                float: right;
            }
            .left{
                margin-right: 80px;
            }
        }
    }

</style>
效果图