创建一个服务器
基本配置:
const http = require('http');

const server = http.createServer((req, res) => {//req:请求对象,res:响应对象
  console.log(`request was made: ${req.url}`);//req.url描述原始的请求路径
  //向请求发送响应头,在res.end()前使用
  res.writeHead(200, { 'Content-Type': 'text/plain' });
  //向服务器发出信号,表明已发送所有响应头和主体,该服务器视为此消息已完成必须在每个响应上调用此方法
  res.end('Hey ting');
});

server.listen(3000, '127.0.0.1');//监听127.0.0.1:3000
console.log('yo dawgs, now listening to port 3000');
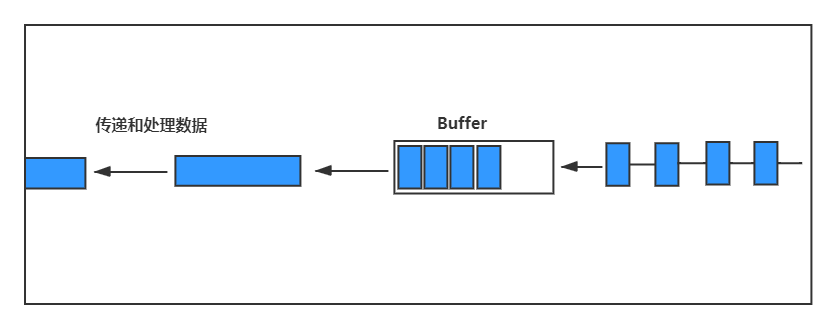
buffers&streams
buffers
- 从一处转移到另一处的大量数据的临时储存点
- 当缓冲区充满了数据,然后开始传输
- 一次传输一小块数据

streams in node.js
- 可以在node.js中创建流传输数据
- 提高性能
通过streams读或写数据
创建指定文件的可读流和可写流,通过streams更高效的实现文件的读写操作。
const fs = require('fs');

const myReadStream = fs.createReadStream(`${__dirname}/readMe.txt`, 'utf8');
const myWriteStream = fs.createWriteStream(`${__dirname}/writeMe.txt`)

myReadStream.on('data', (chunk) => {
//将从readMe中读取的每块数据块写入writeMe文件
  console.log('new chunk received:');
  myWriteStream.write(chunk);
})
pipes
将可写流绑定到可读流,将可读流自动切换到流动模式,并将可读流所有数据推送到可写流。数据流会被自动管理。
const http = require('http');
const fs = require('fs');

const server = http.createServer((req, res) => {
  // res is a writeable stream
  console.log(`request was made: ${req.url}`);
  res.writeHead(200, { 'Content-Type': 'text/plain' });
  const myReadStream = fs.createReadStream(`${__dirname}/readMe.txt`, 'utf8');
  myReadStream.pipe(res);//将从readMe读取的数据都作为返回的数据返回

});

server.listen(3000, '127.0.0.1');
console.log('yo dawgs, now listening to port 3000');
在客户端显示HTML页面
将content-type改为text/html
const server = http.createServer((req, res) => {
  // res is a writeable stream
  console.log(`request was made: ${req.url}`);
  res.writeHead(200, { 'Content-Type': 'text/html' });
  const myReadStream = fs.createReadStream(`${__dirname}/index.html`, 'utf8');
  // const myWriteStream = fs.createWriteStream(`${__dirname}/writeMe.txt`)
  myReadStream.pipe(res);

});
在客户端显示JSON格式数据
const server = http.createServer((req, res) => {
  // res is a writeable stream
  console.log(`request was made: ${req.url}`);
  res.writeHead(200, { 'Content-Type': 'application/json' });
  //修改content-type
  const myObj = {
    name: 'Ryu',
    job: 'ninja',
    age: 20
  }
  res.end(JSON.stringify(myObj))
  //将JSON结构数据以字符串的形式输出,否则输出为[object,object]
});
基本路由配置
通过判断请求的路由进行页面配置,使路由与页面相对应。
const http = require('http');
const fs = require('fs');

const server = http.createServer((req, res) => {
  // res is a writeable stream
  console.log(`request was made: ${req.url}`);
  if (req.url === '/home' || req.url === '/') {//首页
    res.writeHead(200, { 'Content-Type': 'text/html' });
    fs.createReadStream(`${__dirname}/index.html`, 'utf8').pipe(res);
  } else if (req.url === '/contact') {//联系页面
    res.writeHead(200, { 'Content-Type': 'text/html' });
    fs.createReadStream(`${__dirname}/contact.html`, 'utf8').pipe(res);
  } else if (req.url === '/api/ting') {//JSON
    let ting = [{name: 'ting', age: 20}, {name: 'xu', age: 21}]
    res.writeHead(200, {'Content-Type': 'application/json'})
    res.end(JSON.stringify(ting))
  } else {//404 找不到页面
    res.writeHead(404, { 'Content-Type': 'text/html' });
    fs.createReadStream(`${__dirname}/404.html`, 'utf8').pipe(res);
  }
});

server.listen(3000, '127.0.0.1');
console.log('yo dawgs, now listening to port 3000');
nodemon Node自动启动工具
监听代码文件变动并自动重启
安装:
npm install nodemon -g
启动:
nodemon app.js
Express
Express 是一个简洁而灵活的 node.js Web应用框架, 提供了一系列强大特性帮助你创建各种 Web 应用,和丰富的 HTTP 工具。
HTTP methods
- GET -app.get('route', fn)
- POST -app.post('route', fn)
- DELETE -app.delete('route', fn)
- PUT
express基本使用
let express = require('express');//导入

let app = express();

app.get('/', (req, res) => {//使用HTTP GET方法请求特定路由,并在回调方法(即middleware function)中对请求及相应做处理
  res.send('this is the homepage')
});
app.get('/contact', (req, res) => {
  res.send('this is the contactpage')
});
app.get('/contact', (req, res) => {
  res.sendFile(`${__dirname}/contact.html`)//使用sendFile方法返回对应HTML页面
});

app.get('/profile/:id', (req, res) => {//"/:id"是动态的,可以是任意值
  res.send('You requested to see a profile with the id of ' + req.params.id)
})

app.listen(3000);
中间件方法(middleware function)
即在请求和相应之间执行的方法,可以通过中间件对HTTPRequest对象和HTTPResponse对象做一些操作,或在view执行之前做一些操作。
EJS (JavaScript模板引擎)
基本使用(数据输出)
利用JavaScript代码在生成的HTML页面中输出数据
使用<%= ...> 在页面中输出数据
let express = require('express');

let app = express();
app.set('view engine', 'ejs')

app.get('/profile/:id', (req, res) => {
  let data = {
    age: 22,
    job: 'ninja'
  }
  res.render('profile', {person: req.params.id, data: data})
  //渲染views中的profile.ejs并传入第二个参数中的数据
})

app.listen(3000);
//ejs部分,将从render方法中传入的数据对应输出
<body>
  <h1>weclome to the profile of <%= person %> </h1>
  <p><strong>Age:</strong><%= data.age %></p>
  <p><strong>Job:</strong><%= data.job %></p>
</body>


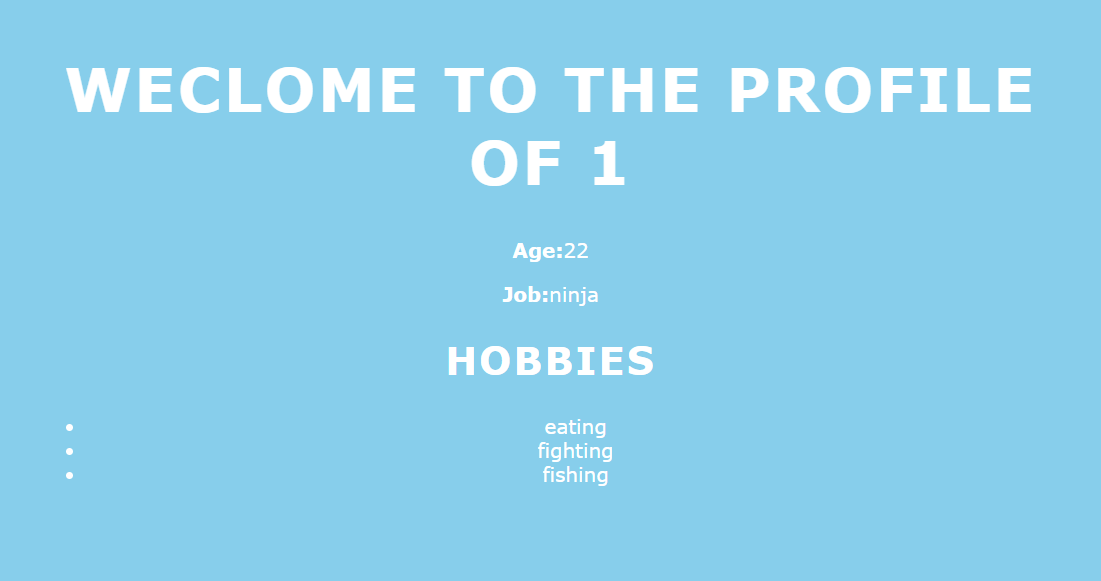
实现数据遍历输出
<body>
  <h1>weclome to the profile of <%= person %> </h1>
  <p><strong>Age:</strong><%= data.age %></p>
  <p><strong>Job:</strong><%= data.job %></p>
  <h2>Hobbies</h2>
  <ul>
    <% data.hobbies.forEach((item) => { %>
      <li><%= item %></li>
    <% }); %>
  </ul>
</body>
复用模板
如设置复用nav模板,就可以省去在每一个页面重复写nav代码的步骤。通过include指令将相对于模板路径中的模板片段包含进来
//nav
<nav>
  <ul>
    <li><a href="/">Home</a></li>
    <li><a href="/contact">Contact</a></li>
  </ul>
</nav>
在页面相应位置添加一下代码,即包含partial文件下nav.ejs文件内容
<%- include('partial/nav') %>
设置静态样式
将静态样式放在assets文件夹下并通过link标签获取,因为设置的样式文件没有像之前的HTML文件或EJS文件一样通过中间件方法放到相应的请求响应中,所以不会在页面显示,为了不在每个请求get请求方法中重复同样的代码,使用express的use方法(对给定的路径做相应的处理)及 express.static()方法设置静态文件
use([path],callback)方法用来给path注册中间件,在实际请求发生之前对HTTPrequest和HTTPresponse做一些操作
express.static()方法是一个express内置的中间件方法,用来提供静态资源文件
//html文件
   <link rel="stylesheet" href="/assets/styles.css" type="text/css" />
app.use('/assets', express.static('public'))
//当请求路径以/assets为根路径时,将请求交给中间件处理
//假设public文件夹下有styles.css文件,则可通过/assets/styles.css访问
query strings
- mysite.com/blog/news?page=2
- page=2
- mysite.com/contact?person=ryu&dept=marking
- 解析请求,并提取数据
app.get('/contact', (req, res) => {
  res.render('contact', {qs: req.query})
});
<body>
  <%- include('partial/nav') %>
  <h1>Contact US!</h1>
  <p>Lorem ipsum dolor sit amet consectetur adipisicing elit. Tenetur, alias.</p>
  <form id="contact-form">
    <label for="who">Who do you want to contact?</label>
    <input type="text" name="who" value="<%= qs.person %>" />
    <label for="department">Which department?</label>
    <input type="text" name="department" value="<%= qs.dept %>" />
    <label for="email">Your email</label>
    <input type="email" name="email" />
    <input type="submit" value="submit" />
  </form>
</body>


POST 请求
- POST 是一个网络请求方法
- POST请求服务器接收/存储请求正文中包含的数据
- 常在表单提交中使用


var urlencodedParser = bodyParser.urlencoded({ extended: false });

app.post('/contact', urlencodedParser, (req, res) => {
  console.log(req.body)
  res.render('contact-success', {data: req.body})
});
<body>
  <%- include('partial/nav') %>
  <h1>Contact US!</h1>
  <p>Lorem ipsum dolor sit amet consectetur adipisicing elit. Tenetur, alias.</p>
  <p>Thanks for getting in touch!</p>
  <p>You contacted <%= data.who %> in the <%= data.department %> department.</p>
  <p>We will reply you at <%= data.email %></p>
</body>