前言
本demo是在idea下搭建的maven项目,数据库使用Mysql,jdk版本是1.8.0_171,ideal:2017.3.5
一、新建项目
1.file->new->porject
2.选择maven,然后next
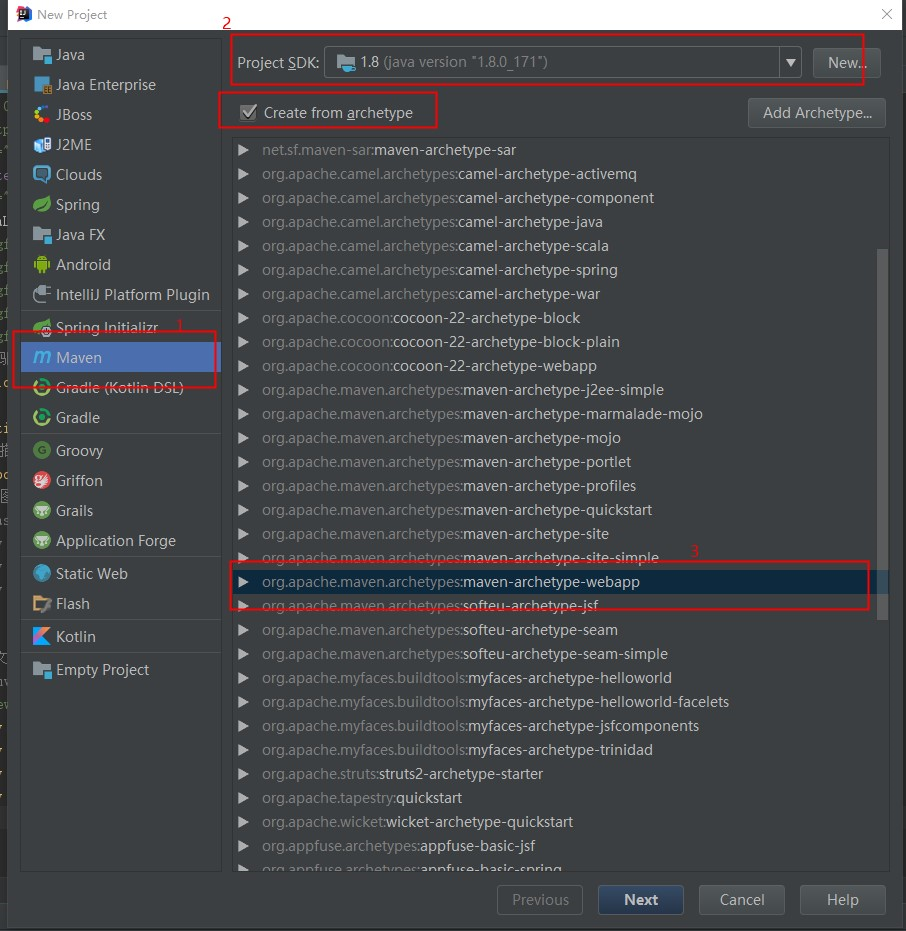
3.填写组织id,随意填写,根据自己需求即可,然后next。

4.这里因为我已经有本地maven仓库了,直接next就行。如果没有配置可以百度一下进行配置

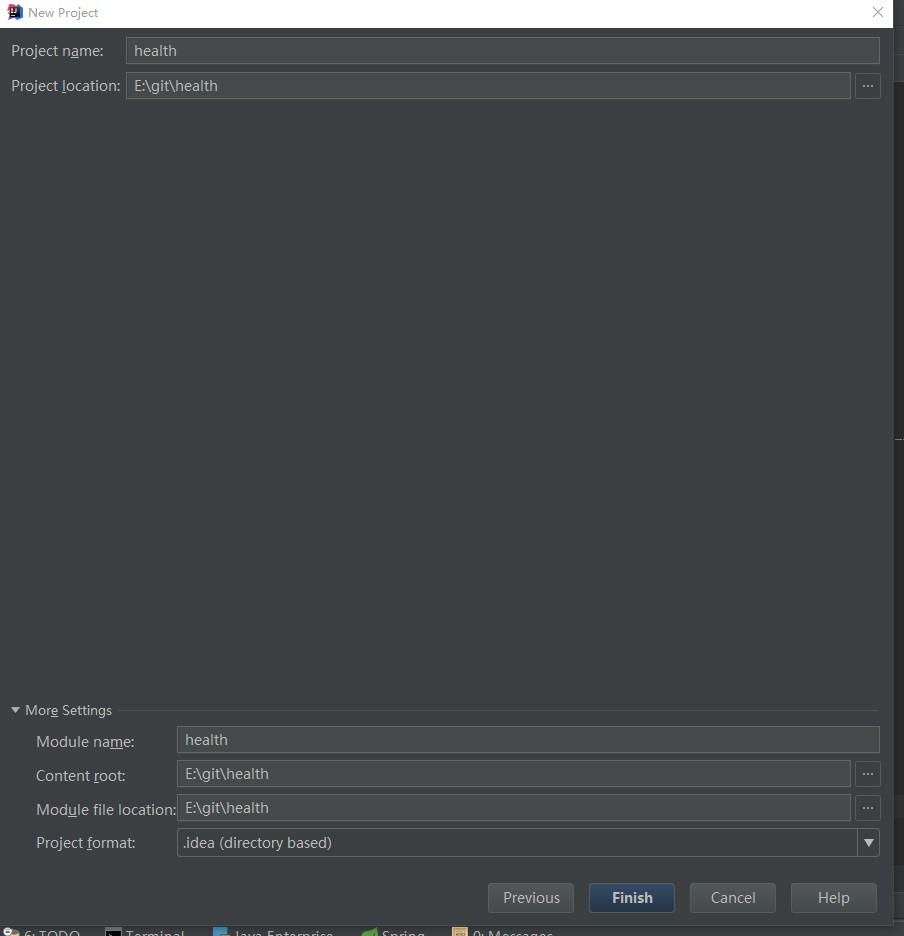
5.输入工程名字和路径(一般默认即可),然后finish
稍等片刻,这里创建项目需要一点时间,到这里新项目已经创建完成,下面主要对项目进行配置
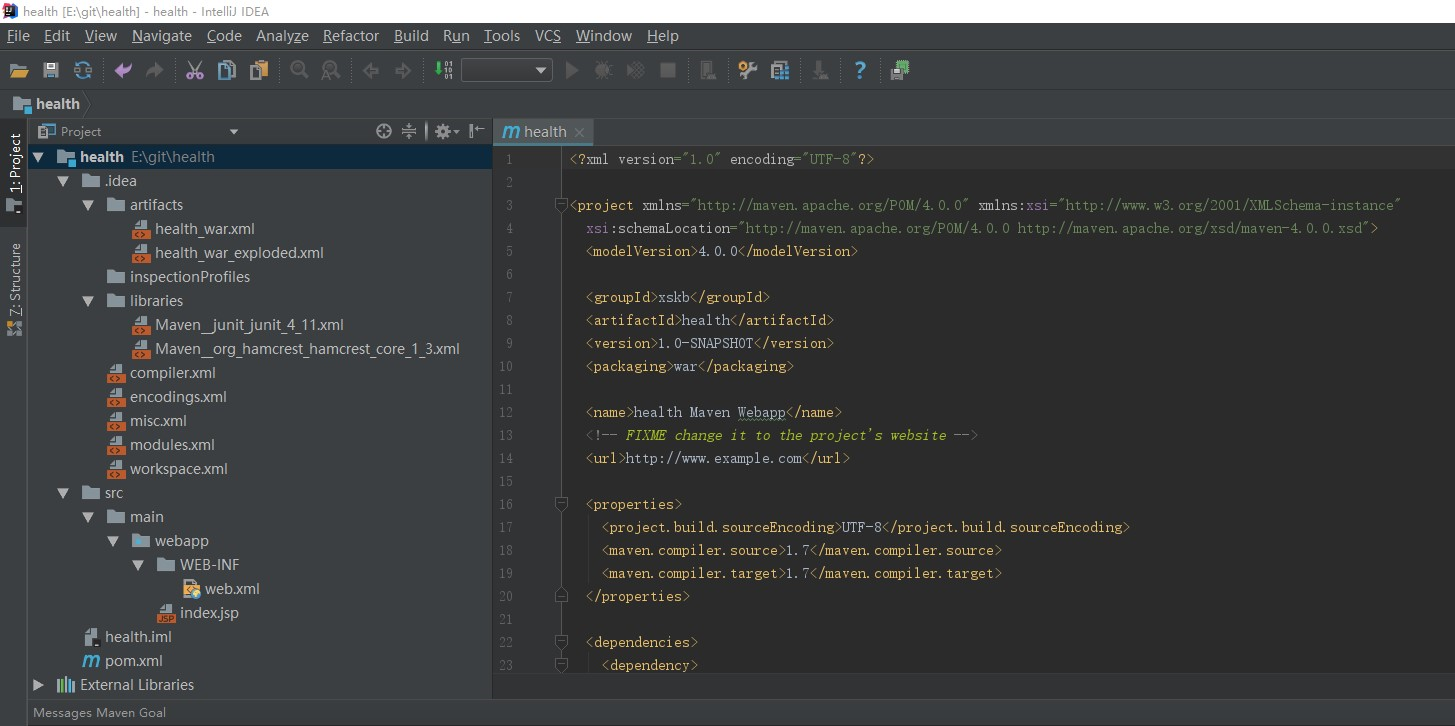
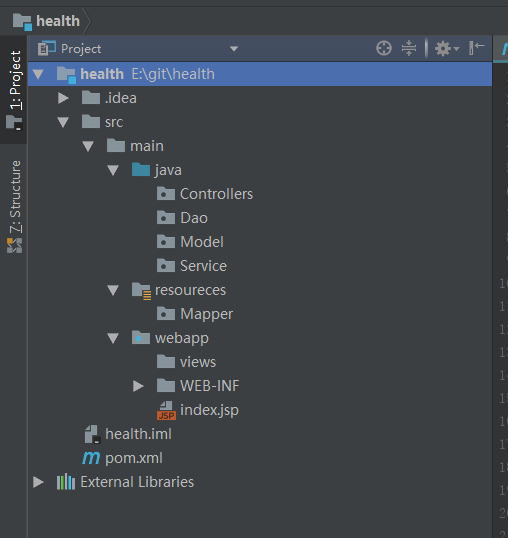
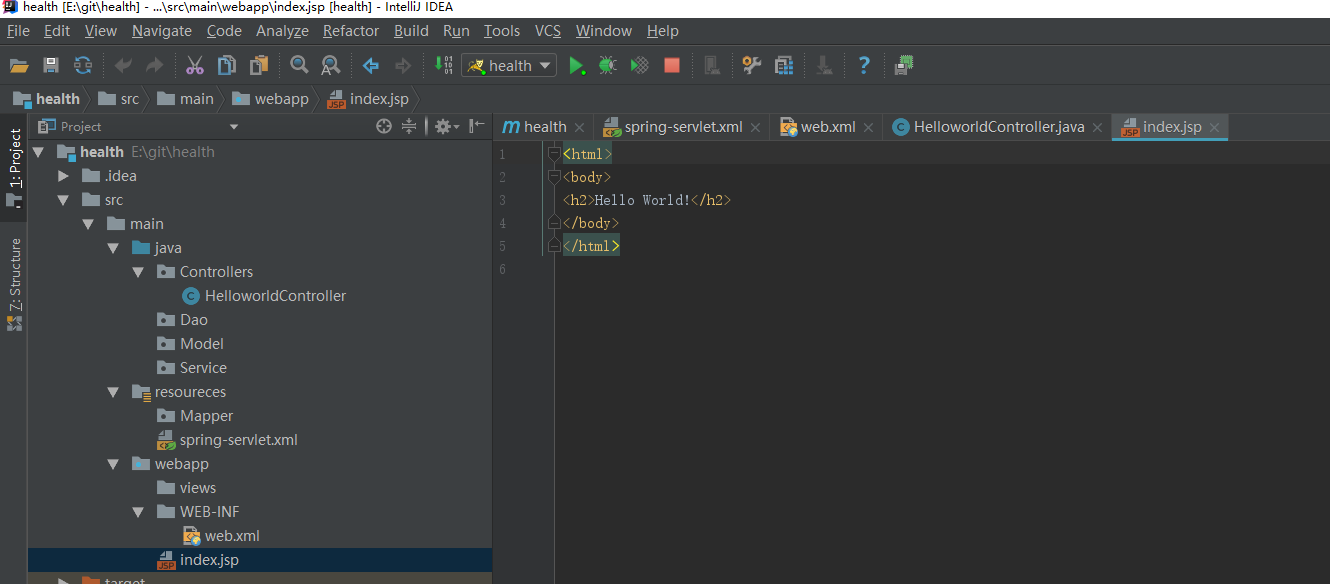
6.创建好的项目目录如下:
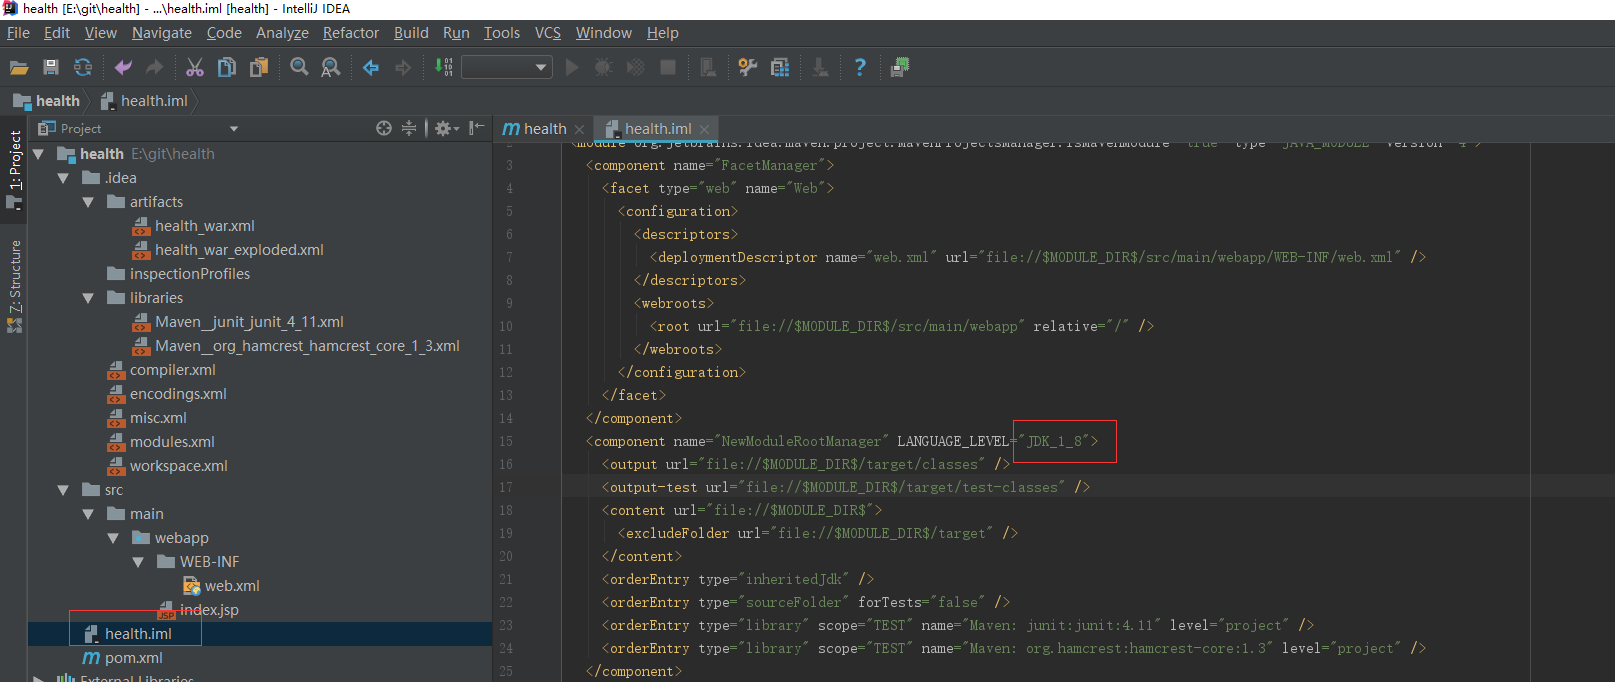
7.检查项目中的jdk版本是否正确,file->settings,我这里以前是1.7现在改成1.8,在项目health.iml文件中也改一下。

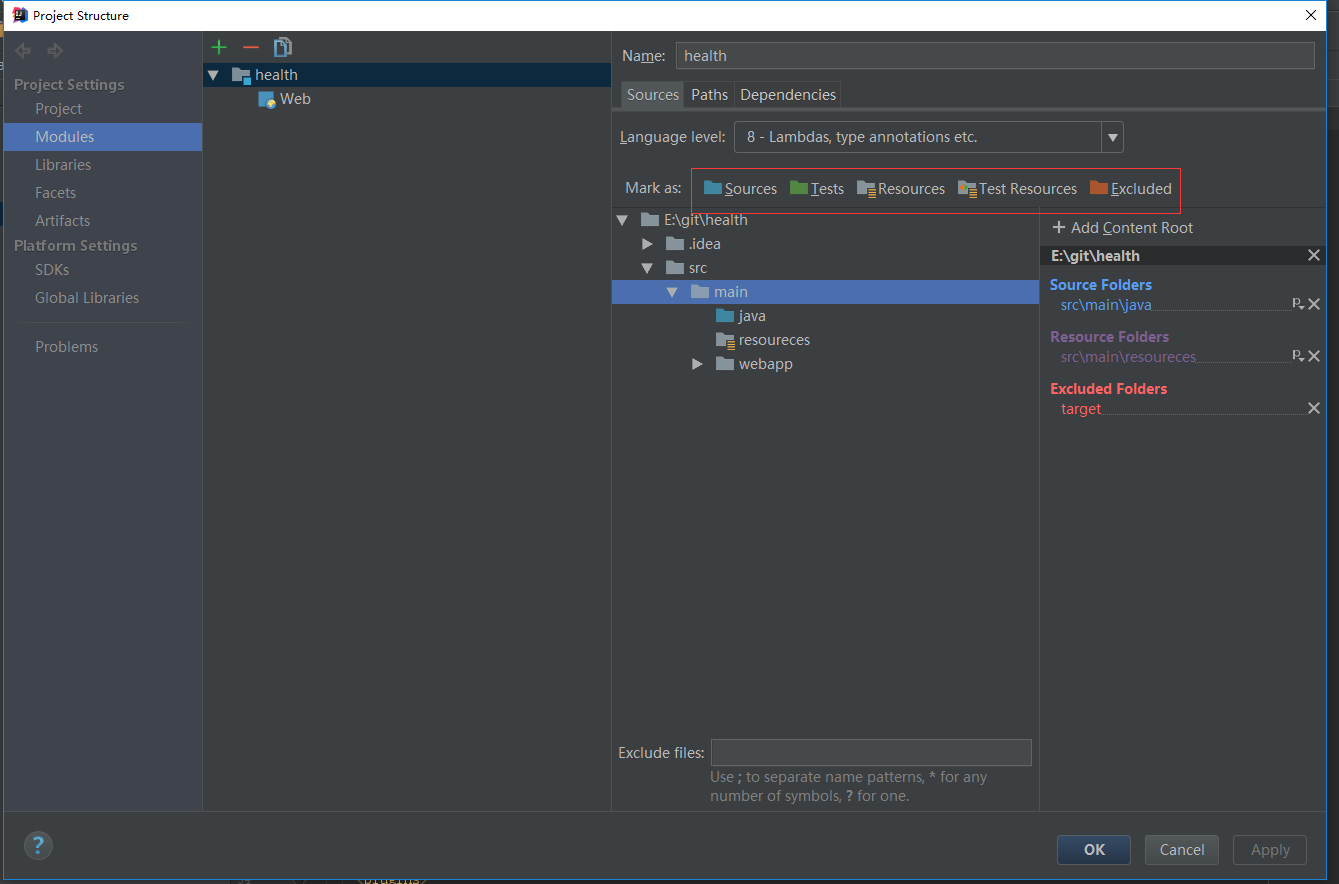
二、目录结构调整
1.新建java代码文件夹,并配置maven的项目结构.file->project structure->modules。(下图红色框内文件的区别请百度查看)
三、maven包的初始化
1.配置pom.xml文件,只需要添加<dependencies>项即可(根据项目需要选择),然后import changes
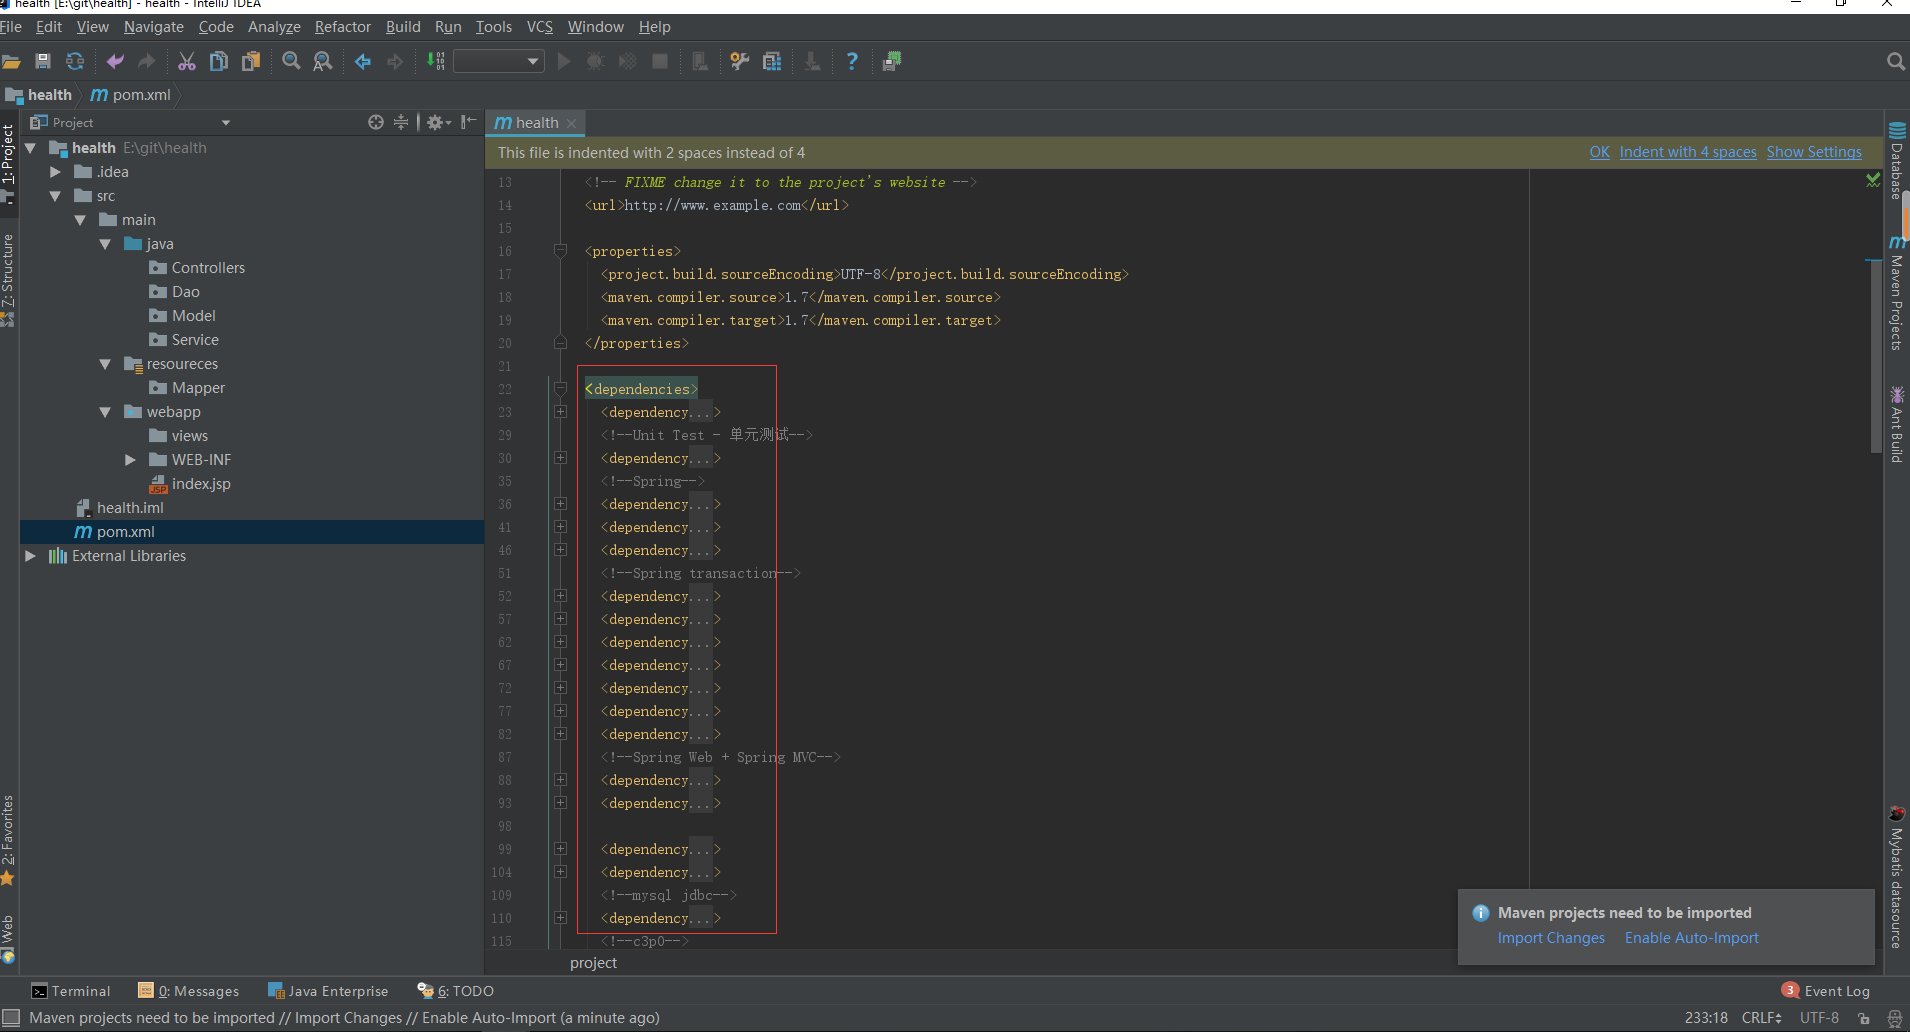
pom.xml 代码作为参考


<?xml version="1.0" encoding="UTF-8"?>

<project xmlns="http://maven.apache.org/POM/4.0.0" xmlns:xsi="http://www.w3.org/2001/XMLSchema-instance"
  xsi:schemaLocation="http://maven.apache.org/POM/4.0.0 http://maven.apache.org/xsd/maven-4.0.0.xsd">
  <modelVersion>4.0.0</modelVersion>

  <groupId>xskb</groupId>
  <artifactId>health</artifactId>
  <version>1.0-SNAPSHOT</version>
  <packaging>war</packaging>

  <name>health Maven Webapp</name>
  <!-- FIXME change it to the project's website -->
  <url>http://www.example.com</url>

  <properties>
    <project.build.sourceEncoding>UTF-8</project.build.sourceEncoding>
    <maven.compiler.source>1.7</maven.compiler.source>
    <maven.compiler.target>1.7</maven.compiler.target>
  </properties>

  <dependencies>
    <dependency>
      <groupId>javax.servlet</groupId>
      <artifactId>servlet-api</artifactId>
      <version>2.5</version>
      <scope>provided</scope>
    </dependency>
    <!--Unit Test - 单元测试-->
    <dependency>
      <groupId>junit</groupId>
      <artifactId>junit</artifactId>
      <version>4.12</version>
    </dependency>
    <!--Spring-->
    <dependency>
      <groupId>org.springframework</groupId>
      <artifactId>spring-core</artifactId>
      <version>4.3.5.RELEASE</version>
    </dependency>
    <dependency>
      <groupId>org.springframework</groupId>
      <artifactId>spring-aop</artifactId>
      <version>4.3.5.RELEASE</version>
    </dependency>
    <dependency>
      <groupId>org.springframework</groupId>
      <artifactId>spring-orm</artifactId>
      <version>4.3.5.RELEASE</version>
    </dependency>
    <!--Spring transaction-->
    <dependency>
      <groupId>org.springframework</groupId>
      <artifactId>spring-tx</artifactId>
      <version>4.3.5.RELEASE</version>
    </dependency>
    <dependency>
      <groupId>org.springframework</groupId>
      <artifactId>spring-test</artifactId>
      <version>4.3.5.RELEASE</version>
    </dependency>
    <dependency>
      <groupId>org.springframework</groupId>
      <artifactId>spring-mock</artifactId>
      <version>2.0.8</version>
    </dependency>
    <dependency>
      <groupId>org.springframework</groupId>
      <artifactId>spring-jdbc</artifactId>
      <version>4.3.5.RELEASE</version>
    </dependency>
    <dependency>
      <groupId>org.springframework</groupId>
      <artifactId>spring-context</artifactId>
      <version>4.3.5.RELEASE</version>
    </dependency>
    <dependency>
      <groupId>org.springframework</groupId>
      <artifactId>spring-context-support</artifactId>
      <version>4.3.5.RELEASE</version>
    </dependency>
    <dependency>
      <groupId>org.springframework</groupId>
      <artifactId>spring-expression</artifactId>
      <version>4.3.5.RELEASE</version>
    </dependency>
    <!--Spring Web + Spring MVC-->
    <dependency>
      <groupId>org.springframework</groupId>
      <artifactId>spring-web</artifactId>
      <version>4.3.1.RELEASE</version>
    </dependency>
    <dependency>
      <groupId>org.springframework</groupId>
      <artifactId>spring-webmvc</artifactId>
      <version>4.3.1.RELEASE</version>
    </dependency>

    <dependency>
      <groupId>com.github.pagehelper</groupId>
      <artifactId>pagehelper</artifactId>
      <version>3.7.3</version>
    </dependency>
    <dependency>
      <groupId>com.github.jsqlparser</groupId>
      <artifactId>jsqlparser</artifactId>
      <version>0.9.1</version>
    </dependency>
    <!--mysql jdbc-->
    <dependency>
      <groupId>mysql</groupId>
      <artifactId>mysql-connector-java</artifactId>
      <version>5.1.38</version>
    </dependency>
    <!--c3p0-->
    <dependency>
      <groupId>c3p0</groupId>
      <artifactId>c3p0</artifactId>
      <version>0.9.1.2</version>
    </dependency>
    <!--NoClassDefFoundError: javax/servlet/jsp/jstl/core/Config-->
    <!-- https://mvnrepository.com/artifact/jstl/jstl -->
    <dependency>
      <groupId>jstl</groupId>
      <artifactId>jstl</artifactId>
      <version>1.2</version>
    </dependency>
    <!--file upload jar package-->
    <!-- https://mvnrepository.com/artifact/commons-fileupload/commons-fileupload -->
    <dependency>
      <groupId>commons-fileupload</groupId>
      <artifactId>commons-fileupload</artifactId>
      <version>1.3.1</version>
    </dependency>
    <!-- https://mvnrepository.com/artifact/commons-io/commons-io -->
    <dependency>
      <groupId>commons-io</groupId>
      <artifactId>commons-io</artifactId>
      <version>2.4</version>
    </dependency>
    <!--json-->
    <!-- https://mvnrepository.com/artifact/org.json/json -->
    <dependency>
      <groupId>org.json</groupId>
      <artifactId>json</artifactId>
      <version>20160212</version>
    </dependency>
    <!-- https://mvnrepository.com/artifact/net.sf.json-lib/json-lib -->
    <dependency>
      <groupId>net.sf.json-lib</groupId>
      <artifactId>json-lib</artifactId>
      <version>2.4</version>
    </dependency>
    <!-- https://mvnrepository.com/artifact/commons-lang/commons-lang -->
    <dependency>
      <groupId>commons-lang</groupId>
      <artifactId>commons-lang</artifactId>
      <version>2.6</version>
    </dependency>
    <!-- https://mvnrepository.com/artifact/commons-beanutils/commons-beanutils -->
    <dependency>
      <groupId>commons-beanutils</groupId>
      <artifactId>commons-beanutils</artifactId>
      <version>1.8.3</version>
    </dependency>
    <!-- https://mvnrepository.com/artifact/commons-collections/commons-collections -->
    <dependency>
      <groupId>commons-collections</groupId>
      <artifactId>commons-collections</artifactId>
      <version>3.2.1</version>
    </dependency>
    <!-- https://mvnrepository.com/artifact/commons-logging/commons-logging -->
    <dependency>
      <groupId>commons-logging</groupId>
      <artifactId>commons-logging</artifactId>
      <version>1.2</version>
    </dependency>
    <!-- https://mvnrepository.com/artifact/net.sf.ezmorph/ezmorph -->
    <dependency>
      <groupId>net.sf.ezmorph</groupId>
      <artifactId>ezmorph</artifactId>
      <version>1.0.6</version>
    </dependency>
    <!--json serialize and deserialization-->
    <!-- 引入fastjson依赖 -->
    <dependency>
      <groupId>com.alibaba</groupId>
      <artifactId>fastjson</artifactId>
      <version>1.2.12</version>
    </dependency>
    <!-- 引入gson依赖 -->
    <dependency>
      <groupId>com.google.code.gson</groupId>
      <artifactId>gson</artifactId>
      <version>2.6.2</version>
    </dependency>
    <!--Base64 加解密-->
    <!-- https://mvnrepository.com/artifact/net.iharder/base64 -->
    <dependency>
      <groupId>net.iharder</groupId>
      <artifactId>base64</artifactId>
      <version>2.3.8</version>
    </dependency>
    <!-- https://mvnrepository.com/artifact/commons-codec/commons-codec -->
    <dependency>
      <groupId>commons-codec</groupId>
      <artifactId>commons-codec</artifactId>
      <version>1.10</version>
    </dependency>
    <!--log4j-->
    <!-- https://mvnrepository.com/artifact/org.apache.logging.log4j/log4j-core -->
    <dependency>
      <groupId>org.apache.logging.log4j</groupId>
      <artifactId>log4j-core</artifactId>
      <version>2.6.2</version>
    </dependency>
    <dependency>
      <groupId>org.jetbrains</groupId>
      <artifactId>annotations-java5</artifactId>
      <version>RELEASE</version>
    </dependency>
    <!--mybatis-->
    <dependency>
      <groupId>org.mybatis</groupId>
      <artifactId>mybatis</artifactId>
      <version>3.3.0</version>
    </dependency>
    <dependency>
      <groupId>org.mybatis</groupId>
      <artifactId>mybatis-spring</artifactId>
      <version>1.2.3</version>
    </dependency>
  </dependencies>

  <build>
    <finalName>health</finalName>
    <pluginManagement><!-- lock down plugins versions to avoid using Maven defaults (may be moved to parent pom) -->
      <plugins>
        <plugin>
          <artifactId>maven-clean-plugin</artifactId>
          <version>3.0.0</version>
        </plugin>
        <!-- see http://maven.apache.org/ref/current/maven-core/default-bindings.html#Plugin_bindings_for_war_packaging -->
        <plugin>
          <artifactId>maven-resources-plugin</artifactId>
          <version>3.0.2</version>
        </plugin>
        <plugin>
          <artifactId>maven-compiler-plugin</artifactId>
          <version>3.7.0</version>
        </plugin>
        <plugin>
          <artifactId>maven-surefire-plugin</artifactId>
          <version>2.20.1</version>
        </plugin>
        <plugin>
          <artifactId>maven-war-plugin</artifactId>
          <version>3.2.0</version>
        </plugin>
        <plugin>
          <artifactId>maven-install-plugin</artifactId>
          <version>2.5.2</version>
        </plugin>
        <plugin>
          <artifactId>maven-deploy-plugin</artifactId>
          <version>2.8.2</version>
        </plugin>
      </plugins>
    </pluginManagement>
  </build>
</project>
四、springMvc的配置
1.在resources文件夹下新建spring-servlet.xml文件,并在配置文件声明spring mvc框架对控制器、页面、资源的访问。
视图解析器使用了InternalResourceViewResolver,配置如下
<?xml version="1.0" encoding="UTF-8" ?>
<beans xmlns="http://www.springframework.org/schema/beans"
       xmlns:xsi="http://www.w3.org/2001/XMLSchema-instance"
       xmlns:context="http://www.springframework.org/schema/context"
       xmlns:mvc="http://www.springframework.org/schema/mvc"
       xsi:schemaLocation="http://www.springframework.org/schema/beans
http://www.springframework.org/schema/beans/spring-beans-3.1.xsd
http://www.springframework.org/schema/context
http://www.springframework.org/schema/context/spring-context-3.1.xsd
http://www.springframework.org/schema/mvc
http://www.springframework.org/schema/mvc/spring-mvc-3.1.xsd">
    <!-- 启动注解驱动的Spring MVC功能,注册请求url和注解POJO类方法的映射-->
    <mvc:annotation-driven >

    </mvc:annotation-driven>
    <!-- 启动包扫描功能,以便注册带有@Controllers、@service、@repository、@Component等注解的类成为spring的bean -->
    <context:component-scan base-package="Controllers" />

    <!-- 定义JSP文件的位置 -->
    <!-- spring-mvc jsp视图解析器 -->
    <bean id="viewResolver" class="org.springframework.web.servlet.view.InternalResourceViewResolver">
        <property name="viewClass" value="org.springframework.web.servlet.view.JstlView" />
        <property name="prefix" value="/views/"/>
        <property name="suffix" value=".jsp"/>
        <property name="order" value="1" />
    </bean>


</beans>
Contorllers和项目文件中Contorllers包文件名对应,views和项目中views路径对应

2.将spring-servlet.xml文件 配置进web.xml文件中
<!DOCTYPE web-app PUBLIC
 "-//Sun Microsystems, Inc.//DTD Web Application 2.3//EN"
 "http://java.sun.com/dtd/web-app_2_3.dtd" >

<web-app xmlns:xsi="http://www.w3.org/2001/XMLSchema-instance"
         xmlns="http://java.sun.com/xml/ns/javaee"
         xsi:schemaLocation="http://java.sun.com/xml/ns/javaee http://java.sun.com/xml/ns/javaee/web-app_3_0.xsd"
         version="3.0">
  <display-name>Archetype Created Web Application</display-name>
  <!--初始化页面-->
  <welcome-file-list>
    <welcome-file>/index.jsp</welcome-file>
  </welcome-file-list>
  <!-- Spring MVC配置 -->
  <servlet>
    <servlet-name>spring</servlet-name>
    <servlet-class>org.springframework.web.servlet.DispatcherServlet</servlet-class>
    <!--Spring-servlet.xml config-->
    <init-param>
      <param-name>contextConfigLocation</param-name>
      <param-value>classpath:spring-servlet.xml</param-value>
    </init-param>
    <!-- load-on-startup元素标记容器是否在启动的时候就加载这个servlet(实例化并调用其init()方法) -->
    <load-on-startup>1</load-on-startup>
  </servlet>
  <servlet-mapping>
    <servlet-name>spring</servlet-name>
    <url-pattern>/</url-pattern>
  </servlet-mapping>
</web-app>
下面验证项目能否跑的起来!!!
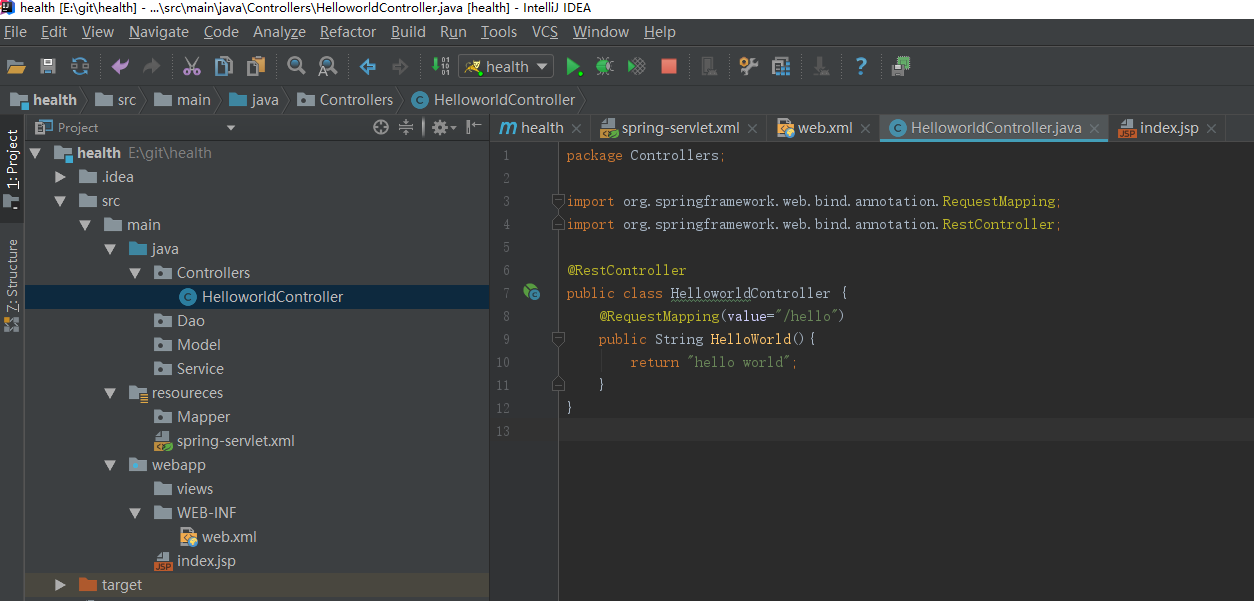
1.在controllers中新建helloworldController类,并添加代码
2.添加tomcat,name随意定义,选择tomcat版本,注意端口号是否被占用(默认为8080),完成之后 启动tomcat
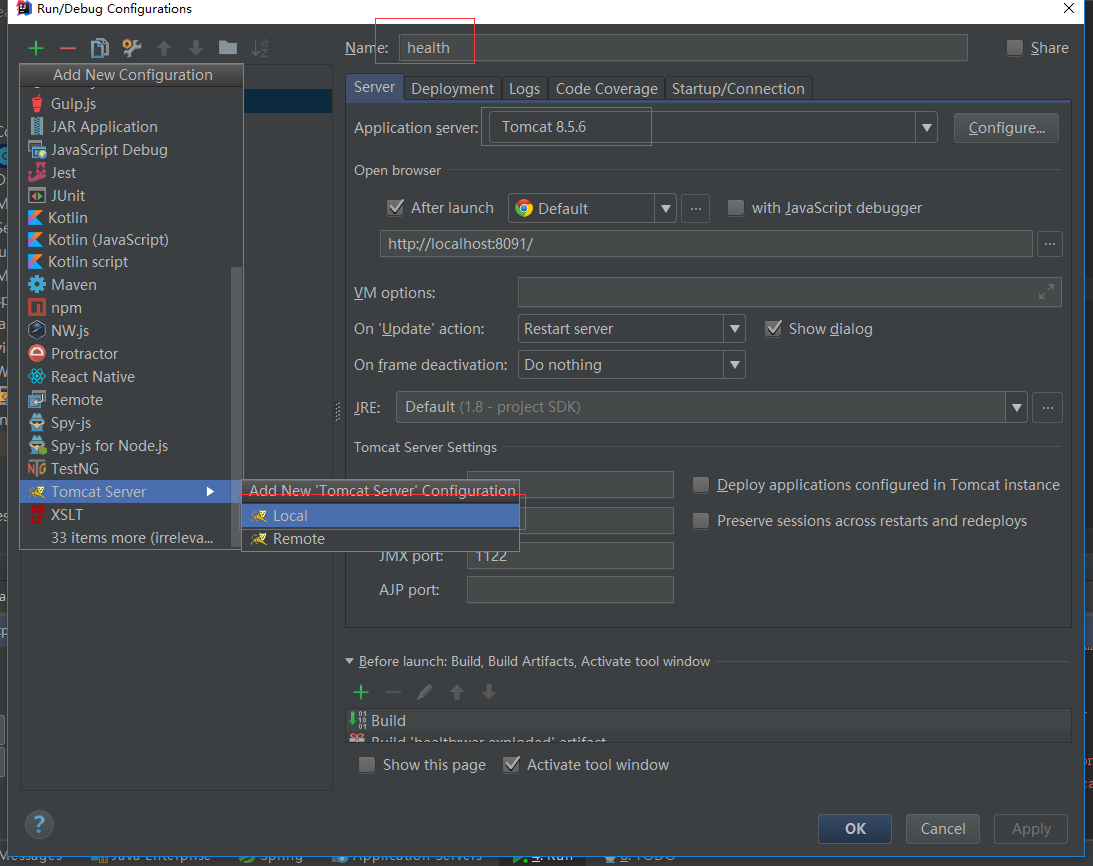
3.控制台如果没报错,则浏览器会自动打开默认的index.jsp页面
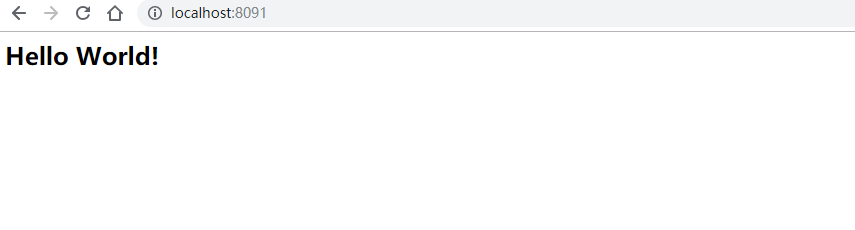
访问http://localhost:8091/hello
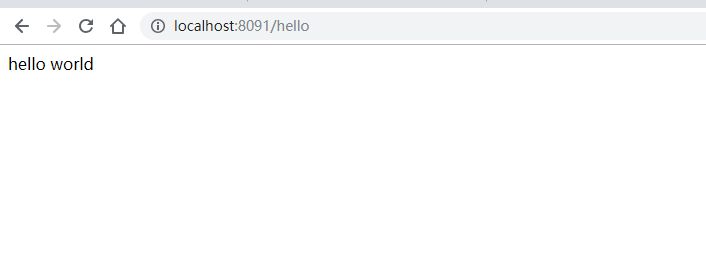
到这里springMvc 已经成功整合到项目中了
五.spring和Mybatis的配置
1.在resoures中新建jdbc.properties文件
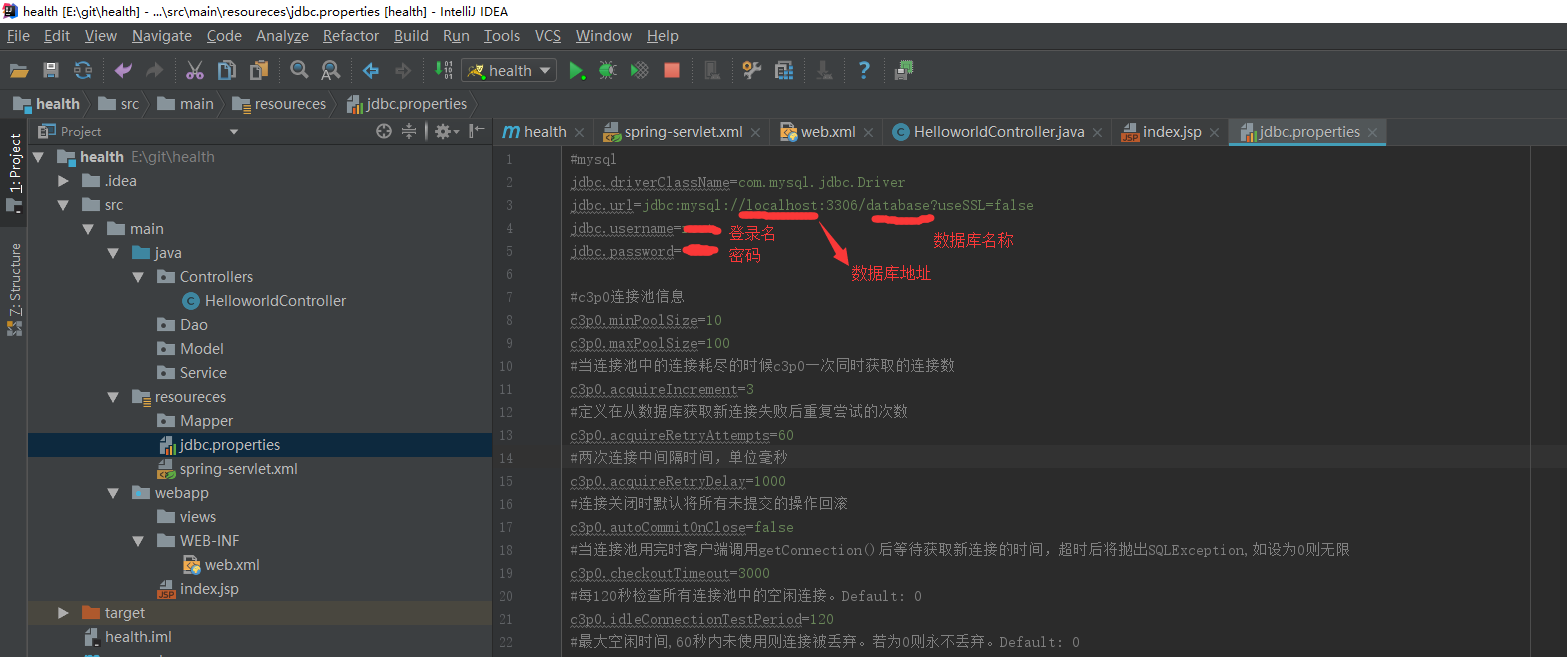
#mysql
jdbc.driverClassName=com.mysql.jdbc.Driver
jdbc.url=jdbc:mysql://localhost:3306/database?useSSL=false
jdbc.username=root
jdbc.password=

#c3p0连接池信息
c3p0.minPoolSize=10
c3p0.maxPoolSize=100
#当连接池中的连接耗尽的时候c3p0一次同时获取的连接数
c3p0.acquireIncrement=3
#定义在从数据库获取新连接失败后重复尝试的次数
c3p0.acquireRetryAttempts=60
#两次连接中间隔时间,单位毫秒
c3p0.acquireRetryDelay=1000
#连接关闭时默认将所有未提交的操作回滚
c3p0.autoCommitOnClose=false
#当连接池用完时客户端调用getConnection()后等待获取新连接的时间,超时后将抛出SQLException,如设为0则无限
c3p0.checkoutTimeout=3000
#每120秒检查所有连接池中的空闲连接。Default: 0
c3p0.idleConnectionTestPeriod=120
#最大空闲时间,60秒内未使用则连接被丢弃。若为0则永不丢弃。Default: 0
c3p0.maxIdleTime=600
#如果设为true那么在取得连接的同时将校验连接的有效性。Default: false
c3p0.testConnectionOnCheckin=false
#如果maxStatements与maxStatementsPerConnection均为0,则缓存被关闭。Default: 0
c3p0.maxStatements=8
#maxStatementsPerConnection定义了连接池内单个连接所拥有的最大缓存statements数。Default: 0
c3p0.maxStatementsPerConnection=5
#自动超时回收Connection
c3p0.unreturnedConnectionTimeout=25
2.在resources中添加spring-mybatis.xml,applicationContext.xml 两个文件
<?xml version="1.0" encoding="UTF-8" ?>
<beans xmlns="http://www.springframework.org/schema/beans"
       xmlns:xsi="http://www.w3.org/2001/XMLSchema-instance"
       xsi:schemaLocation="http://www.springframework.org/schema/beans http://www.springframework.org/schema/beans/spring-beans.xsd http://www.springframework.org/schema/tx http://www.springframework.org/schema/tx/spring-tx.xsd http://www.springframework.org/schema/aop http://www.springframework.org/schema/aop/spring-aop.xsd">

    <bean id="configProperties" class="org.springframework.beans.factory.config.PropertyPlaceholderConfigurer">
        <property name="locations">
            <list>
                <value>classpath:jdbc.properties</value>
            </list>
        </property>
    </bean>

    <!-- 配置数据源 -->
    <bean id="dataSource" class="com.mchange.v2.c3p0.ComboPooledDataSource">
        <property name="driverClass" value="${jdbc.driverClassName}"/>
        <property name="jdbcUrl" value="${jdbc.url}"/>
        <property name="user" value="${jdbc.username}"/>
        <property name="password" value="${jdbc.password}"/>
        <property name="minPoolSize" value="${c3p0.minPoolSize}"/>
        <property name="acquireIncrement" value="${c3p0.acquireIncrement}"/>
        <property name="acquireRetryAttempts" value="${c3p0.acquireRetryAttempts}"/>
        <property name="acquireRetryDelay" value="${c3p0.acquireRetryDelay}"/>
        <property name="autoCommitOnClose" value="${c3p0.autoCommitOnClose}"/>
        <property name="checkoutTimeout" value="${c3p0.checkoutTimeout}"/>
        <property name="idleConnectionTestPeriod" value="${c3p0.idleConnectionTestPeriod}"/>
        <property name="maxIdleTime" value="${c3p0.maxIdleTime}"/>
        <property name="testConnectionOnCheckin" value="${c3p0.testConnectionOnCheckin}"/>
        <property name="maxStatements" value="${c3p0.maxStatements}"/>
        <property name="maxStatementsPerConnection" value="${c3p0.maxStatementsPerConnection}"/>
        <property name="unreturnedConnectionTimeout" value="${c3p0.unreturnedConnectionTimeout}"/>
    </bean>

    <!-- 配置mybatisSqlSessionFactoryBean -->
    <bean id="sqlSessionFactory" class="org.mybatis.spring.SqlSessionFactoryBean">
        <property name="dataSource" ref="dataSource"/>
        <property name="mapperLocations" value="classpath:mapper/*.xml"/>
    </bean>
    <!-- 配置mybatis mapper接口 -->
    <bean class="org.mybatis.spring.mapper.MapperScannerConfigurer">
        <property name="basePackage" value="Dao"/>
        <!--<property name="sqlSessionFactoryBeanName" value="sqlSessionFactory"/>-->
    </bean>

    <!-- 配置事务管理器 -->
    <bean id="transactionManager" class="org.springframework.jdbc.datasource.DataSourceTransactionManager">
        <property name="dataSource" ref="dataSource"/>
    </bean>

</beans>
<?xml version="1.0" encoding="UTF-8" ?>
<beans
        xmlns="http://www.springframework.org/schema/beans"
        xmlns:xsi="http://www.w3.org/2001/XMLSchema-instance"
        xmlns:context="http://www.springframework.org/schema/context"
        xsi:schemaLocation="http://www.springframework.org/schema/beans http://www.springframework.org/schema/beans/spring-beans-3.1.xsd http://www.springframework.org/schema/context http://www.springframework.org/schema/context/spring-context.xsd">

    <context:annotation-config />
    <!-- 配置component所在的包,自动加载需要管理的Bean -->
    <context:component-scan base-package="Service,Dao" />
    <import resource="spring-mybatis.xml" />
</beans>
3.将spring 配置进web.xml中
添加如下内容:
<!--spring listener config-->
  <context-param>
    <param-name>contextConfigLocation</param-name>
    <param-value>classpath:applicationContext.xml</param-value>
  </context-param>
  <listener>
    <listener-class>org.springframework.web.context.ContextLoaderListener</listener-class>
  </listener>
完整的web.xml
<!DOCTYPE web-app PUBLIC
 "-//Sun Microsystems, Inc.//DTD Web Application 2.3//EN"
 "http://java.sun.com/dtd/web-app_2_3.dtd" >

<web-app xmlns:xsi="http://www.w3.org/2001/XMLSchema-instance"
         xmlns="http://java.sun.com/xml/ns/javaee"
         xsi:schemaLocation="http://java.sun.com/xml/ns/javaee http://java.sun.com/xml/ns/javaee/web-app_3_0.xsd"
         version="3.0">
  <display-name>Archetype Created Web Application</display-name>
  <!--初始化页面-->
  <welcome-file-list>
    <welcome-file>/index.jsp</welcome-file>
  </welcome-file-list>
  <!-- Spring MVC配置 -->
  <servlet>
    <servlet-name>spring</servlet-name>
    <servlet-class>org.springframework.web.servlet.DispatcherServlet</servlet-class>
    <!--Spring-servlet.xml config-->
    <init-param>
      <param-name>contextConfigLocation</param-name>
      <param-value>classpath:spring-servlet.xml</param-value>
    </init-param>
    <!-- load-on-startup元素标记容器是否在启动的时候就加载这个servlet(实例化并调用其init()方法) -->
    <load-on-startup>1</load-on-startup>
  </servlet>
  <servlet-mapping>
    <servlet-name>spring</servlet-name>
    <url-pattern>/</url-pattern>
  </servlet-mapping>

  <!--spring listener config-->
  <context-param>
    <param-name>contextConfigLocation</param-name>
    <param-value>classpath:applicationContext.xml</param-value>
  </context-param>
  <listener>
    <listener-class>org.springframework.web.context.ContextLoaderListener</listener-class>
  </listener>
</web-app>
spring、Mybatis已经整合完成,下面进行demo的编写
六、demo
1.打开mysql数据库,新建数据库database,新建student表;并添加字段age name classid uid等
2.数据库建好后,我们进行Model,Dao,Service层以及mapper文件的的编写
a.新建Student实体类.set、get 使用alt+insert快速添加
package Model;

public class Student {
    private byte[] uid;

    private String name;

    private Integer age;

    private Integer classid;

    public byte[] getUid() {
        return uid;
    }

    public String getName() {
        return name;
    }

    public Integer getAge() {
        return age;
    }

    public Integer getClassid() {
        return classid;
    }

    public void setUid(byte[] uid) {
        this.uid = uid;
    }

    public void setName(String name) {
        this.name = name;
    }

    public void setAge(Integer age) {
        this.age = age;
    }

    public void setClassid(Integer classid) {
        this.classid = classid;
    }
}
b.在mapper文件夹下新建
<?xml version="1.0" encoding="UTF-8"?>
<!DOCTYPE mapper PUBLIC "-//mybatis.org//DTD Mapper 3.0//EN" "http://mybatis.org/dtd/mybatis-3-mapper.dtd">
<mapper namespace="Dao.StudentMapper">
    <resultMap id="BaseResultMap" type="Model.Student">
        <id column="Uid" jdbcType="BINARY" property="uid" />
        <result column="Name" jdbcType="VARCHAR" property="name" />
        <result column="Age" jdbcType="INTEGER" property="age" />
        <result column="ClassId" jdbcType="INTEGER" property="classid" />
    </resultMap>
    <sql id="Base_Column_List">
        Uid, Name, Age, ClassId
    </sql>

    <select id="selectByCondition" parameterType="Model.Student" resultMap="BaseResultMap">
        SELECT
        <include refid="Base_Column_List"/>
        from student
        <where>
            1=1
            <if test="uid != null">
                and Uid=#{uid,jdbcType=BINARY}
            </if>
            <if test="name != null">
                and Name=#{name,jdbcType=VARCHAR}
            </if>
            <if test="age != null">
                and Age=#{age,jdbcType=INTEGER}
            </if>
            <if test="classid != null">
                and ClassId=#{classid,jdbcType=INTEGER}
            </if>
        </where>
    </select>


</mapper>
c.在Dao层新建StudentMapper
package Dao;

import Model.Student;
import org.springframework.stereotype.Repository;

import java.util.List;
@Repository
public interface StudentMapper {
    List<Student> selectByCondition(Student record);
}
d.在Service层编写对Dao层的访问逻辑
IStudentService
package Service;

import Model.Student;

import java.util.List;

public interface IStudentService {
    List<Student> selectByCondition(Student record);
}
e.编写实现IStudentService 的接口StudentService
package Service;

import Dao.StudentMapper;
import Model.Student;
import org.springframework.beans.factory.annotation.Autowired;
import org.springframework.stereotype.Service;

import java.util.List;

@Service
public class StudentService implements IStudentService {
    @Autowired
    private StudentMapper studentMapper;
     @Override
     public List<Student>selectByCondition(Student record) {
        return studentMapper.selectByCondition(record);
    }
}
f. 最后编写StudentController调用Sevrices
package Controllers;

import Model.Student;
import Service.IStudentService;
import org.springframework.beans.factory.annotation.Autowired;
import org.springframework.web.bind.annotation.GetMapping;
import org.springframework.web.bind.annotation.RequestMapping;
import org.springframework.web.bind.annotation.RestController;

import java.util.List;

@RestController
public class StudentController {
    @Autowired
    private IStudentService service;
    @RequestMapping(value="/Student")
    @GetMapping()
    public String Get(){
        List<Student> students = service.selectByCondition(new Student());
        String jsonResult = com.alibaba.fastjson.JSON.toJSONString(students);
        return jsonResult;
    }
}
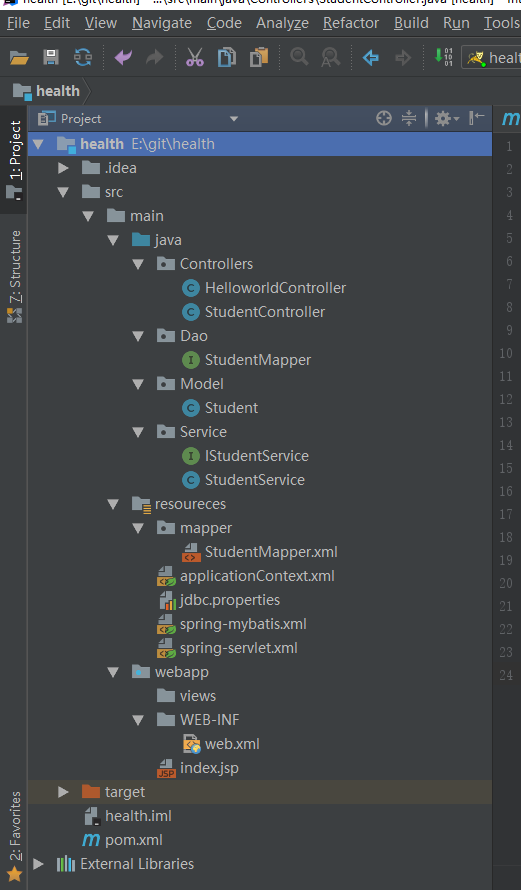
完整的目录结构如下:
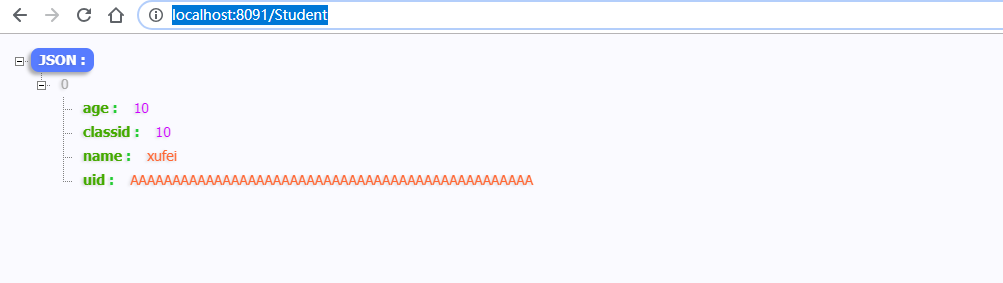
完成后编译、运行。访问“http://localhost:8091/Student”

七、前后端分离
因为在之前的配置过程中,我们已经配置了视图解析器(InternalResourceViewResolver),只需要在WEB-INF文件夹下的views下新建view.xml配置文件
为了方便,我们在HelloworldController里面添加如下代码
@RequestMapping(value="/home")
public ModelAndView home (HttpServletRequest request, HttpServletResponse response)  {
    return new ModelAndView( "home");
 }
view.xml的内容如下:
<?xml version="1.0" encoding="UTF-8"?>
<beans xmlns="http://www.springframework.org/schema/beans"
       xmlns:mvc="http://www.springframework.org/schema/mvc"
       xmlns:aop="http://www.springframework.org/schema/aop"
       xmlns:context="http://www.springframework.org/schema/context"
       xmlns:xsi="http://www.w3.org/2001/XMLSchema-instance"
       xsi:schemaLocation="http://www.springframework.org/schema/aop
        http://www.springframework.org/schema/aop/spring-aop-4.0.xsd
        http://www.springframework.org/schema/beans
        http://www.springframework.org/schema/beans/spring-beans-4.0.xsd
        http://www.springframework.org/schema/context
        http://www.springframework.org/schema/context/spring-context-4.0.xsd
        http://www.springframework.org/schema/mvc
        http://www.springframework.org/schema/mvc/spring-mvc-4.0.xsd">
    <!-- 首页 -->
    <bean id="home" class="org.springframework.web.servlet.view.JstlView">
        <property name="url" value="/views/home.jsp"/>
    </bean>
</beans>
编译、运行。访问“http://localhost:8091/home”


八、结语
通过搭建一个简单的ssm框架,让我学习到了很多东西,从此离后端开发又近了一步。最后感谢作者:柒小博客文章的技术支持。
补充:
文章中有一处错误,创建mapper文件时应该小写,不然运行时会出错,需要注意。
文章如有错误,欢迎各位读者给与指正。