简单例子
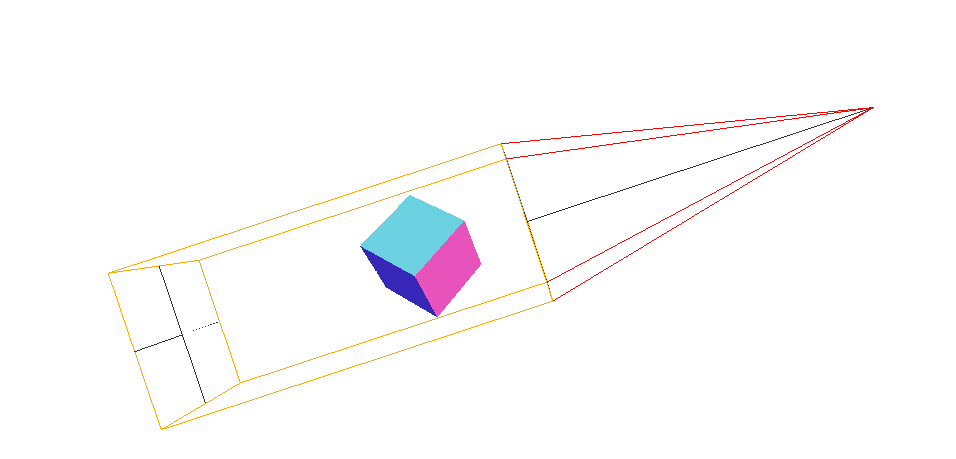
这个例子,是在一个视图中,看到照相机的辅助线,也就是,一个照相机的观察访问
这样,就需要两个照相机,一个是主照相机,一个是加有辅助线的照相机(有两种,正交和透视,这里辅助的使用的是正交的)
设置两个照相机位置:注意,辅助的子照相机要在主照相机里面,这样才能在主照相机的镜头下看到辅助照相机的观察范围
 //场景、摄像机、渲染器、实体
    var scene, camera, renderer, cameraHelper;
    var cube, controls;
    //在页面加载完,进行绘制渲染页面
    window.onload = function() {
      init(); //数据初始化
      setSize(); //设置大小画布
      cube(); //绘制实体
      animate(); //动画渲染
    };
    //初始化摄像机,场景,渲染器,以及一些工具,比如摄像机辅助线,控制器
    function init() {
      scene = new THREE.Scene();
      camera = new THREE.PerspectiveCamera(
        75,
        window.innerWidth / window.innerHeight,
        0.1,
        500
      );
      camera.position.set(10, 5, 20);
      camera.lookAt(new THREE.Vector3(0, 0, 0));
      //正交投影照相机
      camera2 = new THREE.OrthographicCamera(-1, 1, 1, -1, 5, 10);
      renderer = new THREE.WebGLRenderer({ alpha: true });
      camera2.position.set(0, 0, 5);
      camera2.lookAt(new THREE.Vector3(0, 0, 0));
      //renderer = new THREE.WebGLRenderer();
      //camera.position.z = 10;
      controls = new THREE.OrbitControls(camera);
      controls.autoRotate = true;

      //照相机帮助线
      cameraHelper = new THREE.CameraHelper(camera2);
      scene.add(cameraHelper);
    }
    //设置画布大小,这个设置为整个视图,就不需要剪切了
    function setSize() {
      renderer.setSize(window.innerWidth, window.innerHeight);
      document.body.appendChild(renderer.domElement);
    }
    //普通的四方体
    function cube() {
      var geometry = new THREE.BoxGeometry(1, 1, 1);
      var material = new THREE.MeshNormalMaterial({ color: 0x00ff00 });
      cube = new THREE.Mesh(geometry, material);
      //设置位置
      cube.position.set(0, 0, -1.5);
      scene.add(cube);
    }
    function animate() {
      requestAnimationFrame(animate); //一帧帧动画
      cube.rotation.x += 0.005;
      cube.rotation.y += 0.005;
      cube.rotation.z += 0.005;
      camera.updateProjectionMatrix();
      controls.update();
      cameraHelper.update();
      renderer.render(scene, camera); //渲染
    }
看完简单的例子,看看复杂的,
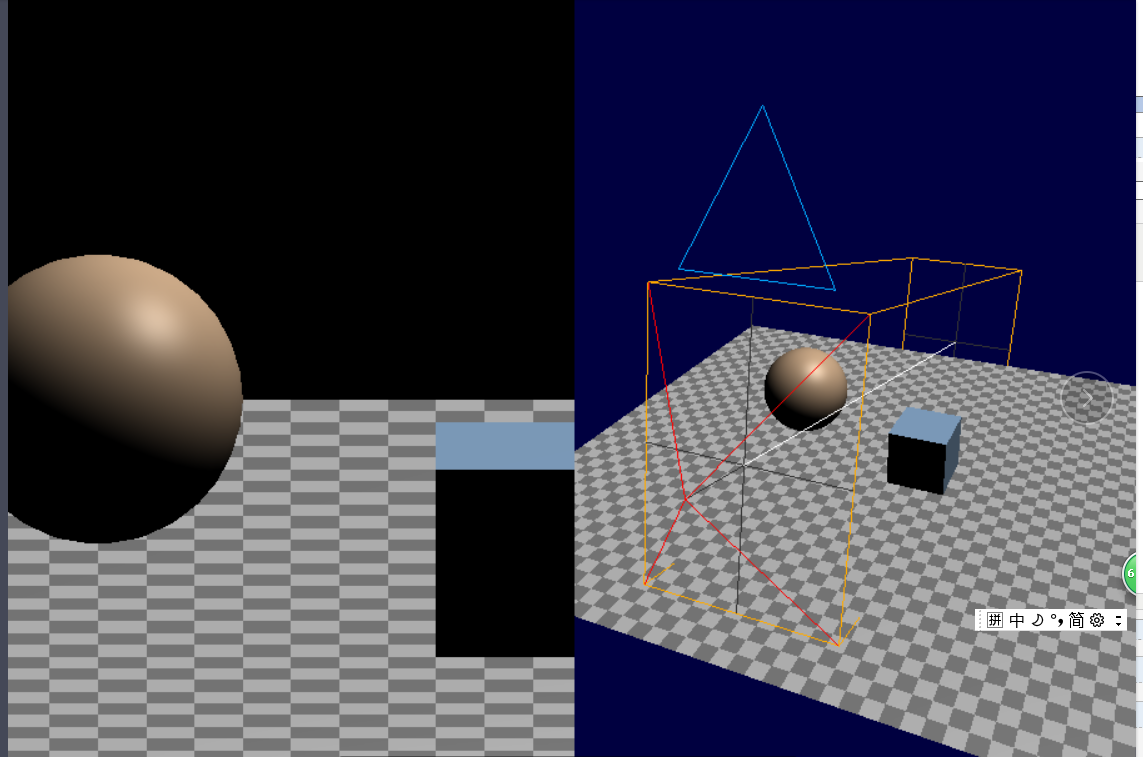
左边是一个视图,用一个小的照相机渲染出来的就是右边辅助线的照相机,
右边是两个照相机渲染出来的,右边,外面有个大的照相机,看到里面有个小的照相机,并且通过辅助线看到里面照相机的观察区域。
html部分:是,一个Canvas ,然后拆分为左右两个视图
<canvas id="c"></canvas>
    <div class="split">
       <div id="view1" tabindex="1"></div>
       <div id="view2" tabindex="2"></div>
    </div>
  <script src="https://threejsfundamentals.org/threejs/resources/threejs/r105/three.min.js"></script>
<script src="https://threejsfundamentals.org/threejs/resources/threejs/r105/js/controls/OrbitControls.js"></script>
css
html, body {
  margin: 0;
  height: 100%;
}
#c {
   100%;
  height: 100%;
  display: block;
}
.split {
  position: absolute;
  left: 0;
  top: 0;
   100%;
  height: 100%;
  display: flex;
}
.split>div {
   100%;
  height: 100%;
}
js,他是有两个照相机,
1.一个透视作为主照相机,
2.一个正交作为辅助照相机,
在正交照相机加上辅助线,然后把辅助线弄到场景里面,
这样我们就可以在一个照相机(主照相机下)下看到另一个照相机(另一个有辅助线的照相机)的作用范围(辅助线范围)
var renderer,
  scene,
  camera,
  camera2,
  cameraHelper,
  canvas,
  view1Elem,
  view2Elem;
function init() {
  renderer = new THREE.WebGLRenderer({ canvas });
  const size = 1;
  const near = 5;
  const far = 50;
  //正交投影照相机
  camera = new THREE.OrthographicCamera(-size, size, size, -size, near, far);
  //透视投影照相机
  camera2 = new THREE.PerspectiveCamera(
    60, // fov
    2, // aspect
    0.1, // near
    500 // far
  );
  //照相机帮助线
  cameraHelper = new THREE.CameraHelper(camera);
  scene = new THREE.Scene();
  scene.background = new THREE.Color("black");
  scene.add(cameraHelper);
}

function setCarema() {
  camera.zoom = 0.2;
  camera.position.set(0, 10, 20);

  //旋转控制器
  const controls = new THREE.OrbitControls(camera, view1Elem);
  controls.target.set(0, 5, 0);
  controls.update();

  camera2.position.set(16, 28, 40);
  camera2.lookAt(0, 5, 0);

  //旋转控制器
  const controls2 = new THREE.OrbitControls(camera2, view2Elem);
  controls2.target.set(0, 5, 0);
  controls2.update();
}

function drawObj() {
  //面的绘制

  {
    const planeSize = 40;

    const loader = new THREE.TextureLoader();
    const texture = loader.load(
      "https://threejsfundamentals.org/threejs/resources/images/checker.png"
    );
    texture.wrapS = THREE.RepeatWrapping;
    texture.wrapT = THREE.RepeatWrapping;
    texture.magFilter = THREE.NearestFilter;
    const repeats = planeSize / 2;
    texture.repeat.set(repeats, repeats);

    const planeGeo = new THREE.PlaneBufferGeometry(planeSize, planeSize);
    const planeMat = new THREE.MeshPhongMaterial({
      map: texture,
      side: THREE.DoubleSide
    });
    const mesh = new THREE.Mesh(planeGeo, planeMat);
    mesh.rotation.x = Math.PI * -0.5;
    scene.add(mesh);
  }
  //正方体的绘制
  {
    const cubeSize = 4;
    const cubeGeo = new THREE.BoxBufferGeometry(cubeSize, cubeSize, cubeSize);
    const cubeMat = new THREE.MeshPhongMaterial({ color: "#8AC" });
    const mesh = new THREE.Mesh(cubeGeo, cubeMat);
    mesh.position.set(cubeSize + 1, cubeSize / 2, 0);
    scene.add(mesh);
  }
  //球体的绘制
  {
    const sphereRadius = 3;
    const sphereWidthDivisions = 32;
    const sphereHeightDivisions = 16;
    const sphereGeo = new THREE.SphereBufferGeometry(
      sphereRadius,
      sphereWidthDivisions,
      sphereHeightDivisions
    );
    const sphereMat = new THREE.MeshPhongMaterial({ color: "#CA8" });
    const mesh = new THREE.Mesh(sphereGeo, sphereMat);
    mesh.position.set(-sphereRadius - 1, sphereRadius + 2, 0);
    scene.add(mesh);
  }
  //光线的设置
  {
    const color = 0xffffff;
    const intensity = 1;
    const light = new THREE.DirectionalLight(color, intensity);
    light.position.set(0, 10, 0);
    light.target.position.set(-5, 0, 0);
    scene.add(light);
    scene.add(light.target);
  }
}
//重新渲染 渲染器的大小,如果canvas的大小不是renderer的大小,就重新设置大小 canvas的大小,这个是因为
function resizeRendererToDisplaySize(renderer) {
  const canvas = renderer.domElement;
  const width = canvas.clientWidth;
  const height = canvas.clientHeight;
  const needResize = canvas.width !== width || canvas.height !== height;
  if (needResize) {
    renderer.setSize(width, height, false);
  }
  return needResize;
}

//剪刀,用来切割canvas 到两个view中,通过view切割计算,找到view的位置,然后进行渲染
function setScissorForElement(elem) {
  const canvasRect = canvas.getBoundingClientRect(); //包围盒的正方体
  const elemRect = elem.getBoundingClientRect();

  // compute a canvas relative rectangle
  const right = Math.min(elemRect.right, canvasRect.right) - canvasRect.left;
  const left = Math.max(0, elemRect.left - canvasRect.left);
  const bottom = Math.min(elemRect.bottom, canvasRect.bottom) - canvasRect.top;
  const top = Math.max(0, elemRect.top - canvasRect.top);

  const width = Math.min(canvasRect.width, right - left);
  const height = Math.min(canvasRect.height, bottom - top);

  // setup the scissor to only render to that part of the canvas
  const positiveYUpBottom = canvasRect.height - bottom;
  renderer.setScissor(left, positiveYUpBottom, width, height);
  renderer.setViewport(left, positiveYUpBottom, width, height);

  // return the aspect
  return width / height;
}

function render() {
  resizeRendererToDisplaySize(renderer);

  // turn on the scissor  开启剪刀,可以进行切割
  renderer.setScissorTest(true);

  // render the original view
  {
    const aspect = setScissorForElement(view1Elem);

    // update the camera for this aspect
    camera.left = -aspect;
    camera.right = aspect;
    camera.updateProjectionMatrix();
    cameraHelper.update();

    // don't draw the camera helper in the original view
    cameraHelper.visible = false;

    scene.background.set(0x000000);
    renderer.render(scene, camera);
  }

  // render from the 2nd camera
  {
    const aspect = setScissorForElement(view2Elem);

    // update the camera for this aspect
    camera2.aspect = aspect;
    camera2.updateProjectionMatrix();

    // draw the camera helper in the 2nd view
    cameraHelper.visible = true;

    scene.background.set(0x000040);
    renderer.render(scene, camera2);
  }

  requestAnimationFrame(render);
}

window.onload = function() {
  canvas = document.querySelector("#c");
  view1Elem = document.querySelector("#view1");
  view2Elem = document.querySelector("#view2");
  init();
  setCarema();
  drawObj();
  requestAnimationFrame(render);
};
上面这个例子有点小复杂,因为涉及到,剪刀进行切割视图的计算