写在前面的话:为什么我一直没有选用RPM类的包管理工具来安装这些服务软件和中间件?那是因为使用tar.gz包来安装你能知道更多的细节,因为我们是在学习!
第一步:老样子,先装一个全新的CentOS8.1虚拟机,选择装配基本的Server软件包,选择好网络模式!
第二步:到官网下载好Elasticsearch7.10.0的tar.gz安装包(elasticsearch-7.10.0-linux-x86_64.tar.gz),并将安装包上传到目标CentOS服务器,并使用 tar 命令解压到指定目录(例如我的是解压到了 /opt/ 目录下):
[root@ELKServer elk]# ls
elasticsearch-7.10.0-linux-x86_64.tar.gz  logstash-7.10.0-linux-x86_64.tar.gz
kibana-7.10.0-linux-x86_64.tar.gz
[root@ELKServer elk]# tar -zxvf elasticsearch-7.10.0-linux-x86_64.tar.gz -C /opt/
在这里tar解压就相关于进行了安装(即安装到了解压目标目录):
[root@ELKServer elasticsearch-7.10.0]# ls
bin  config  jdk  lib  LICENSE.txt  logs  modules  NOTICE.txt  plugins  README.asciidoc
[root@ELKServer elasticsearch-7.10.0]# ls bin/
elasticsearch                elasticsearch-saml-metadata
elasticsearch-certgen        elasticsearch-setup-passwords
elasticsearch-certutil       elasticsearch-shard
elasticsearch-cli            elasticsearch-sql-cli
elasticsearch-croneval       elasticsearch-sql-cli-7.10.0.jar
elasticsearch-env            elasticsearch-syskeygen
elasticsearch-env-from-file  elasticsearch-users
elasticsearch-keystore       x-pack-env
elasticsearch-migrate        x-pack-security-env
elasticsearch-node           x-pack-watcher-env
elasticsearch-plugin
第三步:解压安装后,运行elasticsearch服务前,需要进行基础配置,vim命令打开解压目录下的/elasticsearch-7.10.0/config/elasticsearch.yml配置文件,
[root@ELKServer opt]# vim elasticsearch-7.10.0/config/elasticsearch.yml
elasticsearch.yml中主要要设置的项有:cluster.name、node.name、path.data、path.logs、network.host、http.port 和 cluster.initial_master_nodes,其中path.data、path.logs指定的目录需要给运行Elasticsearch服务的专用账号进行授权,见下面文!注意:cluster.initial_master_nodes一定要指明,否则启动会报错!
第四步:创建运行Elasticsearch服务的专用账号,并作相应目录授权(因为Elasticsearch服务不允许使用root账号运行):
# groupadd elk
# useradd elk -d /home/elk -s /bin/sh -g elk

# chown -R elk:elk /opt/elasticsearch-7.10.0/
# chmod -R 777 /opt/elasticsearch-7.10.0/
# chown -R elk:elk /var/elasticsearch/data
# chmod -R 777 /var/elasticsearch/data
# chown -R elk:elk /var/elasticsearch/log
# chmod -R 777 /var/elasticsearch/log
第五步:加大运行Elasticsearch服务的专用账号可创建的文件描述符(descriptor)数量到超过65535:
[root@ELKServer opt]# vim /etc/security/limits.conf
#        - "hard" for enforcing hard limits
#
#<item> can be one of the following:
#        - core - limits the core file size (KB)
#        - data - max data size (KB)
#        - fsize - maximum filesize (KB)
#        - memlock - max locked-in-memory address space (KB)
#        - nofile - max number of open file descriptors
#        - rss - max resident set size (KB)
#        - stack - max stack size (KB)
#        - cpu - max CPU time (MIN)
#        - nproc - max number of processes
#        - as - address space limit (KB)
#        - maxlogins - max number of logins for this user
#        - maxsyslogins - max number of logins on the system
#        - priority - the priority to run user process with
#        - locks - max number of file locks the user can hold
#        - sigpending - max number of pending signals
#        - msgqueue - max memory used by POSIX message queues (bytes)
#        - nice - max nice priority allowed to raise to values: [-20, 19]
#        - rtprio - max realtime priority
#
#<domain>      <type>  <item>         <value>
#

#*               soft    core            0
#*               hard    rss             10000
#@student        hard    nproc           20
#@faculty        soft    nproc           20
#@faculty        hard    nproc           50
#ftp             hard    nproc           0
#@student        -       maxlogins       4
elk hard nofile 65536
elk soft nofile 65536
# End of file
第六步:加大运行Elasticsearch服务的专用账号可拥有的最大虚拟内存区到过262144:
[root@ELKServer opt]# sysctl -w vm.max_map_count=262145
vm.max_map_count = 262145
[root@ELKServer opt]# vim /etc/sysctl.conf
# sysctl settings are defined through files in
# /usr/lib/sysctl.d/, /run/sysctl.d/, and /etc/sysctl.d/.
#
# Vendors settings live in /usr/lib/sysctl.d/.
# To override a whole file, create a new file with the same in
# /etc/sysctl.d/ and put new settings there. To override
# only specific settings, add a file with a lexically later
# name in /etc/sysctl.d/ and put new settings there.
#
# For more information, see sysctl.conf(5) and sysctl.d(5).
vm.max_map_count=262145
修改/etc/sysctl.conf 文件是为了服务器重启后设置依旧有效!
第七步:在防火墙上开放Elasticsearch要用到的端口,本例中使用的默认的两个端口9200和9300
[root@ELKServer opt]# firewall-cmd --zone=public --add-port=9200/tcp --permanent
success
[root@ELKServer opt]# firewall-cmd --zone=public --add-port=9300/tcp --permanent
success
[root@ELKServer opt]# firewall-cmd --reload
success
第八步:手工创建Elasticsearch服务,并启动:
[root@ELKServer multi-user.target.wants]# vim /etc/systemd/system/elasticsearch.service
[Unit]
Description=elasticsearch service
After=network.target
After=syslog.target

[Service]
Type=forking
LimitNOFILE=65536
ExecStart=/opt/elasticsearch-7.10.0/bin/elasticsearch
ExecStop=/opt/elasticsearch-7.10.0/bin/elasticsearch
User=elk
Restart=on-abort
TimeoutSec=600

[Install]
WantedBy=multi-user.target
[root@ELKServer multi-user.target.wants]# systemctl daemon-reload
[root@ELKServer multi-user.target.wants]# systemctl enable elasticsearch.service
[root@ELKServer multi-user.target.wants]# systemctl start elasticsearch.service
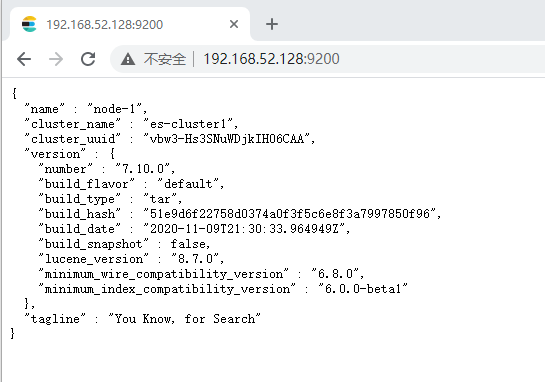
第九步:浏览Elasticsearch目标URL查看服务是否正常了: