参考:
https://www.cnblogs.com/qlqwjy/p/9960706.html
https://blog.csdn.net/debugbugbg/article/details/81091715
https://blog.csdn.net/weixin_43777983/article/details/99685666
https://www.cnblogs.com/throwable/p/12616945.html -todo
SpringTask定时任务的使用
实现定时任务简单的有四种方式:TimerScheduledThreadPool线程池quartz(常用),还有另一种就是springtask。
都说springtask上手简单,于是简单的研究一下springtask的使用,并且运用到自己的项目中。其也有两种配置方式,第一种是基于xml配置,第二种是基于注解。
SprngTask没有专门的包,其核心类位于spring-context包中。所以引入spring的核心包此功能即可使用。
在实际的项目中,我们经常将job作为action层,在job中注入service去操作底层的dao,或者定时的向其他系统拉取数据,再或者向其他系统推送数据。
1.基于xml配置的简单的使用
测试类:(每五秒钟打印一次日志)

package cn.xm.exam.job;

import org.slf4j.Logger;
import org.slf4j.LoggerFactory;
import org.springframework.stereotype.Component;
@Component
public class FirstTestJob {
    private static final Logger log = LoggerFactory.getLogger(FirstTestJob.class);
    private static int count;

    public void cron() {
        log.info("spring task execute times {}", count++);
    }
}
xml配置:(非常类似于quartz的cron表达式和linux定时的cron表达式)
<?xml version="1.0" encoding="UTF-8"?>
<beans xmlns:xsi="http://www.w3.org/2001/XMLSchema-instance"
    xmlns="http://www.springframework.org/schema/beans" xmlns:context="http://www.springframework.org/schema/context"
    xmlns:aop="http://www.springframework.org/schema/aop" xmlns:tx="http://www.springframework.org/schema/tx"
    xmlns:task="http://www.springframework.org/schema/task"
    xsi:schemaLocation="http://www.springframework.org/schema/beans http://www.springframework.org/schema/beans/spring-beans-3.2.xsd http://www.springframework.org/schema/context http://www.springframework.org/schema/context/spring-context-3.2.xsd http://www.springframework.org/schema/aop http://www.springframework.org/schema/aop/spring-aop-3.2.xsd http://www.springframework.org/schema/tx http://www.springframework.org/schema/tx/spring-tx-3.2.xsd http://www.springframework.org/schema/task http://www.springframework.org/schema/task/spring-task-3.2.xsd">

    <context:component-scan base-package="cn.xm.exam.job"></context:component-scan>

    <task:scheduled-tasks>
        <task:scheduled ref="firstTestJob" method="cron"
            cron="0/5 * * * * ?" />
    </task:scheduled-tasks>

</beans>
重点是引入task的schema:
xmlns:task="http://www.springframework.org/schema/task"
http://www.springframework.org/schema/task http://www.springframework.org/schema/task/spring-task-3.2.xsd
结果:
...
2018-11-14 22:35:00 [cn.xm.exam.job.FirstTestJob]-[INFO] spring task execute times 59
2018-11-14 22:35:05 [cn.xm.exam.job.FirstTestJob]-[INFO] spring task execute times 60
2018-11-14 22:35:10 [cn.xm.exam.job.FirstTestJob]-[INFO] spring task execute times 61
2018-11-14 22:35:15 [cn.xm.exam.job.FirstTestJob]-[INFO] spring task execute times 62
2018-11-14 22:35:20 [cn.xm.exam.job.FirstTestJob]-[INFO] spring task execute times 63
2018-11-14 22:35:25 [cn.xm.exam.job.FirstTestJob]-[INFO] spring task execute times 64
...
2.基于注解的使用
首先查看注解的源码:
注解使用必须在xml中开启注解任务,使注解生效:
<?xml version="1.0" encoding="UTF-8"?>
<beans xmlns:xsi="http://www.w3.org/2001/XMLSchema-instance"
    xmlns="http://www.springframework.org/schema/beans" xmlns:context="http://www.springframework.org/schema/context"
    xmlns:aop="http://www.springframework.org/schema/aop" xmlns:tx="http://www.springframework.org/schema/tx"
    xmlns:task="http://www.springframework.org/schema/task"
    xsi:schemaLocation="http://www.springframework.org/schema/beans http://www.springframework.org/schema/beans/spring-beans-3.2.xsd http://www.springframework.org/schema/context http://www.springframework.org/schema/context/spring-context-3.2.xsd http://www.springframework.org/schema/aop http://www.springframework.org/schema/aop/spring-aop-3.2.xsd http://www.springframework.org/schema/tx http://www.springframework.org/schema/tx/spring-tx-3.2.xsd http://www.springframework.org/schema/task http://www.springframework.org/schema/task/spring-task-3.2.xsd">

    <context:component-scan base-package="cn.xm.exam.job"></context:component-scan>

    <!-- 开启注解任务 -->
    <task:annotation-driven />

</beans>
测试类:(每十秒钟打印一次日志)
package cn.xm.exam.job;

import org.slf4j.Logger;
import org.slf4j.LoggerFactory;
import org.springframework.scheduling.annotation.Scheduled;
import org.springframework.stereotype.Component;

@Component
public class FirstAnnotationJob {
    private static final Logger log = LoggerFactory.getLogger(FirstAnnotationJob.class);
    private static int count;

    @Scheduled(cron = "0/10 * * * * ?")
    public void cron() {
        log.info("spring anno task execute times {}", count++);
    }
}
结果:
2018-11-14 22:44:40 [cn.xm.exam.job.FirstAnnotationJob]-[INFO] spring anno task execute times 0
2018-11-14 22:44:50 [cn.xm.exam.job.FirstAnnotationJob]-[INFO] spring anno task execute times 1
2018-11-14 22:45:00 [cn.xm.exam.job.FirstAnnotationJob]-[INFO] spring anno task execute times 2
2018-11-14 22:45:10 [cn.xm.exam.job.FirstAnnotationJob]-[INFO] spring anno task execute times 3
查看@Scheduled的源码:(位于spring-context包内)
/** <a href="http://www.cpupk.com/decompiler">Eclipse Class Decompiler</a> plugin, Copyright (c) 2017 Chen Chao. */
package org.springframework.scheduling.annotation;

import java.lang.annotation.Documented;
import java.lang.annotation.ElementType;
import java.lang.annotation.Retention;
import java.lang.annotation.RetentionPolicy;
import java.lang.annotation.Target;

@Target({ElementType.METHOD, ElementType.ANNOTATION_TYPE})
@Retention(RetentionPolicy.RUNTIME)
@Documented
public @interface Scheduled {

    /**
     * A cron-like expression, extending the usual UN*X definition to include
     * triggers on the second as well as minute, hour, day of month, month
     * and day of week.  e.g. {@code "0 * * * * MON-FRI"} means once per minute on
     * weekdays (at the top of the minute - the 0th second).
     * @return an expression that can be parsed to a cron schedule
     * @see org.springframework.scheduling.support.CronSequenceGenerator
     */
    String cron() default "";

    /**
     * Execute the annotated method with a fixed period between the end
     * of the last invocation and the start of the next.
     * @return the delay in milliseconds
     */
    long fixedDelay() default -1;

    /**
     * Execute the annotated method with a fixed period between invocations.
     * @return the period in milliseconds
     */
    long fixedRate() default -1;

    /**
     * Number of milliseconds to delay before the first execution of a
     * {@link #fixedRate()} or {@link #fixedDelay()} task.
     * @return the initial delay in milliseconds
     * @since 3.2
     */
    long initialDelay() default 0;

}
参数解释:(其实源码的注释也写的非常清楚了)
cron:cron表达式
fixedDelay:表示从上一个任务完成开始到下一个任务开始的间隔,单位是毫秒
fixedRate:从上一个任务开始到下一个任务开始的间隔,单位是毫秒。
initialDelay:任务第一次被调用前的延时,单位毫秒。
需要注意的是上面的前三个属性只能保留一个,不能同时出现,最后一个延时操作可以与上面三个参数搭配。否则会报异常如下:
java.lang.IllegalArgumentException: Exactly one of the 'cron', 'fixedDelay', or 'fixedRate' attributes is required.
接下来我们测试上面的参数:
fixedDelay :方法中模拟处理用了2s
package cn.xm.exam.job;

import org.slf4j.Logger;
import org.slf4j.LoggerFactory;
import org.springframework.scheduling.annotation.Scheduled;
import org.springframework.stereotype.Component;

@Component
public class FirstAnnotationJob {
    private static final Logger log = LoggerFactory.getLogger(FirstAnnotationJob.class);
    private static int count;

    @Scheduled(fixedDelay = 10000)
    public void cron() {
        try {
            Thread.sleep(2000);
        } catch (InterruptedException e) {
            log.error("InterruptedException ", e);
        }
        log.info("spring anno task execute times {}", count++);
    }
}
结果:(实际每两次任务中间相差12s,也就是第一次任务结束10s后开启下次任务)
2018-11-14 23:02:04 [cn.xm.exam.job.FirstAnnotationJob]-[INFO] spring anno task execute times 1
2018-11-14 23:02:16 [cn.xm.exam.job.FirstAnnotationJob]-[INFO] spring anno task execute times 2
2018-11-14 23:02:28 [cn.xm.exam.job.FirstAnnotationJob]-[INFO] spring anno task execute times 3
2018-11-14 23:02:40 [cn.xm.exam.job.FirstAnnotationJob]-[INFO] spring anno task execute times 4
fixedRate测试:
package cn.xm.exam.job;

import org.slf4j.Logger;
import org.slf4j.LoggerFactory;
import org.springframework.scheduling.annotation.Scheduled;
import org.springframework.stereotype.Component;

@Component
public class FirstAnnotationJob {
    private static final Logger log = LoggerFactory.getLogger(FirstAnnotationJob.class);
    private static int count;

    @Scheduled(fixedRate = 10000)
    public void cron() {
        try {
            Thread.sleep(2000);
        } catch (InterruptedException e) {
            log.error("InterruptedException ", e);
        }
        log.info("spring anno task execute times {}", count++);
    }
}
结果:(每两次任务相差10s,也就是本次任务开始之后10s后就开启下次任务,不管中间处理花费多长时间)
2018-11-14 23:04:47 [cn.xm.exam.job.FirstAnnotationJob]-[INFO] spring anno task execute times 1
2018-11-14 23:04:57 [cn.xm.exam.job.FirstAnnotationJob]-[INFO] spring anno task execute times 2
2018-11-14 23:05:07 [cn.xm.exam.job.FirstAnnotationJob]-[INFO] spring anno task execute times 3
至此完成了springtask的测试,确实比quartz简便的多,使用也简单。
附一个在线cron表达式生成器:http://cron.qqe2.com/
SpringTask的入门使用
一、Spring Task简介
1.定时任务
3.三种完成方法
1.java自带的API java.util.Timer类 java.util.TimerTask类
2.Quartz框架 开源 功能强大 使用起来稍显复杂
3.Spring 3.0以后自带了task 调度工具,比Quartz更加的简单方便
二、开发环境准备
1.创建一个JavaWeb项目
2.引入jar包
3.基本的配置
三、如何使用
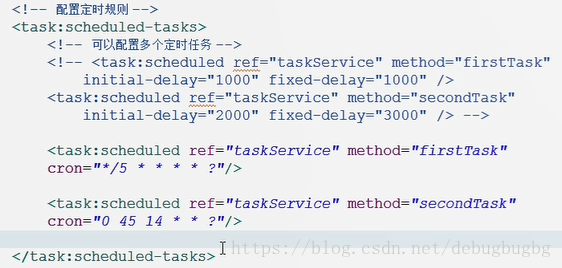
1.纯xml配置的方式
a.简单定时任务
实现业务功能+配置定时间规则

b.复杂定时任务
cron表达式


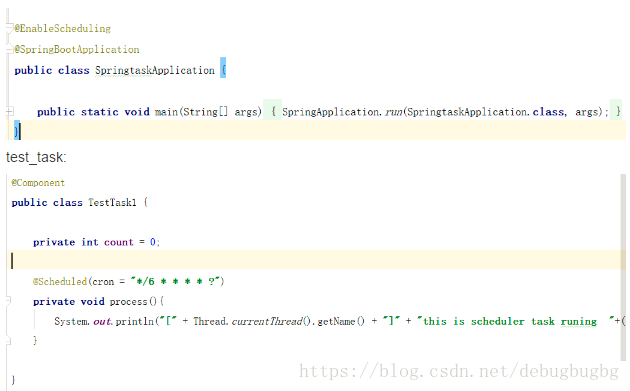
2.全注解的方式
a.在业务方法上提供注解 @Service @Scheduled(参数相同)
b.开启注解支持
@Scheduled所支持的参数:
1. cron:cron表达式,指定任务在特定时间执行;
2. fixedDelay:表示上一次任务执行完成后多久再次执行,参数类型为long,单位ms;
3. fixedDelayString:与fixedDelay含义一样,只是参数类型变为String;
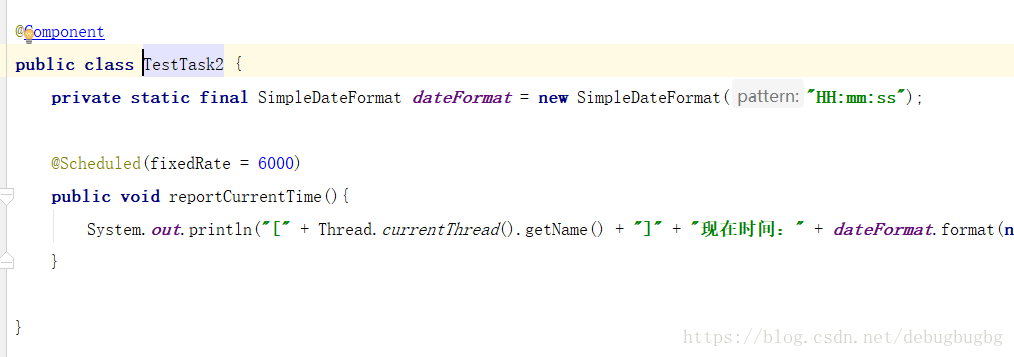
4. fixedRate:表示按一定的频率执行任务,参数类型为long,单位ms;
5. fixedRateString: 与fixedRate的含义一样,只是将参数类型变为String;
6. initialDelay:表示延迟多久再第一次执行任务,参数类型为long,单位ms;
7. initialDelayString:与initialDelay的含义一样,只是将参数类型变为String;
8. zone:时区,默认为当前时区,一般没有用到。
springboot使用:
启动类:
testtask2
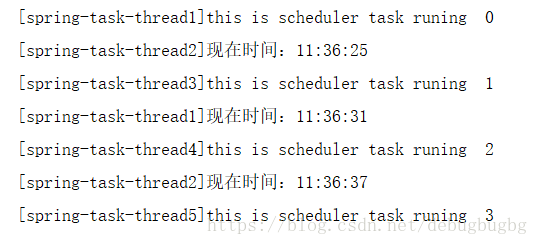
SpringTask 默认是单线程的 上面的两个定时任务使用的都是同一个线程;在实际开发中,不希望所有的任务都运行在一个线程中,想要改成多线程,给SpringTask提供一个多线程的TaskScheduler,Spring已经有默认实现
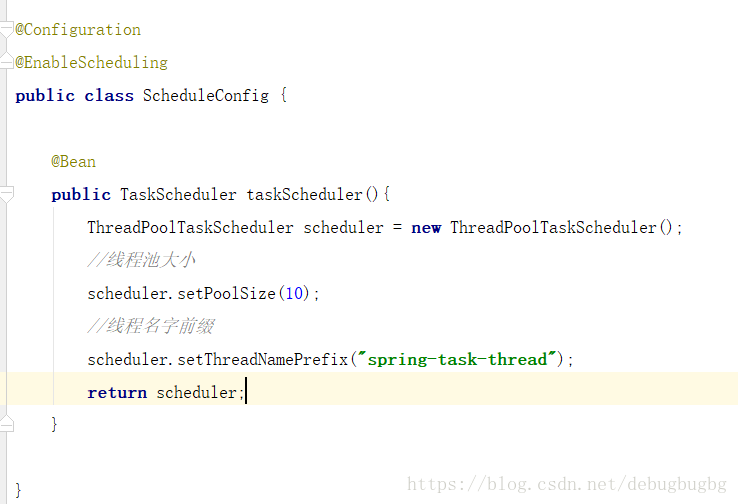
结果:
Spring Task原理及使用
参考文章:
https://blog.csdn.net/u011116672/article/details/52517247
https://blog.csdn.net/lucky_ly/article/details/78726307
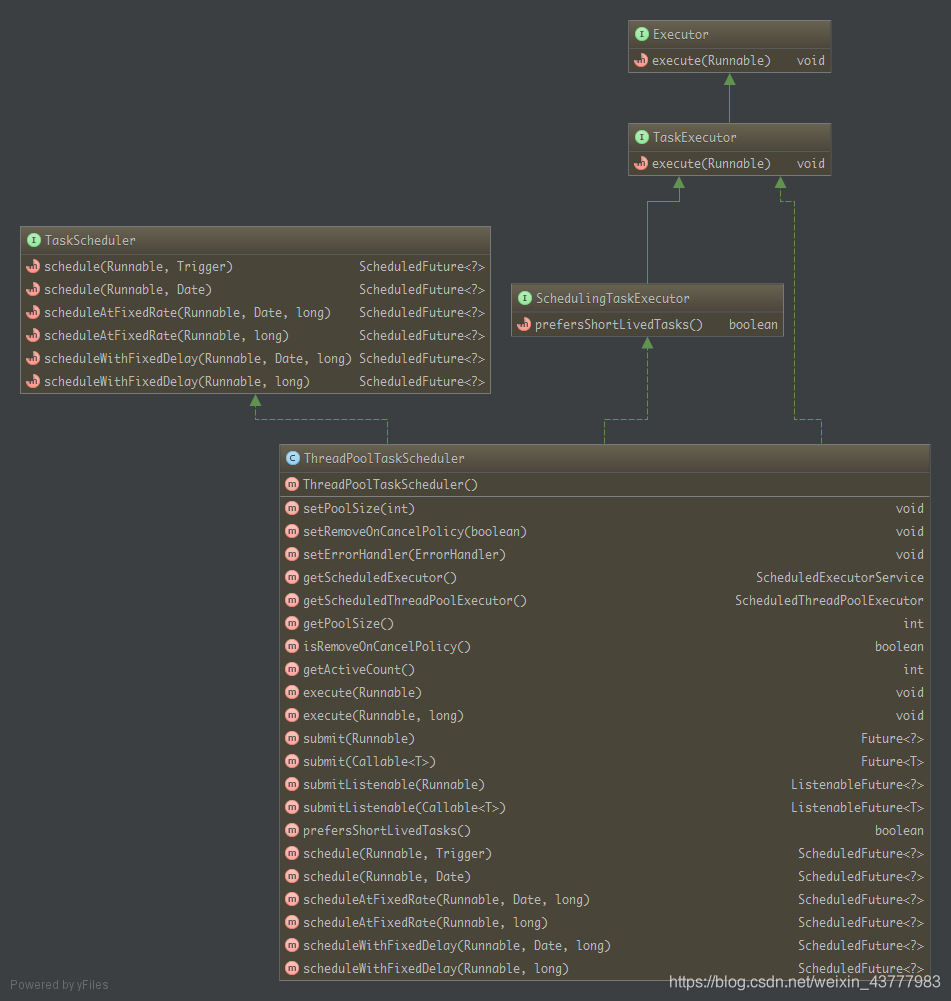
Spring Task的作用是处理定时任务。Spring中为定时任务提供TaskExecutor,TaskScheduler两个接口。
TaskExecutor继承了jdk的Executor:
public interface TaskExecutor extends Executor {
    void execute(Runnable var1);
}
这意味着他就是一个execute。
TaskScheduler提供定时器支持,即定时滴执行任务:
scheduler.schedule(task, new CronTrigger("30 * * * * ?"));
通过上面的方法,传入一个Rannable任务,Trigger触发器,就可以定时滴执行任务了,具体应用了cron表达式。
在spring 4.x中已经不支持7个参数的cronin表达式了,要求必须是6个参数(具体哪个参数后面会说)。cron表达式的格式如下:
{秒} {分} {时} {日期(具体哪天)} {月} {星期}
1
秒:必填项,允许的值范围是0-59,支持的特殊符号包括
, - * /,,表示特定的某一秒才会触发任务,-表示一段时间内会触发任务,*表示每一秒都会触发,/表示从哪一个时刻开始,每隔多长时间触发一次任务。
分:必填项,允许的值范围是0-59,支持的特殊符号和秒一样,含义类推
时:必填项,允许的值范围是0-23,支持的特殊符号和秒一样,含义类推
日期:必填项,允许的值范围是1-31,支持的特殊符号相比秒多了?,表示与{星期}互斥,即意味着若明确指定{星期}触发,则表示{日期}无意义,以免引起冲突和混乱。
月:必填项,允许的值范围是1-12(JAN-DEC),支持的特殊符号与秒一样,含义类推
星期:必填项,允许值范围是1~7 (SUN-SAT),1代表星期天(一星期的第一天),以此类推,7代表星期六,支持的符号相比秒多了?,表达的含义是与{日期}互斥,即意味着若明确指定{日期}触发,则表示{星期}无意义。
通常而言,可以使用xml配合注解开发,以及注解开发两种。
具体做法为:
1.引入pom文件
        <dependency>
            <groupId>org.springframework</groupId>
            <artifactId>spring-web</artifactId>
            <version>4.3.9.RELEASE</version>
        </dependency>
        <dependency>
            <groupId>org.springframework</groupId>
            <artifactId>spring-context</artifactId>
            <version>4.3.9.RELEASE</version>
        </dependency>
        <dependency>
            <groupId>org.springframework</groupId>
            <artifactId>spring-beans</artifactId>
            <version>4.3.9.RELEASE</version>
        </dependency>
        <dependency>
            <groupId>org.springframework</groupId>
            <artifactId>spring-context-support</artifactId>
            <version>4.3.9.RELEASE</version>
        </dependency>

2.添加定时执行的任务
<context:component-scan base-package="com.springTask"/>
<task:scheduled-tasks>
<task:scheduled ref="taskTest" method="execute" cron="0/1 * * * * ?"/>
</task:scheduled-tasks>
第二种方式,主要基于注解
package com.springTask;

import java.text.SimpleDateFormat;
import java.util.Date;

import org.springframework.scheduling.annotation.EnableScheduling;
import org.springframework.scheduling.annotation.Scheduled;
import org.springframework.scheduling.config.TaskExecutorFactoryBean;
import org.springframework.stereotype.Component;

@Component
public class TaskTest {

    @Scheduled(cron="* * * * * ?")
    public void execute(){
        System.out.println("let's go on " + new SimpleDateFormat().format(new Date()).toString());
    }


}
xml配置文件:
    <task:annotation-driven/>
    <context:component-scan base-package="com.zx.jeeTomatoSyS.*"/>
     <task:scheduler id="scheduler" pool-size="100"/>

第三种方式,基于注解:
任务类上 @EnableScheduling 即可。
xml配置文件:
    <task:annotation-driven/>
    <context:component-scan base-package="com.zx.jeeTomatoSyS.*"/>