参考:
https://www.jianshu.com/p/2a446ce48803
https://blog.csdn.net/htf2620032/article/details/79298661
https://www.cnblogs.com/xichji/p/11811733.html
https://www.cnblogs.com/hello-shf/p/10864977.html
目录:
自动加载的原理
SpringBoot自动配置装载配置解析
SpringBoot的自动化配置让我们的开发彻底远离了Spring繁琐的各种配置,让我们专注于开发,但是SpringBoot的自动化配置是怎么实现的呢?
SpringBoot最为重要的一个注解是@SpringBootApplication,它其实是一个组合元注解:
@Target(ElementType.TYPE)
@Retention(RetentionPolicy.RUNTIME)
@Documented
@Inherited
@SpringBootConfiguration
@EnableAutoConfiguration
@ComponentScan(excludeFilters = { @Filter(type = FilterType.CUSTOM, classes = TypeExcludeFilter.class),
        @Filter(type = FilterType.CUSTOM, classes = AutoConfigurationExcludeFilter.class) })
public @interface SpringBootApplication {

    /**
     * Exclude specific auto-configuration classes such that they will never be applied.
     * @return the classes to exclude
     */
    @AliasFor(annotation = EnableAutoConfiguration.class)
    Class<?>[] exclude() default {};

    /**
     * Exclude specific auto-configuration class names such that they will never be
     * applied.
     * @return the class names to exclude
     * @since 1.3.0
     */
    @AliasFor(annotation = EnableAutoConfiguration.class)
    String[] excludeName() default {};

    /**
     * Base packages to scan for annotated components. Use {@link #scanBasePackageClasses}
     * for a type-safe alternative to String-based package names.
     * @return base packages to scan
     * @since 1.3.0
     */
    @AliasFor(annotation = ComponentScan.class, attribute = "basePackages")
    String[] scanBasePackages() default {};

    /**
     * Type-safe alternative to {@link #scanBasePackages} for specifying the packages to
     * scan for annotated components. The package of each class specified will be scanned.
     * <p>
     * Consider creating a special no-op marker class or interface in each package that
     * serves no purpose other than being referenced by this attribute.
     * @return base packages to scan
     * @since 1.3.0
     */
    @AliasFor(annotation = ComponentScan.class, attribute = "basePackageClasses")
    Class<?>[] scanBasePackageClasses() default {};

}
从这个注解可以看出来,它包含了@EnableAutoConfiguration 这 个注解,这个注解就是自动化配置的原理核心所在:
@Target(ElementType.TYPE)
@Retention(RetentionPolicy.RUNTIME)
@Documented
@Inherited
@AutoConfigurationPackage
@Import(AutoConfigurationImportSelector.class)
public @interface EnableAutoConfiguration {

    String ENABLED_OVERRIDE_PROPERTY = "spring.boot.enableautoconfiguration";

    /**
     * Exclude specific auto-configuration classes such that they will never be applied.
     * @return the classes to exclude
     */
    Class<?>[] exclude() default {};

    /**
     * Exclude specific auto-configuration class names such that they will never be
     * applied.
     * @return the class names to exclude
     * @since 1.3.0
     */
    String[] excludeName() default {};

}
我们发现,它使用了Spring 框架提供的@Import 注解注入了注册Bean 的配置类,再往下分析不妨先了解下这个 @Import 注解,再我们平时使用Sping 框架的Enable* 类 注解时,发现他们都有一个共同的特点,就是都有一个@Import注解,用来导入配置类,这些配置方式又分为三种:
- 直接导入配置类:@Import({xxxConfiguration.class})
- 依据条件选择配置类:@Import({xxxSelector.class})
- 动态注册Bean:@Import({xxxRegistrar.class})
很明显,@EnableAutoConfiguration 这个注解使用的是第二种情况,导入@Import(AutoConfigurationImportSelector.class) 类,借助于AutoConfigurationImportSelector, @EnableAutoConfiguration 可以帮助SpringBoot 应用将所有符合条件的@Configuration 配置都加载到当前SpringBoot 创建并使用IoC容器。
借助于Spring框架原有的一个工具类,SpringFactoriesLoader 的支持,@EnableAutoConfiguration 可以智能的自动配置功效才得以大功告成!

在AutoConfigurationImportSelector 类中,可看到通过SpringFactoriesLoader.loadFactoryNames() 把 spring-boot-autoconfigure.jar/META-INF/spring.factories 中每一个xxxAutoConfiguration文件都加载到容器中,spring.factories文件里每一个xxxAutoConfiguration文件一般都会有下面的条件注解:
@ConditionalOnClass : classpath中存在该类时起效
@ConditionalOnMissingClass : classpath中不存在该类时起效
@ConditionalOnBean : DI容器中存在该类型Bean时起效
@ConditionalOnMissingBean : DI容器中不存在该类型Bean时起效
@ConditionalOnSingleCandidate : DI容器中该类型Bean只有一个或@Primary的只有一个时起效
@ConditionalOnExpression : SpEL表达式结果为true时
@ConditionalOnProperty : 参数设置或者值一致时起效
@ConditionalOnResource : 指定的文件存在时起效
@ConditionalOnJndi : 指定的JNDI存在时起效
@ConditionalOnJava : 指定的Java版本存在时起效
@ConditionalOnWebApplication : Web应用环境下起效
@ConditionalOnNotWebApplication : 非Web应用环境下起效
SpringFactoriesLoader
SpringFactoriesLoader属于Spring框架私有的一种扩展方案(类似于Java的SPI方案java.util.ServiceLoader),其主要功能就是从指定的配置文件META-INF/spring-factories加载配置,spring-factories是一个典型的java properties文件,只不过Key和Value都是Java类型的完整类名,比如:
#-------starter自动装配---------
org.springframework.boot.autoconfigure.EnableAutoConfiguration=com.demo.starter.config.MsgAutoConfiguration
对于@EnableAutoConfiguration来说,SpringFactoriesLoader的用途稍微不同一些,其本意是为了提供SPI扩展的场景,而在@EnableAutoConfiguration场景中,它更多提供了一种配置查找的功能支持,即根据@EnableAutoConfiguration的完整类名org.springframework.boot.autoconfig.EnableAutoConfiguration作为查找的Key,获得对应的一组@Configuration类。SpringFactoriesLoader是一个抽象类,类中定义的静态属性定义了其加载资源的路径public static final String FACTORIES_RESOURCE_LOCATION = "META-INF/spring.factories",此外还有三个静态方法:
loadFactories:加载指定的factoryClass并进行实例化。
loadFactoryNames:加载指定的factoryClass的名称集合。
instantiateFactory:对指定的factoryClass进行实例化。
在loadFactories方法中调用了loadFactoryNames以及instantiateFactory方法。
    public static <T> List<T> loadFactories(Class<T> factoryType, @Nullable ClassLoader classLoader) {
        Assert.notNull(factoryType, "'factoryType' must not be null");
        ClassLoader classLoaderToUse = classLoader;
        if (classLoaderToUse == null) {
            classLoaderToUse = SpringFactoriesLoader.class.getClassLoader();
        }
        List<String> factoryImplementationNames = loadFactoryNames(factoryType, classLoaderToUse);
        if (logger.isTraceEnabled()) {
            logger.trace("Loaded [" + factoryType.getName() + "] names: " + factoryImplementationNames);
        }
        List<T> result = new ArrayList<>(factoryImplementationNames.size());
        for (String factoryImplementationName : factoryImplementationNames) {
            result.add(instantiateFactory(factoryImplementationName, factoryType, classLoaderToUse));
        }
        AnnotationAwareOrderComparator.sort(result);
        return result;
    }
总结
创建 自定义 starter 的步骤:
-
确保在Pom.xml文件中声明了使用该组件所需要的全部dependency
-
利用@ConfigurationProperties注解对外暴露恰当的properties
-
利用条件注解@ConditionalXXX编写XXXAutoConfigration类
-
把写好的的XXXAutoConfigration类加到META-INF/spring.factories文件的EnableAutoConfiguration配置中,这样在应用启动的时候就会自动加载XXXAutoConfiguration。
作者:逗逼程序员
链接:https://www.jianshu.com/p/2a446ce48803
来源:简书
著作权归作者所有。商业转载请联系作者获得授权,非商业转载请注明出处。
SpringBoot自动加载的原理
SpringBoot自动加载的原理:
SpringBoot在进行SpringApplication对象实例化时会加载META-INF/spring.factories文件,将该配置文件中的配置载入到Spring容器。
源码分析:
首先我们在程序入口的位置点进SpringApplication这个类的run方法

我们可以看到run方法值执行了一个方法
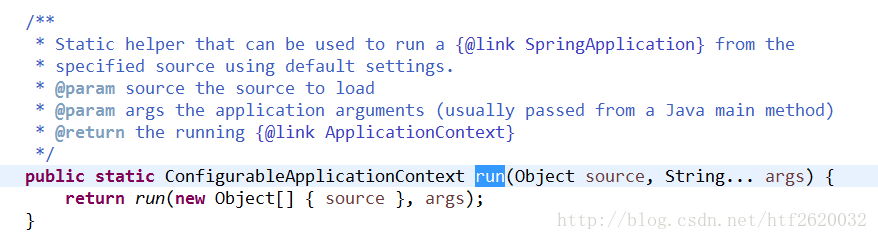
我们继续跟进找到run方法
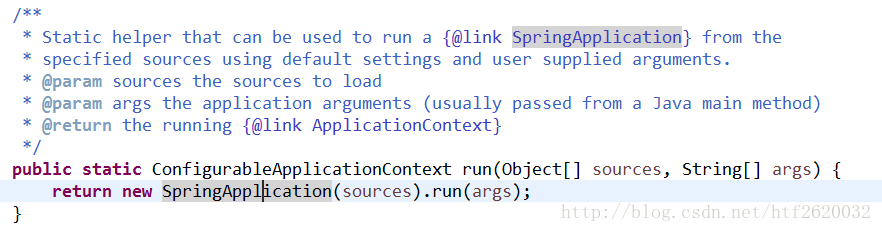
可以看到run方法只是创建了SpringApplication对象,并执行run方法。我们继续跟进

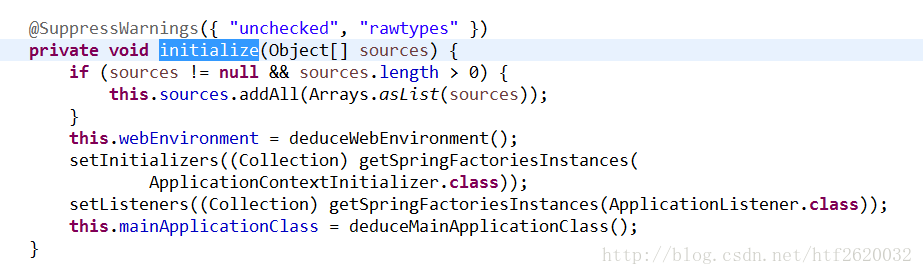
现在我们找到了initialize方法,这个方法主要的作用是初始化一些对象和实例,点进getSpringFactoriesInstances方法找到loadFactoryNames方法
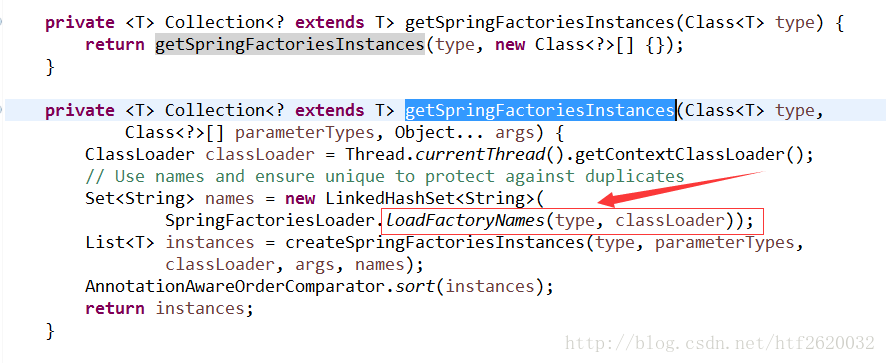
loadFactoryNames方法的作用是把/spring.factories文件中的配置类转化为对象,我们可以看到SpringApplication对象实例化时就是在这里加载META-INF/spring.factories文件


找到META-INF/spring.factories文件,我们看到Spring容器初始化时会加载到的类
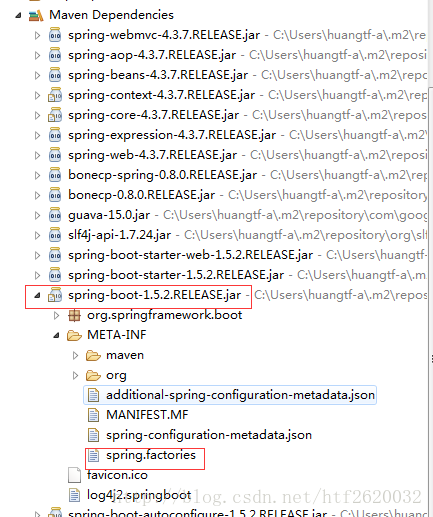
看到这里我们不妨想想关闭自动配置时,我们是怎么写的?以Redis为例,我们可以看到spring.factories文件中有Redis的配置
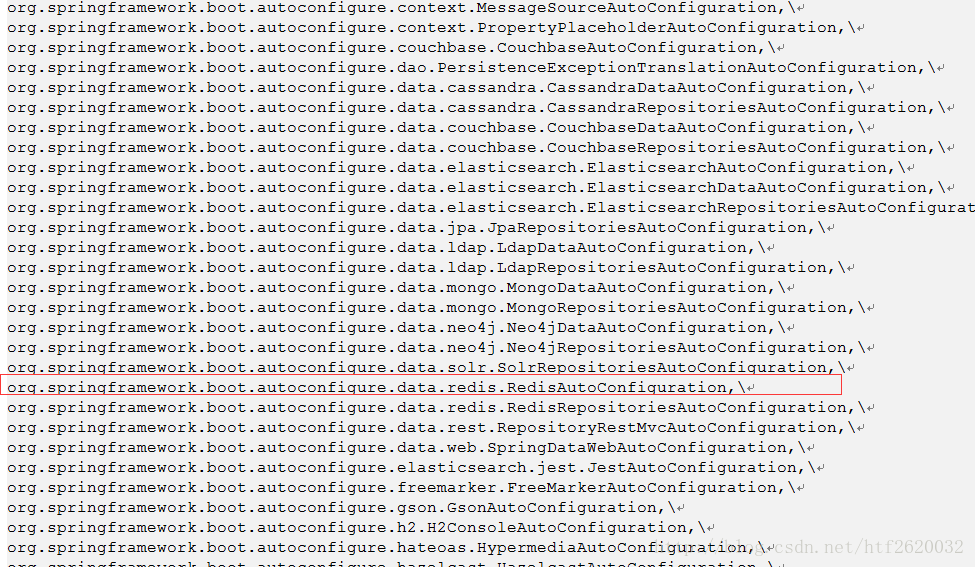
关闭自动配置时我们就是把spring.factories文件不需要自动配置的类过滤掉

由此可见,读取该配置文件来加载内容。
SpringBoot自定义starter及自动配置
摘自:https://www.cnblogs.com/secbro/p/11810105.html
SpringBoot自定义starter及自动配置
SpringBoot的核心就是自动配置,而支持自动配置的是一个个starter项目。除了官方已有的starter,用户自己也可以根据规则自定义自己的starter项目。
自定义starter条件
自动化配置需满足以下条件:
- 根据条件检查classpath下对应的类,也就是说需要提供对应可检查的类;
- 当满足条件时能够生成定义的Bean,并注册到容器中去;
- 能够自动配置项目所需要的配置;
自定义spring boot starter
这里通过maven项目管理工具进行starter的创建。首先我们需要创建一个简单的maven项目。这里我们以集成某短信服务为例,来创建一个项目。
创建maven项目
创建一个简单的maven项目,具体步骤省略。可通过intellj idea等IDE进行创建,也可通过maven命令进行创建。
目录结构如下:
.
├── pom.xml
├── spring-boot-starter-msg.iml
└── src
    ├── main
    └── test
在pom.xml中引入SpringBoot自动化配置依赖spring-boot-autoconfigure:
<dependency>
    <groupId>org.springframework.boot</groupId>
    <artifactId>spring-boot-autoconfigure</artifactId>
    <version>2.1.5.RELEASE</version>
</dependency>
定义Service服务类
定义Service服务类,有两个作用,一个为引入的项目本省的功能性服务,另外一个用来springboot自动配置时的判断依据。
这里定义一个MsgService的类。
package com.secbro2.msg;

import com.secbro2.utils.HttpClientUtils;

public class MsgService {

    /**
     * 访问发送短信的url地址
     */
    private String url;

    /**
     * 短信服务商提供的请求keyId
     */
    private String accessKeyId;

    /**
     * 短信服务商提供的KeySecret
     */
    private String accessKeySecret;

    public MsgService(String url, String accessKeyId, String accessKeySecret) {
        this.url = url;
        this.accessKeyId = accessKeyId;
        this.accessKeySecret = accessKeySecret;
    }

    public int sendMsg(String msg) {
        // 调用http服务并发送消息,返回结果
        return HttpClientUtils.sendMsg(url, accessKeyId, accessKeySecret, msg);
    }

    // 省略getter/setter方法
}
其中MsgService用到了一个工具类HttpClientUtils。在HttpClientUtils中只简单打印了请求的参数信息。
package com.secbro2.utils;

public class HttpClientUtils {

    public static int sendMsg(String url, String accessKeyId, String accessKeySecret, String msg) {
        //TODO 调用指定url进行请求的业务逻辑
        System.out.println("Http请求,url=" + url + ";accessKeyId=" + accessKeyId + ";accessKeySecret=" + accessKeySecret + ";msg=" + msg);
        return 0;
    }
}
定义配置类
定义MsgProperties配置类,用于封装application.properties或application.yml中的基础配置。这里关于短信发送的配置前缀统一采用msg。
@ConfigurationProperties(prefix = "msg")
public class MsgProperties {

    /**
     * 访问发送短信的url地址
     */
    private String url;

    /**
     * 短信服务商提供的请求keyId
     */
    private String accessKeyId;

    /**
     * 短信服务商提供的KeySecret
     */
    private String accessKeySecret;

    // 其他参数定义
    // 省略getter/setter方法

}
通过@ConfigurationProperties注解来进行对应的属性的装配。
创建自动化配置类
自动配置类就是一个普通的java类,通过不同的注解来对其赋予不同的功能。其中最核心的当然是@Configuration注解。
@Configuration
@ConditionalOnClass(MsgService.class)
@EnableConfigurationProperties(MsgProperties.class)
public class MsgAutoConfiguration {

    /**
     * 注入属性配置类
     */
    @Resource
    private MsgProperties msgProperties;

    @Bean
    @ConditionalOnMissingBean(MsgService.class)
    @ConditionalOnProperty(prefix = "msg", value = "enabled", havingValue = "true")
    public MsgService msgService() {
        MsgService msgService = new MsgService(msgProperties.getUrl(), msgProperties.getAccessKeyId(),
                msgProperties.getAccessKeySecret());
        // 如果提供了其他set方法,在此也可以调用对应方法对其进行相应的设置或初始化。
        return msgService;
    }
}
MsgAutoConfiguration类上的注解,@Configuration用来声明该类为一个配置类;@ConditionalOnClass注解说明只有当MsgService类存在于classpath中时才会进行相应的实例化;@EnableConfigurationProperties将application.properties中对应的属性配置设置于MsgProperties对象中;
msgService方法上的注解,@Bean表明该方法实例化的对象会被加载到容器当中;@ConditionalOnMissingBean指明当容器中不存在MsgService的对象时再进行实例化;@ConditionalOnProperty指定了配置文件中msg.enabled=true时才进行相应的实例化。
添加spring.factories
当所有的基础代码和自动配置类都准备完成,就需要对其进行注册。也就是我们熟悉的META-INF/spring.factories配置文件了。当然,这个需要在自己的项目中进行创建。
org.springframework.boot.autoconfigure.EnableAutoConfiguration=
com.secbro2.msg.MsgAutoConfiguration
在spring.factories配置文件中注册MsgAutoConfiguration类。如果有多个自动配置类,用逗号分隔换行即可。
至此,一个基于Spring Boot的自动配置starter便完成了。使用“maven:install”将其打包到本地maven仓库或上传至私服。其他项目便可以通过maven依赖使用。
starter项目使用
在其他项目中,通过以下依赖引入该依赖。
<dependency>
    <groupId>com.secbro2</groupId>
    <artifactId>spring-boot-starter-msg</artifactId>
    <version>1.0-SNAPSHOT</version>
</dependency>
然后在当前项目的application.properties中配置对应的参数:
msg.enabled=true
msg.url=127.0.0.1
msg.accessKeyId=10001
msg.accessKeySecret=afelwjfwfwef
比如其他项目同样是Spring Boot项目,则可定义一个简单的Controller来进行测试。
@RestController
public class HelloWorldController {

    @Resource
    private MsgService msgService;

    @RequestMapping("/sendMsg")
    public String sendMsg(){
        msgService.sendMsg("测试消息");
        return "";
    }
}
当通过浏览器访问:http://localhost:8080/sendMsg时,便会打印出如下日志:
Http请求,url=127.0.0.1;accessKeyId=10001;accessKeySecret=afelwjfwfwef;msg=测试消息说明MsgService对象被自动配置,并且测试通过。
而针对短信发送这样的starter,可以进行进一步拓展,实现短信发送的各种基础功能,而当其他项目需要时只用引入对应的依赖,并配置具体的参数即可马上使用,是不是非常方便?
总结下Starter的工作流程:
- Spring Boot在启动时扫描项目所依赖的JAR包,寻找包含spring.factories文件的JAR包;
- 根据spring.factories配置加载AutoConfiguration类;
- 根据@Conditional注解的条件,进行自动配置并将Bean注入Spring容器。
SpringBoot应用篇(一):自定义starter
一、码前必备知识
1、SpringBoot starter机制
SpringBoot中的starter是一种非常重要的机制,能够抛弃以前繁杂的配置,将其统一集成进starter,应用者只需要在maven中引入starter依赖,SpringBoot就能自动扫描到要加载的信息并启动相应的默认配置。starter让我们摆脱了各种依赖库的处理,需要配置各种信息的困扰。SpringBoot会自动通过classpath路径下的类发现需要的Bean,并注册进IOC容器。SpringBoot提供了针对日常企业应用研发各种场景的spring-boot-starter依赖模块。所有这些依赖模块都遵循着约定成俗的默认配置,并允许我们调整这些配置,即遵循“约定大于配置”的理念。
2、为什么要自定义starter
在我们的日常开发工作中,经常会有一些独立于业务之外的配置模块,我们经常将其放到一个特定的包下,然后如果另一个工程需要复用这块功能的时候,需要将代码硬拷贝到另一个工程,重新集成一遍,麻烦至极。如果我们将这些可独立于业务代码之外的功配置模块封装成一个个starter,复用的时候只需要将其在pom中引用依赖即可,SpringBoot为我们完成自动装配,简直不要太爽。
3、自定义starter的案例
以下案例由笔者工作中遇到的部分场景
▲ 动态数据源。
▲ 登录模块。
▲ 基于AOP技术实现日志切面。
。。。。。。
4、自定义starter的命名规则
SpringBoot提供的starter以spring-boot-starter-xxx的方式命名的。官方建议自定义的starter使用xxx-spring-boot-starter命名规则。以区分SpringBoot生态提供的starter。
5、代码地址
https://github.com/hello-shf/demo-spring-boot-starter.git simple分支哦
二、starter的实现方法
1、新建一个工程
命名为demo-spring-boot-starter
下图为工程目录结构

2、pom依赖

 1 <?xml version="1.0" encoding="UTF-8"?>
 2 <project xmlns="http://maven.apache.org/POM/4.0.0" xmlns:xsi="http://www.w3.org/2001/XMLSchema-instance"
 3          xsi:schemaLocation="http://maven.apache.org/POM/4.0.0 http://maven.apache.org/xsd/maven-4.0.0.xsd">
 4     <modelVersion>4.0.0</modelVersion>
 5     <parent>
 6         <groupId>org.springframework.boot</groupId>
 7         <artifactId>spring-boot-starter-parent</artifactId>
 8         <version>2.1.4.RELEASE</version>
 9     </parent>
10     <groupId>com.demo</groupId>
11     <artifactId>demo-spring-boot-starter</artifactId>
12     <version>0.0.1-RELEASE</version>
13     <name>demo-spring-boot-starter</name>
14     <description>Demo project for Spring Boot</description>
15
16     <properties>
17         <java.version>1.8</java.version>
18     </properties>
19
20     <dependencies>
21
22         <dependency>
23             <groupId>org.springframework.boot</groupId>
24             <artifactId>spring-boot-configuration-processor</artifactId>
25             <optional>true</optional>
26         </dependency>
27
28         <dependency>
29             <groupId>org.springframework.boot</groupId>
30             <artifactId>spring-boot-starter</artifactId>
31         </dependency>
32     </dependencies>
33 </project>
3、定义一个实体类映射配置信息
 @ConfigurationProperties(prefix = "demo") 它可以把相同前缀的配置信息通过配置项名称映射成实体类,比如我们这里指定 prefix = "demo" 这样,我们就能将以demo为前缀的配置项拿到了。
ps:其实这个注解很强大,它不但能映射成String或基本类型的变量。还可以映射为List,Map等数据结构。
 1 package com.demo.starter.properties;
 2
 3 import org.springframework.boot.context.properties.ConfigurationProperties;
 4
 5 /**
 6  * 描述:配置信息 实体
 7  *
 8  * @Author shf
 9  * @Date 2019/5/7 22:08
10  * @Version V1.0
11  **/
12 @ConfigurationProperties(prefix = "demo")
13 public class DemoProperties {
14     private String sayWhat;
15     private String toWho;
16
17     public String getSayWhat() {
18         return sayWhat;
19     }
20
21     public void setSayWhat(String sayWhat) {
22         this.sayWhat = sayWhat;
23     }
24
25     public String getToWho() {
26         return toWho;
27     }
28
29     public void setToWho(String toWho) {
30         this.toWho = toWho;
31     }
32 }
4、定义一个Service
 1 package com.demo.starter.service;
 2
 3 /**
 4  * 描述:随便定义一个Service
 5  *
 6  * @Author shf
 7  * @Date 2019/5/7 21:59
 8  * @Version V1.0
 9  **/
10 public class DemoService {
11     public String sayWhat;
12     public String toWho;
13     public DemoService(String sayWhat, String toWho){
14         this.sayWhat = sayWhat;
15         this.toWho = toWho;
16     }
17     public String say(){
18         return this.sayWhat + "!  " + toWho;
19     }
20 }
5,定义一个配置类
这里,我们将DemoService类定义为一个Bean,交给Ioc容器。
▲ @Configuration 注解就不多说了。
▲ @EnableConfigurationProperties 注解。该注解是用来开启对3步骤中 @ConfigurationProperties 注解配置Bean的支持。也就是@EnableConfigurationProperties注解告诉Spring Boot 能支持@ConfigurationProperties。
当然了,也可以在 @ConfigurationProperties 注解的类上添加 @Configuration 或者 @Component 注解
▲ @ConditionalOnProperty 注解控制 @Configuration 是否生效。简单来说也就是我们可以通过在yml配置文件中控制 @Configuration 注解的配置类是否生效。
 1 package com.demo.starter.config;
 2
 3 import com.demo.starter.properties.DemoProperties;
 4 import com.demo.starter.service.DemoService;
 5 import org.springframework.beans.factory.annotation.Autowired;
 6 import org.springframework.boot.autoconfigure.condition.ConditionalOnProperty;
 7 import org.springframework.boot.context.properties.EnableConfigurationProperties;
 8 import org.springframework.context.annotation.Bean;
 9 import org.springframework.context.annotation.Configuration;
10
11 /**
12  * 描述:配置类
13  *
14  * @Author shf
15  * @Date 2019/5/7 21:50
16  * @Version V1.0
17  **/
18 @Configuration
19 @EnableConfigurationProperties(DemoProperties.class)
20 @ConditionalOnProperty(
21         prefix = "demo",
22         name = "isopen",
23         havingValue = "true"
24 )
25 public class DemoConfig {
26     @Autowired
27     private DemoProperties demoProperties;
28
29     @Bean(name = "demo")
30     public DemoService demoService(){
31         return new DemoService(demoProperties.getSayWhat(), demoProperties.getToWho());
32     }
33 }
6、最重要的来了
如图,新建META-INF文件夹,然后创建spring.factories文件,

在该文件中加入如下配置,该配置指定上步骤中定义的配置类为自动装配的配置。(笔者努力最近把自动装配的博客写出来)
1 #-------starter自动装配---------
2 org.springframework.boot.autoconfigure.EnableAutoConfiguration=com.demo.starter.config.DemoConfig
7、测试
在demo-spring-boot-starter工程中执行mvn clean install 一个自定义的starter新鲜出炉。
新建测试工程
引入starter依赖
1         <dependency>
2             <groupId>com.demo</groupId>
3             <artifactId>demo-spring-boot-starter</artifactId>
4             <version>0.0.1-RELEASE</version>
5         </dependency>
配置文件
1 demo.isopen=true
2 demo.say-what=hello
3 demo.to-who=shf
然后写个测试类。
 1 package com.example.test.controller;
 2
 3 import com.demo.starter.service.DemoService;
 4 import org.springframework.web.bind.annotation.GetMapping;
 5 import org.springframework.web.bind.annotation.RestController;
 6
 7 import javax.annotation.Resource;
 8
 9 /**
10  * 描述:
11  *
12  * @Author shf
13  * @Description TODO
14  * @Date 2019/5/13 15:52
15  * @Version V1.0
16  **/
17 @RestController
18 public class DemoController {
19     @Resource(name = "demo")
20     private DemoService demoService;
21
22     @GetMapping("/say")
23     public String sayWhat(){
24         return demoService.say();
25     }
26
27 }
浏览器
