1.什么是Chrome扩展程序
Chrome扩展程序是一个用Web技术开发,用来扩展增强浏览器功能的软件。和一般的网页一样,Chrome扩展程序由html、js、css和图片等部分组成。Chrome插件的种类功能有很多,比如截图、去广告和观看vip视频等等,这些对浏览器底层的扩展都需要对浏览器源码了解和扎实的基础知识。
开发Chrome扩展程序不单单只运用到前端的知识,还可以结合别的语言来开发,像是配合C++编写的截图插件等。通过对浏览器插件的安装,可以帮我我们扩展浏览器的功能,方便我们的使用。
2.Chrome插件的简单开发
(1)manifest.json
manifest.json文件时Chrome最重要的一个文件,里面用json格式的数据配置插件的图标、插件主页、调用的js和cass等参数。其中最重要的是manifest_version、name和version这三个是必不可少的。我这里只是开发一个简单的天气预报插件,所以只是配置了一些必要的配置项,如下(配置项有很多,详细文档这里):
{
    // 清单文件的版本,这个必须写,而且必须是2
    "manifest_version": 2,
    // 插件的名称
    "name": "demo",
    // 插件的版本
    "version": "1.0.0",
    // 插件描述
    "description": "天气预报",
    // 图标,一般偷懒全部用一个尺寸的也没问题
    "icons":
    {
        "16": "img/icon.png"
    },
    // 浏览器右上角图标设置,browser_action、page_action、app必须三选一
    "browser_action":
    {
        "default_icon": "img/icon.png",
        // 图标悬停时的标题,可选
        "default_title": "这是一个示例Chrome插件",
        "default_popup": "popup.html"
    },
    "content_security_policy": "script-src 'self' https://ip.ws.126.net; object-src 'self'",
    // 默认语言
    "default_locale": "zh_CN"
}
(2)popup.html
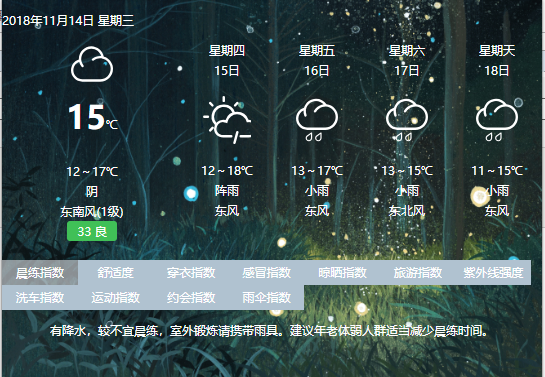
在manifest.json我通过配置项default_popup设置popup.html为默认的交互页面,当我们点击右上角的扩展程序小图标的时候就能打开这个页面,而我们也要在这个页面中展现天气预报的信息。为了方便我直接将css的样式写在了页面里面,引入外部js和css文件的话和普通的页面一样,具体的页面效果如下图:

(3)调试
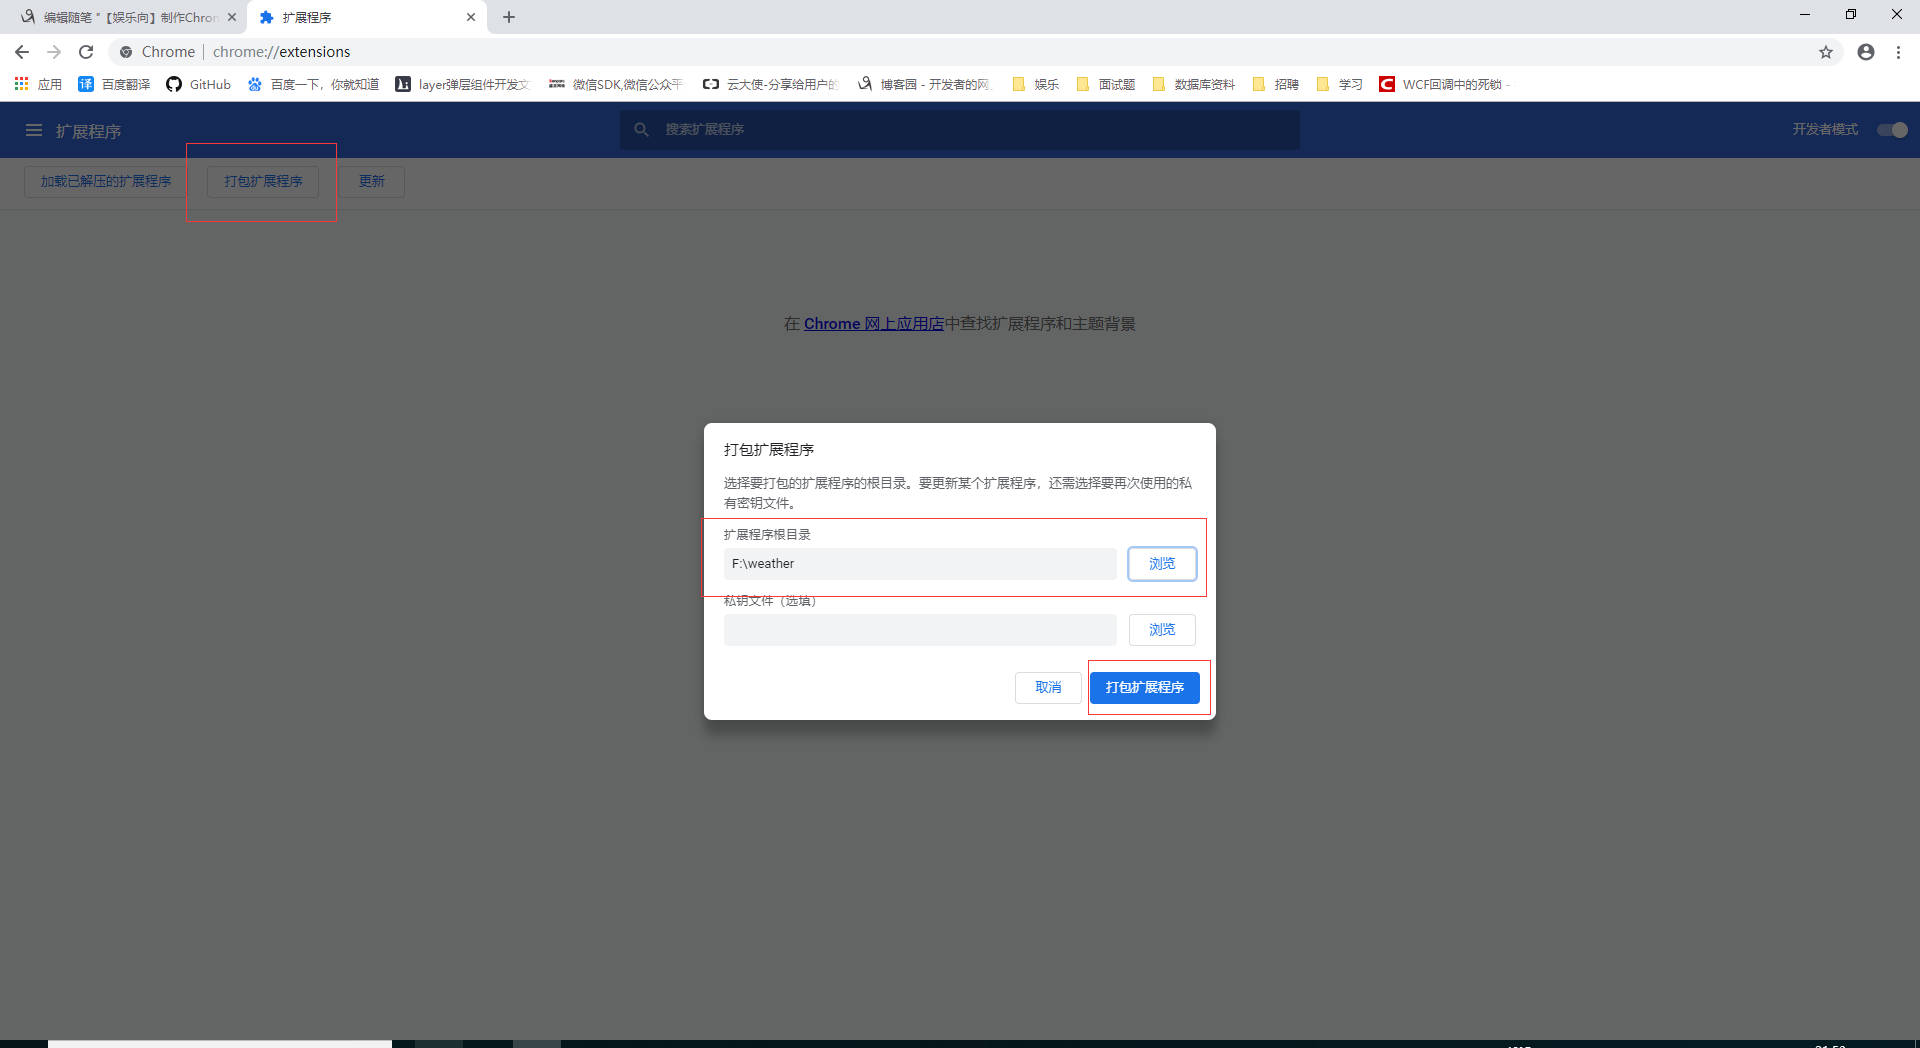
点击谷歌浏览器右上角的菜单栏-》更多工具-》扩展程序,或者直接地址栏中输入chrome://extensions/进入扩展程序页面。第一次打包的时候点击打包扩展程序,后浏览选择我们扩展程序开发的文件夹,点击打包扩展程序就可以了,不管打包成功与否都会.pem文件就是所谓的密钥,生成后下次打包就需要选择这个密钥否则会提示的,打包成功后会生成.crx文件,这里需要注意如果manifest.json文件中配置项格式错误或者引用的文件无法加载成功的问题都会导致打包失败。

将打包后的.crx文件解压,解压后点击页面上的加载已解压的扩展程序按钮,选择刚刚解压的文件夹,就会成功加载我们刚写的扩展程序了,右上角也会出现扩展程序的图标,点击会出现popup.html页面。有更新的话可以点击右下角刷新按钮,不必重新加载。

3.天气预报数据
天气预报数据的接口是网上找来的一个比较好用的接口http://wthrcdn.etouch.cn/WeatherApi?city=城市名,只要传入所在城市名称就可以返回近几天的天气数据,不过它返回的数据是xml的格式的,需要用js解析xml。城市名通过ip获取所在地位置,不过我觉得先获取ip,然后获取所在地还是比较繁琐的,所以找到了另一个外部js资源https://ip.ws.126.net/ipquery,像是引用其他外部js一样引用就可以了。不过这里要注意,Chrome的扩展程序对外部资源的引用是有限制的需要https并且在manifest.json中需要用配置项content_security_policy对外部资源声明才可以用。具体的js代码如下:
$(function () {
    $.ajax({
        url: "http://wthrcdn.etouch.cn/WeatherApi",
        type: "get",
        data: { city: lc },
        dataType: "xml",
        success: function (xmlData) {
            console.log(xmlData);
            var root = xmlData.documentElement;
            LoadDate();
            LoadForecast(root);
            LoadIndex(root);
        }
    })
})
var arr = new Array();
//补零
function pad(num, n) {
    var len = num.toString().length;
    while(len < n) {
        num = "0" + num;
        len++;
    }
    return num;
}
//返回字符串中的数字
function GetNum(str) {
    var num = str.replace(/[^0-9]/ig, "");
    return num;
}
//获取时间
function LoadDate() {
    var week = new Array("日", "一", "二", "三", "四", "五", "六");
    var date = new Date();
    $(".title").text(date.getFullYear() + "年" + (date.getMonth() + 1) + "月" + date.getDate() + "日 星期" + week[date.getDay()]);
}
//更新天气
function LoadForecast(root) {
    var sunrise_1 = root.getElementsByTagName("sunrise_1")[0].firstChild.nodeValue;//日出时间
    var sunset_1 = root.getElementsByTagName("sunset_1")[0].firstChild.nodeValue;//日落时间
    var wendu = root.getElementsByTagName("wendu")[0].firstChild.nodeValue;//实时温度
    var fx = root.getElementsByTagName("fengxiang")[0].firstChild.nodeValue;//事实风向
    var fl = root.getElementsByTagName("fengli")[0].firstChild.nodeValue;//事实风力
    var quality = root.getElementsByTagName("quality")[0].firstChild.nodeValue;//空气质量
    var pm25 = root.getElementsByTagName("pm25")[0].firstChild.nodeValue;//pm25
    for(var i =0;i<5;i++)
    {
        var low = root.getElementsByTagName("low")[i].firstChild.nodeValue;//最低温度
        var high = root.getElementsByTagName("high")[i].firstChild.nodeValue;//最高温度
        var date_1 = root.getElementsByTagName("date")[i].firstChild.nodeValue;//时间
        var fl_1 = "未知";//风向
        var type = "未知";//天气
        var date = new Date();
        if (sunset_1 < pad(date.getHours() + ":" + date.getMinutes(), 5) || sunrise_1 > pad(date.getHours() + ":" + date.getMinutes(), 5)) {//晚上
            type = root.getElementsByTagName("type")[i * 2].firstChild.nodeValue;
            fl_1 = root.getElementsByTagName("fengxiang")[i * 2 + 1].firstChild.nodeValue;
            $(".container").css({ "background-image": "url('../img/dark.jpg')" });
        } else {
            type = root.getElementsByTagName("type")[i * 2 + 1].firstChild.nodeValue;
            fl_1 = root.getElementsByTagName("fengxiang")[i * 2 + 2].firstChild.nodeValue;
            $(".container").css({ "background-image": "url('../img/day.jpg')" });
        }
        if (i == 0) {
            $(".bigFont span:first").text(wendu);
            $(".cur_weather p:first").text(GetNum(low) + "~" + GetNum(high) + "℃");
            $(".cur_weather p").eq(2).text(fx + "(" + fl + ")");
            $(".cur_weather p").eq(3).text(pm25 + " " + quality);
            $(".cur_weather p").eq(1).text(type);
        } else {
            $(".weather").eq(i - 1).find("p").eq(0).text(date_1.replace(GetNum(date_1) + "日", ""));
            $(".weather").eq(i - 1).find("p").eq(1).text(GetNum(date_1) + "日");
            $(".weather").eq(i - 1).find("p").eq(2).text(GetNum(low) + "~" + GetNum(high) + "℃");
            $(".weather").eq(i - 1).find("p").eq(3).text(type);
            $(".weather").eq(i - 1).find("p").eq(4).text(fl_1);
        }
        $(".icon").eq(i).css({ "background-image": "url('../img/" + type + ".png')" });
    }
}
//指数
function LoadIndex(root) {
    var html = "";
    for (var i = 0; i < 11; i++) {
        var name = root.getElementsByTagName("name")[i].firstChild.nodeValue;
        var detail = root.getElementsByTagName("detail")[i].firstChild.nodeValue;
        //arr.push({
        //   name : detail
        //});
        arr[name] = detail;
        if (i == 0) {
            $(".content").text(detail);
            html += "<div class='cur_tab'>" + name + "</div>";
        }
        else
            html += "<div>" + name + "</div>";
    }
    $(".tab").html(html);
    $(".tab div").click(function () {
        $(".tab div").removeClass('cur_tab');
        $(this).addClass("cur_tab");
        $(".content").text(arr[$(this).text()]);
    })
}
4.使用与总结
完成上述的代码后就可以在浏览器上调试使用了,使用效果因人而异吧,对我来说还不错,不过缺点就是每次打开浏览器都会询问我是否停用插件,因为我没有上传到谷歌商店,毕竟成为开发者上传还是要钱的,没钱呀。我这里对Chrome扩展程序的了解还是非常浅层的,属于自娱自乐的,想要详细学习的可以看这个博客【干货】Chrome插件(扩展)开发全攻略。下面附上全部源码。