1、什么是View
View是Android中所有控件的基类,还有ViewGroup,翻译是控件组,ViewGroup也是继承了View,所以其实ViewGroup本身是一个控件只是其内部可能包含了许多控件。
2、View的位置参数
- top 左上角的纵坐标
- left 左上角的横坐标
- bottom 右下角的纵坐标
- right 右下角的横坐标
需要注意的是这些参数都是基于父容器来说的,并不是屏幕。
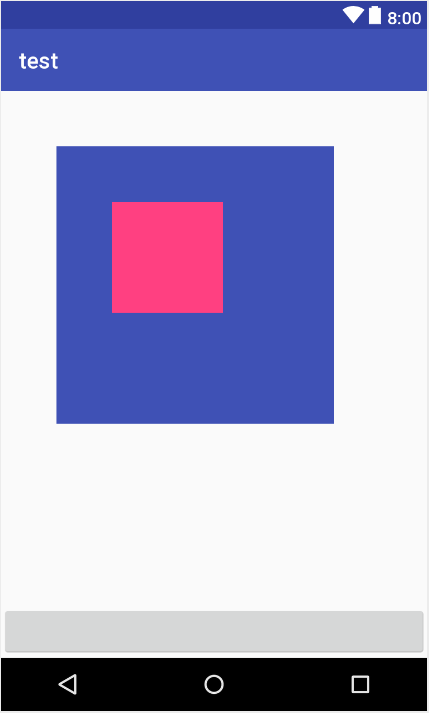
这是布局xml:
<?xml version="1.0" encoding="utf-8"?>
<RelativeLayout xmlns:android="http://schemas.android.com/apk/res/android"
    xmlns:tools="http://schemas.android.com/tools"
    android:layout_width="match_parent"
    android:layout_height="match_parent"
    tools:context="com.example.administrator.test.MainActivity">

    <RelativeLayout
        android:id="@+id/main_Relative1"
        android:layout_width="250dp"
        android:layout_height="250dp"
        android:layout_marginTop="50dp"
        android:layout_marginLeft="50dp"
        android:background="@color/colorPrimary">

        <RelativeLayout
            android:id="@+id/main_Relative2"
            android:layout_width="100dp"
            android:layout_height="100dp"
            android:layout_marginTop="50dp"
            android:layout_marginLeft="50dp"
            android:background="@color/colorAccent">

        </RelativeLayout>

    </RelativeLayout>

    <Button
        android:id="@+id/main_button1"
        android:layout_width="match_parent"
        android:layout_height="wrap_content"
        android:layout_alignParentBottom="true"/>

</RelativeLayout>

然后是Activity的Java代码:
public class MainActivity extends AppCompatActivity {

    private final static String TAG = "MainActivity";
    private RelativeLayout relativeLayout1;
    private RelativeLayout relativeLayout2;
    private Button button1;
    @Override
    protected void onCreate(Bundle savedInstanceState) {
        super.onCreate(savedInstanceState);
        setContentView(R.layout.activity_main);
        relativeLayout1 = (RelativeLayout) findViewById(R.id.main_Relative1);
        relativeLayout2 = (RelativeLayout) findViewById(R.id.main_Relative1);
        button1 = (Button) findViewById(R.id.main_button1);

        button1.setOnClickListener(new View.OnClickListener() {
            @Override
            public void onClick(View view) {
                Log.d(TAG,"relativeLayout1_TOP = " + relativeLayout1.getTop());
                Log.d(TAG,"relativeLayout1_Left = " + relativeLayout1.getLeft());
                Log.d(TAG,"relativeLayout1_Bottom = " + relativeLayout1.getBottom());
                Log.d(TAG,"relativeLayout1_Right = " + relativeLayout1.getRight());

                Log.d(TAG,"relativeLayout2_TOP = " + relativeLayout2.getTop());
                Log.d(TAG,"relativeLayout2_Left = " + relativeLayout2.getLeft());
                Log.d(TAG,"relativeLayout2_Bottom = " + relativeLayout2.getBottom());
                Log.d(TAG,"relativeLayout2_Right = " + relativeLayout2.getRight());
            }
        });
    }
}
这里要注意的是不能直接在onCreate中使用getLeft, getRight, getTop, getBottom,这样直接使用返回的结果将是0,因为View的绘制晚于Activity的创建。
然后还要注意dp和像素的区别。不同的手机不一样。
输出:
12-19 10:40:27.594 22464-22464/com.example.administrator.test D/MainActivity: relativeLayout1_TOP = 150
12-19 10:40:27.594 22464-22464/com.example.administrator.test D/MainActivity: relativeLayout1_Left = 150
12-19 10:40:27.594 22464-22464/com.example.administrator.test D/MainActivity: relativeLayout1_Bottom = 900
12-19 10:40:27.595 22464-22464/com.example.administrator.test D/MainActivity: relativeLayout1_Right = 900
12-19 10:40:27.595 22464-22464/com.example.administrator.test D/MainActivity: relativeLayout2_TOP = 150
12-19 10:40:27.595 22464-22464/com.example.administrator.test D/MainActivity: relativeLayout2_Left = 150
12-19 10:40:27.595 22464-22464/com.example.administrator.test D/MainActivity: relativeLayout2_Bottom = 900
12-19 10:40:27.595 22464-22464/com.example.administrator.test D/MainActivity: relativeLayout2_Right = 900
从Android3.0开始,View在平移的过程中,top和left表示的是原始左上角的位置信息,其值不会发生改变。在平移过程中发生改变的x,y,translationX,translationY,x,y是View左上角的坐标,translationX,translationY是平移的距离。
x = left + translationX
y = top + translationY
3、View的滑动
首先是自定义控件的Java代码:

public class ima extends AppCompatImageView {
    private final static String TAG = "ima";
    Scroller mScroller = new Scroller(getContext());

    public ima(Context context) {
        super(context);
    }

    public ima(Context context, AttributeSet attrs) {
        super(context, attrs);
    }

    public ima(Context context, AttributeSet attrs, int defStyleAttr) {
        super(context, attrs, defStyleAttr);
    }

    //缓慢滚动到指定位置
    public void smoothScrollTo(int destX, int destY){
        int scrollX = getScrollX();
        int scrollY = getScrollY();
        Log.d(TAG,"scrollX = " + scrollX);
        Log.d(TAG,"scrollY = " + scrollY);
        int deltaX = scrollX - destX;
        int deltaY = scrollY - destY;

        //1000ms弹性滑动,效果就慢慢滑动
        mScroller.startScroll(scrollX,scrollY,deltaX,deltaY,1000);
        invalidate();
    }

    @Override
    public void computeScroll() {
        if(mScroller.computeScrollOffset()){
            scrollTo(mScroller.getCurrX(),mScroller.getCurrY());
            postInvalidate();
        }
    }
}
然后是Activity的Java代码

public class MainActivity extends AppCompatActivity {

    private final static String TAG = "MainActivity";
    private ima ima;
    private Button button;
    @Override
    protected void onCreate(Bundle savedInstanceState) {
        super.onCreate(savedInstanceState);
        setContentView(R.layout.activity_main);
        button = (Button) findViewById(R.id.main_button1);
        ima = (ima) findViewById(R.id.main_ima1);

        button.setOnClickListener(new View.OnClickListener() {
            @Override
            public void onClick(View view) {
                ima.smoothScrollTo(60,60);

                Log.d(TAG,"ima_top = " + ima.getTop());
                Log.d(TAG,"ima_left = " + ima.getLeft());

                Log.d(TAG,"ima_ScaleX = " + ima.getScaleX());
                Log.d(TAG,"ima_ScaleY = " + ima.getScaleY());

                Log.d(TAG,"textView_x = " + ima.getX());
                Log.d(TAG,"textView_y = " + ima.getY());
                Log.d(TAG,"textView_getTranslationX = " + ima.getTranslationX());
                Log.d(TAG,"textView_getTranslationY = " + ima.getTranslationY());
            }
        });

    }
}
这是自定义的一个ima控件继承自AppCompatImageView。其中构造函数是直接继承来的。这里使用了Scroller实现View的弹性滑动。
Scroller mScroller = new Scroller(getContext());
首先使用Context创建一个Scroller对象。
  //缓慢滚动到指定位置
    public void smoothScrollTo(int destX, int destY){
        int scrollX = getScrollX();
        int scrollY = getScrollY();

        Log.d(TAG,"scrollX = " + scrollX);
        Log.d(TAG,"scrollY = " + scrollY);

        int deltaX = scrollX - destX;
        int deltaY = scrollY - destY;

        //1000ms弹性滑动,效果就慢慢滑动
        mScroller.startScroll(scrollX,scrollY,deltaX,deltaY,1000);
        invalidate();
    }

    @Override
    public void computeScroll() {
        if(mScroller.computeScrollOffset()){
            scrollTo(mScroller.getCurrX(),mScroller.getCurrY());
            postInvalidate();
        }
    }
这里输入的参数为destX、destY为滑动的终点。调用的getScrollX()方法获得的是View的左边缘和View内容左边缘的距离,getScrollY()方法获得的是View的上边缘和View内容上边缘的距离。
