1、基本 Annotation
1.1、限定重写父类方法:@Override
1.2、标记已过时:@Deprecated
1.3、抑制编译器警告:@SuppressWarnings
1.4、Java7 的“堆污染”警告和 @SafeVarargs
1.5、Java8 新增的用于标识(限定)函数式接口:@FunctionalInterface
2、JDK 的元 Annotation
2.1、注解的保留策略限定:@Retention
2.2、注解的作用目标限定:@Target
2.3、@Documented
2.4、@Inherited
2.5、Java8 新增的重复注解:@Repeatable
3、自定义注解
3.1、定义 Annotation
3.2、提取 Annotation 信息
4、使用 “运行时注解“ 的例子
5、“编译时注解”
5.1、"编译时注解" 的简单使用:编译时打印字段字符串
5.2、将注解和注解处理器打成工具 jar 包使用
5.3、使用 ”编译时注解“ 的例子:模拟 lombok 注解 @Data
5.4、eclipse 创建 maven 项目,使用自己写的 Annotation Processor
从 JDK5 开始,Java 增加了对元数据(MetaData)的支持,也就是 Annotation。Annotation 其实就是代码里面的特殊标记,这些标记可以在编译、类加载、运行时被读取,并执行相应的处理。通过使用注解,开发人员可以在不改变原有逻辑的情况下,在源文件中嵌入一些补充信息。代码分析工具、开发工具和部署工具可以通过这些补充信息进行验证或者进行部署。
1、基本 Annotation <--返回目录
Java 提供的 5 个基本 Annotation 如下:
1)Override,2)Deprecated, 3)SuppressWarnings, 4)SafeVarargs, 5)FunctionalInterface
1.1、限定重写父类方法:@Override <--返回目录
@Override 的用法举例:
public class Animal {
    public void eat() {
        System.out.println("Animal 的 eat() 方法");
    }
}

class Cat extends Animal {
    // 使用 @Override 注解指定下面的 eat() 方法必须是重写父类方法
    @Override
    public void eat() {
        // super.eat();
        System.out.println("Cat 的 eat() 方法");
    }
}
@Override 的源码:
package java.lang;
import java.lang.annotation.*;

@Target(ElementType.METHOD)
@Retention(RetentionPolicy.SOURCE)
public @interface Override {}
@Target(ElementType.METHOD):表示 @Override 注解只能标注在方法上。
@Retention(RetentionPolicy.SOURCE):表示 @Override 注解只会保留在源代码中,编译器直接丢弃(class 文件中不保留)。
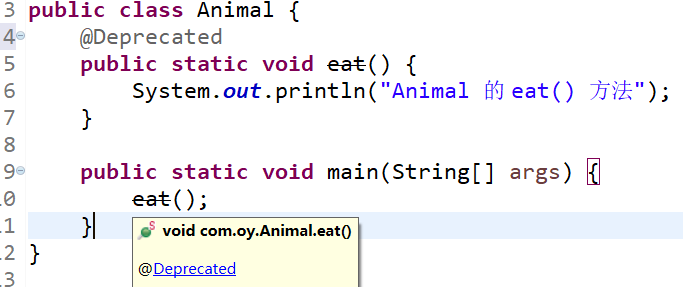
1.2、标记已过时:@Deprecated <--返回目录
@Deprecated 用于表示某个程序元素(类、方法等)已过时,当程序使用已过时的类、方法时,编译器将会给出警告。
@Deprecated 使用举例:使用已过时的方法 eat(),IDE 会在该方法上加上中划线 “—” 的标识
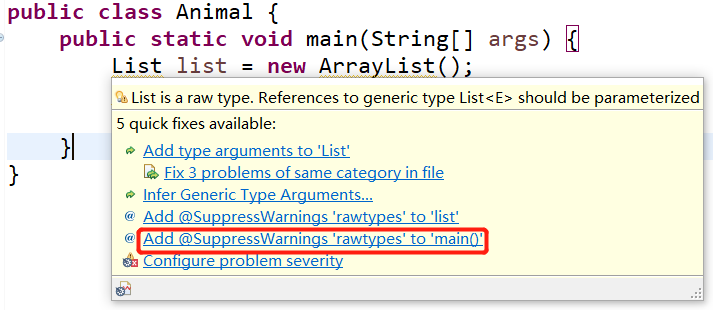
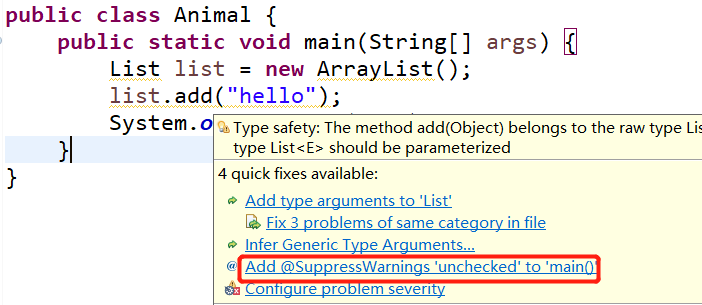
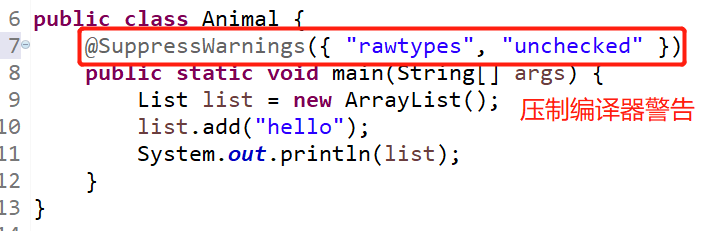
1.3、抑制编译器警告:@SuppressWarnings <--返回目录
@SuppressWarnings 使用举例:
1.4、Java7 的“堆污染”警告和 @SafeVarargs <--返回目录
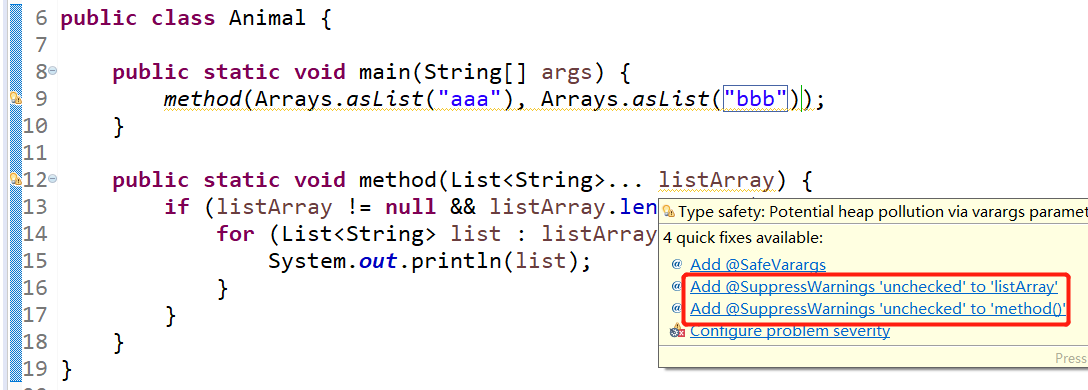
下面的代码引发错误的原因成为“堆污染”,当把一个不带泛型的对象赋给一个带泛型的对象时,往往就会发生这种“堆污染”。
public static void main(String[] args) {
    List list = new ArrayList<Integer>();
    list.add(10);

    // 将 list 赋给 list2,编译运行都完全正常
    List<String> list2 = list;

    // 但只要访问list2里面的元素,就会引起运行时异常
    /* Exception in thread "main" java.lang.ClassCastException:
     java.lang.Integer cannot be cast to java.lang.String
     at com.oy.Animal.main(Animal.java:11) */
    System.out.println(list2.get(0));
}
对于形参个数可变的方法,该形参又是泛型,将更容易导致“堆污染”。如下面的代码,listArray 是可变参数,相当于数组,但是Java不支持泛型数组,所以只能把 List<String>... 当成 List[]来处理,这样就发生了“堆污染”,当在访问 listArray 的元素时引起运行时异常。
public class Demo {

    public static void main(String[] args) {
        method(Arrays.asList("aaa"), Arrays.asList("bbb"));
    }

    public static void method(List<String>... listArray) {
        List[] array = listArray;

        array[0] = Arrays.asList(1);
        // java.lang.Integer cannot be cast to java.lang.String
        System.out.println(listArray[0].get(0));
    }
}
但有时候我们知道代码没有问题,我们不想看到这个警告,可以使用 @SafeVarargs 来压制这个警告
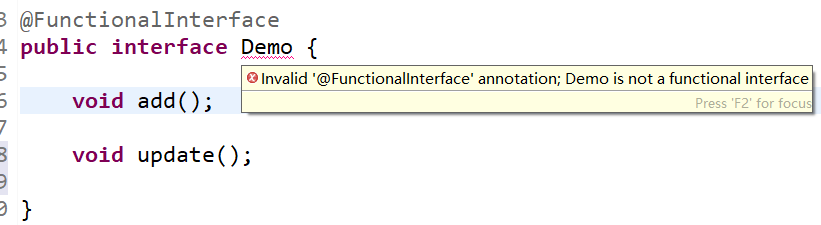
1.5、Java8 新增的用于标识(限定)函数式接口:@FunctionalInterface <--返回目录
如果接口中只有一个抽象方法(可以包含多个默认方法或多个 static 方法),该接口就是函数式接口。@FunctionalInterface 就是用来指定某个接口必须是函数式接口。
@FunctionalInterface 注解只是告诉编译器检查这个接口,保证这个接口只能由一个抽象方法,否则就会报编译出错。
2、JDK 的元 Annotation <--返回目录
JDK 提供了 5 个Meta Annotation(元注解),用于修饰其他的 Annotation 定义,即:
1) Retention, 2) Target, 3) Documented, 4) Inherited, 5) Repeatable。
2.1、注解的保留策略限定:@Retention <--返回目录
@Retention 源码:
@Documented
@Retention(RetentionPolicy.RUNTIME)
@Target(ElementType.ANNOTATION_TYPE)
public @interface Retention {
    RetentionPolicy value();
}
@Retention 只能用于修饰 Annotation 定义,用于指定被修饰的 Annotation 可以保留多长时间,@Retention 包含一个 RetentionPolicy 类型的 value 成员变量,所以使用 @Retention 时必须为该 value 成员变量指定值。value 成员变量的值只能是如下三个:
RetentionPolicy.SOURCE: Annotation 只保留在源代码中,编译器直接丢弃这种注解。
RetentionPolicy.CLASS: 编译器将把 Annotation 记录在 class 文件中。当运行 Java 程序时,JVM 不可获取该 Annotation 信息。这是默认值。
RetentionPolicy.RUNTIME: 编译器将把 Annotation 记录在 class 文件中。当运行 Java 程序时,JVM 也可获取该 Annotation 信息,程序可以通过反射获取该 Annotation 信息。
定义一个 “编译时注解”:
// RetentionPolicy.SOURCE: 表示此注解只保留在源代码中,编译器直接丢弃这种注解
// 通常称这种注解为 “编译时注解”
@Retention(RetentionPolicy.SOURCE)
public @interface MyTag {
}
定义一个 “运行时注解”:
// RetentionPolicy.SOURCE: 编译器将把 Annotation 记录在 class 文件中。当运行 Java 程序时,JVM 也可获取该 Annotation 信息,
// 程序可以通过反射获取该 Annotation 信息。
// 通常称这种注解为 “运行时注解”
@Retention(RetentionPolicy.RUNTIME)
public @interface MyTag {
}
2.2、注解的作用目标限定:@Target <--返回目录
@Target 源码:
@Documented
@Retention(RetentionPolicy.RUNTIME)
@Target(ElementType.ANNOTATION_TYPE)
public @interface Target {
    ElementType[] value();
}
@Target 包含一个 ElementType[] 类型的 value 成员变量,该成员变量的值只能为如下:
public enum ElementType {
    /** Class, interface (including annotation type), or enum declaration */
    TYPE,

    /** Field declaration (includes enum constants) */
    FIELD,

    /** Method declaration */
    METHOD,

    /** Formal parameter declaration */
    PARAMETER,

    /** Constructor declaration */
    CONSTRUCTOR,

    /** Local variable declaration */
    LOCAL_VARIABLE,

    /** Annotation type declaration */
    ANNOTATION_TYPE,

    /** Package declaration */
    PACKAGE,

    /**
     * Type parameter declaration
     *
     * @since 1.8
     */
    TYPE_PARAMETER,

    /**
     * Use of a type
     *
     * @since 1.8
     */
    TYPE_USE
}
ANNOTATION_TYPE:限定该注解只能用于修饰 Annotation。比如 @Target 定义时就使用的是这个限定。
2.3、@Documented <--返回目录
@Documented 是一个标记注解,没有成员。用于指定此注解是否被javadoc 工具提取成文档。如果定义注解时加上了 @Documented,则使用该注解修饰的程序元素的 API 文档中将会包含该注解说明。
@Documented
public @interface MyTag {
}
2.4、@Inherited <--返回目录
@Inherited 用于指定被它修改的 Annotation 将具有继承性---如果某个类使用了@Xxx 注解(定义该注解时使用了 @Inherited 修饰),则其子类将自动被 @Xxx 修饰。
@Inherited
@Retention(RetentionPolicy.RUNTIME)
public @interface MyTag {
}
@MyTag
class Base {

}

// 这个类继承了 Base类
// 并未直接使用 @MyTag 修饰,
public class TestBase extends Base {
    public static void main(String[] args) {
        // isAnnotationPresent: 判断此程序元素是否被某个注解修饰
        // 注意:@MyTag 定义时指定保留策略为 RUNTIME
        System.out.println(TestBase.class.isAnnotationPresent(MyTag.class)); // true
    }
}
2.5、Java8 新增的重复注解:@Repeatable <--返回目录
某些情况下,一个程序元素需要使用多个同一种类型的注解。@Repeatable元注解,顾名思义,重复注解,就是在声明创建注解的时候,指定该注解可以被同一个程序元素多次使用。
使用 @Repeated 举例:
定义一个注解:
package com.oy;

import java.lang.annotation.ElementType;
import java.lang.annotation.Repeatable;
import java.lang.annotation.Retention;
import java.lang.annotation.RetentionPolicy;
import java.lang.annotation.Target;

@Repeatable(Roles.class)
@Retention(RetentionPolicy.RUNTIME)
@Target(ElementType.TYPE)
public @interface Role {
    // 为该注解定义了一个成员变量
    String value();
}
定义一个 “容器” 注解
package com.oy;

import java.lang.annotation.ElementType;
import java.lang.annotation.Retention;
import java.lang.annotation.RetentionPolicy;
import java.lang.annotation.Target;

@Retention(RetentionPolicy.RUNTIME)
@Target(ElementType.TYPE)
public @interface Roles {
    Role[] value();
}
测试
package com.oy;

import java.lang.annotation.Annotation;

// 重复使用 @Role 注解
@Role("admin")
@Role("user")
public class Demo {

    public static void main(String[] args) {
        Annotation[] annotations = Demo.class.getAnnotations();
        for (Annotation a : annotations) {
            // @com.oy.Roles(value=[@com.oy.Role(value=admin), @com.oy.Role(value=user)])
            System.out.println(a);
        }

        // getDeclaredAnnotationsByType: 可以获取多个重复注解
        Role[] array = Demo.class.getDeclaredAnnotationsByType(Role.class);
        for (Role r: array) {
            // @com.oy.Role(value=admin)
            // @com.oy.Role(value=user)
            System.out.println(r);
            System.out.println(r.value());
        }
    }
}
3、自定义注解 <--返回目录
3.1、定义 Annotation <--返回目录
定义注解时,定义了一个成员变量 name, 并且指定了默认值
import java.lang.annotation.Documented;
import java.lang.annotation.ElementType;
import java.lang.annotation.Retention;
import java.lang.annotation.RetentionPolicy;
import java.lang.annotation.Target;

@Documented
@Retention(RetentionPolicy.RUNTIME)
@Target({ ElementType.TYPE, ElementType.METHOD })
public @interface MyTag {
    String name() default "hello";
}
根据 Annotation 是否包含成员变量,将 Annotation 分为如下两类:
1)标记 Annotation:没有定义成员变量。这种 Annotation 仅利用自身的存在与否来提供信息,如前面介绍的 @Override等。
2)元数据 Annotation:包含成员变量。
3.2、提取 Annotation 信息 <--返回目录
使用 Annotation 修饰了类、方法、成员变量等成员之后,这些 Annotation 不会自己生效,必须由开发者提供相应的工具来提取并处理 Annotation 信息。
Java 使用 Annotation 接口来代表程序元素前面的注解,该接口是所有注解的父接口。Java5 在java.lang.reflect 包下新增了 AnnotatedElement 接口,该接口代码程序中可以接受注解的程序元素。该接口主要有如下几个实现类:
1)Class: 类定义;
2)Constructor: 构造器定义;
3)Field:类的成员变量定义;
4)Method:类的方法定义;
5)Package:类的包定义;
java.lang.reflect 包下主要包含一些实现反射功能的工具类,从 Java5 开始,java.lang.reflect 包所提供的反射 API 增加了读取运行时 Annotation 的能力。只有当定义 Annotation 时使用了 @Retention(RerentionPolicy.RUNTIME) 修饰,该 Annotation 才会在运行时可见,JVM 才会在加载 class 字节码文件时读取保存在 class 文件中的 Annotation 信息。
反射获取注解信息的 API:
1)<A extends Annotation> A getAnnotation(Class<a> annotationClass): 返回该程序元素上存在的指定类型的注解,如果指定的注解不存在,返回null;
2)<A extends Annotation> A getDeclaredAnnotation(Class<a> annotationClass): 这是 Java8 新增的方法,该方法尝试获取直接修饰该程序元素的指定类型的注解,如果指定的注解不存在,返回null;
3)Annotation[] getAnnotations(): 返回该程序元素上存在的所有注解;
4)Annotation[] getDeclaredAnnotations(): 返回直接修饰该程序元素的所有注解;
5)boolean isAnnotationPresent(Class<? extends Annotation) annotationClass): 判断该程序元素上是否存在指定类型的注解,存在返回 true,否则返回 false;
6)<A extends Annotation> A[] getAnnotationsByType(class<A> annotationClass): 与 getAnnotation() 功能类似,但是可以获取指定类型的重复注解 ;
7)<A extends Annotation> A[] getDeclaredAnnotationsByType(class<A> annotationClass): 与 getDeclaredAnnotation() 类似,但是可以获取直接修复该程序元素的指定类型的重复注解 ;
4、使用 “运行时注解“ 的例子 <--返回目录
自定义注解 @Test
package com.oy;

import java.lang.annotation.ElementType;
import java.lang.annotation.Retention;
import java.lang.annotation.RetentionPolicy;
import java.lang.annotation.Target;

@Retention(RetentionPolicy.RUNTIME)
@Target(ElementType.METHOD)
public @interface Test {
    boolean value();
}
测试使用该注解:
package com.oy;

import java.lang.reflect.Method;

public class Demo {

    public static void main(String[] args) {
        for (Method method : Demo.class.getMethods()) {
            // 方法上没有标注 @Test 注解,不处理
            if (!method.isAnnotationPresent(Test.class)) continue;

            // @Test(false) 不处理
            Test test = method.getAnnotation(Test.class);
            if (!test.value()) continue;

            // 执行 @Test(true) 标注的方法
            try {
                method.invoke(null);
            } catch (Exception e) {
                e.printStackTrace();
            }
        }
    }

    @Test(true)
    public static void test1() {
        System.out.println("test1...");
    }

    @Test(false)
    public static void test2() {
        System.out.println("test2...");
    }

    public static void test3() {
        System.out.println("test3...");
    }
}
更多使用 “运行时注解“ 的例子可以参考博客:
1)springboot + 注解 + 拦截器 + JWT 实现角色权限控制
2)Java + SpringBoot + 自定义注解 + 拦截器实现 BASIC 认证
5、“编译时注解” <--返回目录
RetentionPolicy.SOURCE: Annotation 只保留在源代码中,编译器直接丢弃这种注解。这种注解通常称为 “编译时注解”,编译器在对源码进行编译时读取注解信息,做一些额外的处理。
APT:Annotation Processing Tool, 是一种注解处理工具,它对源代码进行检查,并找出源文件所包含的注解信息,然后针对注解信息进行额外的处理。使用 APT 的主要目的是简化开发者的工作量,因为 APT 可以在编译程序源代码的同时生成一些附加文件(比如源文件、类文件、程序发布描述文件等),这些附属文件的内容也都与源代码有关。换句话说,使用 APT 可以替代传统的对代码信息和附属文件的维护工作。
Java 提供的 javac.exe 工具有一个 -processor 选项,该选项可以指定一个 Annotation 处理器,如果在编译源文件时通过该选项指定了 Annotation 处理器,那么这个 Annotation 处理器将会在编译时提取并处理 Java 源文件种的 Annotation信息。
每个 Annotation 处理器都需要实现 javax.annotation.processing 包下的 Processor 接口。不过实现该接口要实现它里面所有的方法,因此通常会采用继承 AbstractProcessor 的方式来编写 Annotation 处理器。一个 Annotation 处理器可以处理一个或多个 Annotation 类型。一个继承 AbstractProcessor 的举例如下:
import java.util.LinkedHashSet;
import java.util.Set;
import javax.annotation.processing.AbstractProcessor;
import javax.annotation.processing.ProcessingEnvironment;
import javax.annotation.processing.RoundEnvironment;
import javax.annotation.processing.SupportedAnnotationTypes;
import javax.annotation.processing.SupportedSourceVersion;
import javax.lang.model.SourceVersion;
import javax.lang.model.element.TypeElement;

public class MyProcessor extends AbstractProcessor {

    @Override
    public boolean process(Set<? extends TypeElement> annoations,
            RoundEnvironment env) {
        return false;
    }

    @Override
    public Set<String> getSupportedAnnotationTypes() {
        Set<String> annotataions = new LinkedHashSet<String>();
        annotataions.add("com.example.MyAnnotation");
        return annotataions;
    }

    @Override
    public SourceVersion getSupportedSourceVersion() {
        return SourceVersion.latestSupported();
    }

    @Override
    public synchronized void init(ProcessingEnvironment processingEnv) {
        super.init(processingEnv);
    }

}
其中,init(ProcessingEnvironment processingEnv):所有的注解处理器类都必须有一个无参构造函数。然而,有一个特殊的方法init(),它会被注解处理工具调用,以ProcessingEnvironment作为参数。ProcessingEnvironment 提供了一些实用的工具类Elements, Types和Filer。
process(Set annoations, RoundEnvironment env):这类似于每个处理器的main()方法。你可以在这个方法里面编码实现扫描,处理注解,生成 java 文件。使用RoundEnvironment 参数,你可以查询被特定注解标注的元素。
getSupportedAnnotationTypes():在这个方法里面你必须指定哪些注解应该被注解处理器注册。注意,它的返回值是一个String集合,包含了你的注解处理器想要处理的注解类型的全称。换句话说,你在这里定义你的注解处理器要处理哪些注解。
getSupportedSourceVersion():用来指定你使用的 java 版本。通常你应该返回SourceVersion.latestSupported()。不过,如果你有足够的理由坚持用 java 6 的话,你也可以返回SourceVersion.RELEASE_6。
关于getSupportedAnnotationTypes()和getSupportedSourceVersion()这两个方法,你也可以使用相应注解进行代替。代码如下:
@SupportedSourceVersion(SourceVersion.RELEASE_8)
@SupportedAnnotationTypes("com.example.MyAnnotation")
public class MyProcessor extends AbstractProcessor {
....
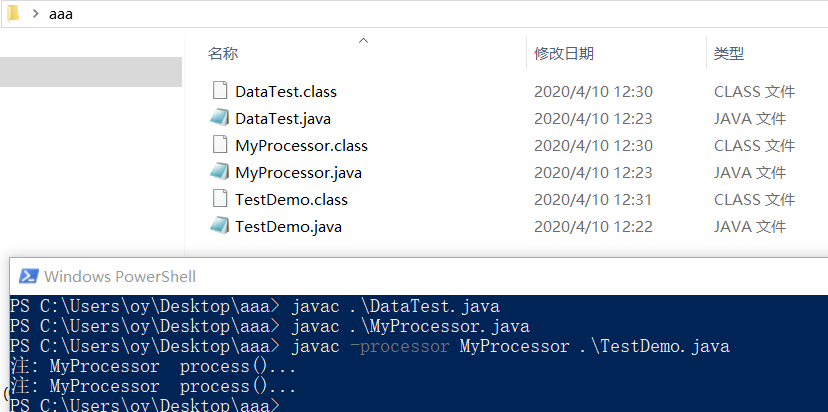
5.1、"编译时注解" 的简单使用:编译时打印字段字符串 <--返回目录
分别编译 DataTest 和 MyProcessor, 然后使用 "javac -process 注解处理器 类名.java" 命令编译使用 @DataTest 注解的类
DataTest 注解的定义
import java.lang.annotation.Retention;
import java.lang.annotation.RetentionPolicy;

@Retention(RetentionPolicy.SOURCE)
public @interface DataTest {
}
注解处理器 MyProcessor
import java.util.Set;

import javax.annotation.processing.AbstractProcessor;
import javax.annotation.processing.ProcessingEnvironment;
import javax.annotation.processing.Processor;
import javax.annotation.processing.RoundEnvironment;
import javax.annotation.processing.SupportedAnnotationTypes;
import javax.annotation.processing.SupportedSourceVersion;
import javax.lang.model.SourceVersion;
import javax.lang.model.element.TypeElement;
import javax.tools.Diagnostic;

@SupportedAnnotationTypes("DataTest")
@SupportedSourceVersion(SourceVersion.RELEASE_8)
public class MyProcessor extends AbstractProcessor {
    private ProcessingEnvironment processingEnv;

    @Override
    public synchronized void init(ProcessingEnvironment processingEnv) {
        this.processingEnv = processingEnv;
    }

    @Override
    public boolean process(Set<? extends TypeElement> annotations, RoundEnvironment roundEnv) {
        processingEnv.getMessager().printMessage(Diagnostic.Kind.NOTE, "MyProcessor  process()...");
        return false;
    }

}
测试类 TestDemo
@DataTest
public class TestDemo {
    public static void main(String[] args) {
        System.out.println("main run...");
    }
}
5.2、将注解和注解处理器打成工具 jar 包使用 <--返回目录
上面的例子简单演示了 “javac -processor 注解处理器 类名.java” 命令的使用。开发中可能需要将注解和注解处理器打成工具 jar 包使用。
步骤1:新建一个 maven 工程:
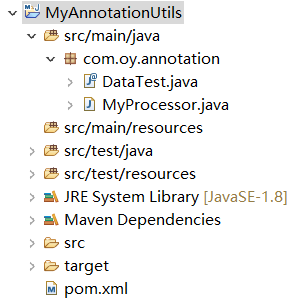
pom.xml 文件


<project xmlns="http://maven.apache.org/POM/4.0.0"
    xmlns:xsi="http://www.w3.org/2001/XMLSchema-instance"
    xsi:schemaLocation="http://maven.apache.org/POM/4.0.0 http://maven.apache.org/xsd/maven-4.0.0.xsd">
    <modelVersion>4.0.0</modelVersion>
    <groupId>com.oy</groupId>
    <artifactId>MyAnnotationUtils</artifactId>
    <version>0.0.1-SNAPSHOT</version>

    <dependencies>
        <!-- https://mvnrepository.com/artifact/com.squareup/javawriter -->
        <dependency>
            <groupId>com.squareup</groupId>
            <artifactId>javawriter</artifactId>
            <version>2.5.1</version>
        </dependency>

        <!-- https://mvnrepository.com/artifact/com.google.auto.service/auto-service -->
        <dependency>
            <groupId>com.google.auto.service</groupId>
            <artifactId>auto-service</artifactId>
            <version>1.0-rc5</version>
        </dependency>

    </dependencies>

    <build>
        <plugins>
            <plugin>
                <groupId>org.apache.maven.plugins</groupId>
                <artifactId>maven-compiler-plugin</artifactId>
                <configuration>
                    <source>1.8</source>
                    <target>1.8</target>
                </configuration>
            </plugin>
        </plugins>
    </build>
</project>
DataTest
package com.oy.annotation;

import java.lang.annotation.Retention;
import java.lang.annotation.RetentionPolicy;

@Retention(RetentionPolicy.SOURCE)
public @interface DataTest {

}
MyProcessor
package com.oy.annotation;

import java.util.Set;

import javax.annotation.processing.AbstractProcessor;
import javax.annotation.processing.ProcessingEnvironment;
import javax.annotation.processing.Processor;
import javax.annotation.processing.RoundEnvironment;
import javax.annotation.processing.SupportedAnnotationTypes;
import javax.annotation.processing.SupportedSourceVersion;
import javax.lang.model.SourceVersion;
import javax.lang.model.element.TypeElement;
import javax.tools.Diagnostic;

import com.google.auto.service.AutoService;

@SupportedAnnotationTypes("com.oy.annotation.DataTest")
@SupportedSourceVersion(SourceVersion.RELEASE_8)
@AutoService(Processor.class)
public class MyProcessor extends AbstractProcessor {
    private ProcessingEnvironment processingEnv;

    @Override
    public synchronized void init(ProcessingEnvironment processingEnv) {
        this.processingEnv = processingEnv;
    }

    @Override
    public boolean process(Set<? extends TypeElement> annotations, RoundEnvironment roundEnv) {
        processingEnv.getMessager().printMessage(Diagnostic.Kind.NOTE, "MyProcessor process...");
        return false;
    }

}
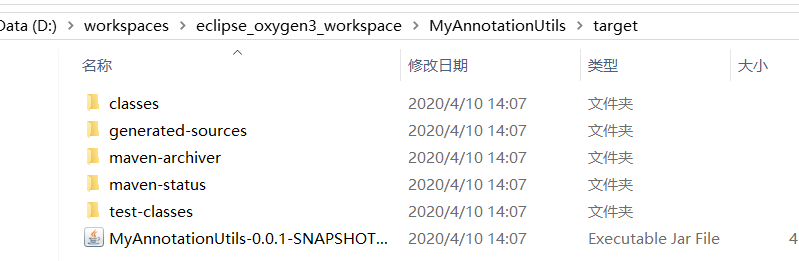
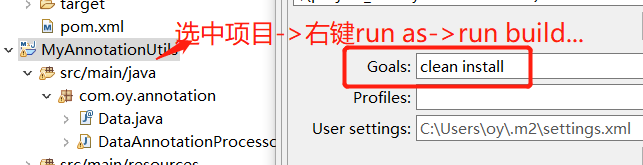
步骤2:选择项目,右键 ==> Run as => Maven build... => clean package, 会在项目根目录的 target 目录下生成 MyAnnotationUtils.jar, 从而可以在其他项目中使用。
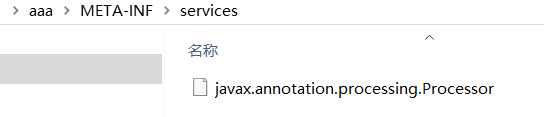
步骤三:新建一个目录,将MyAnnotaionUtils.jar 复制到这个目录

解压这个jar会发现,在 META-INF/services 下面会有个文件 javax.annotation.processing.Processor,是 @AutoService 注解帮助生成的。
步骤四:编写测试类 TestDemo
import com.oy.annotation.DataTest;

@DataTest
public class TestDemo {
    public static void main(String[] args) {
        System.out.println("main run...");
    }
}
步骤五:执行 "java -cp MyAnnotationUtils.jar TestDemo.java" 命令

5.3、使用 ”编译时注解“ 的例子:模拟 lombok 注解 @Data <--返回目录
参考:基于注解处理器开发自动生成getter和setter方法的插件
pom.xml与上面的例子一样,都引入了依赖'com.squareup:javawriter:2.5.1' 和 ‘com.google.auto.service:auto-service:1.0-rc5’
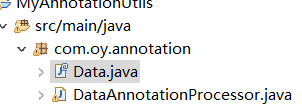
Data
package com.oy.annotation;

import java.lang.annotation.ElementType;
import java.lang.annotation.Retention;
import java.lang.annotation.RetentionPolicy;
import java.lang.annotation.Target;

@Retention(RetentionPolicy.SOURCE)
@Target(ElementType.TYPE)
public @interface Data {

}
DataAnnotationProcessor
package com.oy.annotation;

import java.io.IOException;
import java.io.Writer;
import java.util.EnumSet;
import java.util.HashMap;
import java.util.List;
import java.util.Map;
import java.util.Set;

import javax.annotation.processing.AbstractProcessor;
import javax.annotation.processing.Filer;
import javax.annotation.processing.Messager;
import javax.annotation.processing.ProcessingEnvironment;
import javax.annotation.processing.Processor;
import javax.annotation.processing.RoundEnvironment;
import javax.annotation.processing.SupportedAnnotationTypes;
import javax.annotation.processing.SupportedSourceVersion;
import javax.lang.model.SourceVersion;
import javax.lang.model.element.Element;
import javax.lang.model.element.ElementKind;
import javax.lang.model.element.Modifier;
import javax.lang.model.element.Name;
import javax.lang.model.element.TypeElement;
import javax.lang.model.type.TypeMirror;
import javax.lang.model.util.Elements;
import javax.tools.Diagnostic;
import javax.tools.JavaCompiler;
import javax.tools.JavaFileObject;
import javax.tools.StandardJavaFileManager;
import javax.tools.ToolProvider;

import com.google.auto.service.AutoService;
import com.squareup.javawriter.JavaWriter;

@SupportedSourceVersion(SourceVersion.RELEASE_8)
@SupportedAnnotationTypes({"com.oy.annotation.Data"})
@AutoService(Processor.class)
public class DataAnnotationProcessor extends AbstractProcessor {
    private Messager messager; // 用于打印日志
    private Elements elementUtils; // 用于处理元素
    private Filer filer; // 用来创建java文件或者class文件

    @Override
    public synchronized void init(ProcessingEnvironment processingEnv) {
        super.init(processingEnv);
        messager = processingEnv.getMessager();
        elementUtils = processingEnv.getElementUtils();
        filer = processingEnv.getFiler();
    }

//    @Override
//    public SourceVersion getSupportedSourceVersion() {
//        return SourceVersion.latestSupported();
//    }
//
//    @Override
//    public Set<String> getSupportedAnnotationTypes() {
//        Set<String> set = new HashSet<>();
//        set.add(Data.class.getCanonicalName());
//        return Collections.unmodifiableSet(set);
//    }

    @Override
    public boolean process(Set<? extends TypeElement> annotations, RoundEnvironment roundEnv) {
        messager.printMessage(Diagnostic.Kind.NOTE, "-----开始自动生成源代码");
        try {
            // 标识符
            boolean isClass = false;
            // 类的全限定名
            String classAllName = null;
            // 返回被注释的节点
            Set<? extends Element> elements = roundEnv.getElementsAnnotatedWith(Data.class);
            Element element = null;
            for (Element e : elements) {
                // 如果注释在类上
                if (e.getKind() == ElementKind.CLASS && e instanceof TypeElement) {
                    TypeElement t = (TypeElement) e;
                    isClass = true;
                    classAllName = t.getQualifiedName().toString();
                    element = t;
                    break;
                }
            }
            // 未在类上使用注释则直接返回,返回false停止编译
            if (!isClass) {
                return true;
            }
            // 返回类内的所有节点
            List<? extends Element> enclosedElements = element.getEnclosedElements();
            // 保存字段的集合
            Map<TypeMirror, Name> fieldMap = new HashMap<>();
            for (Element ele : enclosedElements) {
                if (ele.getKind() == ElementKind.FIELD) {
                    // 字段的类型
                    TypeMirror typeMirror = ele.asType();
                    // 字段的名称
                    Name simpleName = ele.getSimpleName();
                    fieldMap.put(typeMirror, simpleName);
                }
            }
            // 生成一个Java源文件(文件名为 类名.java)
            JavaFileObject sourceFile = filer.createSourceFile(getClassName(classAllName));
            // 写入代码
            createSourceFile(classAllName, fieldMap, sourceFile.openWriter());
            // 手动编译
            compile(sourceFile.toUri().getPath());
        } catch (IOException e) {
            messager.printMessage(Diagnostic.Kind.ERROR, e.getMessage());
        }
        messager.printMessage(Diagnostic.Kind.NOTE, "-----完成自动生成源代码");
        return true;
    }

    private void createSourceFile(String classAllName, Map<TypeMirror, Name> fieldMap, Writer writer)
            throws IOException {
        // 生成源代码
        JavaWriter jw = new JavaWriter(writer);
        jw.emitPackage(getPackage(classAllName));
        jw.beginType(getClassName(classAllName), "class", EnumSet.of(Modifier.PUBLIC));
        for (Map.Entry<TypeMirror, Name> map : fieldMap.entrySet()) {
            String type = map.getKey().toString();
            String name = map.getValue().toString();
            // 字段
            jw.emitField(type, name, EnumSet.of(Modifier.PRIVATE));
        }
        for (Map.Entry<TypeMirror, Name> map : fieldMap.entrySet()) {
            String type = map.getKey().toString();
            String name = map.getValue().toString();
            // getter
            jw.beginMethod(type, "get" + humpString(name), EnumSet.of(Modifier.PUBLIC)).emitStatement("return " + name)
                    .endMethod();
            // setter
            jw.beginMethod("void", "set" + humpString(name), EnumSet.of(Modifier.PUBLIC), type, "arg")
                    .emitStatement("this." + name + " = arg").endMethod();
        }
        jw.endType().close();
    }

    /**
     * 编译文件
     *
     * @param path
     * @throws IOException
     */
    private void compile(String path) throws IOException {
        // 拿到编译器
        JavaCompiler complier = ToolProvider.getSystemJavaCompiler();
        // 文件管理者
        StandardJavaFileManager fileMgr = complier.getStandardFileManager(null, null, null);
        // 获取文件
        Iterable units = fileMgr.getJavaFileObjects(path);
        // 编译任务
        JavaCompiler.CompilationTask t = complier.getTask(null, fileMgr, null, null, null, units);
        // 进行编译
        t.call();
        fileMgr.close();
    }

    /**
     * 驼峰命名
     *
     * @param name
     * @return
     */
    private String humpString(String name) {
        String result = name;
        if (name.length() == 1) {
            result = name.toUpperCase();
        }
        if (name.length() > 1) {
            result = name.substring(0, 1).toUpperCase() + name.substring(1);
        }
        return result;
    }

    /**
     * 从带包类名读取类名
     *
     * @param classAllName 带包类名
     * @return
     */
    private String getClassName(String classAllName) {
        String result = classAllName;
        if (classAllName.contains(".")) {
            result = classAllName.substring(classAllName.lastIndexOf(".") + 1);
        }
        return result;
    }

    /**
     * 从带包类名读取包名
     *
     * @param classAllName 带包类名
     * @return
     */
    private String getPackage(String classAllName) {
        String result = classAllName;
        if (classAllName.contains(".")) {
            result = classAllName.substring(0, classAllName.lastIndexOf("."));
        } else {
            result = "";
        }
        return result;
    }
}
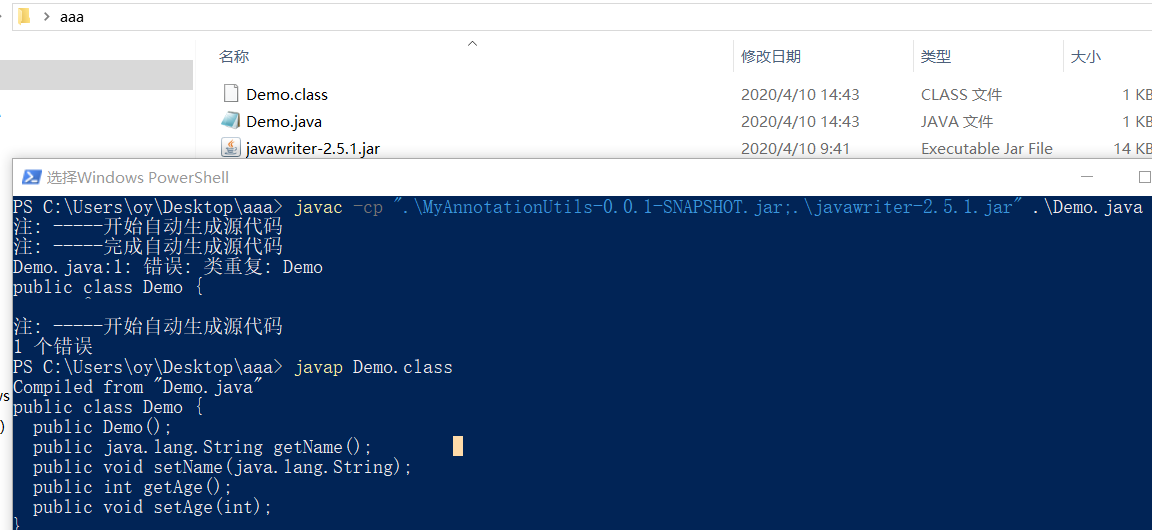
测试使用:
5.4、eclipse 创建 maven 项目,使用自己写的 Annotation Processor <--返回目录
首先将自己写的 Annotation Processor(maven 项目)打包到本地仓库:
新建一个 mavenDemo 项目,在 pom.xml 添加对 自己写的 Annotation Processor 的依赖:
<dependency>
    <groupId>com.oy</groupId>
    <artifactId>MyAnnotationUtils</artifactId>
    <version>0.0.1-SNAPSHOT</version>
</dependency>
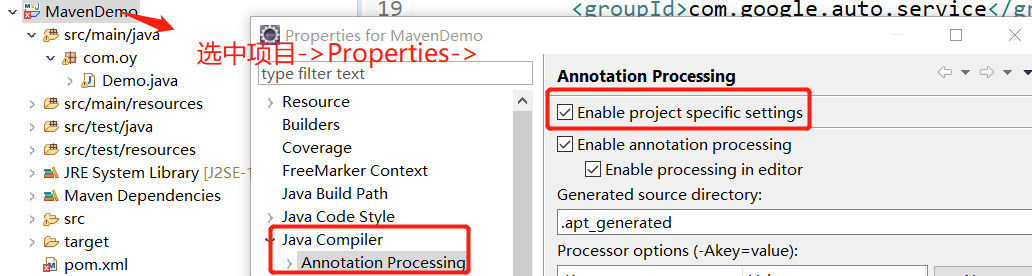
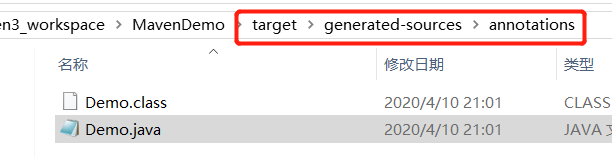
然后,选中 MavenDemo 项目,右键-> run as -> maven build... -> clean compile -> 在 target 目录下生成如下文件:
这个例子会报 com.oy.Demo 类重复的错,因为原来的Demo 类没删,所以重复了。
参考:
1)《疯狂 Java 讲义》--李刚
2)基于注解处理器开发自动生成getter和setter方法的插件
3)javawriter 的使用:生成Java源文件 (javawriter, javapoet, codemodel)