1.什么是Ansible?
ansible是一种自动化运维工具,基于Python开发,集合了众多运维工具(puppet、cfengine、chef、func、fabric)的优点,实现了批量系统配置、批量程序部署、批量运行命令等功能。
2.Ansible安装及环境要求
2.1.安装方法
- 通过GitHub
- 通过系统自带命令安装,如linux的yum,ubuntu的apt等
2.2.管理主机的要求
目前,只要机器上安装了 Python 2.6 或 Python 2.7 (windows系统不可以做控制主机),都可以运行Ansible。主机的系统可以是 Red Hat, Debian, CentOS, OS X, BSD的各种版本,等等。
2.3.对托管节点的要求
- Linux:必须有python2.4以上的python2的版本,只有python3会有问题,如果版本低于 Python 2.5 ,还需要额外安装一个模块: python-simplejson
- Windows:支持win2008及以上服务器,对于Framework 3.0版本的需要升级为4.0或者打补丁(有内存溢出和堆栈异常bug),powershell需要3.0以上
3.两个重要的配置文件
3.1.文件/etc/ansible/ansible.cfg
安装好后建议打开的参数
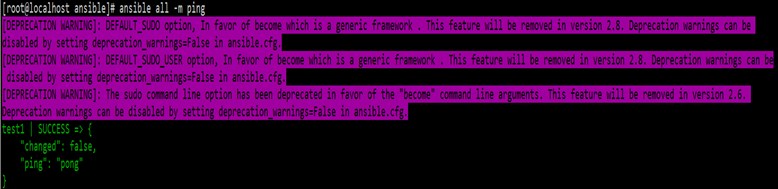
vim /etc/ansible/ansible.cfg
sudo_user = root
sudo = true
deprecation_warnings = False ##(改为false的原因是因为在执行ansible命令的时候会有警告提示)
3.2.文件/etc/ansible/hosts
配置托管节点主机信息的地方,常用的配置有
- ansible_ssh_host 将要连接的远程主机名.与你想要设定的主机的别名不同的话,可通过此变量设置.
- ansible_ssh_port ssh端口号.如果不是默认的端口号,通过此变量设置. ansible_ssh_user 默认的 ssh 用户名
- ansible_ssh_pass ssh 密码(这种方式并不安全,我们强烈建议使用 --ask-pass 或 SSH 密钥)
- ansible_sudo_pass sudo 密码(这种方式并不安全,我们强烈建议使用 --ask-sudo-pass)

方括号[]中是组名,用于对系统进行分类,便于对不同类型进行个别的管理。
4.Ansible的用法
ansible是基于模块工作的,本身没有批量部署的能力。真正具有批量部署的是ansible所运行的模块,ansible只是提供一种框架。
4.1.各种常用核心模块,使用 /usr/bin/ansible 运行 ad hoc 任务.
- Common模块(执行一些命令, command 模块不支持 shell 变量,也不支持管道等 shell 相关的东西.如果你想使用 shell相关的这些东西, 请使用’shell’ 模块. ): ansible all -a "/sbin/reboot“
- Shell模块(与common类似):ansible all -m shell -a "echo hellow“
- Copy模块:ansible all -m file -a "dest=/srv/foo/a.txt mode=600“
- File模块(创建、删除文件或目录,修改文件属性):ansible all -m file -a “dest=/path/to/c state=absent”
- Yum模块: ansible all -m yum -a "name=acme state=absent“
- User模块(创建、删除用户,或是管理现有账户): ansible all -m user -a "name=tom password=dawx@99!“
- Git模块(直接使用 git 部署 webapp):ansible all -m git -a "repo=git://foo.example.org/repo.git dest=/srv/myapp version=HEAD“
- Services模块(启动或停止某服务):ansible webservers -m service -a "name=httpd state=restarted“
- Setup模块(获取服务器信息):ansible all -m setup
4.2.playbooks运行一些复杂的任务
简单来说,playbooks 是一种简单的配置管理系统与多机器部署系统的基础, 非常适合于复杂应用的部署。
Playbooks 可用于声明配置,更强大的地方在于,在 playbooks 中可以编排有序的执行过程,甚至于做到在多组机器间,来回有序的执行特别指定的步骤.并且可以同步或异步的发起任务。
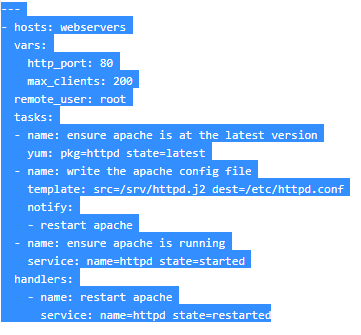
介绍下上图配置文件里的基本参数:
- hosts:执行的主机或组
- vars:变量定义
- remote_user:远程用户
- tasks:执行的内容
- handlers:在执行内容发生改变是执行的操作
- tasks下的操作:yum、传输、notify(task结束时被触发,接下面的handlers)
5.实践
5.1.针对一台新服务器进行初始化的大致操作:初始化服务器==》下载老区文件==》拷贝文件到新服务器
5.1.1.虚拟环境:
管理机:192.168.96.132
- 需求:配置好/etc/ansible/hosts文件
[root@localhost ~]# cat /etc/ansible/hosts
[testserver]
test1 ansible_ssh_host=192.168.96.132   ansible_ssh_user=root   ansible_ssh_port=22
test2 ansible_ssh_host=192.168.96.133   ansible_ssh_user=root   ansible_ssh_port=22
test3 ansible_ssh_host=192.168.96.131   ansible_ssh_user=root   ansible_ssh_port=22
托管机:192.168.96.131(老服务器test3)、192.168.96.133(新服务器test2)
5.1.2.初始化服务器(安装httpd,mysql、gcc、lib等等),简单装下
5.1.2.1.配置文件:
- /etc/ansible/shell/new_server_init.sh
[root@localhost ~]# cat /etc/ansible/shell/new_server_init.sh
#!/bin/bash

ansible_bash_home="/etc/ansible"


function useage {
    echo " this is just for run shell file  in remote server"
    echo " help                         : $0 -h"
    echo " init the new server          : $0  new_server"
}


function server_init {
    ansible-playbook ${ansible_bash_home}/test/roles/new_server_init.yaml -e "host=$1"
}

function main {
    if [ -z "$1" ]; then
    echo "need para!"
    exit
    fi
    if [ $1 == "-h" ];
    then
        useage
    else
        server_init $1
    fi
}

main $*
- /etc/ansible/test/rolse/new_server_init.yaml
[root@localhost ~]# cat /etc/ansible/test/roles/new_server_init.yaml
---
- name: start init server
  hosts: '{{ host }}'
  tasks:
    - name: mkdir data
      shell: mkdir /data
      ignore_errors: yes
    - name: install  httpd mysql zip unzip gcc lib
      yum: name={{ item }} state=present
      with_items:
       - httpd
       - mysql
       - zip
       - unzip
       - gcc
       - gcc-c++
       - ncurses-devel
       - libxml2-devel
5.1.2.2.执行命令:
cd /etc/ansible/shell/; sh new_server_init.sh test2
5.1.3.下载上传文件(/data/server_new/test.zip)
5.1.3.1.配置文件:
- /etc/ansible/shell/server_copy.sh
[root@localhost shell]# cat /etc/ansible/shell/server_copy.sh #!/bin/bash ansible_bash_home="/etc/ansible" function useage { echo " this is just for run shell file in remote server" echo " help : $0 -h" echo " copy the server : $0 old_server new_server" } function server_copy { ansible-playbook ${ansible_bash_home}/test/roles/copy_server_download.yaml -e "host1=$1" ansible-playbook ${ansible_bash_home}/test/roles/copy_server_push.yaml -e "host2=$2" } function main { if [ -z "$1" ]; then echo "need para $1" exit fi if [ -z "$2" ]; then echo "need para $2" exit fi if [ $1 == "-h" ]; then useage else server_copy $1 $2 fi } main $* - /etc/ansible/test/rolse/copy_server_download.yaml
[root@localhost shell]# cat /etc/ansible/test/roles/copy_server_download.yaml --- - name: download start hosts: '{{ host1 }}' tasks: - name: download test.zip fetch: src=/data/server_new/test.zip dest=/etc/ansible/test/files/ - /etc/ansible/test/rolse/copy_server_push.yaml
[root@localhost shell]# cat /etc/ansible/test/roles/copy_server_push.yaml
---
- name: push start
  hosts: '{{ host2 }}'
  tasks:
    - name: push test.zip
      copy: src=/etc/ansible/test/files/test3/data/server_new/test.zip dest=/data/
    - name: unzip test.zip
      shell: cd /data && unzip test.zip
5.1.3.2.执行命令:
cd /etc/ansible/shell/; sh server_copy.sh test3 test2
6.Ansible Tower
6.1.配置需求:
- 1.内存大于4G,要不然安装报错
- 2.yum 装的ansible版本过老(2.4,虽然是最稳定的版本),但是不支持tower,本人升级到2.6(下载rpm包链接https://releases.ansible.com/ansible/rpm/release/)
- 3.yum install –y docker
6.2.安装教程
6.2.1.下载ansible tower(任选)
- https://pan.baidu.com/s/1ebc2tBhC8XSz-Ycq1fkxgA%20 (提取码:xq2n)
- https://releases.ansible.com/ansible-tower/setup-bundle/
6.2.2.创建目录
mkdir -p /var/log/tower
6.2.3.解压到任意目录,我放在/root/ansible-tower-setup-3.4.3-1/
6.2.4.进入目录,配置修改 vim inventory 登录密码 还有 ip 端口 改一下 其他默认

6.2.5.关于集群版需要改额外配置 添加hostname:ip 可参照
https://docs.ansible.com/ansible-tower/latest/html/quickinstall/install_script.html
6.2.6.创建本地数据库
#mkdir -p /data/pgdata
#docker pull postgres:9.6
#docker run --name postgres_ansible -d -p 5432:5432 -e POSTGRES_PASSWORD=admin -e PGDATA=/data/pgdata -e POSTGRES_USER=awx -e POSTGRES_DB=awx postgres:9.6
注意:
- 如果遇到Cannot connect to the Docker daemon at unix:///var/run/docker.sock. Is the docker daemon running?报错,请执行:service docker start
- 如果遇到/usr/bin/docker-current: Error response from daemon: Conflict. The container name “/postgres_ansible” is already in use by container 92b089b032159702aeb06d22db039325de8b2be6d4146e47f0237a5bcf3a5224. You have to remove (or rename) that container to be able to reuse that name..报错,执行docker rm 92b089b032159702aeb06d22db039325de8b2be6d4146e47f0237a5bcf3a5224,然后重新执行命令
- 如果遇到5432端口被占用,那么找到那个进程,干掉它
6.2.7.验证db:
#docker exec -it postgres_ansible bash
#psql -U awx -d awx -h localhost -p 5432
ctrl+p+q 退出容器
6.2.8.执行安装脚本
sh setup.sh
注意:
- 如果遇到Your current version of Ansible (2.4.2.0) is too old for this version of Ansible Tower. Please upgrade.,那么升级ansible
- 如果遇到This machine does not have sufficient RAM to run Ansible Tower.那么升级内存
6.2.9.输出信息为这个,就安装成功了!

6.2.10.测试:
浏览器输入地址即可测试
6.2.11.Ansible tower重启命令:
ansible-tower-service restart
6.3.Ansible Tower 3.x 企业版无限hosts
最暴力最简单最傻瓜方式,root用户登录,执行以下命令:
echo codyguo > /var/lib/awx/i18n.db
6.4.Ansible tower导航栏介绍
- # viewes
- Dashboard 仪表盘展示信息的Jobs 跑过的任务记录
- Schedules 计划任务
- My View 查看用户的工作模版,和任务记录
- # resources
- Templates 任务模版,配置调用playbook执行时的各种参数,从此处添加计划任务
- Credentials 配置连接 机器/云主机api Key/自定义的凭证类型 的账号密码等信息
- Projects 这里配置项目对应的playbook,可以从Git上拉取或从本地文件夹读取playbook
- Inventories 资产清单
- Inventory Scripts 自定义获取资产清单的脚本
- # access
- Organizations 组织管理
- Users 用户管理
- Teams 用户组管理
- # Administration
- Credential Types 自定义凭证类型,添加后可在Credentials中使用
- Notifications 配置任务通知,支持电子邮件,Twillio电话等
- Management Jobs 计划任务管理
- Instance Groups 资产组管理
- Applications 自定义应用
- Settings 设置
Ansible 中文指南:http://www.ansible.com.cn/docs/intro.html
Ansible tower使用文档:https://www.centoscn.vip/8274.html