android支持使用NDK开发C程序,关于配置NDK环境问题应该不用再赘述了,这个网上有很多,这里通过一篇实例来讲述简单的JNI开发,大家可以参考这篇文章(Get Your Eclipse-Integrated NDK On!)搭建Eclipse编译C语言为so文件的开发环境。
native方法实现步骤如下:
1、在Java中声明native()方法,然后编译(javac);
2、用javah产生一个.h文件;
3、编写包含.h文件的c文件
4、编译c文件
5、使用编译成功的so文件。
第一步:
1、声明native方法
public class Printf_Jni {

	 static {
	        System.loadLibrary("com_nedu_jni_helloword_printf-jni");
	    }
	public native void printHello();
}
2、javac编译
进入java文件所在路径,调用javac命令,如图:
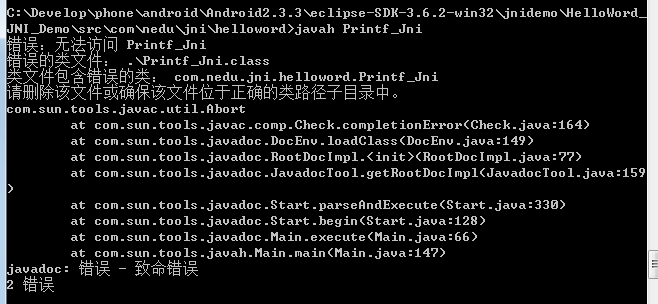
第二步:使用javah命令生成.h头文件,如图:
这个要回到src目录下,不知道什么原因,如果在上面的javac路径下会报错,如图:
使用javah命令生成的头文件如下:
/* DO NOT EDIT THIS FILE - it is machine generated */
#include <jni.h>
/* Header for class com_nedu_jni_helloword_Printf_Jni */

#ifndef _Included_com_nedu_jni_helloword_Printf_Jni
#define _Included_com_nedu_jni_helloword_Printf_Jni
#ifdef __cplusplus
extern "C" {
#endif
/*
 * Class:     com_nedu_jni_helloword_Printf_Jni
 * Method:    printHello
 * Signature: ()V
 */
JNIEXPORT void JNICALL Java_com_nedu_jni_helloword_Printf_1Jni_printHello
  (JNIEnv *, jobject);

#ifdef __cplusplus
}
#endif
#endif
第三步:编写c文件,代码如下:
#include<stdio.h>
#include <stdlib.h>
#include "com_nedu_jni_helloword_Printf_Jni.h"
JNIEXPORT void JNICALL Java_com_nedu_jni_helloword_Printf_1Jni_printHello
  (JNIEnv *e, jobject j)
{
    printf("Hello world!");
}
第四步,书写Android.mk文件,编译c文件
Android.mk文件如下:
LOCAL_PATH := $(call my-dir)

include $(CLEAR_VARS)

LOCAL_MODULE    := com_nedu_jni_helloword_printf-jni
LOCAL_SRC_FILES :=Printf_Jni.c

include $(BUILD_SHARED_LIBRARY)
LOCAL_MODULE := com_nedu_jni_helloword_printf-jniLOCAL_MODULE := com_nedu_jni_helloword_printf-jniLOCAL_MODULE 表示so文件名LOCAL_SRC_FILES 需要编译的文件
按照这篇文章(Get Your Eclipse-Integrated NDK On!)的介绍就可以在Eclipse编译了。
第五步:使用so文件:
通过下面的代码加载so文件
System.loadLibrary("com_nedu_jni_helloword_printf-jni");
通过下面的代码加载so文件通过下面的代码加载so文件调用如下:
Printf_Jni print=new Printf_Jni();print.printHello();
/**
* @author 张兴业
* 邮箱:xy-zhang#163.com
* android开发进阶群:278401545
*
*/